


Likes
7
Share


@FrostyB
Follow
I experimented with this as it was a free seed and I wanted to see what would happen if I removed any additional nodes and just kept focus on the man node/ cola. She weighed in a solid ounce dry maybe less give or take a few days of curing/ drying. Smoked really nice and packed a punch which kinda made me regret using this beautiful strain in my experiment as I would have loved more from her but at the same time she taught me a lot with regards to nutrient levels and how plants react depending on which way they're trained or defoliated which has really helped me with future grows so for that I will certainly be running this strain again! Thanks Barneys ... Awesome genetics as per usual 👏

Processing
Likes
1
Share


@Ferenc
Follow
Hi! In this diary I will grow 5 Sativa and Indica dominant Auto Feminized Strains:
Sour Orange Auto Feminized Seeds (2 seeds.) By The Bakery Seed Co.
Sour Orange Auto Feminized Seeds are a cross of the famous Sour Tangie and the Bakery’s in house Ruderalis. Also a 80% sativa dominant strain with 56 to 70 day flower period. Tested at 17% THC this genetic is highly stable and the Bakery are very happy with the results. This Auto Feminized seed can be cultivated indoors as well as outdoors but definitely prefers a slightly warmer climate to gain the best terpene profile possible. An uplifting effect with a sweet and sour aroma of tangerines. This auto flower seed is another great addition to the Bakery Seed Co’s Automatic Range
Auto Critical Orange Punch Seeds By Dutch Passion.
Auto Critical Orange Punch Seeds are Dutch Passions first Critical Autoflower. A cross of (Grandaddy Purps x Orange Bud) x XXL Auto Kritical Bilbo, creating an easy strain to cultivate. Expect a full life cycle of 75 days from sprout to harvest with impressive XXL yields. She thrives with 20 hours of light and can grow up to 70-100cm indoors. Certain phenotypes can flower for an extra week or so to gain the XXL yields! Sweet skunk aromas with a hint of rich Afghan hash.
Sour Stomper Auto Feminized Seeds are an example of what careful selection can achieve with breeding. A fruity style pheno of the Sour Crack female crossed with the Grapestomper OG male from Gage Green then crossed with ruderalis by Mephisto. This 50/50 Indica Sativa hybrid has a great stretch contributing to large yields. Due to cooler conditions late in flower, this dense canopy can produce beautiful blues and purples. A great genetic for indoor and outdoor cultivation and all finished and ready to harvest in just 65 to 70 days. This hybrid is popular with extracts and has Grape aroma in bloom.
Auto Lemon Zkittle Feminized Seeds are made from quality USA genetics. It is an Overall Highlife Cup Winner 2018!!! It has won 1st prize in Sativa category and also was awarded the Overall Highlife Winner Trophy. Lemon Zkittle Auto retains its high THC and yields even in automatic form. Due to the lineage, this hybrid is very simple to cultivate and a great choice for beginners. Fruit and skunk aromas combined with citrus flavors and long-lasting effects. 20 Hour light cycle is recommended as well as a minimum of 75 days from seed. Some phenos can take a week longer to produce the massive yields. Outdoors this variety can take up to 100 days from seed to harvest. With THC levels tested 21% as well as minimum yields of 400g/m2, this automatic hybrid is a great addition to Dutch Passion Automatic range.
24 hours light schedule, 90 percent humidity, trigger spray, no fertilization. 15th of August: Girls are ready for germination, tonight I will place the seeds to be in water at least for 12 hours :) 15th of August: I put the seeds in the water. 16 of August 2019: Seeds are placed between damp paper towel :) 17th of Augsut 2019: All good so far, They are ready to be planted tomorrow;) Day 1: They are in the soil. Hopefully they will come out soon :) 60W LED for 5 plants and the humidity is very high 98 percent. I give 5 ml water a day per plant and plus triggering to keep the humidity very high. All the holes are closed. Day 2: Non of them are out yet but I think by tomorrow it will happen:). Day 3: All out :)
Day 5: Sour Stomper and Lemon Zkittle a bit slower but all of them grow nicely. Babies ❤️
Day 6: They are coming! Critical Orange Punch is growing very quick she is already 10 cm but the rest of them are 6-7 cm.


Likes
11
Share


@902EastCoast
Follow
Ladies are looking awesome! They have a week or more left but will see tomorrow when I check the trichs. They smell so good , mouth watering and they chunked out. I see worms in my organic living soil which is pretty neat.

Likes
12
Share


@SupremeJay
Follow
Had to move gigabud outside because the other 2 have started flowering and she was only getting bigger😂

Likes
7
Share


@BudXs
Follow
Super busy with a move and a big garden reno. Sorry, this is the only update for this week

Likes
10
Share


@Colectivegrow
Follow
4ta semana de cultivo de Tropicanna Poison Auto XL de sweetseedsbank
Los tres fenotipos muestran diferencias notables. Las hojas de las tres plantas están bien moradas, pero solo una tiene tonos morados en sus flores.
Se supone que ya complieron el tiempo predeterminado por el banco para la finalización de, poryecto; aún así, se dará mas tiempo a nuestro cultivo

Processing
Likes
13
Share


@Cheesefarmer420
Follow
Week 5 of flowering for the three ladies went well. A couple of the hairs started turning orange and shriveling. Tricomb production is looking grand, smell just continues to grow stronger and stronger. Stinking the whole house up even with a 4” carbon filter and fan constantly scrubbing the closet. Ph fell down to the lower 6.1-6.2, plants started yellowing and loosing older fan leaves, could have something to do with them Inching closer to harvest time, also probably has something to do with the slight ph drop, either way sugar leaves, new growth, and bud is all thriving so as long as the problem doesn’t continue to get server I’m not worried about the plant using up nutrients and offing some at this point in time useless lower fan leaves. Popsicle cake is giving off a straight gas/diesel fuel smell. The tallest unknown plant is solid lemons and Kush, and the middle sized unknown plant has a semi sweet but yet gassy aroma coming off her. Very exciting leading into week 6 of flower!
Likes
2
Share

@fabialien
Follow
Semana 4. 20 - 26 de octubre.
Se mantiene en maceta de 1 galon, con Anillo de riego y solución nutritiva.


Likes
2
Share

@Dr_Metanol
Follow
Buenas chicos, ya empezo lo que nos gusta, la floración, y en este caso iniciamos con un 55% de grow proline y 45% de bloom, hago esto porque no me gusta que amarillen temprano, aun no le pongo el co2 ya que pienso aplicarlo a partir de la 2 semana, me toca hacer un poco de poda de hojas grandes y debajo de la malla pero por lo demás todo va bien, vamos a ver si sacamos buenos cogollos con este cultivo. Gracias por su apoyo a todos

Likes
68
Share


@MrHightimes
Follow
Deoliated and trained!
Even did a little video showcase!
In love with this round from Fastbuds!!!!!
Gonna get a great harvest!
Likes
54
Share


@Mr_Horse
Follow
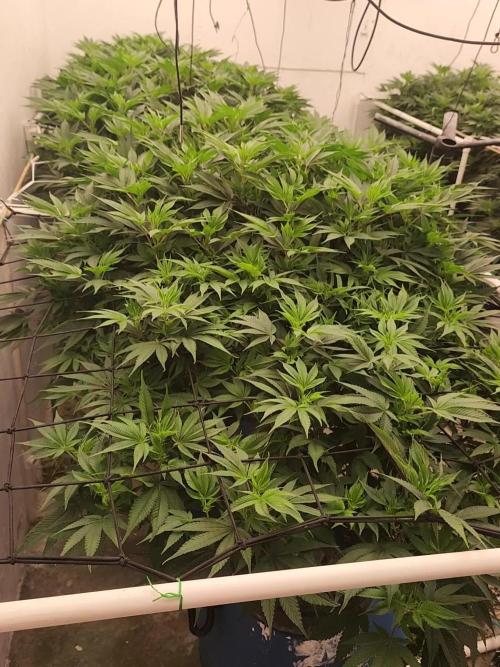
Everything looking great going into week 9, very exciting watching these ladys mature. Height management was difficult this run due to lack of training uniformity. Maxed out light height as these ladies are still quite tall even with intense LST.


Likes
14
Share


@ao_grows1978
Follow
The OG Kush made it through her final week of flower...56 days in total. Super sticky and smells like a mix of limonene and pinene and a hint of sweetness on the back end. I'm definitely happy I have a couple more of these beans. Super smooth run, chunky resinous buds. Thank you to everyone that visited to check my first Grow Diary out. You made it a really cool experience ✌️☺️.
https://www.instagram.com/ao.grows?igsh=MXR1dWZxMWhlNnF6bA==
Check out my Instagram for clips I made for this grow.

Likes
8
Share


@Gardens_of_Of
Follow
All Girls matured and went to drying this week. I will include an harvest report once dried.

Processing
Likes
12
Share


@eldruida_lamota
Follow
Buenas noches familia, sorpresa, jueves noche por aquí , actualizamos las power plant xL.
Es la última semana antes de nuestra cosecha, el tiempo se nos echó encima y las Flores ya están echas, se preparó un lavado de raíces y tijeretazo,para sucesivamente colgarlas.( PRIMERA VEZ que se me echa el tiempo encima con la floración, jurao)
Me habría gustado darles algo de estrés hídrico, pero lo veremos con las lemon kush y las northern light xL.
-power plant xL es una cepa con predominancia sativa, con una corta floración,es un ejemplar fácil de cultivar, fuerte, y vigoroso.
Estos ejemplares se cultivaron en 7L en sustrato light MIX de plagrOn, controlando en todo momento el PH de nuestras plantas, y dándoles de comer una gama advanced nutrients bastante básica.
-PROS: facil cultivar, flores llenas de resina , flores compactas, ramas laterales largas.
-CONTRAS: hay que tutorar por el peso de la flor, floración demasiado rápida a mi gusto (no te das ni cuenta).
*Aquí ya me despido hasta la cosecha familia.

Processing
Likes
13
Share

@Cheesefarmer420
Follow
This plant has a solid stench of pure ripe lemons. So much aroma and color in every bud, purples, to dark green, to lime green, to solid frost. This one definitely a fun strain to watch grow and tend too for the last few months. She’s definitely a hungry girl, seemed to be the only strain out of the three that accepted and thrived with full feed nutrients. Would definitely recommend this Strain to someone For a nice uplifting day smoke, also seems to do me good for some pain and stress relief.


Likes
13
Share


@Pierrougarou21
Follow
Salut les Growmies,
Quelle superbe aventure cette génétique de chez Exotic Seeds.
Cette Zkittalicious depuis le debut m'étonne , de part sa grande vitalité .Malgré l attaque du caht , elle a reprise le dessus , elle a réagi merveilleusement bien a l entrainement que je lui ai fait subir ,LST ,Topping.....
Et maintenant comme vous pouvez le voir elle développe de nombreux sites floraux et elle devient de jour en jour de plus en plus frosty.
Donc en gros vous pouvez vous tourner vers Exotic Seed les yeux fermés et je lui donne une note de 9/10 pour sa vigueur, beauté, odeur pour la production on verra plus tard. Mais au vue des resultats mors de la phase croissance et debut de flo . Je m attend a de tres bons resultats 👍👍👍👍👍🤜🤛Merci Exotic Seeds.
