The Grow Awards 2026 🏆 


Likes
7
Share
@Adam22
Follow
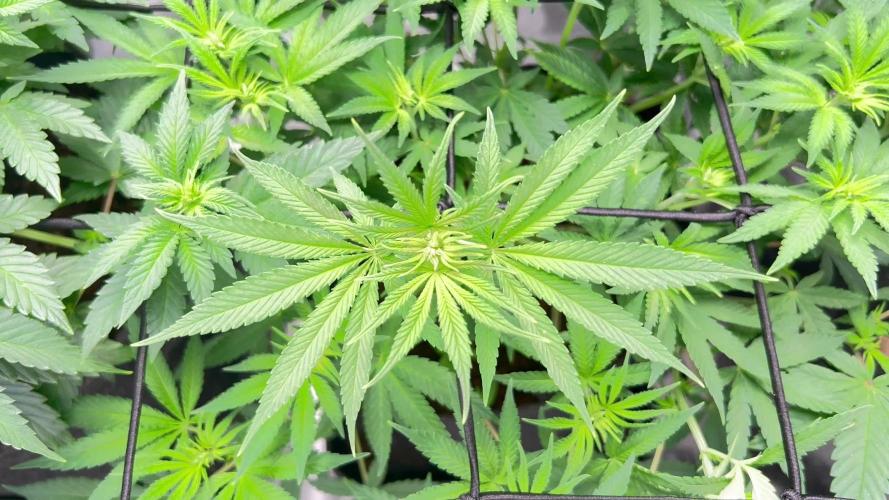
Day 28 week 4 of flower plants looking good I dropped a 3L water bottle on a string which snapped a whole branch from the bottom 😳 on right plant 😭
Likes
8
Share
@Mahali
Follow
Going into flower on 4/10. Plants have been growing and inch or two every day. Suspect front middle and back middle to be males.

Likes
32
Share
@Hawkbo
Follow
Day late on the update, pics/vids were taken on time tho just been a crazy week of harvests and trimming and keeping up with these. I linked up with Rain Science Grow Bags on Instagram and got them to offer all my followers and friends a discount of 10% off entire order from their site with the code ' bangdang ' so if anyone is in the market for a pot upgrade use that code. I got them in the mail 3 days after I ordered. Reason I went with Rain Science is because they offer identical air flow for rapid growth as the radicle bags, just using a different material and a tighter knit so water doesnt flood out the sides during feeds and when you pick these up when the coco is dry, it wont fly all over the tent like with the radicles. They're the optimal bag for autoflowers especially. She is showing some purple now, I feed this one a slightly lower ppm than the others she doesnt need much. I've been about 200ppm lower than I usually do with the soil blend and still gettin burnt tips.

Likes
16
Share
@TheCannaProphet
Follow
Soil ph resolved, back to 6.7. End of this week all will get their final top dress and then will just be getting ph'd water with CalMag+ through the remainder of flower. I do plan on adding molasses 2-3 tbsp/gl every 3 to 4 days to feed the microbes. PP has such a strong fruity aroma, WW is hashy, GSD still smelling like a bag of candy. The BD has not really impressed me with growth, tricomes or environmental tolerance....finicky bitch! GSD looks like hell as well with continuing leaf purpling and yellowing. The GSD would have been absolutly FIRE if it had gotten flipped way earlier (note to self for future runs with it).


Likes
8
Share
@ohcibi
Follow
Flower starts in this week. Ima start off 1 day later, so the first night is still on 22/2 because I want the topped shoots to develop properly. Also I have done some more defoliation and just want to give everything another day of recovery.
I pushed training hard in the final veggie week because I had two squeeze everything into one week. Additionally I did the mistake of watering the leaves with fertilized water which caused some heavy burn marks. Fortunately as this happened to fan leaves mostly I had to defoliate them anyway. With no hanging leaves and all shoots developing properly ima switch to flower on January 2nd.

Likes
16
Share
@Tipton
Follow
These babies are rocking!!!!! Lollipopped up to the last 3 nodes... Pretty evenly spaced thru out... Going to give a 1/4 strength flower nute and regular veg feed and some recharge and then I'll be Flipping to flower next week! 😁 I hope I remember to update...
Update* pictures are lollipopping, topping, defoliation, and training em to a pretty even zone... Gave food last night (March 30 today) and put a quarter dose flower food and they loved it! It's going to be flipped in the next week

Likes
5
Share
@Ginger_gnome
Follow
Damn 1 of my Grand daddy Purp plants is growing like its life is depending on it lol. As you can see I swapped out that cob light and added my SE-3000 to the room so that I'm running all Spider-Farmer lights during flower. I put it over that tall GDP because I can let the plant get a lot closer to ot then one of my SF lights. I have to say when it comes to what I consider Amazon Special grow lights (Mars Hydro, Phlizon, Spider-Farmer, Viparspectrum, Etc) Spider-Farmer is by far the best. The SF-4000 light I have is still running at 100% after using it for roughly 10 grows now. Other LED brands I've ran only lasted 2-3 grows before they needed to be replaced. I've had the SF-2000 for just over a year now and it's got about 4 grows on it and again still working 100%. Now I just finished my first run in my 3x3 with the SE-3000 (last 2 weeks I'm running a blurpe LED light to see how it effects the potency) and I was extremely happy with thw outcome of the light. For only 300w I feel like it did a better job then my 450w SF-4000 light in my 4x4 tents.
The humidity levels and temperature have been doing great all week during day/night even with temperatures outside dropping to 3c. I'm expecting November/December/January to be very difficult out here to try and keep the temp up. So what I might do is run a 400W HPS light in my 3x3 next go around during the day to keep it warm and then run the main room at night with the LEDs. We'll see what it's like when I get there tho. Also thinking of moving the 2x2x4 to the main room and putting my 2x3x5 tent were it is. Again tho we well see.
Well that's all for now. So happy growing everyone!!!


Likes
74
Share
@Mr_Maes
Follow
This plant will be grown again for sure. From start to finish there wasn’t a single issue and she performed well under my Optic LED and LST. Can’t wait to grow this again.

Likes
10
Share
@Blazeman
Follow
Auto looks done.
Pakistan Valleys look almost done.
Candy may need another couple weeks.
What do u think i should do guys? Should i wait and harvest all together? Or harvest the auto now, then the kush and lastly the Candy? What's the best way.
Also i had been planning to dry them all in my tent. If I do a staggered harvest, i have to build a box or empty out a closet to try and dry them in 😫


Likes
21
Share
@GRow_M8s
Follow
- Drying for 3 days, the 2 airports-plants chopped and dried in the dehumidifier and the other 2 hanged upside down as they were.
- Humidity -> 40-50% and temps -> 21-24C°.

Likes
14
Share
@Fullmeltalchemist
Follow
D9 - 9.21 - Just growing growing growing. All of them have nice velvety roots lining the bottom of the cups 💪😬
D10 - 9.22 - Super impressed by the growth and color of these ladies
D13 - 9.25 - Transplanted into my 5 Gallon fabric pots with 1/3 Nature's Living Soil Super soil mix on bottom and fox farms on top
------------ Right now these are under 250w (True watts) of LED. One of the lights is a "600w" Phlizon full spectrum, the other is a "600w" YGrow for a mixture of 2-peak blurple and 3500k, respectively
D14 - 9.26 - Loving their new pots and tent space! 👽👍

Likes
134
Share
@Roberts
Follow
Number 10 has been flowering strong. Has about a week left for feeding then to a 2 week flush. I gotta work with what the plant tells me. Thanks again fast buds
Thank you grow diaries community for the likes, follows, and subscriptions on my YouTube channel. 🌱🤜🤛 Happy growing

Likes
11
Share
@Organic473
Follow
Bud weight continues in week 4 of flowering…I don’t know if it’s the location or the strain but these buds are really big for 4 weeks….can’t wait for harvest in 35 days.
Likes
59
Share
@Comfrey
Follow
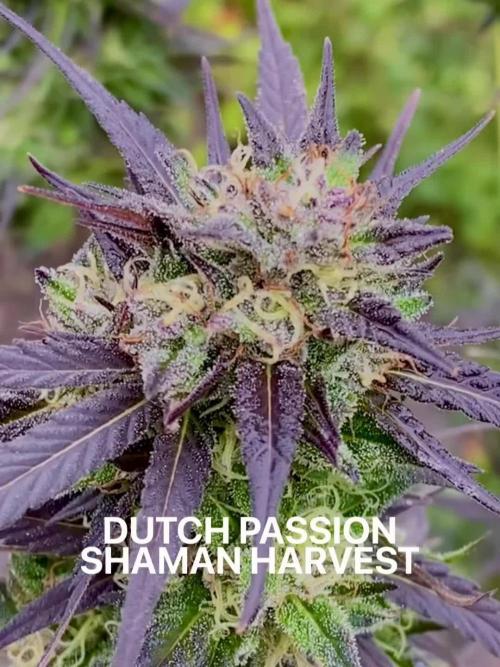
Die Blüten wurden zur Hälfte nass getrimmt. Die Trocknung erfolgte im Growzelt mit Ventilator und Abluft bei einer Temperatur von 22 Grad Celsius und einer Luftfeuchtigkeit von ca. 56 Prozent über 7-9 Tage. Bei der täglichen Kontrolle habe ich wenige Blüten gefunden, die ich entsorgen musste. Sie braucht schon etwas Aufmerksamkeit, die Shaman. Anschließend wurden die Blüten trocken weiter getrimmt und zum Aushärten mit Boveda 62% in Schnappdeckelgläsern bei 20 Grad in einem Eichenschrank gelagert. Das Endprodukt und ein abschließender Konsumreport folgen ca. Mitte November. Ich bin ziemlich happy! 💚
Likes
5
Share
@Cowboy
Follow
Everything is really going well this week not changing much at all just trying to keep an eye on the last few weeks

Likes
35
Share
@The_Bearded_Grower
Follow
Day 80 Harvesting was a bit of a trick with this one because I used to Trellis Nets but it went very smoothly no accidents and in the end I ended up with a staggeringly large amount of wet weight. My wet weights have a minimal amount of stock so that they more accurately represent the actual weight of the flower itself. In three days roughly I will be putting in the dry weight and then putting all the flowers into curing.
welcome to Day 83 this will be my last update i have now done my final trim and got my dry weight 362.30 gram's !! off one plant. that's 12.77 ounce's i don't sell but my god if i didn't care about laws lol, For a plant thats no cured i will sat it tastes smooth AF and has a nice head high that i didn't really expect from her being that its not cured and didn't really look like she had tones of trichomes. This baby is going to be nice in a month.
I'd like to thank everyone that followed this grow and asked questions as always my friends keep your stick on the ice
Likes
20
Share
@Hawkbo
Follow
Pics and video were taken a few days ago been busy as shit lately so the update is a little late. I'm gunna put the video up first on all of them then go back and upload the pics so if come back if the pics arent up yet.
Processing
Likes
3
Share
@Andres
Follow
spring is coming and goodbye cloudy days..one of my dogs try to eat one of my plants ... it's sad but she's strong..

Likes
39
Share
@GrowWiththeBro
Follow
Starting the week with a feed. Not much to comment on.
Fed at the end of the week. Just TPS and Bloom.


Likes
9
Share
@drzoidberg
Follow
just watching her fill out is great seems like every time i look she is bigger and bigger been plucking fan leaves as need be have no problems to report