
Likes
Comments
Share


@420DeepGrow
Follow
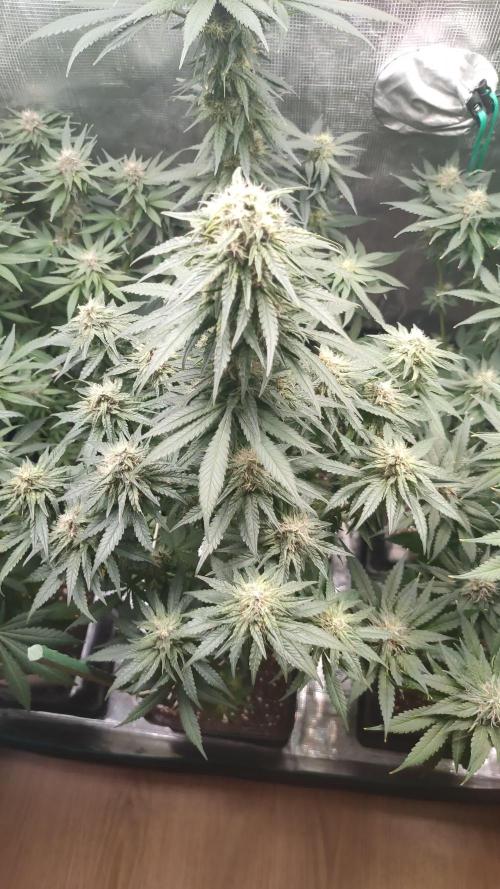
Gracias al equipo de AnesiaSeeds, Marshydro, XpertNutrients y Trolmaster sin ellos esto no sería posible.
💐🍁 Sticky Boof:
Prepárate para dejarte llevar por Sticky Boof, nuestra última obra maestra que está poniendo el listón muy alto para los amantes de las índicas. Nacida del legendario cruce de Super Boof y Cadillac Rainbow, Sticky Boof es una potente planta con un asombroso 80% de dominancia Indica que promete una relajación sin igual.
Prepárate para un viaje épico con el asombroso 37,5% de THC de Sticky Boof.
Sumérgete en una cosecha abundante con Sticky Boof, que produce hasta la friolera de 500 g/m² en interior y 800 - 900 g por planta en exterior. Esta variedad es generosa y está lista para llenar tu alijo de cogollos de la mejor calidad.
Sticky Boof es todo rapidez y eficacia, acelerando el tiempo de floración en sólo 7 u 8 semanas.
💡TS-3000 + TS-1000: se usaran dos de las lámparas de la serie TS de Marshydro, para cubrir todas las necesidades de las plantas durante el ciclo de cultivo, uso las dos lámparas en floracion para llegar a toda la carpa de 1.50 x 1.50 x 1.80.
https://marshydro.eu/products/mars-hydro-ts-3000-led-grow-light/
🏠 : Marshydro 1.50 x 1.50 x 1.80, carpa 100% estanca con ventanas laterales para llegar a todos los lugares durante el grow
https://marshydro.eu/products/diy-150x150x200cm-grow-tent-kit
🌬️💨 Marshydro 6inch + filtro carbon para evitar olores indeseables.
https://marshydro.eu/products/ifresh-smart-6inch-filter-kits/
🍣🍦🌴 Xpert Nutrients es una empresa especializada en la producción y comercialización de fertilizantes líquidos y tierras, que garantizan excelentes cosechas y un crecimiento activo para sus plantas durante todas las fases de cultivo.
Consigue aqui tus Nutrientes:
https://xpertnutrients.com/es/shop/
💻 Trolmaster Tent-X TCS-1 como controlador de luz, optimiza tu cultivo con la última tecnología del mercado, desde donde puedes controlar todos los parametros.
https://www.trolmaster.com/Products/Details/TCS-1
📆 Semana 2:
Fantástica semana, estan creciendo de una forma espectacular gracias a la ayuda de @marshydro, @xpertnutrients y @trolmaster.
Se puede apreciar un cuarto nudo y se ven aparecer las primeras futuras ramas, espero que todo siga asi.
Esta semana espero trasplantar a la maceta definitiva.
Potencia de la lámpara: 50%

Likes
13
Share


@DeepRootsGrowTrees
Follow
JOANNE'S CBD / ROYAL QUEEN SEEDS
WEEK #9 OVERALL
WEEK #8 VEG
This week she starting to look much healthier and she growing at a nice rate overall a good week! Stay Growing!!
Thank you for stopping by and taking a look it's much appreciated!!
Thank you ROYAL QUEEN SEEDS!!
JOANNE'S CBD / ROYAL QUEEN SEEDS

Processing
Likes
5
Share


@Dunk_Junk
Follow
9cm vertical growth this week but she's got a lot bushier!!!!!!!!!!!!
Loads of new growth!
I'm thinking this week she will enter flowering.

Likes
14
Share


@Phurlax
Follow
Day 78: watering 2 gal of ph water a few amber trichomes on some buds extended night cycle to 20/4
Day 82: trimmed off most fan leafs hung up to dry have a humidifier to keep it 50-60% and the temp will be 50-70°F smells super good again.
Day 88: put into jars havent trimmed yet about 12 to 15 grams in each jar and there 12 jars so im guessing about 4 oz total after trimming
Finished trimming finally have been curing for 8 days dank smell more and more everyday.
Ended up with a dry weight of: 4.39 Oz
Smoked 1 test joint and tasted alot like a dryer sheet.
31.45 grams of trim I will make into wax
Likes
10
Share


@Troy_Farms
Follow
This girl got delayed in flowering due to the neighbors outdoor lights. Didn't start flowering and it was coming to the end of September (time for early harvest for some outdoor varieties), so I was worried. Almost quit on her all together since she was not kicking into flowering. As a last ditch effort to stress into flowering I cut about half of the branches off. That worked and she finally kicking in and started flowering as September ended. She slowly got into flowering and the developing flowers looked nice. I used Bloom booster and Sweet and sticky to enhance flavor and flower. Curious to see how the end flower comes out. Colas didn't get super fat but looks quality. Should get around 2.5 ounces Dry I would guess. For an outdoor plant that is not that good but all things considered I am happy!
I am glad I found this site so I can more accurately log my grows, and I will only be growing seeds from seed banks now so I will have the legit strain and information beforehand.
Will update this harvest full when initial hanging is done in 10 days and I jar it all up.
Cheers and here is the next harvest 😎
Likes
77
Share


@BipolarHellas
Follow
Hello there,
🇬🇷
so the previous week was good with slow but steady growth...the girls were fed with Bio Grow from GHF and some of the Enhancer...they are under a 50W Led,safe and sound,until transplant when they will be moved outdoors...
WEEK 3 : "RUN IF YOU CAN"
☠️Day 15...they are forming the 5th set of leaves...strange thing,when I get them out of their cupboard they tend to stretch their leaves upwards...when I put them back they are back to normal...I think it has to do with humidity...thinking of transplanting soon as I can see the roots on 2 of the 3...I started preparing the pots,I put Bio Grow from GHF and the babies will be transplanted there in a few days...just waiting for the weather to be stable as they will go outdoors...
☠️Day 16...💧watering time for my babies...they seem to be very well...awaiting for that transplant...today I was thinking about what to do with the girls in terms of training...what I have decided is that I will perform different techniques for each one of them...one will be left to grow naturally like a Christmas tree...the second will be topped and the third will be LSTed...it is a good chance to compare the final weight of each technique...what stresses me a bit is that these girls will go outdoors during the day and under low wattage Leds during the night...I am used to using an HPS lighting and I don't know if the sun here from my spot will be enough...moreover summer is coming...here in Greece the temps will go above 35° C in July...I guess I have work to do and solutions to find...
☠️Day 17...💧📥transplant is here...the girls were put in their final homes, pots of 15 L,and were watered with plain water...I used "Coco Humus" which is coco coir fiber mixed with 20 % manure and organic matter...Its ph is 6,0 - 6,8...I also added Bio Grow, 45 gr for 15 L substrate, and the same quantity of Bio Bloom, both from Green House Feeding... I was a bit confused if I should place the Bio Bloom now,but I decided to do so as these are their final containers...they are 100% organic so I am not worried about any kind of burn...
they are now inside under low wattage Leds so that they will slowly get used to their new environment...I may give them some sun in the afternoon...their roots had reached the bottoms of the solo cups,so it was a good time for transplanting...hope they will take it good...I don't like calling them with numbers so I will give them names...We have Angie,Michelle and Lucy...Girls say hello to everyone...
☠️Day 18...its cloudy outside...the girls will stay inside under their low lighted shelter...maybe I will take them outside for a couple of hours just to get some fresh air...transplant was OK for them,no signs of shock or something...they are a bit small but from now on they will have the mighty Sun with them outside...I hope they will boost...Run if you can babies...
💀💀💀...today they survived a massive attack from my son...he probably wanted his toys back from the pots...🤣🤣🤣Anyway,Michelle is a bit hurt on her stem..not something very serious but I have to keep an eye on her...
☠️Day 19...💧summer is here...with temps at 32°C the girls are outside sunbathing...🌞I uploaded a short video showing them off...
I watered each one with 500 ml of pure water (ph 6,9)...
☠️Day 20...it's too hot down here...the girls are enjoying the sun but I have a feeling I will have a problem with the temps outside...it's too early too be that hot...32-35 °C...
☠️Day 21....💧last day of the week...the girls are doing fine...I would like them a bit bigger but I think they will catch up...Today I used 6,0 ph water for the first time...usually I don't adjust it,straight from the tap...after a lot of research I decided to give them water at this ph as it is better for coco.I hope the will like it..
So,I hope u enjoyed this week like I did...see u next week..stay tuned...


Likes
5
Share


@Budhunter
Follow
Week 10 is been magical.. Sour D is showing really good smell, different one.. similar with one I smoked from the streets.. plant is a bit smaller than gelato just beside it but man, they both are reaching the stars.. my biggest plants ever.. so far Barneys farm is showing really good genetics in my hands.. let’s gooo
I will cut off silicon and big bud from next week on 👍🏼👍🏼👍🏼


Processing
Likes
30
Share

@Dunk_Junk
Follow
So this week she grew 32cm..... That is over 12 inches!!! Incredible!! Every so often I will cut a few leaves off to allow light to penetrate the lower flower sites.

Likes
6
Share

@Elguacho420
Follow
Buenas a tod@s... Otra semanita más para las niñas, se supone q es la anteúltima semana pero siempre queda algún día más seguro... Está semana se quitaron y agregaron nutrientes nuevos para esta etapa de la floración, de momento todo en orden, este rmario salió muchísimo mejor a comparación a otros diarios, eso desde mi punto de vista. Tanbm le quité varias hojas, haciéndole hueco para que entre más luz x debajo, ya había aquitado pero tenía bastantes otra vez. De momento todo en orden... La semana q viene ya vemos q tal van... Un saludo y buenos humos para tod@s... 💨💨💨🙌🏻👍🏻
😎💀🇦🇷🤝🏻🇪🇦

Likes
11
Share


@TheMeltCorporation
Follow
Havrested a bit before just becouse i needed to have a harvest before the full one
Likes
Comments
Share


@Barzenegger
Follow
first issue, one of the plants has some spots on a leaf, which started popping up around the time of a watering, but I was also away for a few days and only got around to watering a few days after I had planned to. so I suspect that it might have been too dry which might have caused the EC in the medium to rise too much? No idea, let's carry on.
Likes
36
Share


@GreenHouseLab
Follow
These girls are more so at day 12 F, first application of MM. One pheno drinks considerably more than the other starting to look like a daily drinker.


Likes
29
Share


@GrownwithLED
Follow
The germinated seeds were planted with the white tap-root pointing downwards into small pots (0,25 l) with light-mix from Goldlabel.nl. During week 1 almost all seeds came up and grew into small seedlings. Some late-comers like the MAC are just peaking out of the soil, while others are already small plants of 5-7 cm size. During this phase I only use one single S4W-LED lamp from SANlight in Austria. The fixture is appr. 50 cm above the babies and this is plenty of light for the small seedlings. They get a little bit of BIO NOVA roots with their water, because this enhances root growth a lot and helps the babies to stay healthy until they are tall enough to be repotted. Don't let the pics with the KANNABIA strain-markers in the small pots confuse you, the genetics are all different strains from different producers (see germination)! Three strains are from KANNABIA SEEDS (the Kritikal-K, the Pineapple Dream and the Skit Kandy Dream), but they came with a bunch of handy plastic strain markers, which I used for all my plants/pots.


Likes
42
Share


@MrJoint
Follow
✌️🎃 Thank you for checking my cultivation.
✂️ Defoliation Time’s
🌷 Started flower stage
Likes
12
Share


@Kakui
Follow
Veg17, riego 1.3 EC y pH 6.1. Se hizo una muy pequeña defoliación y corte de algunos nodos para empezar a moldear la estructura.
Veg18, un par de horas después del LST ya están mostrando la estructura deseada.
Veg21, ajuste de LST.
Veg22, riego 6.1 pH y EC 1.5.


Likes
4
Share


@SamDo
Follow
🌱 Grow Diary – Week 11 Veg
Week 11 of veg, and the plant is finally settling into a steady rhythm again. After last week’s defoliation and topping, she’s been taking her time to bounce back, and this week you can see clear signs of recovery. Growth is coming back with energy, not explosive, but steady and healthy.
Right now, there are eight new apex sites forming nicely. I’m considering topping again, but that’s still undecided—I’d rather let her keep pushing forward for a while before making that call. For now, she’s cruising.
The main focus this week is on stability. pH has been kept between 5.9 and 6, and that seems to be working well. Temperatures are holding steady at 22–23°C, with relative humidity around 70%. These conditions feel just right for recovery and steady growth heading into autumn.
On the branch I taped after it cracked during training, the healing seems to be going fine. I haven’t fully checked under the tape yet, but from the look of things, it should be on track, and I’ll likely remove it next week.
It’s a bit frustrating that we lost some valuable time in the early stages, but over the past few weeks the plant has definitely been getting back on track. The color looks healthy, growth is steady, and overall she’s moving in the right direction again.
So, Week 11 is about patience, observation, and keeping everything dialed in. No big changes, just letting her recover and stack energy for what’s next.

Likes
2
Share


@CannaIGrow
Follow
Plant seems to be growing well, she’s has some nice fans. I’ll be transplanting some time next week. Topped her this week too.