
Likes
Comments
Share


@Ieiogrow94
Follow
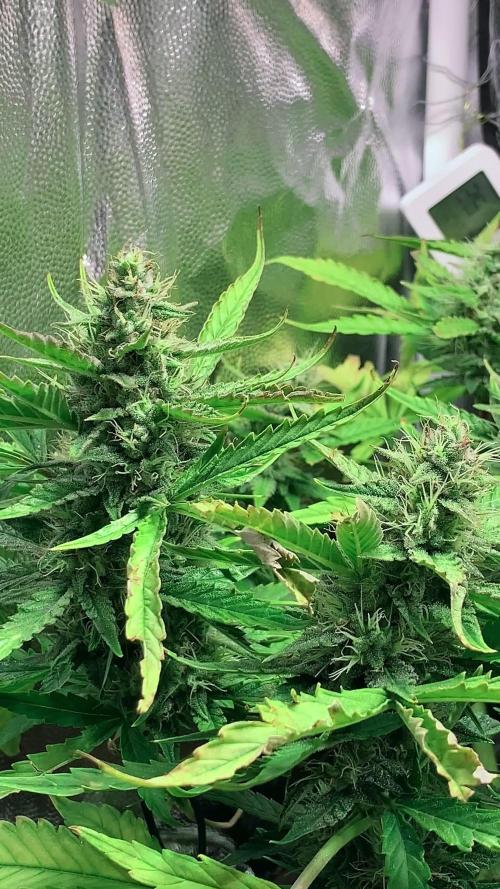
Eccoci qui...
Ormai manca davvero poco ci siamo quasi.... Ora niente più fertilizzanti solo acqua ed attendiamo la maturazione..
Seguiranno aggiornamenti, grazie a tutti per il supporto🔥🌲❤️

Likes
32
Share


@CaliGrown
Follow
Day 83 - changed her to 12/12 lighting to finish her faster. Smells of dank cheese plus a sweet candy smell when I give her a finger hug 👌


Likes
18
Share


@Stonyways
Follow
trimmed and netted the plants last night, 12/30, and the energy pushed the plants to stretch another 1/2 inch+
this will be the last week of vegetation as I prep this light leaking tent for flower, not a fan of mars hydro at all right now. their poles are the weakest I've encountered yet, too many light leaks and this is the first grow with it. My high cfm fan , which is only a 4", is pulling the fabric too much and causing the leaks to grow a bit. This is not new, its been happening with indoor tents for a while now but I thought a grow company such as MH would have a decent, respectable tent. My solution is Blackout Curtains draped over the sides. However, I am hesitant to do this with the MH tent as the poles for the tent are too weak as it is, tsk tsk tsk mars hydro.
will continue to increase the watts the next 6 days
HAPPY NEW YEAR
a combination of light and fresh soil has made the plants stretch so I will finish tightening up the MH tent today and ill start flower tomorrow, day 62.
while adjusting the height I must have nudged the dial for the dimmer and sent it to 184w. this would have been a big jump but manageable but I lowered the light 7" and the plants took a bit of a hit. I adjusted the light back down to 160w and I'll let the plants recover before anymore adjustments.


Likes
7
Share


@Zuppler
Follow
Week 10 - Fifth Week of Flower
The Donutz tent is stepping into its fifth week of flower with some exciting developments and a few surprises. The plants are thriving, and the vibes remain immaculate as the grow progresses.
Key Updates:
Purple Phenos: 3-4 of the plants are starting to show stunning purple hues in their buds and sugar leaves. The color shift adds a beautiful contrast to the tent and hints at the unique expressions within the Donutz genetics.
Different Phenotypes: While most of the plants are stacking up nicely, 1-2 phenos are a bit on the thinner side with less bud density. It’s a reminder of the natural variability in genetics, but there’s still time for them to fill out in the coming weeks.
Environment & Care:
Stable Conditions: Temperature, watering (reverse osmosis), and overall care are dialed in perfectly. The plants are enjoying a consistent, stress-free environment with plenty of love.
Healthy Growth: The rest of the tent is looking strong, with vibrant buds and trichome development continuing to ramp up.
Observations:
The purple phenos are a standout feature this week, bringing extra visual appeal to the tent.
Even the thinner phenos are showing healthy structure and potential to develop further before harvest.
Trichome production is increasing, and the tent is starting to radiate that sweet, sticky aroma.
Next Steps:
Continue monitoring the thinner phenos to ensure they’re getting enough light and nutrients.
Maintain stable environmental conditions and nutrient levels to support bud development.
Keep a close eye on trichomes as they mature, watching for any signs of ripening as the grow approaches the final stretch.
The Donutz are flourishing, and the tent is alive with color, aroma, and promise. The Florida Gang grind is paying off big time — the finish line is in sight!

Likes
2
Share


Likes
36
Share


@SensimillaP
Follow
Started the flush yesterday, the Zkittlez is pretty much ready to harvest at only 42 days of flower, now just waiting the critical to finish.
Both smell amazingly good
The intensity from the led's made the critical yellow in some tops, and got worse since i flush them yesterday so I raised up the lights just a bit.

Likes
7
Share

@majklsoft
Follow
Considering that Syrup is a fast-flowering autoflower (lifespan 56–65 days), we're getting close to the finish line... :)
Big thanks to everyone who's been guiding me through messages and answers — and also to all the growmies who just stop by!
BTW: For those chasing purple buds — just underfeed them a bit and give them a phosphorus deficiency. 😂

Likes
70
Share


@Santica_Garden
Follow
So this is how things are looking for the Dark Phoenix at the end of Week 8 of Flower. I have uploaded a video for you guys with all the information you need, any questions just ask away 👍🏾🌱💚

Likes
43
Share


@Sabac
Follow
Semana 4 de flora están a full mis plantitas. Creciendo cada día más y más.
Sanitas.


Likes
18
Share


@Strainguy
Follow
Plants look good, getting super bushy. Still quite hot, cant go full power, also not able to use under canopy because if it. Waiting for colder weather :)
Lights running: 55%
Added a timelaps, hope you like it. If yes, I will try to make even better ones :)

Likes
5
Share


@khmerkid
Follow
Hi guys were back at it again todays a new day a holy day! Oh boy am I blessed to see this fine beautiful lady grow right before my eyes! Last week looked like a disaster now its looking awfully beautiful! This lady right here shot back up on its own with the proper nutes we gave her which was by FoxFarm. Talk about new growth! WOOOO

Likes
7
Share


@DEEGREEN
Follow
WITH A DAY OFF I GIVE HER CALCIUM ( 235 PPM. ) WITH SHORT FLOWERING. TOTAL: 905 PPM.

Likes
22
Share


@GreenHouseLab
Follow
Another 2 weeks to 18 days and should be able to wrap this one up. Looking promising considering only 330w was used, 36w/sqft. Its bud ripening time.
Pics are of Day 46 currently sitting at day 49 to be precise.
GHL

Likes
9
Share


@Alejangrow
Follow
Thanks for checking out my grow. 😉👍🏼
Feel free to check out my others, and follow along for more to come. 🌿🌺

Likes
32
Share


@Chucky324
Follow
Hello. It 35 c. in the greenhouse today with 5 fans running. Stinkin hot in there. I hope the heat doesn't melt my THC crystals. It's suppose to be as warm tomorrow too.
> I have not seen any powdery mildew on either Amnesia Lemon this year.
>I have started my 2nd flush today. I' try for 4. But might have to cut a little earlier because>>>
> AAHHH, I found a small patch of spider mites on the Amnesia Lemon. I only have a week to go so I decided to turn up the fans instead of spray. Yes they will progress, but slowly and they cant spin their webs in the wind, so it slows them down. And I don't mind smokin dried spider mites (isn't it extra protein). I'm blaming the house behind me, I looked through the fence and they have about 12 large pots growing cannabis, imagine that.
>Starting to get some color on the Burmberry and the Sister Amnesia Lemon looks ready to be cut down.
> I'll take some more pictures just before harvest and during and after. It took me 2 days to cut it down last year. I wet trim. I grew Dr. Green Thumb seeds Big Laughing last year. They made decent buds but they were not very strong, disappointed. Thought I'd try some stuff that did well inside and see what they did in the greenhouse. These plants were taken as clones, near the start of the year 2020. I moved them in the greenhouse when it was warm enough and did some training then. I started to flower them at the end of May. The tent worked great at forcing flowering at the brightest time of the year. Less chance of problems then trying to flush on a cold October day. I hope I helped makes it clearer in what I'm doing. Chuck.


Likes
18
Share


@Grow420pice
Follow
Über Ostern jetzt hatten wir sooo gutes Wetter... Ich konnte nicht wiederstehen und hab Sie nach draußen gebracht... Sie liebt es.
Bis dann growmies
🌱💚💪😎
Likes
31
Share


@MadeInGermany
Follow
Info:
Unfortunately, I had to find out that my account is used for fake pages in social media.
I am only active here on growdiaries.
I am not on facebook instagram twitter etc All accounts except this one are fake.
Flowering day 50
since time change
to 12/12 hrs.
Hey everyone ☺️.
Another nice week goes by.
The buds keep getting thicker and smell better ;-).
This week the water was poured twice with 1.2 l each time.
One of them with GHSC enhancer.
Otherwise everything was cleaned and checked.
lots of fun and stay healthy 🙏🏻
You can buy this Strain at :
www.Zamnesia.com
Type:
Runtz
☝️🏼
Genetics:
Zkittlez x Gelato
👍
Vega lamp: 2 x Todogrow Led
Quantum Board 100 W
💡
Bloom Lamp : 2 x Todogrow Led
Cxb 3590 COB 3500 K 205 W
💡💡☝️🏼
Soil : Bio Bizz Coco
☝️🏼
Nutrients : Green House Seeds Company Powder Feeding Bio
☝️🏼🌱
Water: Osmosis water mixed with normal water (24 hours stale that the chlorine evaporates) to 0.2 EC. Add Cal / Mag to 0.4 Ec Ph with Organic Ph - to 5.8
