
Likes
Comments
Share


@420DeepGrow
Follow
Gracias al equipo de Kannabia Seed, Marshydro, XpertNutrients y Trolmaster sin ellos esto no sería posible.
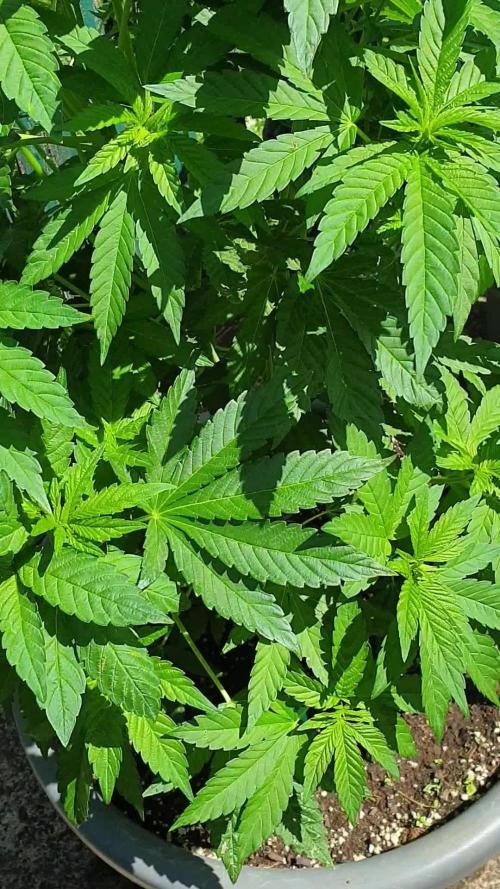
💐🍁 Moby Dick 🐋:
Criada a partir de dos parentales icónicos, como es el cruce de White Widow y una Haze pura G13, este choque de titanes provoca un híbrido que golpea a las puertas de las sativas más fuertes disponibles en el mercado.
Estamos ante una criatura impresionante en todos los sentidos, con ejemplares que florecen en solo 9-10 semanas en interior y arrojan un peso en lonja de 550 gr./m²
Al igual que su padre Haze, nuestra Moby Dick ofrece agradables notas cítricas, pero con efluvios de vainilla y eucalipto, una mezcla de aromas que genera una combinación intrigante, que puede llenar cualquier habitación con una fragancia inolvidable.
El sabor es muy parecido a su olor, con toques de limón agrio que harán que tu lengua cosquillee al inhalar, convirtiéndose lentamente en un humo dulce y terroso, con pinceladas de madera e incienso que se adhieren al interior de la boca al exhalar.
💡TS-3000 + TS-1000: se usaran dos de las lámparas de la serie TS de Marshydro, para cubrir todas las necesidades de las plantas durante el ciclo de cultivo, uso las dos lámparas en floracion para llegar a toda la carpa de 1.50 x 1.50 x 1.80.
https://marshydro.eu/products/mars-hydro-ts-3000-led-grow-light/
🏠 : Marshydro 1.50 x 1.50 x 1.80, carpa 100% estanca con ventanas laterales para llegar a todos los lugares durante el grow
https://marshydro.eu/products/diy-150x150x200cm-grow-tent-kit
🌬️💨 Marshydro 6inch + filtro carbon para evitar olores indeseables.
https://marshydro.eu/products/ifresh-smart-6inch-filter-kits/
💻 Trolmaster Tent-X TCS-1 como controlador de luz, optimiza tu cultivo con la última tecnología del mercado, desde donde puedes controlar todos los parametros.
https://www.trolmaster.com/Products/Details/TCS-1
🍣🍦🌴 Xpert Nutrients es una empresa especializada en la producción y comercialización de fertilizantes líquidos y tierras, que garantizan excelentes cosechas y un crecimiento activo para sus plantas durante todas las fases de cultivo.
Consigue aqui tus Nutrientes:
https://xpertnutrients.com/es/shop/
📆 Semana 2:
Gran primera semana, ella ha dado un gran estiron estos días, si sigue así será una gran cosecha.
Esta semana se practica defoliacion, poda de ramas bajas y se le agrega Sticky Fingers .
La carpa está ocupada al 100%, sigue una floracion explosiva gracias a @Marshydro y @Xpertnutrients y @Trolmaster con esta gran genética 💪.
Potencia de la lámpara: 70%

Likes
39
Share


@GrowWiththeBro
Follow
Fed on Day 39
Up’d the nutes a bit. Added some Superthrive.
Also added (2)3 gallon strains I have from another grow and additional lighting 250w in the tent.
Day 44: Watered with PH’d 6.1 water and a couple pinches of epsom salt.
Both of their ppm’s were a bit high on the R/O around 1700.
I assume this is from the feeding earlier in the week. (I need to start taking better notes) I brought it down considerably to around 900 ppm with a couple gallons of mild flushes.
**Personal note**
I read alot and I mean ALOT of forums and questions from here as I grow. I’m using a combination of techniques I feel are beneficial and learning do’s and do nots as I go. That being said Please feel free to comment, advice is ALWAYS welcomed!
Grow on.


Likes
105
Share


@WhiteWidow
Follow
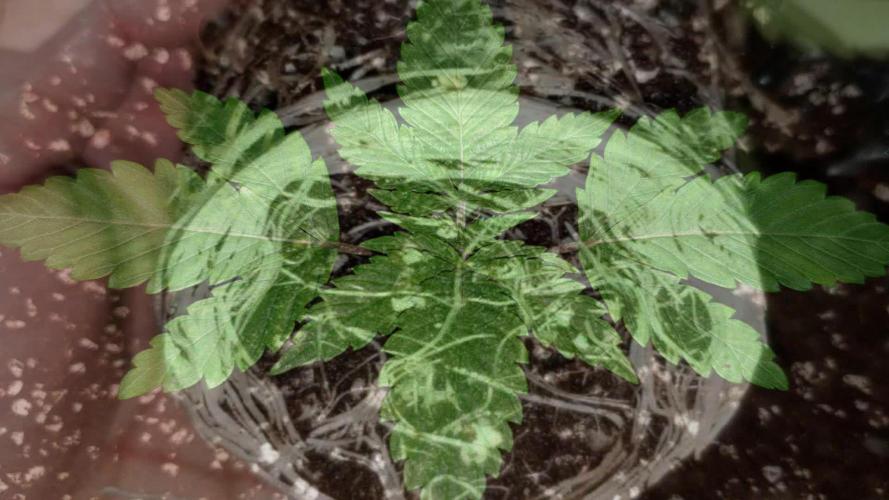
Hello friends, I planted this plant as an experiment as you can see but today in day 17 from seed i decided to share this growth here coz it surprised me with the so far growth. Sorry for lacking photos from week 1 but i didnt take pictures.. she is under the sun whole day and 4 hours 250w HPS... and as you can see some leaves curled in coz she is too young for 250W hps 25 cm from her..
So far I foliar fed her and regularly watered, dilluted 2ml/L of B-52, 2 ml/L fitobacillus (essential bacterias and enzymes) and foliar sprayed her. With every watering so far i put 2ml/l fitobacillus and 2ml/ B-52 and mycorhizae in the very first and second watering.
As you can see her main stem is already fatter than average for that time of growth and the root mass is so dense and thick, also many many hairs ready to absorb some nutes so tmrw will be her first nutes dosage, day 18 that will be from seed.
I am hoping only that the pot size will not restrict her growth, as the roots already reached the bottom and started to curl back in.. but their colour is bright white and i have no worries bout rot or similar, at least so far so good :D
Stay tuned brothers and sisters, all my grows are for you in order to learn ultra fast all the interesting and mind intriguing stuff by following only one grower. @James drop an eye here, you did a good job with genetics on this one..
Kisses to all from white and Team Wolfpack 😎✌️
UPDATE same day LOL
I decided to transplant her to a 3 gallon fabric pot coz those roots got me so surprised and i prepared a good nutes mix for them.. you can
see the health potion in the video that contains myco and nutes
UPDATE 10.10.2107.
Today i applied some more lst to maximally expose side branches to the sun. You will see some interesting pics and vids explaining my low stress training technique. I blv this plant's main goal in life to be LST'd. Dont be afraid, side branches will be thankfull and your harvest will be thankfull..
You can se some lst with side branches and how i tucked the leaves and made sure they stay there using the green wire and forming that shape on the pic.
Today i also noticed a white hair showing up, still not sure if it is starting to flower in her DAY 19 from seed, or is it just "stress defending mechanism".
Seems to me i will find out soon :)


Likes
24
Share


@SmallBatchNugz
Follow
GO ETHOS, GO ETHOS GO!!!!!
this may be the absolute 8th wonder of the world, look at those ladies!!! Oooo la laaa... just started week 5 and added some Purpinator to the mix.. see how she goes.
And you notice that little fancy C02 rockin in style in the corner 😎

Likes
22
Share


@Lontra
Follow
day 65:
Removed some leafs that were about to fall off by themselfes and gave her about 5.5 liters of water. I also noticed some more amber trichomes on some buds.
day 66:
just visual check. more trichomes turning amber. I guess it's time to chop her in a few days.
day 67:
just visual checks.
day 68:
Today I gave the plant another 6 liters of pH-regulated water without any additives and removed 2-3 dry leaves. While some buds already have quite a few brown trichomes and look as if I could harvest them in 3 days, other buds look as if they will need another 2 weeks, both in terms of the trichomes and the pistils. According to the current plan, the next watering day is Tuesday. Then I will reassess the situation.
day 69:
Just visual check and refreshing humidification. The "ugly" spots continue to spread, but I hope it's okay and that she will last until the harvest.
day 70:
Just visual check and refreshing humidification.
day 71:
Removed some dead leafs and gave her about 5 liters of water. I will give her an extra 1 or 2 liters tomorrow, so she will have enough water (hopefully) for the next few days that I'm gone.
Likes
53
Share


@Mastr
Follow
Just chop her down in 75 days from seed
Veg 21 days
Bloom 54
She produce very dense nugs alot better than before I think without bloombastic won't happen I let her dry in 23° for 32 hour then 24°for 3 days then ready this is quekest way you can dry your bud without test or smell like grass its take max 5 days

Likes
13
Share


@Homegrown76
Follow
This is a beautiful plant! I tied the main shoots to spread it out and allow the undergrowth more light. Very happy with the progress so far! Happy growing everyone!
Likes
1
Share

@birdmountain
Follow
My Queen of Outdoor, jedenfalls, was das aktuelle Wachstum betrifft und auch den Düngerbedarf. Sie ist hungrig, sehr hungrig sogar.
Dafür ist ihr Wachstum und ihre Blattgröße außerordentlich. Sie war eine Dreiblatt-Mutation, mittlerweile hat sie sich auf die Doppeltriebigkeit reduziert, was dazu geführt hat, dass aus drei Trieben zwei wurden. Dieser Doppeltrieb ist zwar sehr stark, hat aber auch viel mehr Seitentriebe durch kurze Internodien und ist etwas kleiner als der andere Standardtrieb. Sie hat im Wachstum jedoch die Fruit Bomb Punch etwas überholt und zeigt leichte Defizite. Deshalb mehr Dünger und mehr Mineralien, damit es positiv weiter gehen kann. The Blueberry-Monster is rising!
Es hat viel geregnet und gestürmt in dieser Schafskälte-Woche, sie hat es ohne Stützung durchgestanden. Ein Nachteil des starken Wachstums ist natürlich die Krautigkeit/Weichheit der Triebe, sie müssen sich noch verfestigen um Sommerunwetter auszuhalten. Dann wird auf jeden Fall ein Anbinden (damit sie mir nicht fortläuft... :)) und zusammenbinden der Haupttriebe nötig werden, so wie ich es die vergangenen Jahre praktiziert habe.
Vielen Dank für euren Besuch!

Likes
34
Share


@PapaNugs
Follow
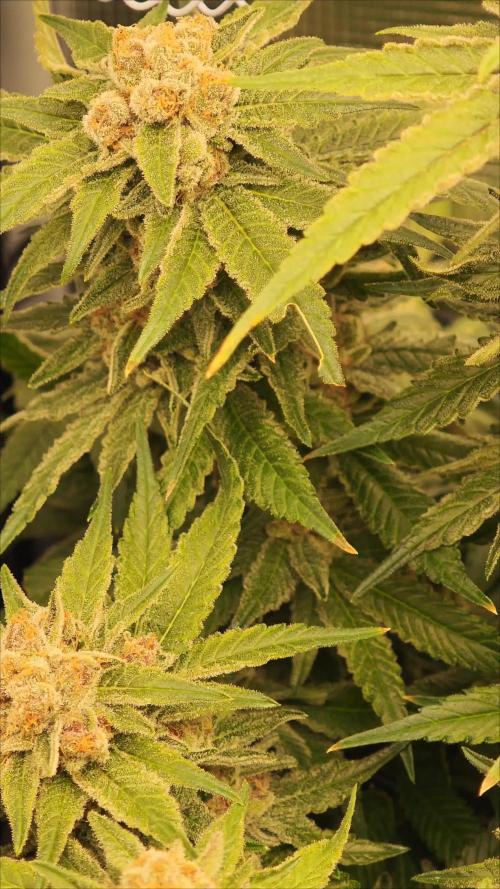
This was the best smelling girl out of the crew. Happy with that. The size of the buds are good considering the plant size and total time of the plant. Will dry for 10-14 days then cure for a month before trying them out.
Likes
Comments
Share


@grower0007
Follow
Great strain! I was to get such plan with tree leaves instead of two.
Likes
10
Share


@MsMaggie
Follow
March 3:
Added a few pics.
All is growing right on target!
Buds are starting to stack and I absolutely love the smell coming out of the flower room.
These next 3-4 weeks are my favorite 😊
March 1: Four weeks since light switchover to 12/12.
Technically I call this end of week 2 of flowering since I don't count pre-flower.
Managed to get a video although the quality isn't what I would like.
Grow is going very well.
I kept 4 plants that I didn't top as an experiment this grow since I always top and have never let them go au natural :-)
Last time I do that though.
Feeding big bloom at a rate of 3 tsp per gallon every other watering. Going to add some bloom boost this upcoming week.
I'm quite happy all in all with how this particular grow is going.
Humidity got a bit high this week 60 and I immediately took steps to remedy this.
Now humidity is around 50.
Don't want dreaded bud rot!
I'll add some additional pictures this week in the meantime enjoy the video and beware of dog near the end :-D

Likes
346
Share

@Canna96
Follow
This week went pretty well, other than she stretched like crazy and I am now getting worried about running out of vertical space. I also had a few of my bottom leaves get a few brown and yellow spots on them. I did post some pics and asked a question, thank you for the responses, much appreciated! I am thinking about adding my Spyder Farmer LED 100 Watt light into the tent for the nebula auto because it is about 23 inches shorter than the sour diesel. I believe it would only raise my temp about 2 degrees, and possibly lower the humidity by one or two percent. I must say my dehumidifier has been a freaking stud, running 24X7 and not complaining. I should look into adding another unit, it has been in the mid 90's and muggy for about a week. So far I have to say I am super impressed and excited with this setup, the genetics, and with growing this wonderful plant in general. Already planning ahead to my next grow, and what I can do better. I have been enjoying myself and I really appreciate everyone who has taken the time to answer my questions! I am having a blast and am excited to see what this lady will give up in a few weeks!

Likes
2
Share


@Chi_K24
Follow
Hey folks. Into week 5. Lots have happend. Ladies got hit with a huge wind storm and took down all 4. We had to steak them up to keep support of main branch.
Other than that. We did a heavy defoil/lollipop and topdressed at 2tbps/gal 70/30 mix of 444 to 285.
Regular watering. Each plant has been taking on about 1.2 gals every 2-3 days.
See ya on the next update.
Likes
31
Share


@MadeInGermany
Follow
Hey everyone 🤗.
This week it has taken up more and more of its fertilizer and has got a nice color.
It also grows very well 👍.
It was topped again this week.
Otherwise everything will continue as before and will continue to be topped 👍.
I wish you a lot Spas with the update, stay healthy and let it grow 👍🙏🏻
You can buy this Strain at
https://www.barneysfarm.com/blue-cheese-34
You can buy the fertilizer at
https://www.greenbuzzliquids.com/
Type:
Blue Cheese
☝️🏼
Genetics:
Blueberry
X
Original Cheese
👍
Vega lamp:
2 x Todogrow Led
Quantum Board 100 W
💡
Bloom Lamp :
2 x Todogrow Led
Cxb 3590 COB 3500 K 205W
💡💡☝️🏼
Soil :
Canna Coco Professional +
☝️🏼
Fertilizer:
Green Buzz Liquids :
Organic Grow Liquid
Organic Bloom Liquid
Organic more PK
More Roots
Fast Buds
Humic Acid Plus
Growzyme Big Fruits
Clean Fruits
Cal / Mag
Organic Ph - Pulver
☝️🏼🌱
Water:
Osmosis water mixed with normal water (24 hours stale that the chlorine evaporates) to 0.2 - 0.4 EC. Add Cal / Mag 2 ml per l water every 2 waterings . Ph with Organic Ph - Pulver to 5.8 .

Likes
7
Share


@Mr_nugs_lover_David
Follow
This week looks like it's gonna be amazing in all aspects, the plants looks super healthy and they are getting bigger and bigger everyday with beautiful fat healthy green leafs, cannot wait to flip them into flower!! 😍💯🔝


Likes
2
Share


@Sammy23
Follow
Bonne semaine, y'en a une qui a stretché beaucoup... Les autres un peu moins, elles culmine à 30cm. Je vais commencer à travailler avec les engrais floraison. Je mettrai l'ajout sur la semaine prochaine.
Likes
12
Share


@Bread_n_Buds
Follow
Our Purple Urkle by Zamnesia has reached 16 buds. I'm growing it a little more to make sure it doesn't go into flowering with small brunches but now we're there, a few days and it will go into flowering and it will be very exciting you can bet on it.
The Topping worked very very well the plant at the moment of topping went into overfertilization due to the obvious slowdown in growth, so I slowed down the fertilizer for growth but it was about to go into crisis, so we are starting to give fertilizer again. When topping is a delicate moment it is probably better to do what I explain below.
The ideal when topping is probably to start with a gradual release fertilized soil or start preparing the soil for a period that is at least enough for the vegetative phase at most by adding a bit of alga grow which by itself I must admit gives me some problems at least in this case if the plant grows straight much less or rather nothing.
We are always using soil, feeding and all the recommended additives from Plagron 100% organic, we have only lowered the amount of grow in this topping phase for the reasons mentioned above.
---- Decide on the right soil and calculate your fertilizer sheet based on the soil on the official website.
-- www.plagron.com
Try a seed of this strain that drives us crazy..
---- https://www.zamnesia.io/en/11168-zamnesia-seeds-purple-urkle.html
Zamnesia Description // A direct descendant of a Mendocino Purps phenotype, Purple Urkle is a high-performance cultivar from Zamnesia Seeds. This feminized, indica-dominant strain is sure to win over any cannabis grower. With a THC content of 20%, Purple Urkle has a lot to offer from seed to harvest and beyond. A grape-flavored adventure, Suitable for indoors, outdoors or in the greenhouse, Purple Urkle is a very resilient strain. Growers will be impressed by how easy this cultivar can be managed. Purple Urkle can reach 120cm indoors and 160cm outdoors, but if you want more control over the height you can use the LST technique.
Purple Urkle has fantastic flavors and aromas that intensify during the flowering phase. Regardless of the method of consumption, Purple Urkle offers tangy, fruity flavors that lean towards notes of grapes, berries and plums. The effects of this strain are soothing and relaxing, with uplifting sensations that make the experience suitable for any occasion, whether in a social setting or alone.
All the best that mother nature can offer is on ---- www.zamnesia.com


Likes
19
Share

@DivineBuds420
Follow
After going back and forth about the harvest, I decided to give her another week. It feels like the right balance between playing it safe and giving the plant the chance to fully express herself.
The flowers keep maturing, the trichomes continue to develop and the terpene profile becomes more intense.
The buds are getting heavy enough that several branches are now resting on the net for support. Without it, they would probably start collapsing under their own weight.
The finish line is close now. Time to stay patient and let nature do the rest.