The Grow Awards 2026 🏆 


Likes
Comments
Share
@CashiLashae
Follow
This weeks focus is balancing ph of my homemade Texas Tea nutrient and creating the perfect “Tropical” environment for my babies to thrive in. Incorporated Advanced nutrients up/down to assist with ph also helped lower the PPM. They are loving the vegetation box I built!


Likes
12
Share
@BudMunchies
Follow
09/10: The are both still much behind where i would expect them to be right now. I think maybe this strain just produces much smaller plants than im used to? Not sure. The run is actually starting to look as big as the other, just shorter.
I havent yet decided if i want to take the little one to flower.
I will be transplanting tomorrow, and will decide then.
09/12: I transplanted one today. Im bot going to repot the little one.
Oddly enough they are both already showing signs of preflower. Admittedly, I have only grown like 4 autoflowers ever, but I am very surprised by how soon these are transitioning. And frankly i dont like it. Would have expected another two weeks for veg development before this started. She is going to be a very small plant likely.
Likes
1
Share
@Cannerd
Follow
How ya doing mates?? Awesome week last week - all photos and logs have been added so be sure to check it out! This week is going great so far! I've switched to an early vegetative state nutrient system. As you'll see in the daily logs early this week, this bumps up the micro and grow nutes, and keeps the bloom at 0.6ml/gal. A quick note about last week - I'm unable to update the measurements, but please note that those nutrient amounts are measured in ml/gal, NOT ml/l.
Anyhow, this week I'm just waiting to get my order of diatomaceous earth so that I can make up another batch of soil. I'm still debating between topping this week before repotting or letting them take root in the new pots first. Decisions decisions lol. I think at the very least I'll clean up some of the lower growth to make sure the energy is being spent at the right places. I've been switching back and forth between just LST and mainlining in the past - but I think I really like the ease and cleanliness of mainlining. The draw back is the recovery time they take in the process haha.
UPDATE:
The D.E. has come in, and I repotted the girls this week. I mixed in about 1.5-2 cups D.E. for the whole pot, as well as some Bat Guano and Kelp Meal for micro and macro nutrients to use on dry cycles.
I've also included some photos of the mother plant to give an idea of what's to come! I've just started to flower it, which is the first time for this strain - so I'm pumped!
Day 15:
M.C. 01-21 After reviewing the last set of photos from last week, I figured I'd play it safe and dimmed the light back down to 25% strength. The mother plant is almost ready for flower, and I'm down some tents so she'll be taking this one over shortly. These photos were taken shortly after the lights went off, and they look quite happy! You can see some of the side branch developement in today's photo for MC-01. The pots are fairly dry now, and I've decided to move to the next stage in the nutrient regime. This kicks up the Micro and Grow nutes, while maintaining the Bloom amounts.
M.C. 02-21 A nice top photo for MC-02, you can really see the lighter green in this photo. Not to worry though, as these will darken back to a vibrant green as long as I give her what she needs shortly! The pots are fairly dry now, and I've decided to move to the next stage in the nutrient regime. This kicks up the Micro and Grow nutes, while maintaining the Bloom amounts.
M.C. 03-21 Look at that little leaf poking out from the 2nd node! Some slight yellowing you can see too, but again, not to worry. The new mix should rectify that. I've decided to move to the next stage in the nutrient regime. This kicks up the Micro and Grow nutes, while maintaining the Bloom amounts.
Day 16:
M.C. 01-21 Today is the day - for the mother! I've cleared out some space and moved plants around. So back out to the grow room these girls go! MC-01 seems much better today with the reduction in light. The 5th node is almost flattened out and the 6th coming through still. Most notably though, you can really see the work she's put into the side branches! The branches at nodes 2 and 3 are starting to produce more leaves - great sign! The new growth at the top is also a nice dark green. Added 500ml water to the tray.
M.C. 02-21 MC-02 seems to have liked the adjustment of light as well. She's got nice dark green growth at the top, and the little branches at the 2nd node seem to have a full leaf! Added 500ml water to the tray.
M.C. 03-21 The photo from today is cool, because you can see how close MC-01 & 03 are, even though there's almost a full node difference. MC-03 is stretch out a bit to compete with her sister for the light haha. She's also put some more effort into the side branches that you can see. Added 500 ml water to the tray.
Day 17:
M.C. 01-21 I figured a video would be the best way to illustrate the changes today! They've been back in the grow room under the Veg dedicated light for a day now and seem to be loving it! MC-01 has its' 5th node out, splitting the 6th node, and I can JUST see the 7th node coming in. I don't think they'll get too much more height, as you can see that the side branches are starting to stretch now! She's definitely going to be well tangled in the roots by the end of the week when I hope to repot her.
M.C. 02-21 MC-02 is doing great despite the difference in height! You'll notice the side branches stretching out at nodes 2 & 3. The pots are also still fairly wet at their center, so I'll hold off on water most likely. At least this clone will have time to root more while we wait for the supplies!
M.C. 03-21 MC-03 also has great side branching! If you take a look at the group photo from today, you'll see that both MC-01 & 03 are practically the same height, but MC-03 snuck in there by the stretch haha.
Day 18:
M.C. 01-21 My order of D.E. came in last night, perfect timing! As you can see, her roots have fully reached the bottom, and have started to migrate upwards with the water that's absorbed. The soil was a little dry for my liking, which made things a little difficult/dusty but still no mishaps! Watered around the root-zone before covering with more soil to keep the gnats down.
M.C. 02-21 Not quite as much lateral root growth as MC-01, but still plenty enough for a repotting! Her soil was a little dry as well. Ideally I should have given them a light misting from the top of the soil and let is drip down to keep the dusty bits together haha.
M.C. 03-21 Nice and thick root growth, no issues with repotting, and strong stalk. The extra spacing in the nodes may prove to be helpful during the training phase.
Day 19:
M.C. 01-21 Some nice top shots today as they slowly get acclimated to their new homes. Once I see them push out a new node, I'll probably top them. This is to make sure that they're taking to the new pot without causing any extra stress before they can take it. Today I watered them with an early veg nutrient. I like to stay cautious with nutrient boosts since they're in soil - not to mention the added nutrients from the repotting.
M.C. 02-21 Top shots for the girls today. Not much change, but also no immediate signs of shock either, so I'll take it.
M.C. 03-21 You can't really see it in this angled shot, but the small branch at the second node is coming along nicely! I think the girls are happy that they each have their own tray not haha.
Day 20:
M.C. 01-21 Definitely noticing some slow changes to the top nodes when comparing the pictures from the previous day. The leaves are slowly starting to separate, and I'm not noticing too much yellowing yet which is good. Watered with 500ml water to keep water migrating upwards to meet the roots.
M.C. 02-21 Not noticing much change in this girl today, but that's okay. She's most likely focusing on the root developement instead which I can't complain about! Watered from the bottom.
M.C. 03-21 Maybe seeing some separation in the top leaves, however more notably are the small branches at the 2nd node that you can see better here. Still a bit of stretching with them as they get longer. I might even keep them on for clones later on. Watered from the bottom.
Day 21:
M.C. 01-21 Looks like she gained some distance last night, as the top node is now above the fan leaves, unlike 2 days ago. I'm really getting eager to top them, as I don't want them to waste too much time and energy growing tissue that I'll just end up cutting off. I'll be bumping the nutrients up starting next week to keep the progress going, moving to a mid-veg stage shortly. I'm going to let things dry up tonight for a fresh boost of water tomorrow to give it a dry cycle as the pot is still a bit heavy.
M.C. 02-21 MC-02 really worked hard last night it seems, as she almost completely flatted out her top leaves! I think she's ready for a topping, but I'll let her benefit from the headstart and let the other two catch up and root before. dry cycle for her tonight as well.
M.C. 03-21 MC-03 was busy last night too and is now slowly flattening out the top node as well! Maybe tonight they'll have enough progress to go topless afterall haha. Dry cycle in prep for watering tomorrow.
Likes
10
Share
@Skully
Follow
🇩🇪
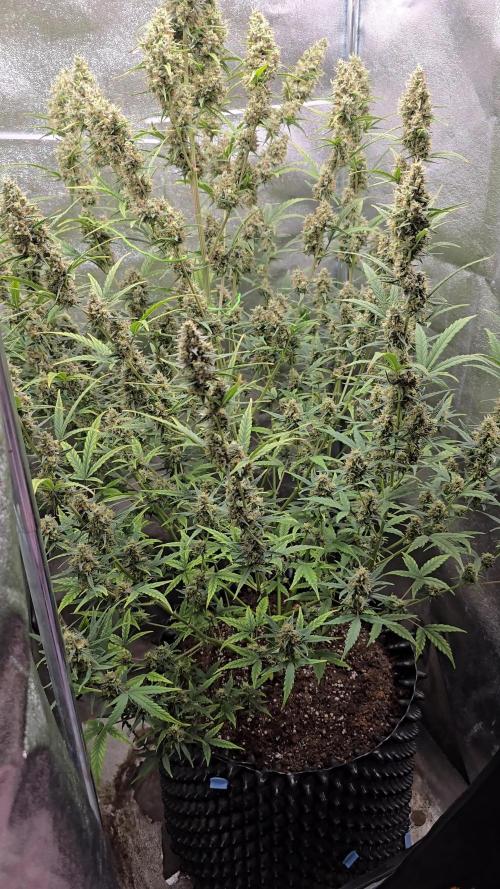
Die ersten Blütenstände sind erkennbar und sie beginnt sich zu Strecken. Sie beginnt auch schon leicht zu duften. Ich bin mal gespannt. Alle Parameter sehen gut aus und die Pflanze dementsprechend auch. Vor ein paar Tagen war es sehr heiß draußen, wodurch die Temperatur auf 29 grad gestiegen ist. Dem Strain hat es aber nichts ausgemacht. Die anderen Pflanzen haben die Blätter hängen lassen aber FB scheint sehr resistent gegen hohe Temperaturen zu sein, bzw. sie gut wegzustecken. Die Lampe habe ich heute auf 75% hochgedreht.
🇺🇸
The first buds are visible, and it’s starting to stretch. It’s also beginning to emit a light scent. I’m curious to see how it develops. All the parameters look good, and so does the plant. A few days ago, it was very hot outside, causing the temperature to rise to 29°C. However, the strain didn’t seem to mind. The other plants drooped their leaves, but FB appears to be very resistant to high temperatures or able to handle them well. Today, I turned the lamp up to 75%.
🇪🇸
Los primeros cogollos son visibles, y está comenzando a estirarse. También empieza a emitir un ligero aroma. Tengo curiosidad por ver cómo se desarrolla. Todos los parámetros se ven bien, y la planta también. Hace unos días hizo mucho calor afuera, lo que hizo que la temperatura subiera a 29°C. Sin embargo, a esta cepa no pareció afectarle. Las otras plantas bajaron sus hojas, pero FB parece ser muy resistente a las altas temperaturas o capaz de manejarlas bien. Hoy subí la lámpara al 75%.

Likes
10
Share
@HerrnLubitz98
Follow
We’re done! Thanks a lot again to Zamnesia and Greenhouse, next big shoutout to Spiderfarmer and Biobizz.
For further updates and more stuff hit me up with a follow on IG @herrnlubitz88
Stay tuned for next run!


Likes
10
Share
@MrIssa3buy3
Follow
Happy I made it to harvest as I know that’s a lot of first growers issue. She’s sticky, funky, and chunky. Nothing bad to say. I definitely learned some things that I’lol be implementing next grow. Probably do another run of Autos from Mephisto as I have a few. But my goal is to get into the Photos, preferably the kushiest of the kushy lol. If anybody has any suggestions of some fire Gas, point me in the direction. More updates to come, so for the next week or so, just monitoring. Stay high growmies!

Likes
10
Share
@4F1M6
Follow
Stretch is done and flowers are piling on now! I treated with lost coast as a preventative. I kept the feed the same but it will be altered end of grow week. Canopy is getting hella full can't wait to watch these colas stack on. Until next update. Happy growing and stay lit fam.


Likes
38
Share
@GODSGIFT_2005_JM
Follow
For LIQUIDS & NUTES ******GREEN BUZZ NUTRIENTS***** organic.
Also i’m using their LIVING SOIL CULTURE in powder form!
MARSHYDRO ⛺️ has large openings on the sides which is useful for mid section groom room work. 🤩
☀️ MARSHYDRO FC 3000 LED 300W
💨MARSHYDRO 6” in-line EXTRACTOR with speed-variation knob, comes complete with ducting and carbon filter.


Likes
7
Share
@Mosquito_Haarlem
Follow
Ze krijgt deze laatste week alleen nog flawless finish mee van advanced nutrients.
De koningin heeft haar vruchten flink opgepompt.
Ik sta versteld van de prachtige zware toppen die ik heb moeten ondersteunen omdat ze anders zouden omvallen door de zwaarte
Echt wauw.
Likes
27
Share
@TheCannaProphet
Follow
~ FASTBUDS TESTER #2205 ~
Well friends, here we go on another 'canna-venture' together!
The grow room has had a complete remodel and some upgrades done to it including brand spanking new 4x8 and 4x4 tents and a Trolmaster Hydro X controller along with a new Control Panel.
This tester strain is one of six tester strains that FastBuds has graciously provided me with and I'm looking forward to seeing what this girl has to offer when she's grown to her full potential!
One drawback of 'testers' is I have little to no information on it other than its number and that it's an autoflower... 🤪 But, it's ALWAYS a blast growing them for me because not knowing a lot allows me to just concentrate on the essentials: Light, Environment, Water, Nutrients and possibly a bit of LST... not complicated, just basics like keeping a constant temperature and RH in the tent at a level that gives a good VPD, watering when almost dry and maintaining proper light levels according to their stage of growth.
____________________________________________________________________________________________________________________________________________________________________________________________________________________________________________________________________________________________________________________________________________________________________________________________________________________________________________________
~THE SETUP~
~Initially seeds were lightly scuffed, then soaked for 3 hours in 78℉ distilled water after which they were transferred to moist paper towels laid out in a Jiffy Pellet plastic starter tray with lid. Underneath the tray was placed a Mars Hydro Heat Mat with Controller that was set to 78℉ where they stayed until their tap roots emerged.
~Planted into Jiffy Peat Pellets that were hydrated with distilled water warmed to 78℉ with a 7.0 ph.
~Once roots emerge from the Jiffy Pellet they're transferred to their fabric pots.
~Grown 100% organic in a 4g Gronest fabric pot and a 3g fabric pot by Wraxly filled with Mother Earth 70/30 Coco/Perlite medium and initially amended with Dr. Earth 4-4-4 / Earthworm Castings / Dr. Earth Flower Girl 3-9-4 and Coast of Maine Stonington Blend Organic Plant Food 5-2-4.
~19/5 light cycle for the entire run with supplemental UVA added during flower. Lights are controlled by a Trolmaster Hydro X controller set for a 15min Sunrise/Sunset simulation.
~Top dressing every 3-4 weeks with slow release dry amendments and Earthworm castings.
~Straight water ph'd @ 6.2-6.8 when needed and bi-weekly Compost Tea's.
____________________________________________________________________________________________________________________________________________________________________________________________________________________________________________________________________________________________________________________________________________________________________________________________________________________________________________________
Weekly Updates:
1/19- Here we go into Week Four of flower and these testers are ON FIRE!🔥🔥🔥
Both testers are in a flower frenzy and are ready to eat! Today I gave both girls their last top dressing with Down To Earth 4-8-4 Flower Mix at a ratio of 2tbsp/g and Coast of Maine's Stonington Blend 5-2-4 Organic Plant Food at a ratio of 1tbsp/g which I simplified by using 1/3 cup of the 4-8-4 and 1/4 cup of the 5-2-4 in the 4g pot and 3/8 cup of 4-8-4 and 1/8 cup of the 5-2-4 in the 3g pot. After working the amendments into the medium, I watered it in with 1g of straight de-chlorinated water ph'd to 6.6 @ 74℉. It will take a week for the microbes to begin breaking it down and will last for 3-4 weeks after that which should coincide with them finishing up, or close to it, enabling them to naturally 'flush' themselves out.
I've also increased the power to the HLG 650R's the the Trolmaster Hydro X Controller to 75% which has them pulling 990w at the wall and have them hung 32" above canopy. I also starting adding in 4 hours of UVA during the middle of the light cycle for the remainder of flower. I've been monitoring their leaf temperatures and they're running 71-73℉ which is perfect! I have the AutoPilot APC8200 co2 Controller set to 1100ppm with a 100ppm window and the AC Infinity Cloudline T6 controller set to maintain a 74℉ temperature in the tent while the lights are on.
1/21- I'm watering these thirsty girls daily with straight de-chlorinated water ph'd it to 6.6 @ 74℉ and they're both thriving! The #1 pheno stays in a perpetual state of 'praying'.... a VERY happy girl she is and the #2 is just enormous with tons of bud sites and flowers that are starting to get a coating of white trichomes giving her that frosty appearance!
1/23- I watered/fed both testers today with 0.75g of de-chlorinated water each with GreenGro's Natures Brix, Granular Myco and Flower Finisher mixed in, after which I added 1 tsp/g of unsulfured molasses and then ph'd it to 6.6 @ 74℉. They'll be getting straight water from here moving forward as the medium has enough food in it to support them until they finish.
1/25- Daily watering continued today with both girls receiving 0.75g of straight de-chlorinated water ph'd to 6.6 @ 74℉.
Both testers are extremely healthy and in max flower mode. Both testers are looking amazing and always in a constant state of 'praying'! I'm really looking forward to Week Five of flower where these ladies should start to look epic! 😍💚
😎💚 Thank you for checking out my passion in life! Please visit as often as you wish and I hope you enjoy this journey as much as I know I will! Grow Strong! 💪😎🤙
Likes
58
Share
@Kmikaz420
Follow
Et voilà la floraison à bien commencé sur les 2 plantes la bannana x purple à un peut d avance sur la west coast og mais elle aussi a bien commencé (et moi j latrouve trop belle forme, structure;)
Voilà voilà rien de neuf autrement a part que d ici 2 jours je commence le flusch de la scherbet (la grosse derrière la bannana et une fous couler la west coast og ira rejoindre la bannana x purple histoire que je puisse fermer la tante pour utiliser du co2 en gaz (pour mon dernier grow fast bud et dernier grow de l année j vais essayer de tous faire pour avoir une recolte digne de se nom;)
Likes
3
Share
@HookahCli
Follow
d58
Se han cambiado de sitio, ahora están donde será su lugar final, no su maceta final, me refiero a que ahí se quedarán todas las mañanas hasta que se cosechen, o al menos intentaré eso, ya depende de otros factores a futuro, como posibles plagas, lluvias o hongos.
d59
Debido a las lluvias y el fuerte viento, Melon Gum se ha doblado el tallo y le he puesto un tutor para ayudarla a que se mantenga firme.
d60
Se las ve contentas, vamos, vamos que ya viene el solecito bueno para el cuerpo.
Pronto esto va a explotar en crecimiento, será un no parar.


Likes
26
Share
@CannaTrope
Follow
I trimmed off a bunch of fan leaves, but still not as many as some of the more experienced growers. I started dropping down the Flora Grow and Micro. I hope they finish strong. Pictures are all from the end of week 5 of flower.


Likes
9
Share
@Smokingthatdank420
Follow
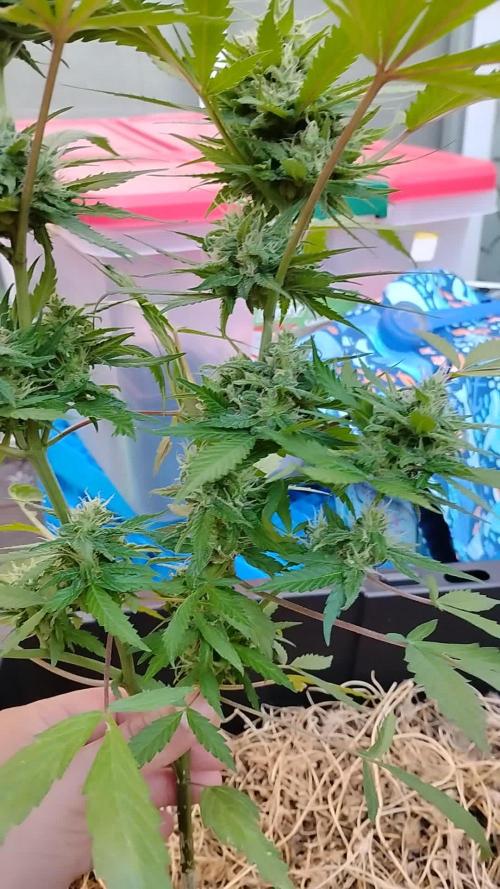
Week2 of flowering and this baby is really stretching. She’s the tallest one in the tent 🏕️. And the smell of mango is great. I had to cut a lot of fan leaves off her for more light penetration. Lot of bud sites, can’t wait to see how she fills out.😎

Likes
39
Share
@Fattorello90
Follow
Managed to keep humidity at lower levels thanks to adding two mini dehumidifiers. Although, the space in the tent is quite tight at the moment, I will use 9l pots next time 😉.
Ps: one plant (the one from the video and the single one in the picture) it’s probably not HulkBerry Automatic, I think that Royals Queen Seeds sent me one wrong seed in the package. The plant is completely different from the others 🤷♂️🏼.


Likes
9
Share
@Mrs_Larimar
Follow
2022-10-30
What a Strain!
I absolutely loved it to grow Them
Pictures tell more than Thousand Words
Wasy to grow, resiliant and well structured Plants,
Finishing with thick dense and gluey Buds.
One plant had Polyploids😍
They loved the Conditions in the Floweringroom
VPD, Wind and Nutrients helped those great Genetics to develop their Beauty
Especially to Mention is the fantastic Lightspectrum of the HYPHOTONFLUX HPF-4000
Plants were growing vigor and looking very happy and chilled