The Grow Awards 2026 🏆 


Likes
Comments
Share
@GoldenWeedGrower
Follow
Legend
Timestamp: 📅
EC - pH: ⚗️
Temp - Hum: 🌡️
Water: 🌊
Food: 🍗
pH Correction: 💧
Actions: 💼
Thoughts: 🧠
Events: 🚀
Media: 🎬
D: DAY, G: GERMINATION, V: VEGETATIVE, B: BLOOMING, R: RIPENING, D: DRYING, C: CURING
______________
📅 D15/V11 - 30/04/24
⚗️ EC: 0.7 pH: 6.0
🌡️ T: 21 °C H: 50%
🌊
🍗
💧
💼
🧠
🚀
🎬 1 TL video
______________
📅 D16/V12 - 01/05/24
⚗️ EC: 0.7 pH: 6.0
🌡️ T: 21 °C H: 50%
🌊
🍗
💧
💼
🧠
🚀
🎬 1 TL video
______________
📅 D17/V13 - 02/05/24
⚗️ EC: 0.6 pH: 5.8
🌡️ T: 20 °C H: 50%
🌊
🍗
💧
💼
🧠
🚀
🎬 1 TL video
______________
📅 D18/V14 - 03/05/24
⚗️ EC: 0.8 pH: 5.6
🌡️ T: 22 °C H: 60%
🌊
🍗
💧
💼
🧠
🚀
🎬 1 TL video
______________
📅 D19/V15 - 04/05/24
⚗️ EC: 0.8 pH: 5.5
🌡️ T: 22 °C H: 60%
🌊
🍗
💧
💼
🧠
🚀
🎬 1 TL video
______________
📅 D20/V16 - 05/05/24
⚗️ EC: 0.7 pH: 5.5
🌡️ T: 22 °C H: 60%
🌊
🍗
💧
💼
🧠
🚀
🎬 1 TL video
______________
📅 D21/V17 - 06/05/24
⚗️ EC: 0.7 pH: 5.3
🌡️ T: 22 °C H: 50%
🌊
🍗 Calmag, Grow A-B
💧5L
💼
🧠
🚀
🎬 1 TL video

Likes
131
Share
@Roberts
Follow
Just cut down the Miller high life bottle grow with QP. Was a really neat micro grow. It got much bigger then I expected. Was a pain to get started, and growing. Finally got it. The Unit Farm UF2000 worked great. Thank you Unit Farm 🌱
I will be back when dried to weigh out.
Happy growing 🌱🌱
Thank you grow diaries community for the likes, follows, comments, and subscriptions on my YouTube channel. 🍻🌱👍
https://youtube.com/channel/UCAhN7yRzWLpcaRHhMIQ7X4g

Likes
20
Share
@Robin87
Follow
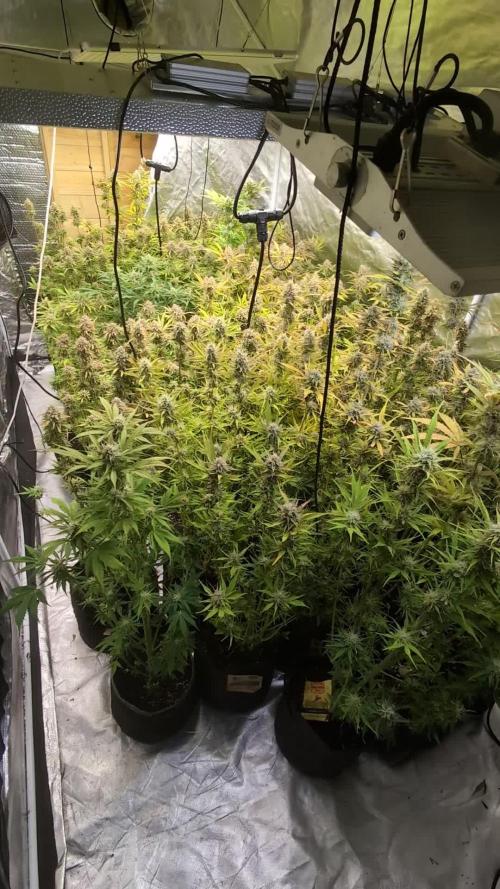
Day 69!😜😂… The lemon cherrys are without question in there final few days, some amazing colours and smells amongst this grow, the gorilla cookies, I’m not to sure if I’m honest, every single plant is different, in size, colour, bud growth, not quite sure why, but there coming along, one of them though as you see, it’s literally 5ft, purple stems and yellow leaves🤷🏻♂️ but with very weird healthy purple buds😅 The final stretch is amongst us, I’ll note next week the 🍋🍒🍪 being harvest, but I’ll update a few weeks after that with weights and reviews👊🏻

Likes
5
Share
@Mr_Puff_N_Stuff
Follow
Starting off week 8 pretty solid. High Tide amendment from Commonwealth Canna has really helped the plants out. Added a 4 foot stake to the tallest plant.
Pound Cake does not need much nutrients. My tips were burned as a result of too much Humic Acid in weeks 3-4. You and learn. Besides for that issue, they are rolling alone very nicely.
Likes
15
Share
@ShadowGrows
Follow
A great week for the girls, started with some defoliating after figuring out where our net would be. Mostly the lower leaves and lowest sets of bud sites that would be popcorns or larf later. Also took a couple larger fan leaves to open them up for the light, and tied down the freshly healed topped main stems to even out the canopy. The diary was extended 2 days (and our diaries are late lol, birthdays) as we are flipping on the first of July, the net is around 70% full or more as of dropping it and tucking some branches. I'll probably shift them slightly, they'll be in the same spots but moved to give Blue Dream some extra tucking space. She's Sativa dominant and likely to stretch the most along side Apex and possible Citradellic Sunset but the journal's i've seen her stretch wasn't as severe lol. With extra tucking space, and being next to the taller hybrids it should help keep the right side canopy balanced. Both sides have their own 4x4 light. Bud Ignitor has been added on the last day. We will continue defoliation for the first two weeks of flower focusing on the under side of the canopy where it's shaded, and removing any suckers we find.
There were signs of a Ph imbalance on Citradellic Sunset which is my own error, tap water Ph vs Nutrient Ph, not in soil anymore! lol But she has recovered happily and is growing vigorously.
Still no new TDS meter so we stick close to the feeding schedule from Advanced Nutrients with some tweaks. We feed twice a week, Feed/Feed/Water. So instead of the full 4ml of base nutes we use 3ml each watering and they seem happier. 2ml of the additives but most are only added once a week except for Sensi Cal-Mag, Bud Candy and now Bud Ignitor (we also will use Big Bud, Nirvana and Overdrive twice a week). The final watering is PHd to be the same as the feed watering. Max strength base nutes have always burned the tips of my plants, I almost backed off to 2ml of base nutes twice a week as 3ml gave slight tip burn to the smaller Say Less and White Wedding but they have adjusted to it and new growth is healthy. I will most likely edge up to 3ml more gradually next grow. We are still new to scrog but I feel we are off to a better start this round, last time the net was completely full and I don't want a second net.


Likes
6
Share
@Cannabis4Crohns
Follow
Continued feeding plant with each watering of 2 litres every 3/4 days. The flowers are fattening up nicely, into some bigish colas, meaning harvest isn't too far away.
Removed some dieing leaves from bottom of the plant. Almost time to stop feeding and start the flushing process.

Likes
2
Share
@Aleks555
Follow
Our beauty is now 9 weeks old and is in full bloom, delighting us with her appearance and aroma. Her buds are getting covered in a thick layer of fragrant trichomes, and the air is filled with a pleasant fruity scent—promising a wonderful finish.
The climate in the tent remains stable: daytime temperature is 28°C, nighttime drops to 21°C, and humidity is kept at 65%. The light schedule is still 12/12, and we continue using CO2 to support the flowering process. We’re also consistently feeding her with Xpert Nutrients, which provide everything she needs during this critical stage.
A huge thank you to Xpert Nutrients for their top-quality fertilizers that drive such vigorous flowering, and to Seeds Mafia for the amazing genetics that gave us this strong and aromatic beauty. We’re eagerly looking forward to the moment she fully ripens and rewards us with a great harvest!


Likes
51
Share
@eldruida_lamota
Follow
Esa familia, traigo la última semana de floración de las cookies gelato, increíble lo prietas que están , son flores muy compactas y llenas de tricomas.
Un híbrido increíble, ya se ve productor y además se aprecia potencia en su flor.
Ya deseando pegar machetazo y en unas semanas podré apreciar los resultados.
.
La humedad esta al 45% la temperatura está entre 21/25 grados , y como siempre el ph , ya que es de lo más importante,está en 5,8/6,0.
.
AgroBeta:
Ya tenemos el lavado de raíces realizado, hemos retirado los nutrientes y finalizamos con un estrés hídrico.
.
Hasta aquí todo familia 🕸️ , un saludo y buenos humos fumetillas💨💨💨.
Likes
6
Share
@CanarianGrow92
Follow
Nice colors are appreciated in this strain, that purple background is awesome 😎
The smell is also amazing very sweet 🎂
This time we gave some candy and some green sensation! For the rest only water and we will continue to add some more PK next weeks

Likes
9
Share
@DeepRootsGrowTrees
Follow
KICKASS AUTO by KANNABIA
Week #10
Week #4 Flower
This week no issues to report being outside as she continues to flower. Her buds are getting thicker by the week and the trichome coverage is looking good she's getting frosty!! Stay Growing!!
Kannabia.com KICKASS AUTO

Likes
24
Share
@el_cultivito
Follow
Added yellow sticky fly traps to all cubes as a preventative measure to avoid infestation of fungus gnats. So far none have been spotted.
Defoliated and did a little more LST to all the plants to open up the center and give more light to lower shoots.
Blue Dream 3 and Chemdawg 3 started showing some discoloration on the leaves (yellowing around the veins) and also the leaf tips curling down.
Did some research and came up with this...
Possible diagnosis:
- Yellowing around leaf veins could be a sign of Magnesium or Iron deficiency
- Leaf tip curling down could be a sign of Nitrogen Toxicity.
- Both could be caused by improper ph balance in water
Possible solutions:
- Applied Botanicare CalMag+ as a foliar feed and added some to the reservoir. CalMag+ contains Calcium, Magnesium and Iron.
- Diluted nutrients in reservoir to lower amount of nitrogen being fed to plants. Was feeding them at 1300ppm, lowered it to 1050ppm
- Tested runoff and saw it was coming out at 5.4pH so I increased the pH in the reservoir to 6.0. Now the runnoff is testing at 5.7pH, meaning that my rootzone is in the optimal range of 5.5-5.8
Well wait and see how the plants react to these slight tweaks. Hopefully we start to see a nice healthy even green again.


Likes
4
Share
@bobtheblob
Follow
Felt greedy and moved SBR back, they're together again, started one more plant, planning to add another diary soon. Girls look good! Already started blooming, stigmas appeared at the beginning of week 2, buds seem to start forming. Since SBR is a bit smaller than KE she has a podium to stand on. Like a queen ahah. I've cut 2 lower branches of KE, and few from SBR. Not sure about defoliation at the moment, Leaves under the lights seem to be ventilated well and aren't wet


Likes
36
Share
@Cannabeast40
Follow
Here we go 😊
Planning & germination 👍
I´m really looking forward to this run, the SpectrumX from Medicgrow with
build in PPFD, 4 spectrums V1, F1, VS, FS and 880 Watt is definitely serious business 👊
Trying out a new soil in this grow.
The plant mulch is an exclusive mixture of harped mulch, nutrient-rich natural fertiliser,
hill sand and long-term matured compost. The mixture provides a porous and airy structure,
which ensures that both water and nutrients are easily accessible to the plant's roots.
Stay tuned and Keep it green 😎

Processing
Likes
6
Share
@Jack_Greenstalk
Follow
3 Plants. 3 citrusy phenos!
#1 : First to sprout rapid rooter. TASTE: Pure Lemon front end into hashy cakey afghani. refer to this as the "lemon hashcake" phenom very dense, beautiful nug structure. Yielded 24.5 dry grams of primo smoke. Uplifting more cerebral sativa high with some punch in body as well. happy stress reliever for sure! has some "gassy" or fuel notes to it but very subtle
#2 Tangerine pheno: I orginally thought sour 76 was sour diesel x 76 Afghan til i read hso marks post on uk420 forums saying its cali sour d x 76 afghan. cali sour d is cali orange x sour d x mexican sativa. and it shows in this pheno which smell and taste pretty similar to tangie my friend grows which is cali orange x skunk 1 (mexican sativa x Colombian sativa x afghan indica) pretty similar genetics roots! Smell: Sweet tangerine 🍊
Taste: Just like tangerines 🍊
Medical Effects: Hybrid feeling effects felt both in body and mind. Stimulating mentally, relaxing in the body. Mild pain relief generally with amazing relief improving feeling in joints (reduced swelling or irritation in otherwise aching areas, loosened tension at joints)
Notes: After breaking up or grinding the sweet tangerine open jar/bud smells turns more sour tangerine with very subtle gas aroma. This one is scary strong! I am an all day regular smoker of the most potent buds I can find, and I never make it thru 1 bowl of this without long breaks after each hit. Starts off strong and creeps to EXTREME psychoactivity. Not for the faint of heart this one might not be best for "new smokers" 😎🔥🔥🔥 yielded 26.1 grams if id have taken clones this woulda been the keeper of the batch, but I got more to check out in future run :) and I got a cloner and veg chamber to start keepin the keepers now I know i like the strain!
#3 Lime Fuel pheno: Smell: Lime🍈 and gas ⛽
Taste: lime
Medical Effects: Cerebral uplift. Creeper. thought it was weakest on initial smoke but 10 minutes in it end up being strongest high of all 3. super wicked sativa, buzzy uplifting all similar to Cinderella 99 or strong jack herers this has almost a "scary high" first few times but once you get used to it or microdose, it is a super fun creative medicine. Helps my arthritis pains and gives me the clean up the house kind of high
Notes: Foxtailed, lowest yield of 3 sour 76's likely because its place directly under the light (perhaps didnt like too intense direct light) but is the most potent of the 3 as well. yielded 22.5 grams of dry
Likes
15
Share
@Brianm420
Follow
Plants are great, GROWING WITH 24 HOUR LIGHT CYCLE FROM SPROUT. I get great results with 24 hour

Likes
10
Share
@Fat_Olsh_Farms
Follow
Looking good. Starting to flower pretty good. Watered with bud candy day 36(Bettis).
Steelers fans show me some love🤘🏻🖤💛
Likes
21
Share
@Staffedition
Follow
Привет друзья. Моей растихе сегодня 34 дня.
Начал применять LST технику на 19 дне и продалжаю применять её через день, а 18 августа добавил ДЕФОЛИЗАЦИЮ
С 20.08 ДЕФОЛИЗАЦИЮ делаю каждые 3,4 дня
С 20.08 LST технику делаю каждые 4.6 дней
На сегодняшний день влажность 70%
Чувствуется по листьям много влажности.
Буду что решать с этим вопросом, ведь впереди цветение.
Не смотря на высокую влажность растение растёт хорошо. генетика радует.
Всем мира и добра!
#Smail_Seeds

Likes
Comments
Share
@smoking_hills9
Follow
These cali genetics are blowing my mind 🤯 super sticky, very frosty rock dence buds with extra strong smells. All 3 strains are 10 out of 10, very impressed. Done last defoliation few days ago, preparing for the harvest so it's much easier. Stalks are super fat, same as buds.
Got big surprise from Atami, plant food, and many extras. Crazy. Thanks a lot guys. 💚 Start adding you Bloombastic food already. They love it. Smell is mad. I think most of plants ready in week or so.
