


Likes
28
Share


@Ferinky
Follow
Hola y gracias por pasarte a ver mi diario.
Cuando compré esta semilla buscaba una variedad de rápida floración y con toques a naranja para completar mi cultivo de exterior.
La planta creció sin ningún problema excepto alguna carencia que presentó antes de tiempo, especialmente de nitrógeno.
Al ser un cultivo 100% orgánico y únicamente con riegos de agua del grifo sin añadir abonos líquidos era esperable, aunque el resultado final me deja muy satisfecho. Además, el hecho de añadir todos los nutrientes al sustrato me ha permitido facilitar la tarea del riego y no tener que realizar el lavado de raíces.
La planta se desarrolló en una maceta de 20L y ha producido 90g de cogollos secos, bastante duros y con una relación flores/hojas bastante buena.
El olor de las flores húmedas era bastante intenso y con matices dulces y cítricos.
Respecto a plagas y enfermedades ha sido muy resistente, no he apreciado signos de araña roja, pulgón ni trips gracias al aporte de harina de Neem en el sustrato.
Tampoco he sufrido el temido y habitual ataque de las orugas (ni la oruga de las hojas ni la del cogollo) gracias a las pulverizaciones en las fechas clave con Bacillus Thuringiensis.
Tampoco se ha visto afectada por el Oídio que normalmente aparece al final de la floración en la zona donde vivo, tampoco botrytis pese a ser cogollos densos y llenos de resina, por lo que la pastilla de Micorrizas y Trichodermas ha funcionado a la perfección, no sólo reforzando el sistema radicular sino también frente a los hongos invasores.
El clima también me ha acompañado este año, vivo en una zona cálida donde la temperatura suele ser óptima para el cultivo de exterior de cannabis, el mes de mayo llovió algún día de forma agradable, junio, julio y agosto fueron especialmente secos, solo llovió un par de noches a finales de agosto, y septiembre también ha sido muy respetuoso lloviendo solo 2 veces.
Por todo esto, siendo la primera vez que elaboro un supersoil, estoy seguro que para la temporada 2022 repetiré el sistema, haciendo algunos ajustes a la mezcla para evitar estas carencias que he comentado.
Quiero agradecer a Growdiaries.com la herramienta que nos brinda a los cultivadores (en mi caso cultivador clandestino) para poder realizar el seguimiento de nuestros cultivos y como, en mi caso particular, ha hecho que mi motivación y trabajo hayan sido una constante semana tras semana, por lo que ha influido directamente en el buen resultado final de la cosecha.
También agradecer a todo el que pasó por aquí durante el seguimiento ya que me dieron el apoyo necesario para mejorar en mi cultivo.
Un saludo.
Ferinky

Likes
11
Share


@CanadianFillmore
Follow
Welcome to my second grow of the Blue Dream strain. This girl was veg'd for 14 week in a small pot while my first grow of this strain is in the flowering room. She stretched quite a bit compared to the first GG#4 during veg. This strain seems to be long and stretchy by nature. She's looking good after moving her to the big pot and giving her a trim.
Thanks for checking out my grows!

Likes
3
Share


@Unculti_responsable
Follow
Bueno esta semana se amoldaron muy bien las ramas a la malla ya se levantaron y están engordando muy bien tiraron bastante resina y bienes muy bien, esta va a ser la última semana se fertilizantes después de esta semana vamos a empezar con el lavado de raíces, esperemos que sigan así de bien !


Likes
2
Share

@DmbTexasRanger
Follow
Blue zushi having a tough time finishing again. The stretch lasts 2+ weeks, wondering if flowering time is based on 1st preflowers? harvest is roughly 11 weeks from 12/12 flip both seed and clone. Canopy will stagger in late flower even if it’s flat after stretch.

Likes
34
Share


@Bread_n_Buds
Follow
The RainBow Sherbet really have everything in its place, they are beautiful plants, one was planted a few days later because a little sister damaged by the placenta was replaced, but we are talking about 4 (5 days of difference between the two, nothing special, I will not have to do hrvest on the same day.
Growing projects for autoflowering plants ----- As for autoflowering plants, I really love preserving the Main Cola. So I will try to make the plants grow well or badly without damaging the main cola. Nowadays, topping autoflowering plants is very accepted but it is not my favorite thing to transform a baby born to finish in 10 weeks into a baby who finishes in 14, I say at this point I do photoperiodic. But in times of people who only grow autoflowering everything is permitted for goodness sake if you want to do it, do it, I will not be the one to stop you. Also because the results are excellent, nothing to really discuss about anything except time.
All this to tell us that I recommend for example fimming on plants that tend to grow tall to give power to the side branches, LST as much as you want, I don't like too much, I need space. HST and splitting are with experience. These are my tips not the absolute truth please do not mistake me for a great sage holder of the truth I speak as I see it.
The first week went only with Power Roots 1 Ml/l and Pure Zym 1 ml/l from now on we will start with ALga Grow. The plants were transplanted shortly after germination because the biodegradable pots were very small. The soil is Plagron Pro Mix 100% organic renewed with 30% new soil and 20% Perlite added. (Pro mix does not have perlite but is airy, we added it anyway)
Plagron fertilizers are available at Zamnesia in convenient Pack formats for all growing styles. I used this one with a simple search you can find the other products.
---- https://www.zamnesia.io/it/12119-plagron-top-grow-box-100-naturale.html
Try a seed of this variety that drives us crazy...
---- https://www.zamnesia.io/en/11230-zamnesia-seeds-rainbow-sherbet-automatic.html
Description Zamnesia // A cross between Pink Guava, Sunset Sherbet and a hint of ruderalis, Rainbow Sherbet Auto offers a wide range of flavors, effects and more. This 70% indica-dominant strain reaches considerable THC levels (24%) and is suitable for both experienced growers and those taking their first steps in the world of cannabis cultivation.
Growbox and Air System - Secret Jardin DS120w + fans + exhaust fans and DF16 filters kit ---- https://www.secretjardin.com
All the best that mother nature has to offer is at ----www.zamnesia.com
Collaboration request: I am available for collaborations with companies of lights and various growing equipment (please no seed and nut companies) I would like to renovate my 120x120 space that has slightly outdated lights and would like to try some controllers. If you have any proposals available.

Likes
4
Share

@BudBeezy
Follow
Welcome to week 12 and finally the last week of my grow diary. As predicted, the weather has taken a turn for the worse, so I've decided to harvest. If the weather had been better, I would have given it another 1.5 to 2 weeks, but unfortunately, there's nothing we can do about that. The outdoor season has therefore come to an early end. It would be great to live in a place where it works all year round without any problems.
A brief summary of Sour Jealousy:
This strain is simply fantastic. Super easy to grow. Apart from a minor incident with mildew, I had no problems. The citrusy, creamy terpenes are right up my alley, and I hope the effect is too. In the end, the plant grew bigger than I had imagined, but I was able to see from other diaries how the plant would develop. Chubbs Sour Jealousy was even bigger. This strain will definitely end up in my indoor tent again so I can get the max potential out of it.
See you next week for the conclusion of the diary!

Likes
1
Share


@DrBud420
Follow
13.06.
Rainbow Sherbet 1# Day 49#
The plant is at the end of its seventh week today, I moved it a few days ago to a mild shade and now it behaves much better and is progressing nicely.
Rainbow Sherbet 2# Day 47#
I have nothing special to write about this pheno, it is progressing well
5 nights ago there was a strong storm, the morning after the storm when I came to the site, I found some plants crooked, some normal, but there were no broken ones, thank God, but they were very stressed and what you can see in the pictures appeared on the leaves, some leaves were crispy at the edges, but still green, mostly shoots before the newest ones.
I haven't had this problem before, I researched a bit on the internet and came to the conclusion that the wind burned them, and I also turned to GW for an opinion, two characters confirmed my opinion.
Two days later I noticed that the matter was getting worse and that it was spreading, which worried me, so I contacted GW again for an opinion.
Some told me that it was mold, some that it was an infection, disease and so on, mostly guesswork, but no one specifically told me what was certain, so I decided on nim oil, and whatever it is, I guess the problem should be solved.
According to some leaves, I would say that insects might be the problem, but I really don't know, I haven't had similar problems before.
I regulate the ph of the plants, I still don't feed them, there is food in the ground for another week, except for the fact that I added cal-mag after that storm when I watered them.
I want to say that the plants are certainly not locked, and the heat is not yet so high that this would happen from the same, the more the temperatures have dropped and now it is perfect.
Since transplanting, I have watered the plants only 2 times.
Yesterday morning they were topped for the second time, only the main branches, I will do the next topping of the side branches.
Last night I sprayed the plants with neem oil and already today the problem seems to be going away, if I tripped at least it doesn't spread further, that's for sure.
I didn't mix the oil very well, I didn't add any soap or anything like that because I wouldn't really spray the plants with any chemicals, and on some of the leaves on one or two plants there is that thick, brownish liquid, so I hope it won't hurt them, I noticed that today during the day, I couldn't see it at night.
I still don't know what the problem is, but my guess is still that the wind burned them or some insects.
Speaking of insects, I think I noticed thrips on one plant on the underside of the leaf, so in addition to the neem oil I already gave, I also ordered SMC, so I will spray that at least once a week while they are still young.
Happy Growing and Stay High!!!

Likes
17
Share


@Leonard_Lunte
Follow
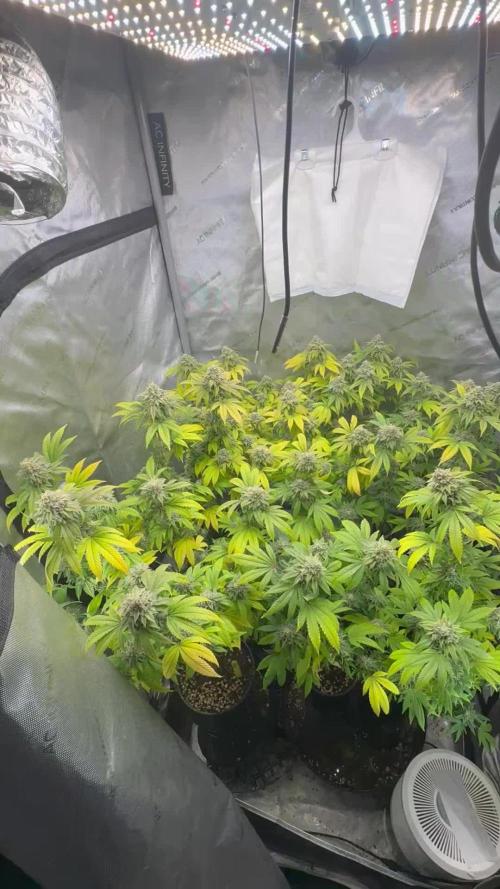
Picture 1 - Day 8 - Seedling 1 got its nutrients the first time today. 1ml/L Biobizz Grow about 700ml.
Picture 2 - Day 8 - Seedling 2.1 still stretching a bit too much, am waiting for the new light to arrive.
Picture 3 - Finally got the new setup, the grow tent isnt perfect yet but itll do for the next few weeks (its just an old temporary closet) it leaks a lot of light and moisture but since I only have these 2 mini plants rn I dont think its gonna be a huge problem until flowering.
Picture 4 - Day 9 - Seedling 1 looking good and Seedling 2.1 (3 Days old) will hopefully stop stretching now that I finally got the bigger light here. Watered 2.1 again today with just ph water.
Picture 5 - Day 10 - Nothing special happening, the plants are looking good!
Picture 6 - Day 11 - I now installed a fan in the grow area to better the ventilation. The fan is doing a great job at moving air around, but kinda messing up the moisture coming out of the humidifier... (With fan and humidifier on at same time = 40% with just humidifier running = 60-70%) Not sure how to fix that yet... Will water Seedling 1 again tomorrow.
Picture 7 - Day 12 - Seedling 1 growing good but its leaves are still looking really weird, I think theyre going up on the edges because I put them under slight wind stress, but that issue is fixed now. Some parts of some of the leaves still look really odd to me, like they got cut off or something? I dont know
Picture 8 - Day 12 - Seedling 2.1 is 6 days old now and growing good, theyre some tiny yellow dots on the leaves surface but its really slight so I dont know if its something bad. I watered both plants today, Seedling 1 with Bio Grow Nutrients and Seedling 2.1 with just Ph'd water.
Video - Day 13 - Both seedlings still growing, but looking kinda sus.

Likes
62
Share


@Roberts
Follow
Do-Si-dos auto is doing good. It looks like she is switching over to do some bulking soon. I started adding pk to the solution a few days ago. Everything is looking great at the moment. Thank you Zamnesia seeds, Athena, and Medic Grow. 🤜🏻🤛🏻🌱🌱🌱
Thank you grow diaries community for the 👇likes👇, follows, comments, and subscriptions on my YouTube channel👇.
❄️🌱🍻 Happy Growing 🌱🌱🌱
https://youtube.com/channel/UCAhN7yRzWLpcaRHhMIQ7X4g
Likes
20
Share


@L8bloomr1008
Follow
She got a nice fade going. Been feeding just ph’d water this week. Idk if she’s slowed down drinking or if my soil is a little water logged but the pots definitely staying heavier throughout the week.
Dropped my light closer to the canopy but lowered the I reality slightly cause temps were creeping into the 80’s. I think we’re cruisin. Can’t wait to see how she turns out.

Likes
3
Share

@BlaKX
Follow
Der GMO Auto Bericht über die Jagd nach dem einmaligen Gestank
Ich bin echt überrascht wie der strain jetzt schon so stinkt wie andere in peak flowering.
Sehr gute verzweigungen entwickelt samt stamm.

Likes
14
Share

@UDUDUDUDU
Follow
it got eaten by slugs after a heavy rain' now itz DeaD
YaY.
What did I learnt from all this ? I am an Idiot.


Likes
3
Share


@Lebanese_Landrace
Follow
Week 11 July 19.
As mentioned in the week before if plants recover from topping will perform LST by bending main stem and they did. So i spread the ladies legs today for a better canopy and light penetration fed 30L each with 10gr/30L all purpose 17-17-17 granular fertlizer. Today first white pistils started to show so guessing plant will recover before flowering begins. Stay tuned

Likes
4
Share


@Osavv_OTGUK
Follow
Week 6 this is of flower. The trichomes are showing cloudy/ clear so now it’s just a waiting game

Likes
21
Share


@NSABND
Follow
Today start of week 10 (Day 70) 😎😵😏 with Trailer Park Mod 😂😂😂😂
i had old fans around here and a ice box, so i startet to build the 7 watts Trailer Park Fans Mod 😁😁😁
It´s Monday Day 71 and "Hilde" got another fertilizer shot today
from Day 72 to Day 75 i was on a Road Trip... 😳😎😳
Back from Road Trip and "Hilde" got another fertilizer shot today 😎👍😏