The Grow Awards 2026 🏆 


Likes
Comments
Share
@Insaniac_0
Follow
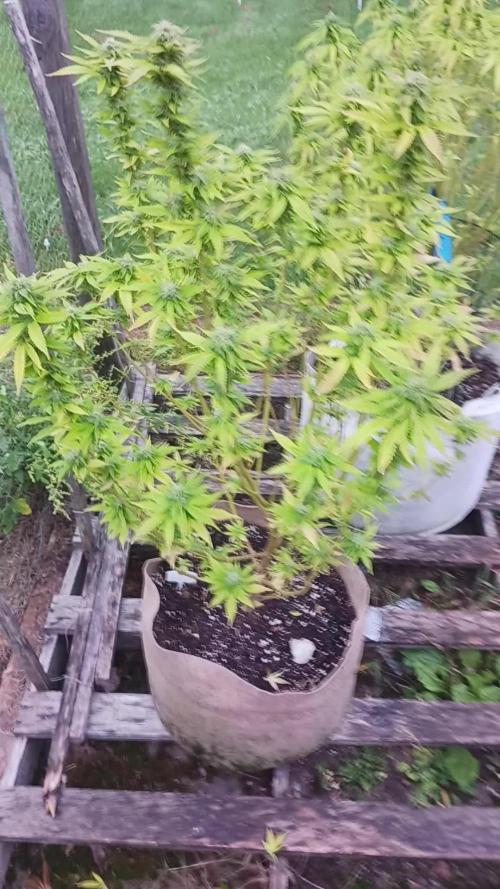
8set Mainline & 6/4set Manifold in Auto Pot - Selfie Seeds Sweet Slurry x Sugar Cane (6X4) - Week 15
Flower Week 6 Day 42 to 48 - 4/29 to 5/5
They both look very healthy this week. The calyx are swelling with maturing hairs, the pistols are orange, the trichomes are mostly white, and the leaves are fading/changing colors - still not ripe enough for me, but flushing with half nute feeds now.
Feed this week was another auto pot reservoir flush feed at 400ppm total before add-ins. I used 400ppm of Bloom concentrate mix (recipe week 5). And then, I also added 1ml/gal of CaliMagic (General Hydroponics 1-0-0). PH balance this week was for 5.8 where I plan to maintain it until harvest.
Next week will continue the same half nute feed. I will continue to monitor the signs of trichomes, pistols, and calyx for a better harvest and allow the buds to mature more.
Likes
59
Share
@Rap_a_cap
Follow
Cropped on Sunday evening as scheduled, a few days before complete ripening. I'm not worried about that as this shit plant has the hardest and frostiest buds I've ever seen. The complete pre-harvest defoliation made me understand a few things, stem rot. What I believed was a lack of nutrients instead was some rot at the base of the stem which I did not recognize because this plant was too leafy. This is probably the reason for the buds rot spots, considering that the weather was still dry until now. The loss is few grams so far. The plant has a fantastic skunky and fruity smell and is very easy to manicure.The buds are so resinous that seems to have slime in my hands. See you soon for the report of the harvest. I've decided to do a wet trim and manicure to check out for eventual hidden rot spots, this has required 3 days of work and a lot of spliffs and simply I forgot to weight wet plant. Estimated wet weight is 1,5/2 kilos.

Likes
25
Share
@m0use
Follow
Fun little week for these ones, was making some more LAB serum and one of my containers was contaminated with a fruit fly and it laid a fuck ton of eggs that turned into maggots. the one container that was still safe is getting made into a cheese and the left overs in that where mixed with the water for this week. Giving it a lovely boost of lactic acid and bacteria.
Plants look to be hungry, hard to focus on them outdoors vs indoors and hit the correct PH range plus monitor the runoff for accurate feeding. o well.

Likes
17
Share
@masterofsmeagol
Follow
9/20 Man I've been busy. I'm sick too. Looking back at my diaries I get sick this time of year every year it seems. Once I get the important stuff done I'll put some pictures of finished product up. Sunny today and windy as hell. All the plants left seem to be doing good and look like they'll finish. The pink kush might not finish how I WANT but it's stinky and has lots of milky trichs. I'm playing with fire with this mk ultra. It's fucking done. It could get a LITTLE more amber and maybe come together a bit more but I don't know if it's smart to risk it. Frost warning in effect tonight. I'll probably check the forecast and harvest tomorrow. We're having some good weather just cold nights. Then it turns to like a 30% chance of rain for 4 or 5 days. I'll yank it before that. This actually turned out tp be a pretty good year. Haven't tested everything (especially shit in the ground) but what I have sampled I'm incredible happy with.
9/21 IT was a balmy 36° on my way to the garden. My windshield had frost on it. Surprisingly the TIGHT nugs of the pink kush and this phenome of 10th planet didn't seem to mind it. Both strains are still increasing in size, smell and trich development. Not just changing but adding more. Trichs on trichs. Very in hospital environment. It will be interesting to see what happens with these girls. We will be getting some rain. I mean we've had SOME but I mean real rain. If thays the case I'll put these in the garage for a little bit. Honestly I thought these would be goners. I've gotta get to work trimming bucking and manicuring flower. Doing a garden like this sure is an awful lot of work. But the reward is worth every penny. WATERED EVERYTHING LEFT A HALG GALLON APIECE. PROBABLY SHOULDVE GAVE A GALLON BUT THEY WERE STILL A LITTLE HEAVY.
9/22 It rained last night and we got another frost. HAD to cut a main branch of the tenth planet as it had stem rot. Lots more cold weather coming. If I could get it done and I wasnt sick and have all this other material to process I would probably pull then. It's getting really cold. We're going to be getting rain. I'll check the weather and hopfully I can just put the movable ones in the garage. Either way things will work out. Pictures that will be coming will be of the finished product!
9/23 Had a super busy day. Had to but a branch off the pink kush due to stem rot. If I had time I would've taken it. It rained today but I think the plants will be alright. I've been working non stop. I may not have the quantity I'm used too but the quality is AMAZING. I can't wait to do the smoke points and put up finished flower. The other 10th planet seems to be doing really well. I expected nothing off that. I'll keep it updated but it's hard with everything going on.
9/24 Had more emergencies. Raining and cold. Finding stem rot a boytritus but not much. We are getting an inch of rain tomorrow and rain the next day. I wasn't going to watch my shit rot as it was hard as hell and all milky so I quickly waited for a break in the rain and harvested two pink kushes. Still have one pink kush in the 50 and the 10th planet. I cut a cola off 10th planet just in case. This should've been done yesterday but it is what it is. Even with ALL the damage this had been a pretty good year. I can't believe the quality of....well....everything lol. A couple take the cake but I'll wait to do that. I gotta get back to work.
9/25 Heavy rains today and tomorrow. After seeing the damage on the 10th planet and the stripped branches and dying leaves I took out the loupe and checked the trichs. It was a rare break in rain and the plant was luckily dry. After seeing the pistols change on many buds to pure red and seeing lots of cloudy trichomes abd swollen buds I was able to harvest it. I have one pink kush left that sea7s like a willow. I probably should've taken that by looking at it but the trichs had some clear on it. Lots of damage this year on all plants but the first special kush. The quality is amazing though. I havent got to try every strain but I am incredibly impressed with what I have so far. I stopped smoking dabs (for now) in favor of switching my different strains up. I hope that every gardener is able to instil there energy in the plant and gets the same feeling that I do because it's wonderful. I will do an independent review of each strain, and keep updated on last pink kush.


Likes
3
Share
@JSanchezz
Follow
Finally harvested after a long back and forth whether too much fertilizer or too little fertilizer, I came to the conclusion that the left ladie was simply ready much earlier, which was probably due to the Co2.
I'm looking forward to the weight and the taste
it will take another 14 or at least 30 days until I know
2nd GROW :)
Thanks to everyone who helped !!!
Likes
27
Share
@Smokepurple137
Follow
Buds are bulking up and getting denser, looking nice and frosty. Had to tie a few branches as they were getting top heavy. No problem though they are going strong💪. Zkittles OG is standing out and has a nice structure I would definately recommend. Few more weeks then ripen and flush.

Likes
8
Share
@CrowMaster
Follow
Last week gonna harvest these soon everything looks beautiful…another o for the books room 10k hps apple fritter and Sunday driver clones I ran before
Processing
Likes
2
Share
@smokeycropping
Follow
- LAS PLANTAS SIGUEN CON EL MISMO PLAN NUTRICIONAL
- NO SE VEN CARENCIAS NI EXCESOS
- el hps de 600 MANTIENE MI AMBIENTE SIN MAYORES INCONVENIENTES
- EN ESTA SEMANA Y EN LOS ÚLTIMOS DÍAS DE LA SEMANA SE LE APLICO DEFOLIACIÓN

Likes
2
Share
@I_Identify_As_A_Dan
Follow
Day 56
Shes Stretched out quite nicely would like a little more from her but we'll see.
Shes massive still though, seems pretty healthy, giving her so many defoliations but she still looks busy af.

Likes
25
Share
@TegridyCal
Follow
Gelato is finally putting in a very nice structure. Purple Lemonade has a bit of structure as it is currently but it is still developing the final bruches. It seems to promise well, here at TegridyCal we love the Gelato strain very much, we are waiting for the inflorescences with anxiety. Second top 4 main bruches and here too the power plant regrown and topped again.
Likes
23
Share
@Bread_n_Buds
Follow
Here they are the beautiful Purple Lemonade ready. One was harvested today the other I am just waiting for the soil to dry up to dry. The first feature you notice is the resin. Fastbuds is confirmed as the number one for consistency of resin quality and unrivaled quantity of trichomes. Other pints sometimes look better but Fastbuds in general wins for resin without a doubt. A spectacle for the eye and for the palate trichomes like porcini mushrooms, large, very gross, visible to the naked eye. Although it is not my favorite pheno, I grate more that green with a little purple, even this super purple and descended from pure purples is a feast for the eyes and palate.
Likes
43
Share
@TheCannaProphet
Follow
~ GG4 SHERBET FAST FLOWER by FastBuds ~
Well fam, here we go again with another epic strain from FastBuds Fast Flowering stable. After having such tremendous success growing their Gorilla Cookies Fast Flower outdoors last year, I've decided to run another of their fast flowering strains outdoors this year... GG4 Sherbet Fast Flower!
The best description of this awesome cultivar comes directly from my friends at FastBuds which is as follows:
"Bred from extremely potent and flavorful Gorilla Glue and Orange Sherbet genetics, GG4 Sherbet FF (Fast-Flowering) takes all the best traits to the next level, offering a high-yielding strain that can produce up to 600 g/m2 in a 7-week flowering time. This super resilient Indica-leaning hybrid thrives indoors and outdoors, and in all types of climates while producing mouth-watering sweet, fruity, spicy and earthy terps that translate into a delicious sugary hazelnut aroma. Expect an extremely relaxing and overall happy effect that’ll leave you with a huge smile from ear to ear. It’s the perfect strain for growers of all levels of experience seeking low-maintenance yet highly productive photoperiod varieties that deliver quality and quantity without extra effort.
GG4 Sherbet FF grows chunky buds with long dark orange hairs and spade-shaped calyxes that get encrusted with trichomes by harvest time, giving them a gorgeous silvery-white appearance. This medium-sized photoperiod can reach up to 200 cm in height and yields up to 650 g/m2 while developing that typical hybrid structure. GG4 Sherbet FF grows with a stocky, bushy appearance, developing one sturdy main cola and fat side branches that support huge yields without much effort. This super-fast variety produces distinctive light-green buds with a high bud-to-leaf ratio, making your trimming sessions a breeze. It’s a top-notch resin producer that doesn’t need much maintenance and will thrive in almost every climate, rewarding growers of all levels with extremely flavorful resin that makes for outstanding hash end extracts."
________________________________________________________________________________________________________________________________________________________________________________________________________________________________________________________________________________________________________________________
The Setup:
This is going to be an outdoor grow, but I have started the GG4 Sherbet Fast Flower indoors as our weather is still too cold to put her outside (nighttime temp's dipping regularly into the 30's℉).
The plan is simple... let her grow inside under a 19/5 light schedule until the nighttime temperatures stay above the mid 40's℉, at which point she'll be moved outside and transplanted into the soil which I have already setup and inoculated with beneficial microbes, and then let the fun begin!🤪💚
________________________________________________________________________________________________________________________________________________________________________________________________________________________________________________________________________________________________________________________
Weekly Updates:
5/30- Nine weeks from breaking ground, this lady started off slow but is now making up for lost time!
6/1- Today I top dressed the GG4 Sherbet FF with 2 cups of Gaia Green 4-4-4, 1 cup of Down to Earth Bio Fish along with 1/2 gallon of worm castings. After top dressing and working the amendments into the soil by hand, I watered it in via garden hose with straight well water.
6/3- Rained hard today so I skipped watering the GG4 Sherbet FF.
6/5- Today was sunny and warm. I watered the GG4 Sherbet FF with straight well water from the garden hose.
Another week on the books for the FastBuds GG4 Sherbet Fast Flower and she continues to impress me with her resilience and vigor!
Thank you for checking out my diary, your positive comments and support make it all worthwhile! 💚Growers Love!💚😎🙏
Likes
12
Share
@2Stones1Bird
Follow
Checkout my Instagram @smallbudz to see the Small budget grow setup for indoor use, low watt, low heat, low noise, step by step.
12/01/2020 - Fed her 1.5l of 6.6PH water with 0,2ml of each: Cal Mag (Atami), Grow, Bloom and Max, and 0,5ml of each: Heaven, Alga-mic and Vera, noticed some run off, I use about 1/4 of the nutrient dosage on the chart, to achieve about 100/150PPM (500 scale).
Now using the perfect PPM worsheet made by Grow Boss.

Likes
21
Share
@Indicate
Follow
Day 97 and the grow box is battling to stay at 16 degrees as the garage drops to -2 degrees. I made my first ever compost tea for a batch of homemade super soil that I’m feeding. I gave the girls a drink of that yesterday, although stopped with the biobizz nutrients a few days ago. Will stick to water and slowly flushing from now on. It’s finally started to smell a wee bit like weed but it’s not noticeable in amongst all my fermenting jars of the various homemade KNF nutrients. I’d highly recommend getting into making your own KNF nutrients….lots of good fun. I started making Fish Amino Acid tonight so the whole garage is looking a bit like I rented storage space to Jeffrey Dahmer.
In the video, the first plant on screen is the Skywalker and the smaller one is the. Orange bud. Both have not grown much in last few days (16 degrees or end of life territory?). I’m looking out for the clear to milky but I can’t really tell with my shitty magnifying glass. I’m fed up smoking ‘session weed’ and got Skywalker on the go in the hope I can tap into that 26% thc they boast about. So don’t want to chop it too early. The second I see one amber trichome, auld Luke is getting the chop. May then leave the orange bud for a bit longer to see if less competition causes it to bulk a bit.
Likes
120
Share
@DogDoctorOfficial
Follow
Get ready for a fun and informative update, including the training techniques i am using to shape our Tangie into a true ninja warrior!
Our Tangie has been flourishing with energy and vigor, showcasing her ninja skills at every turn. With each passing day, she grows taller and stronger, reaching for the sky like a true botanical ninja. Her vibrant green leaves are a testament to her health and vitality, shimmering in the grow room like emerald blades of a ninja's sword.
To help guide our Tangie's growth and maximize her potential, i've employed the art of Low Stress Training (LST). Picture this: we're like plant whisperers, gently manipulating her branches to create a symphony of growth. Through the technique of leaf bending, i encourage her branches to spread out, creating a wide and even canopy. It's like teaching her the ancient martial art of flexibility and agility.
By skillfully bending and tying down her branches, i ensure that each bud site receives an equal amount of light. This training technique not only promotes better light penetration but also encourages the growth of multiple colas, leading to a higher yield of resinous and potent buds. Our Tangie is like a ninja warrior, adapting to her environment and maximizing her potential with every training session.
But training isn't limited to physical techniques alone. I am also nurturing our Tangie with the perfect balance of nutrients from Aptus Holland. Their specialized formulas act as her ninja fuel, providing her with the essential elements she needs to grow strong and healthy. With each nutrient feeding, she absorbs the power of growth and development, inching closer to becoming a legendary ninja of the cannabis realm.
Of course, light plays a crucial role in our Tangie's training regime. She thrives under a PPFD (photosynthetic photon flux density) of 500, bathing in the intense glow of her training camp. These photons are like her training partners, pushing her to optimize photosynthesis, grow denser foliage, and develop the building blocks for future bud production. With each photon absorbed, she becomes a more formidable ninja warrior.
Creating the ideal environment for our Tangie is essential for her training success. She prefers a cozy temperature range of 27 to 28 degrees Celsius, providing her with the warmth and comfort of a tropical paradise. With a relative humidity level of 60 to 70%, she thrives in the perfect balance of moisture and freshness, creating an environment that supports her ninja-like growth and training.
Before we conclude, let's give another shoutout to Dutch Passion, the master breeders behind our Tangie strain. Their dedication to crafting top-notch genetics has allowed us to embark on this incredible journey. I am forever grateful for their expertise and commitment to the world of cannabis cultivation.
So let's continue this thrilling adventure with our Lego Ninja Tropical Tangie Run. Embrace the power of LST and leaf bending as you shape your plants into formidable ninja warriors. Remember to provide them with the right nutrients, light, and environment to support their growth. May your gardens be filled with the spirit of the ninja, and may my Tangie's training lead to an abundance of resinous and flavorful buds.
Stay tuned for the next update, where we'll unravel more tales from the captivating world of our Tangie. Until then, keep training with passion, harness the power of LST, and watch as your plants transform into stealthy ninja warriors.
As always thank you all for stopping by, for the love and for it all , this journey of mine wold just not be the same without you guys, the love and support is very much appreciated and i fell honored and blessed with you all in my life<3 <3 <3
#aptus #aptusplanttech #aptusgang #aptusfamily #aptustrueplantscience #inbalancewithnature #trueplantscience #dutchpassion #dogdoctorofficial #legoninjago #growerslove
With true love comes happiness <3 <3 <3 Always believe in your self and always do things expecting nothing and with an open heart , be a giver and the universe will give back to you in ways you could not even imagine so <3 <3 <3
Friendly reminder all you see here is pure research and for educational purposes only
<3 <3 <3 Growers Love To you All <3 <3 <3
Likes
24
Share
@N3wbGrow3r
Follow
Flowering: Week 10 since 12/12 change, Week 8 after 1st pistils, Breeder states 9 week flowering period
11/24 - Trichome Check - roughly 95% cloudy, 5% clear, few random ambers, will check again in 2-3 days, but definitely starting to mature
11/28 - Trichome Check - roughly 95% cloudy, 2% clear, 3% random ambers, will check again in 2-3 days, shooting for 20-30% amber
NOTE: Included picture of 2nd Blue GSC I've been growing side by side with this diary. The 2nd plant was planted 3 weeks behind the plant seen in this diary and only had LST with no topping. The plant actually surpassed IMO the one I've kept a diary on and I'd have to attribute that to a combination of not being topped and a slightly larger pot giving it more room to grow.
NON Nutrient Watering: 1500ml of 6.2ph Water every other day now until harvest
PS - I really appreciate everyone's kind comments and likes!! Thanks for stopping by and checking out my grow :)

Likes
68
Share
@Ferenc
Follow
Day 71, 26th of November 2020:
Beautiful isn't she? Purple colour appears.... so nice! The other Kaini the normal does not show any sign of purple colour unfortunately.
Not much to report. The leaves started getting lighter hopefully they ain't gonna just die so quick.
Fertilization is the same like before with exactly the same ratio and mixture above.
The lamp is on 11.15 min and off 12.45 min.
Last week was 15 min longer light cycle....
So every week 15 min shorter light cycle until the 5th week. So far -45 min. It switches on at 6 am and off at 17.15 pm.

Likes
Comments
Share
@zaperos
Follow
Hello growmies,
Today the ladies officially entered their last week of life and the countdown has begun!
Yesterday I switched to pure water only, no nutrients, to let them slowly use up what’s left inside before the chop. In a few days the lamp will go off and the girls will spend about 48 hours in complete darkness, then it’s time for the final cut and the start of drying.
Cheers and stay tuned!
Likes
13
Share
@TPBzh
Follow
They are getting fat and smelling strong. I have to defoliate quite often as my room get small now. I think i got 2 more week b4 harvest. Everything is on trace I think.
Likes
15
Share
@DaddyPrime2
Follow
5/28/24 oh damn baby, this cultivar is gonna be colorful
6/2 plant is still throwing out pistils but also chunking up quite nicely. I tried to create just mainly top colas. In description she should have a 3-5 nodal colas with disconnected nugs underneath that. But I only ended up with 3 node colas give or take but with maybe 2 more weeks if veg would've given me larger branches and bigger cola structure and can always cut the larfy.
