The Grow Awards 2026 🏆 


Likes
Comments
Share
@Dennis_Bong
Follow
!!!!!!!!!!!!!!!!!!!!!!!!!!!!!!!!!!!!!!!!!!!!!!guckt euch letzen Report an !!!!!!!!!!!!!!!!!!!!!!!!!!!!!!!!!!!!!!!!!!!!!!!!!!!!!!
Blüte hat begonnen:
Edit:11.05
Die Pflanzen sind innerhalb von 2 Tagen explodiert. Ich habe das Licht nun auf 75 Prozent gestellt und noch einmal Cal-Mag nachgegeben, da die letzte Gabe nur eine halbe war. Die beiden Titan sehen fast identisch aus. Die beiden Epsilon sind circa 3 Tage unterschiedlich, eine ist etwa 5 cm kleiner als die andere und hat noch kaum Blüten. Ich denke, in 3 Tagen wird das der Fall sein. Die Cosmos F1 ist im Umfang circa 50-50 cm, kaum Blüten bisher. Ich hoffe, sie wird nicht noch viel größer, da der Platz langsam eng wird. Ich bin von dem Wachstum dieser Pflanze absolut begeistert. Mal gucken, was die Blüte bringt.
Edit ende
Ich habe alle Blüten entfernt, die nicht im direkten Licht sind, und alle Blätter, die die Blüten bedecken.
Die Pflanzen weisen einen Cal-Mag-Mangel auf, was bei der Blüte normal ist, gerade bei diesem Licht.
Ich habe dem Gießwasser etwas Cal-Mag hinzugefügt.
Die Pflanzen sind drei Tage älter als im letzten Report.
letzte Woche :
Die Pflanzen sind seit der Keimung auf diesen Fotos genau 30 Tage alt.
Ich habe eine Pflanze ausgetauscht, da es sich um eine Epsilon F1 handelte, die vermutlich Mutationen aufwies. Sie hatte verkümmerte Blätter, die nicht wie die ihrer Artgenossen aussahen, und wuchs deutlich langsamer. Daher habe ich sie nach 2,5 Wochen ausgetauscht. Der kleine Mann(die ausgetauschte Pflanze) leidet natürlich jetzt ein bisschen unter Lichtstress, deswegen werde ich wohl nur eine sehr gestauchte Pflanze erhalten. Aber besser, als die Fläche leer zu lassen.
So viel zu dem, was nicht funktioniert hat:
Die Sanlight stand die ersten 2 Wochen auf 20 Prozent.
Dann habe ich sie teilweise mit dem Dimmer höher gestellt: 2 Stunden auf 25 Prozent.
Eine Woche später bin ich auf 30 Prozent und 2 Stunden mit 35 Prozent gegangen.
Für Woche 4 habe ich 40 Prozent und 2 Stunden auf 45 Prozent gewählt.
Ich erhoffe mir, die Pflanzen so schneller an die starken Lampen zu gewöhnen.
Im Nächsten grow soll bei jeder Pflanze die TDS per Infrarot gemessen werden. Da werde ich dann ein Experiment zu machen, wie die Lichtsteigerung am besten umzusetzen ist.
Zu den Lampen kann ich bis jetzt nur Positives sagen. Im Gegensatz zur dazugehörigen App, diese ist wirklich nicht sehr gut umgesetzt. Das Menü und die Einstellungen sind teilweise irreführend und nicht sehr durchdacht. Ich muss mir immer wieder die Tutorials in der App ansehen, da diese immer wieder angezeigt werden.
Noch dazu hätte ich gerne die Möglichkeit, mehr Einstellungen treffen zu können. Das ist aber Meckern auf hohem Niveau, weil auch die App das macht, was sie soll, nur eben meiner Meinung nach nicht sehr gut umgesetzt.
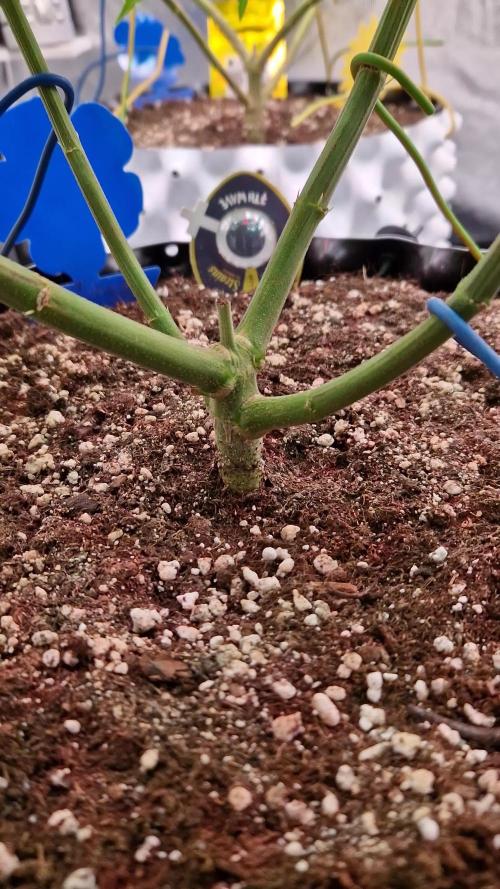
Die Pflanzen wurden von mir mit Klipsen aus dem 3D-Drucker gestützt. Diese Klips kann man Stück für Stück im Winkel verstellen, so dass man die Triebe damit neigen kann. Das habe ich von Tag zu Tag im Winkel verstellt, so dass ich am Ende einen 45-Grad-Winkel habe. Das habe ich insgesamt über 6 Tage gemacht.
Die Pflanzen haben an sich ein sehr gleichmäßiges Wachstum. Die Cosmos F1 wächst so optimal, dass kein LST mit den Klipsen nötig ist. Ich habe an den Pflanzen keine Mängel entdecken können und auch keine Anzeichen von Mutationen.
Die Pflanzen haben im Durchschnitt eine Höhe von 35 cm, wobei eine etwas stärker abweicht mit 22 cm (wieder eine Epsilon F1). Der Umfang mit LST bei der Cosmos F1 liegt ohne LST bei 20 cm im Durchschnitt, wo wir wieder die Epsilon im Negativen haben mit 14 cm.
Die Pflanzen wurden alle entlaubt, das eine Woche vor der Blüte. Morgen werden die Pflanzen erneut entlaubt und ge-lollipoppt.
!!!!!!!!!!!!!!!zusätliche infos werden morgen ergänzt + Fotos !!!!!!!!!!!!!!!!!!!!!!!!!!!!!!!!
*1. Foto Mutation:
Dieses Foto wurde nur 5 Minuten nach dem Umtopfen der Pflanze aufgenommen. Vorher stand sie in einem größeren Topf, in dem sie genauso aussah. Ich habe sie umgetopft, weil ich den Topf brauchte, aber die Pflanze nicht wegwerfen wollte. Der Pflanze geht es gut, aber sie sieht im Moment etwas mitgenommen aus. Bilder folgen

Likes
15
Share
@Kurow
Follow
Very optimal setup for everything so far. you can really tell the first sprout apart right now because of the second set coming in. Can’t wait to start using nutrients soon!

Processing
Likes
5
Share


Likes
28
Share
@OrganicPower
Follow
Week 5 flower going well. Nothing much to report. Increased the drip as she is taking in more water. Turned up the fans to 100% for maximum flow, and due to that, the tent got a bit warmer and a bit dryer so the exhaust fan and humidifier are working a bit harder. 75-77 deg F, 50-60% RH. Not sure if the lights are to intense or if it’s purple coming through, but at the highest tops there seems to be a bit of discolouration on the newest growth, just at the tips of the new buds. But I’m looking really close and it may be purple, not brown. I’ll keep an eye on it and turn the lights down if symptoms worsen. This plant is growing strong and getting chunky. Hopefully she keeps growing well until the end. Thanks for the views…keep calm and grow on!

Likes
1
Share
@GoodTimesOrganics
Follow
Die Pandora geht nun in die Haupblüte über und der Stretch scheint abgeschlossen zu sein.
Man sieht ihr den Rudersliste Einschlag deutlich an, doch die Blütenbildung wirkt sehr harmonisch und sie entwickelt dicke Stigmen. 💚

Likes
27
Share
@DeepRootsGrowTrees
Follow
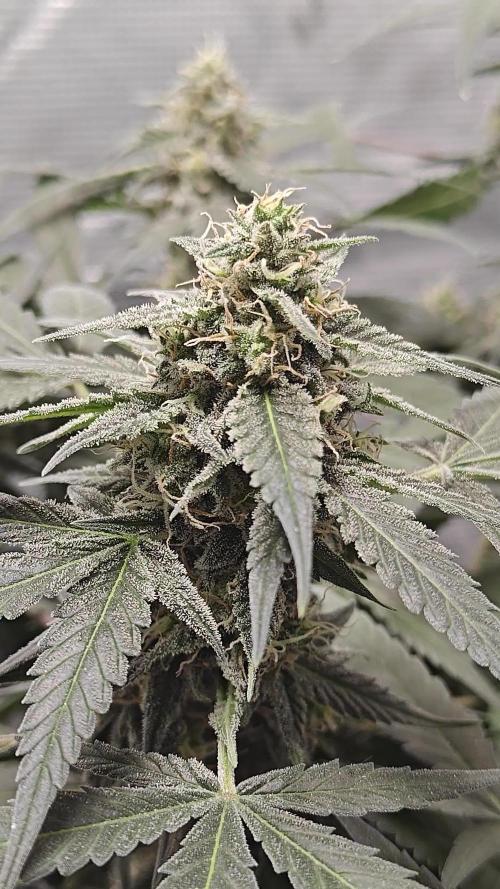
Week #14 Gelato-K By Kannabia Seeds
Week #14 Feb. 8th-15th
This week she has continued to swell her buds are starting to put on some weight. The Trichome coverage on this plant is amazing👏 she has some great genetics!! This plant can be easily trained for SCROG grow also if your looking for a strain for that type of grow. Gelato-K By Kannabia Kannabia.com

Likes
20
Share
@TrickzGrowz
Follow
Aufgeholt wie eine 1! Dicker Stamm, kräftige Triebe. Sie kommt super zurecht. Die Wurzeln sind unten am Boden angekommen.
Gelbtafeln und Blautafeln vorbereitet.


Likes
11
Share
@McShorty
Follow
They grew a lot this week or so it seems to me, because i was on vacation and havent seen them the last 5 days.
SQ#1 and Blue cheese are now my biggest plants Even though i germinated 1 week later and also from the other strain there was one plant that was always bigger than the Rest and now its the second smallest.
So far everything was nice, no issues with nutrients, desease or bugs, every plant develops hairs and is female. I think i give them 1 more week to grow and then i‘m changing the light cycle and start the flowering Phase, really excited for that :)


Likes
31
Share
@Screwie
Follow
Today i changed the light from Mars Hydro300W classic to MH TS1000. Can tell straight away its much brighter and more like the sun. Hopefully it’ll be better and they grow strong!
Ive had the ladies in their 2 litre fibre pots and been watering a bit more now that they’re out of the propagator since 3 days ago. Actually i took them out late i suppose, and maybe the reason one of them has splotches is because of the high humidity of those couple of nights i thought it would be ok without the extraction fan for a few hours, however the ranges were going from like 90-70 or something. Anyway they’re big enough now to be outside on their own.
Might be a bit late to start nutrients but going to pick some up on the weekend and start them off on Biobizz standard nutrient.
Got to be watering more than i have as today noticed on 2 of them the leaves were drooping. Think they should be watered twice and around 75ml per plant but still getting used to these fibre pots that dry out quickly. Last thing i want is to screw it up early and lose any of these precious babies.
Going to ask a couple questions to clear up some queries i got.
Till next week...


Likes
7
Share
@MaltedMadness02
Follow
She's filled out really nicely in these final weeks. The leaves are maturing and turning amber, I hope to cut the plant here soon, I don't want too much amber in the buds, as I'm aiming for a more cerebral head high. She's got really nice citrusy diesel tones. Very similar to my first grow with notable different tones. Make sure to check back again soon as I will add more pictures throughout the week! Thank you for checking in!

Likes
5
Share
@eldruida_lamota
Follow
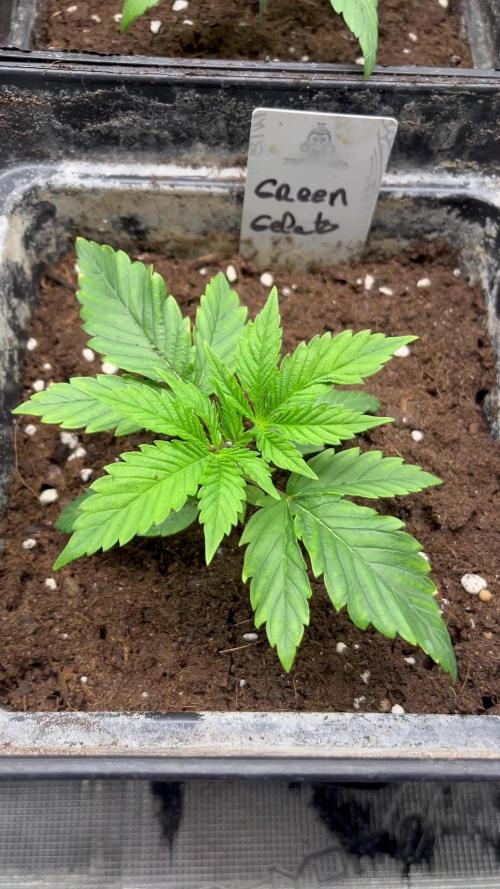
Que pasa familia, vamos con la tercera semana de vida de estas Green Gelato feminizadas de RoyalQueenSeeds.
Vamos al lío ,se trasplantaron en macetas de 7 litros definitivamente.
El ph se controla en 6.0 , la temperatura la tenemos entre 24/20 grados y la humedad ronda el 50%.
El ciclo de crecimiento puse 16h de luz, el foco está al 50% de potencia.
De momento van creciendo a buen ritmo y tienen un buen color, estaban muy bien enraizadas al realizarle el trasplante se notaba la abundancia radicular.
- os dejo por aquí un CÓDIGO: Eldruida
Descuento para la tienda de MARS HYDRO.
https://www.mars-hydro.com
Hasta aquí todo, Buenos humos 💨💨💨


Likes
13
Share
@cheesensugar
Follow
left for couple days only to arrive home to an empty resi lol 😲 filled about 3gal before leaving but im learning how much these girls drink and i should of left them at least 5g in the tank...still they look unfased by it and are still streching a bit...just been adding Dr.Higas Em-1 and fish sh!t to resovior once every couple weeks
Processing
Likes
14
Share
@CBD_Sweden
Follow
2018-04-02. Week 3 day 1. It was time too upgrade the 0.1 liter pot too the 1 liter.
Did the transplant today.
They are a little bit overwatered but i will let them dry out now.
This is the newest release from RQS seeds.
And i will veg her under a Apollo 10 led and flower her in Growroom Nr2 under a 600 w Hps on a light mover.
Its a organic grow and i will be using BioBizz nutrients.
Strain information.
Fat Banana is a unique tropical indica/sativa hybrid. It is the result of crossing delicious Banana and outstanding OG Kush genetics. The strain demonstrates amazing potency and the THC level reaches to 25%.
The plant develops a strong and long central cola and grows up 80-140 cm tall. Fat Banana develops a huge bushy structure outdoors.
The flowering period takes 7-8 weeks and the harvest brings 350-400 g/m² under a 600w light indoor and 450 - 500 gr/plant outdoor.
The smoke brings sweet, fruity, banana aroma and a very potent and enjoyable relaxing effect.
Gender Feminised
Genes 50% indica / 50% sativa
Genetics Banana x OG Kush
Harvest 350 - 400 gr/m2
Flowering 7-8 weeks
Likes
12
Share
@Daviz_42
Follow
Muy buena genética, me quedé con el pheno 1, ya que tenía más resina y un mejor terp para mi gusto. Buen híbrido no te deja superaplacado y ofrece un efecto cerebral eufórico.


Likes
3
Share
@elsolo1
Follow
- Second Week
Started with a light dosage of Base A - Base B - Vege - Silica - around 0.5 ML per Liter
Kitty decided to be curious and do a taste test while I was changing the reservoir
Had a planned trip so I loaded up the water and left her to chill, hopefully my cat didn't do much damage.
Likes
12
Share
@Northernlights
Follow
Hey,
sie wächst wirklich gut und schnell, doch der Winter rückt immer näher und ich habe Angst das sie es nicht rechtzeitig schafft... Was denkt ihr wie viele Wochen sie noch braucht? Am 23. Juli habe ich den gemeinten Samen eingepflanzt.
Likes
22
Share
@High_And_Hydro
Follow
Die letzte Woche ist angebrochen und sie bekommen ab jetzt nur noch reines Leitungswasser ohne Nährstoffe und das auch nur abends.
Morgens lasse ich das Wasser ab und lasse sie mit der Pfütze zurecht kommen, die noch drin bleibt, um etwas Trockenstress zu erzeugen.
Die Wasserpumpen mit den Aeroponik-Düsen sind bereits aus, aber die Airpumps laufen noch.
Ich warte noch ein wenig auf die Trichome, aber es wird vermutlich nicht mehr all zu lange dauern, bis ich sie ernte 😁👍
An Tag 78 habe ich angefangen zu ernten, wird wohl etwas dauern 😇
...
Tag 82... selbst die Schere hat zwischendurch versagt, aber davon lässt man sich ja nicht aufhalten. Es wird wohl noch ein paar Tage dauert, bis ich fertig bin.