Likes
Comments
Share
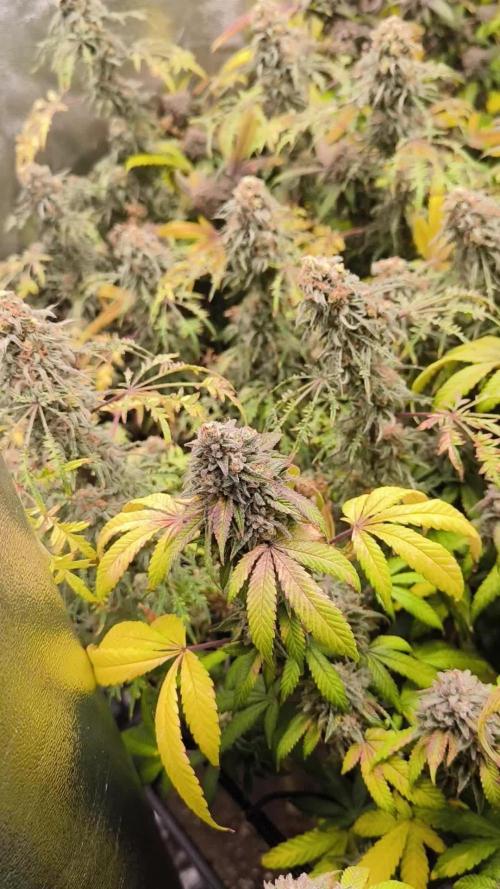
5/12/2024 happy Mother’s Day to all the ladies and buds 5/15 super frosty sugar leaves. I can visually see them standing, that they are so tall 5/18 end of week 4
Likes
5
Share
@Kayakbob
Follow
Starting week 3. I decided to wait on feeding until next week. I say a comment where someone said the FFOF is a hot soil and should suffice until then. He also said to add about an inch more FFOF to recharge the soil which I did. We will see how the week goes. Middle of week 3 and decided to start the feeding regimen tomorrow. The girls look very healthy and I hope they continue on this path. Three weeks And had a small feeding yesterday. All looks good.
Likes
10
Share
@Thibaut
Follow
Second grow of the summer!! started not to great this season weather is not same always, lots of rain ☔️ hopefully this girls will grow without pest aswel,first week 10 to go ! i keep updated on this hopefully purple gods ❤️ using 50/50 lava sand and coco coir some perlite, light batguano mix
Likes
17
Share
@Grey_Wolf
Follow
Mexican Joker Cannabiogen seeds Purple Mexican 21st August 2020 This is a seed that took ages to germinate , but looks quite healthy now 😎 I'll be growing it 12/12 from Seed and with my 100% Organic soil mix I'm not expecting to get lots of weed, for me it's pretty much just a quick run to sample the genetics before deciding what to grow this summer. Also I'll be extremely busy moving Houses halfway across the state and all of my grows may get neglected for a few days here and there whilst that happens. Basically If I really like the strain after Ive finished growing it and the smoke is great then I will Run it again in higher numbers to maybe find a keeper plant 👊 I named the Diary after the Hilarious South Park episode "Mexican Joker" And I absolutely mean no offence to anybody from or living in mexico I just couldnt resist after getting this strain and then I saw that episode 😆 Old Randy Marsh is the best Lol As for the Purple Mexican Variety it's from an awesome mob called Cannabiogen & Ive heard quite a few good reports regarding them and this variey in particular as it is created from a cross with an oaxaca Strain 👌 Anyway That's enough talk.. Lets Grow!! Thankyou For Stopping By 👍
Likes
39
Share
10/27: Strawberry Pies are the first to senesce, and also look to be the least ripe at this point...they need to hurry and fatten up some more! Wedding Cheesecakes will be the heaviest, but Orange Sherbet will prob have the fattest colas..except for Halle Berry, the Blackberry. She's so phat! Orange Sherbets are the most pungent so far, but the Strawberry Pies are a close second. 10/28: Found my cell phone lens kit after being misplaced for a few months...took a few photos with various lenses.😍 10/29: The shorter Wedding Cheesecake is a pinkish/purple..very cool! Everything is frosting up very well and their combined reek is truly horrid! I'll feed tomorrow, but all 3 Strawberry Cheesecakes are getting close to finished, one of the Orange Sherbets, and the other blackberry are not far behind them, so they'll get flushed as well. I gave Halle Berry a big drink of liquidsoil today just so she's nice and turgid when I harvest her on Sunday. 10/31: Early morning I harvested Halle Berry,
Likes
10
Share
@OS_Farmz
Follow
Everything goes well. Last vegetation week for these babys. Put SCROG net yesterday. The main-lining plant slows the whole process.
Likes
37
Share
######################################### HARVEST (Day 110 / December 21) ######################################### ----------------------------------------------------------- GROW SUMMARY ----------------------------------------------------------- Grown in 4x4 tent - but I only used 2x4 because of heater and dehumidification but each plant averaged a 2x3 canopy. Each plant had a dedicated light, Sage 2 used the HLG 300 V2 Rspec and Sage 3 used the CMH 315. It's not an accurate comparison of lights because there was some overlap but I'm just utilizing my resources the best I can for this dedicated autoflower tent. The plants were grown in hydroponics using a custom two-site PA hydroponics clone RDWC system with Advanced Nutrients Sensi Coco line, Microbial Mass and Orca for beneficials. All around a pretty easy grow and things went very well. Sage #3 had an issue just after stretch, and I think I burnt it a bit when the CMH was at 22". I also experimented with a single water change which was only performed when switching to bloom nutrients around week 7 and turned out surprisingly well - see the results below. It's always fun to see the two contrasting phenotypes side by side. ----------------------------------------------------------- HARVEST ----------------------------------------------------------- From day 106 to day 110, I just stopped feeding and let the ppms run down. No dark period and no flush. On day 110 they were chopped. I probably could have let them go a bit longer, but my concerns were growing with Sage 3 and the sugar leaves being brittle and flacking off onto lower buds promoting bud rot. The smell of this flower on the plant was funk and was hard to control the funk... even with a carbon filter. Trichomes are slightly amber, mostly milky overall. I'm convinced hydroponics can add a couple of weeks of veg time to the run compared to coco/soil. Cutting the Scrog net was required. ----------------------------------------------------------- DRYING ----------------------------------------------------------- The plants were dried in a 3x3 tent, so I had to cut the plants in 1/4 sections to fit in the 3x3 drying tent for a slow dry. Branches were hung to dry on burlap twine in a tent in complete darkness, branches upside down. The temps were dialed in at 60F by pointing AC at the intake vent on side of the tent. Humidity was dialed in at 63%/60F for 24hr, 62%/60F for the next 48hr. Then 60%/60F for the third day and onward. Ambient RH in my house is 30% due to winter so I had to use two humidifiers and an Inkbird controller to add humidity to the room and block the humidity streams from hitting plants directly. AC Infinity T6/S6 exhaust and intake fans were on the setting of '2' during drying until day 8, then I could turn down to a setting of '1' once the plants were not transpiring excess moisture. I pulled the branches to trim as they were ready around starting around day 12. ----------------------------------------------------------- TRIMMING ----------------------------------------------------------- I trimmed each branch as it was ready but there were times when I pulled more than I could trim without being interrupted so a few branches did overdry on my trim table due to the low ambient RH due to winter. Very few fan leaves on branches, so most trim was all sugar leaves. I went tight with trim to ensure a better flower product and more supply for edible totaling in over 11 ounces of trim product. ----------------------------------------------------------- CURING ----------------------------------------------------------- Flower product was transferred to 1L mason jars averaging 35g of product per jar. I added a mini hygrometer to each jar and boveda/boost 8gr humidity pack. The RH averaged 62-64% when trimmed flowers went in jars. I started by burping once a day for the first seven days, once every other day for the next seven days, rolling jars often. The burp was only for 3-5 second for air exchange. Because the flower product was already at almost 62% when packaged in jars, quite the contrast from drying in summer conditions, I only needed to burp once per day and mold really wasn't much of an issue due to low humidity in winter. ----------------------------------------------------------- YIELD ----------------------------------------------------------- * Weight calculated at 62% humidity after 10 day cure. ============================== FLOWER PRODUCT ============================== Sage 2: 301g (10.75oz) Sage 3: 377g (13.46oz) ---------------------------------------- Total: 670g (23.93oz) ============================== TRIM PRODUCT ============================== Sage 2: 204g Sage 3: 135g ---------------------------------------- Total: 327g (11.67oz) **I went tight on the trim for better flower product and sufficient supply for edibles, and is calculated in overall yield. ** All major fan leaves, stems, and branches removed from trim product. ============================== TOTAL OVERALL YIELD ============================== Flower: 678g (24.21oz) Trim: 327g (11.68oz) ---------------------------------------- Total: 1005g (35.89oz) (2.24lb) ============================== SPACE YIELD ============================== 1005g / 12 sqft (3x4 canopy) = 83.75g per sqft ============================== WATTAGE YIELD ============================== 615 Watts / 12 Square Foot (3x4 canopy) = 51.25 watts per sqft. 1005g / 615 watts = 1.63 grams per watt ----------------------------------------------------------- PRODUCT TEST ----------------------------------------------------------- On day 10 of cure, I tested the flower and passed some to a few friends for their input. Feedback was positive. One little bud was given to a friend and he reported it stunk his entire car. Sticky, trichome-covered fire! Smoke is smooth, no cough. White ash. The 60/40 (sativa/indica) is a blend that is on point. Sage Scout definitely is a heavy hitter; upwards of 3.5 hour noticeable head/body change with no couchlock at the end. In regards to flavor and smell, it's not fully there yet on only day 10 of cure. The flavors/scents are still muted but I expect the flavours to prevail after 6-8 weeks of curing. Very funky and strong smell that bursts past the mason jar lids. Piney sweet scent. ----------------------------------------------------------- REGRETS ----------------------------------------------------------- Honestly, I only have two regrets with this run. 1. More aggressive lolipopping! I just feel if I had lolipopped more, I would have had a denser product overall. The flower product is indeed dense, and all in all, I'm happy with the result, but it's I'm adding as a reminder for the next run. I need to be more selective. 2. I slacked on the training of Sage #2 due to the hard-to-reach factor which probably affected about additional 1-2 oz of yield. ----------------------------------------------------------- NEXT RUN ----------------------------------------------------------- 1. I’m was very happy with Microbial Mass product in combination with Orca. Once again, I was overall happy with Advanced Coco blend for RWDC. I went with Coco product because Coco is similar to hydroponics, the AN Coco line just has added Calmag to it. I didn’t really see any issues with the AN Coco line and I like the autonomous factor of AN sensi products because my photoperiod tent takes some of my attention, so it is nice to have this autolower tent on auto-pilot for the majority of the grow. 2. When harvesting, I did find a few spots of concern in the root system, so I will definitely upgrade the pump from 250gph to a 400gph for better flow to combat that issue. 3. My experiment with a single water change when switching to bloom nutrients was a surprising result. Sage 2 (purple pheno) performed well with no deficiencies which I had trouble sorting out the deficiency on Sage 3. I continue to wonder if it was salt build-up, but it seemed to start shortly after the change to bloom nutrients so maybe it was a nitrogen/calmag issue. I may add an additional water change mid-flower (week 11) to the next run and see if it makes any difference is the same conditions happen. 4. I'll also like to move the two-site system to the front of the tent for better accessibility to train the plants. 5. I'm also looking at the floorplan of the tent and I think I can run a single system in parallel next to this two-site system and still have room for heater/dehumidifier and still keep accessibility for training. ----------------------------------------------------------- FINAL THOUGHTS ----------------------------------------------------------- Night Owl genetics has performed once again in my RDWC setup. I also feel a dedicated light for each plant really helped improve the yield. If I calculate a 2x3 space for each plant, with a total of 615 watts / 12 sq ft, running at 51.25 watts per square foot is the result. In regards to gram per watt, I've calculated the result is nearly 1.63 gram per watt when using 1005g / 615 watts. My goal was a pound per plant, I was happy to exceed that goal line with autoflowers with 2.24lb total yield. ----------------------------------------------------------- THE END ----------------------------------------------------------- Thanks for checking out my diary! I typically journal in my notebook but I put some time and effort into documenting my grows on this platform in hopes it will help a new or experienced grower with their DWC journey. Any questions or suggestions are welcomed. Happy growing!
Likes
3
Share
@PoshGrow
Follow
Welcome to GhostGrow Chapter One by PoshGrow! 🌳 Week #9 6th week of flowering. Humidifier was raplaced with dehumidifier to maintain 50% rH. Still fighting some high temperature problems, it was very hot last week and this one so far in my city and the temperature in my grow room(not tent) is high 30s 32s... So i keep my tent open and ventilated with additional standing fan. All strains look healthy, happy and stacking up some nice weight, except 2 strains, Alaskan #2 and Alaskan #5. Alaskan #2 Looks good but still falls behind in flowering time, also looks abit streesed out and with smaller budsites, dont know what to expect to be honest. Alaskan #5 As mentioned last week got some serious Nitrogen deficiency to fight with. No results at this moment... Alaskan #4 Seems to be fastest strain so far, stacked good buds, hard as rock top ones. Started watering only with pH'ed water for flush before harvest, because it seems to go down first of all this grow run, also I started to check its trichomes with mini digital microscope. 90% are cloudy, other still clear. Gonna wait till 10% amber & 90% cloudy before chopping this girl down. Lemon and Blueberry doing perfect, stacking up well, all trichomes are crystal clear☺️ Watering when needed(2, sometime 3 times a week), every other watering I used Fox Farm Big Bloom, Grow Big & Tiger Bloom. Except with Alaskan #5 watering, its more in experimenting mode with increased Grow Big dosage so wont be covering it here. UPDATE! JUNE 28TH. Uploaded 2 new videos and Alaskan #4 picture. Enjoy!
Likes
86
Share
What an incredible grow this has been! It's definitely up there with my best and favorite indoor grows I've done on Grow Diaries so far. It had a strong, resilient and beautiful growth from the first week when it fell all the way to harvest. Definitely an easy plant to grow that had an amazing pay off in the end. I think it's safe to say that anyone could grow this strain with mid level supplies and minimal experience and get good results. If I ran more powerful lights and kept a more comfortable environment (humidity etc) I don't see why my yields couldn't get even better with each grow. Even at the 4 ounces of good smokeable buds and 1 and 1/2 of trim and larf I was very satisfied . After drying and curing the plant had a strong smell with hints of flowers and sweet fruit. The taste was subtle fruity and sweet too. Where the Blue Monkey really shines is with making concentrates. I was able to do a few different projects with it. First I did some rosin pressing where the return rate was just barely under a 20%, which is very good. A 4 gram squish giving .8 gram back, that's the best return I've gotten off just bud, no kief or hash pressing. Then I decided to make some rick simpson oil. Ground buds and trim, decarb it, put it into the jars with high proof alcohol 150+, let it sit and shake overnight and then strain into a dark tincture, then use double boiler with no open flames to evaporate all of the alcohol out, and suck up into some syringes. I got 12 ml total...which is equal to 12 grams of RSO. It was awesome, you can smoke it, use it for edibles, a good diverse concentrate. * Don't forget to make your mom a care package, she'll be happy.💚 All in all this was the most productive, and educational grow I've had all year. Not to mention the plant and buds were just gorgeous! Thank you @exoticseed this was an amazing seed you created.
Likes
2
Share
Likes
12
Share
@Tommy716
Follow
Wow! I literally put these ladies in 10 days ago. Seeds in Rockwell with a little clone x cloning gel on it seems to make them all pop. This is Royal Queen's seed sponsored. These are also top tao seeds I won from Grow diaries. These things are jumping off. Love the cloneck solution. Working great. Like the new arrow pot ceiling station works great. It was 50 bucks too winning. I added an extra pump. Super stoked to see how it comes up. Going in good old HTG Aero parts after this. Stay tuned
Likes
17
Share
Week 7 - -Overdrive added -Nugs are weighing the branches down even more - using support from sidewalls of tent -Trichombs are about 20-30% cloudy right now - some browning -Some slight nitro deficiency which was fixed by adding nutes -500ish PPM -5.6-6.2 PH -Warm+Cold days in bay area. Tent is 75-88F. Out door temps are 55-75F -Nugs are huge and almost the size of baseballs. Use a 1 GALLON bottle which seems small vs. nugs
Likes
61
Share
@Roberts
Follow
So I am harvesting sweet Bourbon Kush Autoflower. It grew really fast. It smells like a wooddy sweet Bourbon. Hence the name. 🤷. She grew great for me in coco/perlite in a 1.5 gallon Potter. She has a great smell, great frost. Looks delicious. I am super eager to try the results. Thank you Spider Farmer, and Super Sativa Seeds Club. 🌱🤜🏻🤛🏻🌱❄️🌱 Thank you grow diaries community for the 👇likes👇, follows, comments, and subscriptions on my YouTube channel👇. ❄️🌱🍻 Happy Growing 🌱🌱🌱 https://youtube.com/channel/UCAhN7yRzWLpcaRHhMIQ7X4g
Likes
28
Share
....Understanding Electrical Conductivity Electrical conductivity measures a material’s ability to transmit electric current, which in the context of gardening, relates to the soil or nutrient solution’s ion content. In simpler terms, EC indicates how salty the environment is around the roots of a plant. This “saltiness” is crucial because it affects the plant’s osmotic pressure, which in turn influences nutrient uptake and overall plant health. The Science Behind EC At its core, EC measures the presence of soluble ions like potassium, calcium, magnesium, and nitrates – all vital nutrients for plant growth. These ions carry electrical charges, and their movement creates an electrical current, detectable as conductivity. High EC levels typically mean a high concentration of dissolved ions, whereas low EC levels indicate fewer nutrients are available. The Impact of Electrical Conductivity on Plant Growth The relationship between EC and plant growth is a delicate balance. Just the right EC level can enhance nutrient uptake, bolster plant health, and increase yields. However, when EC levels stray too far from the optimal range, they can lead to nutrient imbalances, osmotic stress, and even plant death. Nutrient Uptake and EC Levels Plants absorb nutrients from the soil or water through their roots, a process influenced by the surrounding EC levels. Ideal EC levels help create an optimal environment for this exchange, ensuring plants receive the nutrients they need without exerting excessive energy. High EC Levels: A Double-Edged Sword While a certain level of dissolved ions is beneficial, excessively high EC levels can harm plants. High salinity can draw water out of plant cells, leading to dehydration and nutrient lockout – a condition where plants cannot absorb essential nutrients despite their presence. Low EC Levels: Undernourished Gardens Conversely, low EC levels can starve plants of necessary nutrients, stunt growth, and lead to underdeveloped or diseased plants. Maintaining an optimal EC range is crucial for healthy plant development. Measuring and Adjusting Electrical Conductivity Understanding the importance of EC is one thing, but applying this knowledge in the garden or greenhouse requires practical steps. Regular monitoring and adjustment can ensure that plants remain in a conducive growth environment. Tools for Measuring EC Gardeners can use various tools to measure EC, from simple handheld meters to more sophisticated systems integrated into hydroponic setups. Regular monitoring allows for timely adjustments to soil or nutrient solutions, ensuring optimal EC levels. Adjusting EC for Optimal Growth Adjusting EC involves changing the concentration of nutrients in the soil or solution. In hydroponics, this might mean diluting or concentrating the nutrient solution. In soil, amendments may be added or flushed with water to correct EC levels. Practical Applications: EC in Various Growing Environments The application of EC knowledge varies across different growing environments, from traditional soil-based gardens to modern hydroponic systems. Soil Gardening In soil, EC measurements can help diagnose nutrient imbalances and guide fertilization practices. Amending soil with organic matter or flushing with water can adjust EC levels to better support plant growth. Hydroponics and Aquaponics In hydroponic and aquaponic systems, where plants are grown in water-based solutions, maintaining optimal EC levels is crucial for nutrient availability. These systems allow for precise control of EC, directly influencing plant health and yield. Greenhouse Cultivation In greenhouses, EC monitoring can help manage the nutritional status of various plants, ensuring that each receives the right nutrient mix for optimal growth. Automated systems can provide real-time EC adjustments based on plant needs. Navigating Challenges: Overcoming EC-Related Issues While maintaining optimal EC levels can significantly enhance plant growth, gardeners may encounter challenges such as fluctuating conditions, equipment malfunctions, or environmental stresses. Regular monitoring, combined with a solid understanding of each plant’s specific needs, can mitigate these issues. Conclusion: The Conductive Path to Lush Gardens Electrical conductivity, though an invisible factor, is a cornerstone of successful gardening and farming. By understanding and managing EC levels, gardeners and farmers can profoundly influence the health and productivity of their plants. As we continue to explore the nuances of plant growth, the role of EC stands out as a testament to the marriage of science and nature in cultivating life. Whether in soil, water, or air, mastering the art of electrical conductivity can unlock the full potential of our green companions, leading to bountiful harvests and vibrant gardens.
Processing
Likes
74
Share
@Mr_Maes
Follow
We are officially in full bloom. The have been enjoying 6-7 hours of sun light per day for about 4 days now, then brought back in under the cobs. The girls are all exploding with growth and stacking what I expect to be huge buds.