
Likes
Comments
Share


@ykscotttyk25
Follow
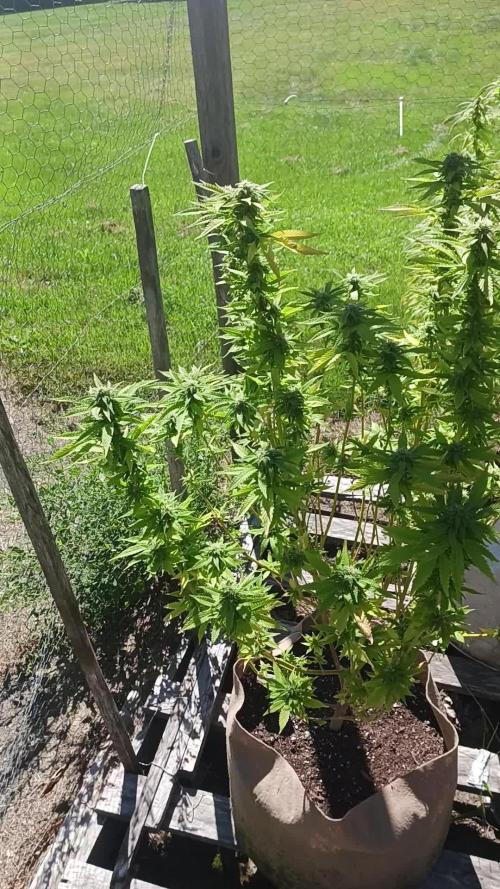
Afghan Original was developed by crossing several Afghani Indica landraces, so there’s only 100% Afghani cannabis genetics behind it. Potent, sturdy and perfect for novice growers as well as more experienced enthusiasts with bigger demands. A resin production champion it can be conveniently used for hasheesh making! Afghan Original has been probated by hundreds of growers and proven a sturdy, fast growing Indica that yields heavily and can sustain minor mishaps. Afghan Original can be regarded as “the very Afghani cannabis” that any devoted stoner feels obliged to try at least once!
Mostly grown out of doors, but Afghan Original works for indoor growing just as brilliantly. Perfect choice for hydroponic/aeroponic setups, green houses and even balconies! Provide at least 18-20 litres for a full-size root system if using soil or substrate. Feel free to make Afghan Original cannabis bushier by using any training techniques such as LST, FIM or topping, ScroG or SoG, mainlining or supercropping. About 35-50% increase in yielding can be expected after training! Resistant to molds. Insect pests are guarded away with aggressive hashy stench – another superpower of Afghan Original! Sometimes plants need supports further into flowering to stay vertical (weighy colas). Outdoor harvesting time is late September – early October.

Likes
26
Share


@d0cterstrain
Follow
had to do a long veg and clone a lot whole cos I couldn't flower. glad I had all photoperiod plants and gave me lots of time to work on environmen. flower commenced. let's get it. grrrr

Likes
17
Share

@masterofsmeagol
Follow
9/20 Man I've been busy. I'm sick too. Looking back at my diaries I get sick this time of year every year it seems. Once I get the important stuff done I'll put some pictures of finished product up. Sunny today and windy as hell. All the plants left seem to be doing good and look like they'll finish. The pink kush might not finish how I WANT but it's stinky and has lots of milky trichs. I'm playing with fire with this mk ultra. It's fucking done. It could get a LITTLE more amber and maybe come together a bit more but I don't know if it's smart to risk it. Frost warning in effect tonight. I'll probably check the forecast and harvest tomorrow. We're having some good weather just cold nights. Then it turns to like a 30% chance of rain for 4 or 5 days. I'll yank it before that. This actually turned out tp be a pretty good year. Haven't tested everything (especially shit in the ground) but what I have sampled I'm incredible happy with.


Likes
30
Share


@Gruenerfinger85
Follow
Hallo meine Garten Freunde.
Ich heiße euch herzlich willkommen zum Ende von diesem Grow, ich bin mit der Qualität der Blüten äußerst zufrieden.
Dieser Strain hat mich vollstes überzeugt, ich bin sehr begeistert von der Resistenz gegenüber den Schädlingsbefall oder im allgemeinen.
Man kann ruhig ein zwei Tage mit dem Gießen im Verzug sein ohne das dieser Strain dir das gleich Übel nimmt.
Diese Sorte ist auch nicht so anfällig für über Gießen oder über und unter Düngung.
Ich habe in der Mitte der Blüte ein kleines Problem mit Frassflügler ( Triepse ) gehabt, da für kurze Zeit mein Lüfter ausgefallen ist, den Befall hat sie ohne weiteres weggesteckt, ohne jegliche Anzeichen für Probleme.
Die Buds haben sich sehr vielversprechend entwickelt und haben einen süßlich tropischen Geruch im Raum verströmt.
Wo drüber ich am meisten gestaunt habe war dass man diesen Strain Trainieren kann egal ob topping oder HST das haben die Damen gut weggesteckt.
Das einzige was man beachten sollte wenn man die Pflanzen toppt ist, dass man mit einer längeren Anbau Zeit rechnen muss.
Von insgesamt 5 sind 5 Seeds gekeimt, leider habe ich ein Sämling verloren.
Ansonsten haben sich alle Pflanzen so entwickelt wie ich es mir gedacht habe.
Der Ertrag hätte größer ausfallen können, dann hätte ich aber auch größere Töpfe nehmen müssen, und das konnte ich zu dieser Zeit leider nicht. Die Medusa #1 braucht noch einwenig länger.
Also meine Freunde wär eine schnelle Sorte sucht, dem kann ich diesen Strain ans Herz legen.
Vielen Dank das du mich und meine Schönheiten bis hierhin gefolgt bist ich weiß das sehr zu schätzen und wenn du willst kannst du bei meinen anderen Tagebüchern vorbeischauen oder mein Instergram Profil besuchen. https://instagram.com/gruenerfinger85?igshid=OGQ5ZDc2ODk2ZA==
Ich wünsch euch eine erfolgreiche Woche und fette Ernten ✌️🏼bleibt alle gesund.
Hier gibt es noch 20% Rabatt wenn ihr Diesen oder andere Strains sucht.
Bei Royal Queen Seeds gibt es auch viele andere tolle Produkte die dir beim Thema Grow oder dir bei der Fermentation helfen können.
Gib diesen Code ein.GROWERS20
https://www.royalqueenseeds.de
Processing
Likes
1
Share


@GreenLashes
Follow
Looking forward to seeing what the cement produces!! Definitely outshone grandad Purps!
Likes
11
Share


@Paradox_1ste1
Follow
Stardog room it is looking pretty good and is thriving. Hopefully get the results we asking for.
Aya room up to now is giving pretty impressive results and it looks like they like the enviroment even tho its not fully equiped.
After adding the c4 neet to celan the insides a little bit more and see how it will react.
Likes
11
Share


@Budders
Follow
12/01/2021
FIMed all plants a second time, and also FIMed the tips of the other main branches of all plants. They will get another dose of Recharge with their next feeding tomorrow. I will give them exactly one week to recover from this FIMing, and will flip these plants to a 12/12 light flowering schedule. These girls are supposed to have a flower period of about 45 days, but I am expecting to have to run them about 50 days or so. My goal is to get over 8 ounces of nice bud on this run.
12/02/2021
I fed two gallons of water with the nutrients listed above.
12/05/2021
I gave all the girls a second major defoliation. I plan to switch to 12/12 flower cycle this Tuesday evening.
12/06/2021
I removed a few leaves and fed two gallons of water with the nutrients listed above. These girls are doing excellent. They have responded very well to the major defoliation that they received. I will flip them to the 12/12 flower cycle in a day or two I believe.
I uploaded a couple of pictures of the strains I plan to grow in the future, which is mostly Humboldt Seed Company genetics

Likes
10
Share


@Nimbus
Follow
Hello dude's
This week we are switching to 20 lt reservoir. A little training and defoliation. I am very satisfied with the development.
Keep in peace ✌️

Processing
Likes
4
Share


@Andres
Follow
I was traveling ... to give information ... the temperature has dropped ... I think she will be even slower outdoor ...

Likes
16
Share


@GreenMunchkin
Follow
Alright grow cycle, mistakes, improvements, etc...
She did stay in veg for too long, her growth was slow and not the best and so she took quite long, next time i'll be there from the beginning so I can take care of her throughout.
But her growth is really fun. It is a tall growing sativa with fairly tight noding when trained accordingly, producing long filled colas. The buds grow fairly dense and fluffly but do air out a little when dried. Trichome production was pretty impressive as well as terpene production.
She had thrips since her early days but did not seem to mind them at all. I did spray them initially but once flower started I stopped. I believe predatory mites might have been feeding on the pupae in the soil, if that is what this specific species of thrips did, the reason I say that is I could never see adults only larvae. Whatever the case maybe they were there but the population never really increased.
Something I did not mention during the grow is that those plants were played music during the days, music that is apparently developed for plants.
The 10L pot was WAY too small for a true sustainable living organic and to provide enough space for the plant, that was a mistake, I'd say a 20L would be the bare minimum and still. The bigger the better.
The hempy transfer did not hurt the plant and I believe even helped to some extent, BUT, I am still running test on the subject and so can't confirm anything, here are my observations
Roots did not colonize the perlite, a little on top and the sides but that was it, I was expecting to see a big root mass in there.
I believe hempy are great for salt fert as it hold a soup of nutes where the plant can feed from since the coco only holds very little
Whereas in nature most nutrient are in the top soil where the highest amount of decomposition happens, this is where the highest microbial activity happens and so where the plant will find food. Living organic is trying to reproduce nature and so there is no need for the plant's roots to gather at the bottom of the pot. Although it could have potentially provided the plant access to a larger amount of water and possibly more oxygenation of the pot. Those are all theories, please speak up if you have other proofs.
In conclusion , unless i get proven otherwise by someone or my latest running experiment , I will not be using hempies again as I believe it brings more complication and issues than a simple fabric pot.
The lights, The 600w at the start was good, then I decided to add a 400w...😂 That was completely overkill and not necessary. Waste of electricity. And they started suffering from too much light it seems at some point, I raised the light by a good 30 cm and they were fine.
600 is more than enough.
I am happy about how the soil performed but it has room for improvements.
As for the watering technique I have been watering large ammount every few days, next time I will be giving constant small amount of water each day and a soak every week or so, I believe the soil might perform better under those conditions.
She was also an easy plant to harvest whit her long colas which had very little foliage, I do trim in excess as I like my buds extra clean but the buds are not excessively bushy.
The trims were use to make some bubble hash, around 100g of wet trims yielded around 1.5-2g of bubble hash.
I did add a negative effect but only because it wouldn't give me a smile otherwise, but to be honnest it barely dries your mouth.
The soil is going to be recycled and reused in a next grow.
I can't think of anything else at the moment but if you have any question don't hesitate.


Likes
37
Share


@Capo420
Follow
Will update throughout the harvest, drying, and curing.
Great grow!!! I honestly could not have asked for a better first time growing experience. A few little bumps along the road, but nothing these ladies couldn't handle.
Very citrus smell topped with a salvating creaminess. Will definitely keep this lady in mind for all future grows. Maybe at least one plant. I can't wait until I can try this girl. Thank you to Fast Buds for these awesome genetics and thank you to the Grow Diaries Cimmunity for all your help along the way.
Happy Growing
💚💪🌱😎🌱💪💚

Likes
14
Share


@DevelGrow
Follow
Hallo Freunde 👋 Frost Banger von fast buds ist 28 Tage alt! Und geht fast sie ist in vor Blüte gegangen und wird wie es aussieht sich noch mächtig strecken! Keep Green and grow High ✌️🍀💚🍀
Processing
Likes
24
Share


@MadeInGermany
Follow
Hey everyone 🤗.
This week the buds have continued to swell and smell better and better every day 😍.
Since rinsing, she has only received Ph and Ec adjusted water to 0.4.
otherwise there is nothing more to report this week :-).
Stay healthy and let it grow 🍀🌱
You can buy this Strain at :
www.Zamnesia.com
Type:
Runtz
☝️🏼
Genetics:
Zkittlez x Gelato
👍
Vega lamp: 2 x Todogrow Led
Quantum Board 100 W
💡
Bloom Lamp : 2 x Todogrow Led
Cxb 3590 COB 3500 K 205 W
💡💡☝️🏼
Soil : Canna Bio
☝️🏼
Nutrients : Canna Bio
☝️🏼🌱
Water: Osmosis water mixed with normal water (24 hours stale that the chlorine evaporates) to 0.2 EC. Add Cal / Mag to 0.4 Ec Ph with Organic Ph - to 6.0 - 6.3

Likes
15
Share


@ScouseCityLX
Follow
Not seen as much bud development as I thought I would have upto now. Trichomes on #3 is amazing way more than #2. As mentioned in previous weeks comments this week is a big week. As you may have seen I have been using the TS1000 for veg and flower upto now. I now have a FC-E4800 from Mars hydro. As these plants are in the corner and side of my grow tent they will be getting a lot more light than the ts1000 was able to offer. Exited for future runs with this light!
Likes
38
Share


@Green_Mountains
Follow
Another good week. Watered them twice. I'm not planning on feeding them again. A little defoliation. I definitely think they are in the last 2 weeks before harvest.
Still seeing some nutrient burn developing on the leaves. I don't think I watered enough through the whole grow! I'd love to hear opinions on this!
Took some videos of the buds with an iPhone 12 at 6X magnification. Decent quality!
Otherwise, still looking to successfully harvest these plants! Thinking about the next grow. Probably going to be Auto Strawberry Cheesecake and Auto Anesthesia.
Peace!
Likes
93
Share


@OrganicNature420
Follow
Germination date 🌱 28/11/2021
Day 71 09/02/2022
Strain 🍁 SinCity seeds Frosted Biscotti
(Biscotti Sundae x Whitenightmare)
THC% • Unknown
💡 Mars Hydro FC-E6500
• Power draw 650W + 5%
• Max coverage 5 x 5
• LED 3978 pcs high quality chips
• Max Yield 2.5g / watt
• Noise level 0 DB
• Removable Driver & Light bars
• Daisy chain
• Fast cool system
https://marshydroled.co.uk/ 🇬🇧
PROMO CODE • (organicnature420) DISCOUNT
https://www.mars-hydro.com/ 🇺🇲
PROMO CODE • (ORG420) DISCOUNT 👍🏻
⛺ Mars Hydro 150 x 150 x 200cm
📤📥 AC infinity 6inch
💧 10lt dehumidifier
❄️ 3.1kw air con system
💉 Nutrients GreenBuzzLiquids 🇩🇪
⭐⭐⭐⭐⭐
Organic Grow Liquid • 1-4ml until 2wk flower
Organic Bloom Liquid • 2-4ml flower stage
Organic More PK • 2-4ml +wk3 of flower
Organic Calmag • 1-2ml/lt whole grow
Fast Plants Spray • first 2wks at night lights off
More Roots • 2-5ml veg +2wks flower
Fast Buds • 5ml 12days before flower until wk1
Humic Acid Plus • 2-5ml whole grow
Growzyme • 2-5ml whole grow
Big Fruits • 2-5ml flower stage
Clean Fruits • 5ml flush 1wk
Ph powder
Root Gel
Living Organics
https://greenbuzzliquids.com/
PROMO CODE • organicnature420 15% off ✌️🏼
🥥 Growing Media • Coco Coir
Notes 📝
Frosted Biscotti and green buzz Living up to the grow game 🌱💚 All of my coco grows have a nice level of frost. Soil one's are pretty 50/50. Plants now get fed every 12hrs until flush week. Ive had a couple of visitors but thank god good ones 🌱🌱 no problems 💚
Go and give PharmaZ a follow and GreenBuzzLiquids and check out their grows and the future of nutrients.. Organic 💚
Discount codes in bio for Mars and GreenBuzzLiquids 👍🏻

Likes
18
Share


@DogDoctorOfficial
Follow
Hey fellow green thumbs! 🌿💚 We’ve just wrapped up the fifth week of flowering with our Auto Fast Pete and Auto Northern Dragon Fuel from Super Sativa Seed Club. This week has been all about resilience and adaptation as our plants continue to push through the challenges. Let’s dive into the details!
🌟 Week 9 (Fifth Week of Flower) Progress:
Day 57-59: Bud Development and Resilience
• Auto Fast Pete: Despite the ongoing stress and burned leaves, Pete’s buds are continuing to bulk up. The aroma is rich and potent, filling the grow room with a delightful scent. The resilience of this plant is truly remarkable. 🌿🌸
• Auto Northern Dragon Fuel: Dragon Fuel is also showing strong bud development, with sticky, dense flowers. The burned leaves persist, but the plant’s overall vigor remains impressive. 🌱✨
Day 60-62: Growing with the Flow
• Nutrient Strategy: Continuing with the adjusted nutrient regimen, including increased CalMag to support the plants through the stress. Monitoring the plants closely to see how they respond to these adjustments. 🌿
• Reservoir Details:
• TDS: 450
• Temperature: 18°C
• pH: 6.2
• Environmental Conditions:
• Temperature: 31°C
• Humidity: 51%
Maintaining these conditions to optimize bud development and plant health. 🌡️💧
Day 63: Observing and Embracing the Journey
• Auto Fast Pete: The buds are continuing to grow and mature. The plant’s resilience in the face of stress is truly inspiring. 🌿🌼
• Auto Northern Dragon Fuel: The bud sites are dense and sticky, and the plant is showing incredible strength. Despite the burned leaves, the flowers are developing beautifully. 🌱🌟
🌟 Care Tips:
• Light: Maintaining the 12/12 light schedule. The plants are adapting to this schedule, and we’re keeping a close eye on their response. 💡
• Autopot System: The Autopot system ensures a steady water supply, reducing the need for frequent manual watering. This system is great for maintaining consistent soil moisture, which is crucial during the flowering phase. 🌊
• Nutrient Monitoring: Continuing with the increased CalMag dose to address deficiencies. Keeping an eye on the reservoir’s TDS and pH levels to ensure the plants receive the right amount of nutrients and minerals. 🌿
• Environment Control: Maintaining a stable temperature of 31°C and humidity around 51% to create the perfect conditions for flowering. Adjusting airflow and positioning to optimize plant health. 🌡️💧
🌟 Genetics Spotlight:
Auto Fast Pete:
• Characteristics: Rapid bud development, strong structure, early resin production, but showing signs of stress and possible nutrient deficiencies. This strain is still pushing through with impressive bud bulk.
• Future Expectations: Continued bud swelling and resin production. Monitoring nutrient adjustments closely to ensure a healthy finish.
Auto Northern Dragon Fuel:
• Characteristics: Robust structure, dense bud sites, resilience, but also showing stress signs and possible CalMag deficiency. The buds are still developing beautifully.
• Future Expectations: Significant bud growth and increased resin production. Close monitoring and adjustments will support a strong finish.
🌍🌿 Fun Fact:
Did you know? 🌿✨ Plants are incredibly resilient and can adapt to a variety of stressors. This resilience is especially important during the flowering phase when the plants are focusing their energy on bud production.
For all the in-depth action and detailed explanations, head over to my YouTube channel! 🎥✨ I’m sharing all the tips, tricks, and step-by-step guides to help you get the best results from your grow. This week has been particularly challenging and exciting, and there’s so much more to explore and learn together!
👉 Join me on YouTube Link in my profile 👈
🌟 Conclusion:
Week 9 marks the fifth week of flowering, with both Auto Fast Pete and Auto Northern Dragon Fuel showing remarkable progress despite some stress and deficiencies. The buds are developing beautifully, and with careful monitoring and adjustments, we’re set for a promising harvest.
Stay tuned for Week 10, and happy growing! 🌿💚✨
#SuperSativaSeedClub #Week9Report #FastPete #NorthernDragonFuel #PlantMagic #GardeningJoy #NatureLovers #PlantPower #InspireGrow #YouTubeJourney
Germination method 🌱 @thecannakan
Genetics @supersativaseedclub_official
Nutrition
@aptusholland 🌿
@aptus_world 🌎
@aptus_es 🌍
@aptusbrasil 🌱
@aptus_thailand 🌿
@aptus_portugal 🌳
@aptususa_official 🍀
@aptusplanttechnz 🌺
@aptusplanttechaus 🍃
Ambient controls🎮
@trolmaster.eu @trolmaster.eu.support @trolmaster.support @trolmaster.agro
Soil @promix_growers_eur @promix_cannabis
LED - @lumatekeu
Watering- @autopot_usa @autopot_global
Love and attention- @dogdoctorofficial
As always thank you all for stopping by, for the love and for it all , this journey of mine wold just not be the same without you guys, the love and support is very much appreciated and i fell honored and so joyful with you all in my life 🙏
With true love comes happiness 💚🙏 Always believe in your self and always do things expecting nothing and with an open heart , be a giver and the universe will give back to you in ways you could not even imagine so 💚
More info and complete updates from all my adventures can be found ⬆️link in the profile description ⬆️
Friendly reminder all you see here is pure research and for educational purposes only
💚Growers Love To you All 💚
Discount Codes :
@thecannakan DOGDOCTOR 15% off
@theneutralizer PORKIT5-DOG 15% off
@kannabiaglobal DOGDOCTOR 30% off
@seedsmangenetics DOGDOCTOR 10%off
@terpyz.mutant.genetics DOCTOR 15% off

Likes
10
Share


@Ananacio
Follow
Hi folks!
Here in another week of flora.
This is the 51st day since I put them on the ground.
I continue to water with Top Bloom and PK 14-13.
There are some that are more advanced and others that are too high.
For now it is going well, I am 200 m from the sea and it is very humid, I usually have problems with biotritis. But it's still early to worry.
Cheers!
Processing
Likes
17
Share


@Ashbash
Follow
Buds are starting to take proper shape now, second quickest of the four I have now although the sweet tooth did get topped possibly slowing it down. Got some bad looking marks on lower leaves some are completely dead. Look like pH or phosphorus. Got a pH test pen on the way tomorrow so will test when I water them. I will update the diary once tested.
Tested pH and it looks good at 6.9 so I'm gonna increase bloom nutes cos it could be phosphorus or magnesium.
Likes
8
Share


@Bread_n_Buds
Follow
Our Tangerine Dream by Zamnesia is now in full bloom and it's time to bring out the heavy artillery of boosters. Beautiful, full, sound flowers, a bit distant like many nowadays but...how beautiful!
** Remember that we are growing a plant worked with the techniques indicated and another left to grow without pruning to preserve its speed; in the previous/next diary you will find the other plant of the same variety.
We are in a 100% organic configuration, the soil is recycled Promix + 1/3 fresh soil + 10% Perlite + RQS Mycorrhizae Mix (4 g in the mix, 1 g under the small fiber pot).
We switched to the advanced flowering program a couple of days ago but last week we still didn't give any green sensation. We fertilize with: // 1 ml/l Sugar Royal - 3 ml/l Alga Bloom - 1 ml/l Power Buds - 1ml/l Green Sensation
All nutrients are available from Zamnesia: https://www.zamnesia.io/it/531-growshop/476-fertilizers
We always have the excellent mycorrhiza from RQS running through the soil. https://www.zamnesia.io/5778-mix-micorrhiza-easy-roots.html
Taste this strain a little bit, it's a cross of legendary strains ---- // https://www.zamnesia.io/en/10966-zamnesia-seeds-tangerine-dream.html
Short Description Zamnesia // When legendary genetics are crossed, something exceptional can only be born. Tangerine Dream is the result of crossing classic strains. With citrus and sweet aromas and flavors, vigorous growth and euphoric and stimulating effects, Tangerine Dream by Zamnesia Seeds has it all. But don't take our word for it: order your seeds now and discover it for yourself.
You can find the whole world of growing at Zamnesia and much more take a tour of the site and you will find "all the best that nature has to offer" in various shapes and colors.
The whole world of growing and more is at Zamnesia: just take a look at the site and you will find "all the best that nature has to offer" in various shapes and colors.
The new strains are fantastic and the old ones are no exception...
-- // www.zamnesia.com