
Likes
Comments
Share


@jojopfoh
Follow
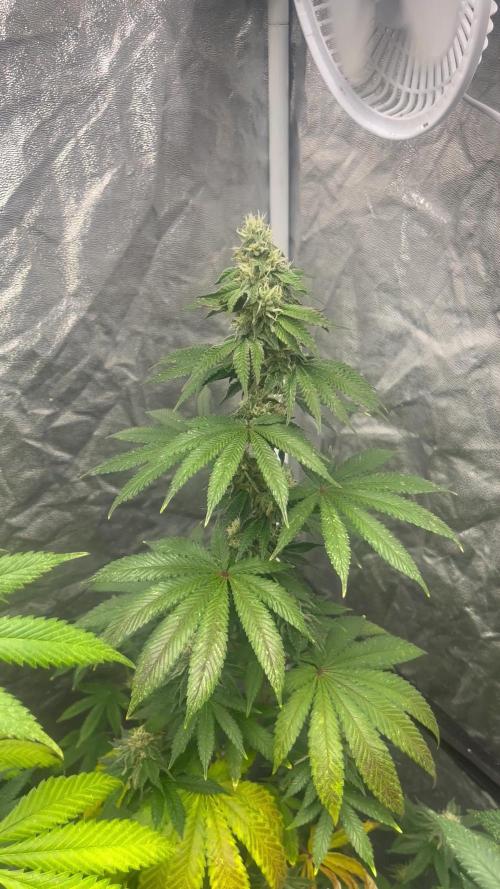
This girl is nearing the end. Currenty it is 56+ days in flower and it is a 62-67 flower strain. There are just so many beautiful buds. It is so stickiy and frosty with a sweet smell.

Likes
7
Share


@IberianRootcraft
Follow
Another week, a little bit stressed, fixing and growing.
First epsom salt foliar, pretty light (1g/L).


Likes
46
Share


@MrJones
Follow
OSS Sherbet Moonrocks
🔹⊱╮🔹╰⊰🔹 GROW Started 03.10.24 INFORMATION 🔹╰⊰´🔹⊱╮🔹
🌞Environment - Maintaining 80F and 65%Humidity
🌾Training - The girls are recovering from last week's Pruning and Defoliation,
⚱️2-Gallon 📊6.2 PH
💧 Feeding - Using Horti Bloom and Horti Cal 12-0-0
🌞Medic Grow Smart 8 760 Watts
🕷️ IPM - CannControl from Mammoth and Mosquito Bits as needed
🔹⊱╮🔹╰⊰🔹 PLANT UPDATES 🔹╰⊰´🔹⊱╮🔹
📝 Notes - I am still not getting the vertical growth that I want before I flip, so I changed my light cycle to 18/6 and will be doing another defoliation and pruning of a few side branching - remember, I am looking for tall plants with little horizontal growth.
Fertigation injects fertilizers into an irrigation system to supply dissolved nutrients to crops.
🗓️04.20.24 Today, I flipped the ladies into flower. I Have let them veg out as much as I feel the grow space can handle. I am sure there will be a bit of pruning and super cropping in the near future. These girls will grow untouched other than the 2x daily fertilization, but I am switching out the Horti-Grow with the Horti-Bloom, feeding at Hort-Bloom @ 2.7 GRMS Per Gal and Horti-Cal @ 2.5 GRMS Per Gal.
🗓️04.21.24 Today fed with Hort-Bloom @ 2.7 GRMS Per Gal, and Horti-Cal @ 2.5 GRMS Per Gal.
🗓️04.22.24 Today fed with Hort-Bloom @ 2.7 GRMS Per Gal, and Horti-Cal @ 2.5 GRMS Per Gal.
🗓️04.23.24 Today fed with Hort-Bloom @ 2.7 GRMS Per Gal, and Horti-Cal @ 2.5 GRMS Per Gal.
🗓️04.24.24 Today fed with Hort-Bloom @ 2.7 GRMS Per Gal, and Horti-Cal @ 2.5 GRMS Per Gal.
🗓️04.25.24 Today fed with Hort-Bloom @ 2.7 GRMS Per Gal, and Horti-Cal @ 2.5 GRMS Per Gal.
🗓️04.26.24 Today fed with Hort-Bloom @ 2.7 GRMS Per Gal, and Horti-Cal @ 2.5 GRMS Per Gal.
╰⊰🔹╰⊰´🔹⊱╮🔹╰⊰🔹╰⊰🔹STRAIN INFORMATION🔹⊱╮🔹╰⊰🔹╰⊰🔹╰⊰🔹⊱╮
Introducing our latest powerhouse, Sherbet Moonrocks, one of our strongest weed strains to date, setting a new bar for potency and effect. A combination of US genetics, Sherbet Cake, and Purple Moonbow create this potent sedative with THC levels above 30% that will take you to celestial bliss.
An exquisite terpene profile offers a tempting treat of sensational fruity tastes, flavors, and aromas that will seduce your mind and body and take you to a serene place of pure tranquility. Ocimene, Caryophyllene, and Limonene are the predominant terpenes; they produce an incredible array of sugary berry fruit flavors with floral hints and spicy undertones.
Growing these feminized seeds is effortless and straightforward regardless of your growing skills, and at harvest time, you will be generously rewarded. Plants will mature to a manageable height with a flowering period of 65 - 70 days and will develop thick, dense buds glossed in thick layers of THC resin crystals packed with indica power that will lure into a deep relaxation. Expect an indoor yield of 600 - 700 gr m2 and outdoor production of over 1 kilo per plant.

Likes
1
Share


@TheBulldozerSicily
Follow
Passaggio a fioritura, dopo aver completamente riempito i box, fin ora soddisfatto del risultato

Likes
45
Share


Likes
290
Share


@Ferenc
Follow
Did she start flowering ? Usually I see the same with pheno ants when I switch off the light for 36 hours to start flowering and after the top is light green. This is how flowering starts. I am not sure about her ?
Weather is shit anyways....

Likes
5
Share


@Learntogrow818
Follow
About 3weeks left.. No problems after Nitrogen and some P deficiencies.. As a new grower best things I have picked up is not be afraid to make mistakes do tons of research and testing nutrients on a separate dummy plant, have fun patience and learn everyday.


Likes
10
Share


@Rko41
Follow
Facile à cultiver à toute suite pris sa couleur violet super odeur pressé d’y goûter


Likes
229
Share


@OrganicNature420
Follow
Germination date 🌱 12/07/2021
Day 50 02/09/2021
Strain 🍁 SinCity seeds Frosted Biscotti
(Biscotti Sundae x Whitenightmare)
THC% • Unknown
💡 Mars Hydro FC4800
• Power draw 480W + 5%
• Max coverage 5 x 5
• LED 2070pcsSamsungLM30B1&Osram660nm
• Max Yield 2.5g / watt
• Noise level 0 DB
• Removable Driver +2m cable
• Daisy chain (multiple lights)
https://marshydroled.co.uk/products/mars-hydro-fc-4800-led-grow-light-samsunglm301b-commercial-greenhouse-medical-indoor-kit 🇬🇧
https://www.mars-hydro.com/buy-fc-4800-480w-4x4-energy-saving-full-spectrum-commercial-led-grow-light-mars-hydro-for-sale 🇺🇸
PROMO CODE • (ORG420) DISCOUNT 👍🏻 marshydroled.com
⛺ Mars Hydro 120 x 120 x 200cm
📤📥 AC infinity 6inch
💧 10lt dehumidifier
❄️ 3.1kw air con system
💉 Nutrients GreenBuzzLiquids
Organic Grow Liquid • 1-4ml until 2wk flower
Organic Bloom Liquid • 2-4ml flower stage
Organic More PK • 2-4ml +wk3 of flower
Organic Calmag • 1-2ml/lt whole grow
Fast Plants Spray • first 3days at night lights off
More Roots • 2-5ml veg +2wks flower
Fast Buds • 5ml +wk2 of veg until 1wk flower
Humic Acid Plus • 2-5ml whole grow
Growzyme • 2-5ml whole grow
Big Fruits • 2-5ml flower stage
Clean Fruits • 5ml flush 1wk
Ph powder
Root Gel
Living Organics
https://greenbuzzliquids.com/
PROMO CODE • organicnature420 15% off ✌️🏼
🥥 Growing Media • Coco Coir
Notes 📝
Plants have had a trim up. Not done a full job but all the undergrowth has gone. Given them a top feed of wormcastings as they are now on flower. Look forward to results with both Mars Hydro and GreenBuzzLiquids 💡💚 really can't fault these company's 🙌🏻
Happy growing fam ❤️🌱🍁👍🏻
Discount codes in bio for Mars and GreenBuzzLiquids 👍🏻

Likes
4
Share

@eldruida_lamota
Follow
Que pasa familia, vamos con la quinta semana de floración de estas F.U.H. feminizadas de Seedstockers.
Vamos al lío, las plantas se trasplantaron a macetas de 7 litros.
El ph se controla en 6.5, la temperatura la tenemos entre 24/21 grados y la humedad ronda el 50%.
El ciclo de crecimiento puse 12h de luz, el foco está al 100% de potencia.
Tenemos como visitante de nuevo los trips, compré depredadores que colocaré a principios de semana.
Me gustaría estar más encima este cultivo pero la salud me está impidiendo un poco estar 100% con el proyecto.
- os dejo por aquí un CÓDIGO: Eldruida
Descuento para la tienda de MARS HYDRO.
https://www.mars-hydro.com
Hasta aquí todo, Buenos humos 💨💨💨

Likes
3
Share


@WeedM8
Follow
Hello m8 welcome to this journey with me in this diary will have very interesting strains hope u find something useful
O.G. Kush Titanium
- [ ] 1st week Veg: germinated in substrate lighting very close so it jets medium high humidity after the 3rd day they started sprouting
- [ ] 2nd week Veg: this week my ventilator broke down and as the temperature stayed very warm nothing developed much
- [ ] 3rd week Veg:fortunately this week i had fixed the ventilation and the temperature has go down a bit allowing the little plants to develop and reinforce
- [ ] 4th week:
- [ ] 5th week Veg:
- [ ] 6th week Veg
- [ ] 7th week Veg
- [ ] 1st week Fl
- [ ] 2nd week Fl
- [ ] 3rd week Fl
- [ ] 4th week Fl
- [ ] 5th week Fl
- [ ] 6th week Fl
- [ ] 7th week Fl
if this was useful please like and follow

Likes
4
Share


@Gollum
Follow
Everything dried in about 7 days and burped 3 times a day for 8 days 19mins at a time. Trust me the longer you wait the better it smells. Makes wonderful wax and rso.


Likes
3
Share


@SenorTricoma
Follow
One more week with no more than just appreciating these babies growing. After one feed with just water this week I feed them with Biobizz nuts once more. Following the same chart as last week.

Likes
6
Share


@gabigarcia
Follow
It is already the fifth week of vegetation and they are incredible, the autoflowering ones above all are beautiful and it is also noticing how the critical x are growing little by little. ! (Any questions, or any advice you can give me leave it in the comments, I also speak Spanish)
Likes
9
Share


@masterofsmeagol
Follow
6/22 Some pictures didn't upload but that's probably a good thing. As long as the video went up its good. I need to take less pictures. I'm glad I watered the plants in the back with a premixed gallon last night as we didnt get nearly the rain I thought we would. It's small showers throughout the day. The plants are getting enormous. A couple have revegged. Mostly the 10th planet. The others aren't anywhere near as impacted. Boy are some of these stalks thick. I chose to keep a couple plants that could be grown naturally without topping or fimming. I like to see the structure of the tree bit with humidity like this 98%rh it's easy to get botrytis. That's why it's good sometimes to have multiple bid sites so your proverbial eggs aren't all in one basket. But you do end up with a massive cola. I think that mk ultra with the big fan leavescis just going to be one giant bud. That's what it's looking like. Oh and today is the summer solstice. Longest day of the year.
6/23 WATERED EVERYTHING. USED FIVE AND A HALF GALLONS. EVERYTHING GOT AT LEAST A HALF GALLON. Despite the rain we got and the bags still having some heft I decided to water. It's 80 at 9am. It's supposed to he in the upper 90's today and coukd break 100° tomorrow. I hate that the grow bags are black. That's way to hot for the plants. I should find some empty soil bags and wrap the black fabric for a couple days. A sunscreen might help but I doubt much. We'll see how it goes.
6/24 It's 90° at 9am. It's supposed to break 100° amd stay there a while. Up to 106°. Plants looked awesome this morning. I wasn't sure what I'd find. Today is the worst of the days. If it didn't break 100 yesterday it was damn close all day and the girls look GREAT. I WATERED AGAIN TODAY. I USED 6.5 GALLONS TO WATER THE GARDEN. It was nice cool well water too so they should like that. Branches are getting longer and I'm training as the get bigger. I need to put up the trellis but I'm not doing it in this heat.
EDIT: 90° @ 6PM WENT OVER AND AS PREDICTED THE TWO TENS WERE DROOPING. IM WONDERING IF THEY WILL BE ABLE TO FINISH IM THOSE TENS. LAST YEAR I HAD ONE THAT WAS HUGE IN A TEN BUT IT JUST DEVELOPED INDIVIDUAL CALYXS WITHPUT CONNECTING. CHECK IT OUT ON LAST YEARS DIARY. IF THATS THE CASE I SHOULD KIGHT DEP THEM BECAUSE THEYRE GETTING BIG. I WATERED THE TWO TENS WITH ABOUT A HALF GALLON AND I USED WHAT WAS LEFT OF THAT COLD WELL WATER ON THE 10TH PLANET IN THE 30. SHITS LIGHTER THAN USUAL BUT LOOKING PRETTY GOOD. THE REST CAN WAIT UNTIL THE MORNING FOR THEIR WATERING. TOMORROW TOPS OUT AT 85° WHICH WILL BE MUCH BETTER. IM LOVING MY STRAIN CHOICES RIGHT NOW.
6/25 It's super humid out but much cooler. I think it's like 80 at noon time. I had to water the two tens this morning. I didn't really HAVE to but I did. I filled up my watering can that says it holds 1.5 gallons (but it seems like more) and watered the two tens at least a half gallon and focused the rest on the 10th planet in the 30 and the other one up front that gets lighter than the rest. I was fully planning on watering EVERYTHING this morning but I could feel moisture in the soil and they had weight. I'm pretty sure I made the right decision. Especially with humidity so high. Either way I'll check tonight.
EDIT: WENT TO THE GROW AT APPROX 2:30PM. I HAD BO IDEA HOW HOT IT WAD OUTSIDE. IT WAS 87° BUT THE HUMIDITY IS DAMN NEAR 100%! I HAD WATERED SHIT A KOT LATELY AMD WANTED TO WAIT UNTIL THE MORNING. THE TWO 10'S (WITH GIANT PLANTS THAT IM NOT SURE CAN FINISH IN TENS) WERE DRY AND LIGHT. A COUPLE SPECIFIC PLANTS WETE A "LITTLE" LIGHTER THAN THE REST. I MIXED UP THE WATERING CAN WHICHVIS 2.5 AND ANOTHER GALLON. I USED THE WATERING CAN ON THE PLANTS IN THE FRONT. THE CHEMDOG #4 WAS SIGNIFICANTLY LIGHTER THAN THE REST SO I GAVE IT MOST OF A GALLON. THE PLANTS THAT ARE STILL HEAVY ARE GOING TO HAVE TO WAIT LONGER BEFORE I WATER THEM.


Likes
15
Share


@IsseyBukkake
Follow
We've made it to day 28! - 17/12/20
The girls seem to be happy and healthy today.
I won't be feeding/watering them as the pots are still heavy from yesterdays feed.
A few of the girls have started to show sex & the smell has picked up a little bit(inside the tent), so I'm hoping to see some flowering begin this week sometime.
(I've been using my iPhone as my only DSLR lens is useless for focusing on certain depths, but I hate the colour I get using the iPhone... I may be switching back to DSLR unless I can find a better camera app.)
update - day 29 (18/12/20)
Short update today.
Fed the girls today and will probably be feeding/watering every day from here on out, we'll see though.
veg growth has really taken off by now, I'm hoping to see some flowering this week.
update - day 30 (19/12/20)
I fed the girls today.
I need to find a better way to hand water, the plants are so short and bushy its a pain getting in between all the branches.
I wish i left my drip feed system up and running, I will definitely refine it and use it next run.
Update - day 31 (20/12/20)
Fed the girl's straight water today.
I'm going to purchase the pieces I need tomorrow to reconfigure my drip feed system & hopefully have it running by mid-week!
Update - day 32
I attempted to set up my drip feed system today but the plants are too thick around the base to place the halo around :(
I will have to wait until next season to set it up, oh well, I guess its hand watering for the next 5-10 weeks
Fingers crossed these girls start to flower ASAP.
I fed the girls today, everything is looking good so far.
I also moved the plants around to try to make hand watering easier, I had issues trying to water the whole pot instead of just one spot due to plants/branches being in the way.
Update - Day 34 - 23/12/20
It definitely seems ill be watering the girls every day from here on out.
All the girls look fairly happy and healthy, they're getting a bit big for the 5x5 they're in.
It looks like flowering has begun on 2 of the girls, hoping to see some more progress on the others in the next few days.
Thanks for stopping by! 🙏

Likes
18
Share


@Borberad
Follow
Hoffe nach den Überraschungen in der letzten Woche verlaüft diese wieder ruhiger. Habe den Leitwert des Drain bei beiden Pflanzen auf ph6 und 2000 microSiemens Ende letzter Wiche reduziert bekommen. Interessanter Weise waren die Leitwerte bei den Pflanzen trotz exakt gleicher Wasser/Düngergabe um den Faktor 2 auseinander. Der ph-wert lag bei beiden bei 4,8 [Warum auch immer]. Hab die Werte durch Spülen mit Leitungswasser und Osmosewassermix mit Leitwert 500 auf die oben beschrieben Werte gebracht und hoffe das die Damen es mir verzeihen und mich trotzdem in 3 Wochen mit reicher und vor allem leckerer Ernte belohnen werden. Gieße jetzt jeden 2Tag, so viel, dass genügend Drain entsteht um die Werte zu kontrollieren. Drain liegt bei Ph ca. 6,0 bei max 2,5mS andernfalls wird mit Osmose oder Leitungswasser (0,8mS und Ph7.2) gegegengehalten. Da sie in Stofftöpfen stehen, ist es hoffentlich nicht so dramatisch etwas zu viel Wasser zu bekommen.
