


Likes
11
Share


Likes
26
Share


@DarbGrowDiaries
Follow
Finally time has come to chop down plants 1&2.
They look ready and trichomes are mostly cloudy with some embers.
Both plants weight 750 grams as whole.
I would assume there is around 30-40 grams dry on each, but we would have to dry cure and than return with results.
3rd plant can probably go for another week, she looks like she can get her buds bigger, also still many many white pistils.
She is looking very promising with very long buds (:
3rd plant chopped after 1 week, weighs 500 grams wet as whole.
Joining the 2 other girls in the closet

Likes
Comments
Share


@Ogchemst
Follow
I have had to touch the a bud by accident and went to wipe my nose, omg the smell I have never smelled anything g this sweet fruity zkittlez with a nice balance of that gelato... my nose has a relationship with that buds as I love such fruity strains I can't imagine the taste mixed with gelato...
I like the bud formation alot.


Likes
29
Share


@lefthandedJ
Follow
Growing along quite well. Next year, bigger bags and better soil mix. Also, a little longer veg inside wouldn't hurt. Got buds starting on the three ATF's, Chemdog, Night Nurse, and one Viper Cookies. Still no signs on the big mother Lamb's Bread, which makes me wonder how big she's gonna get. Finally stopped being lazy and set up some support for them, since my training left them a little wild. Hit them again last night with neem as the little pests are back and munching away. Supposed to stay relatively dry this week, hoping the single application will last for a while. Continuing with TIger Bloom every other feeding, alternating with straight water ph around 6.

Likes
5
Share


@AustinRon
Follow
TH 1Q2025 - Week 11 - Flower 8
(ON Haze X Original Haze) X Northern Lights #2
“Todd’s Haze”
Objective
- 8 Female Plants, Topped ONCE @ Flip, 12” when topped
- Modified Sea of Green
Seeds Wet: 1139PM, 28.2.2025
Germinated: 2.3.2025
Flip: 21.3.2025
Harvest: 77 Days, DATE: 6.6.2025
_________________________________________
__
Fri May 16, 2025
TH 1Q25 57:F:8:1
Harvest Dehu
- [x] Amount: [ 1.5, gal]
- [x] EC: [ 2.9, mS/cm]
Refresh Reservoir
- [x] Primer A&B: [ 36, ml]
- [x] SLF-100: [ 15, ml]
- [x] Amount: [ 3, gal]
- [x] EC: [ 1.8, mS/cm]
Runoff
Amount: [ 2, gal]
EC: [ 1.9, mS/cm]
__
Sat May 17, 2025
TH 1Q25 58:F:8:2
- [ ] Install Line Supports for TALLS!!!
We REALLY need to clean up the foliage, especially lowers.
Defoliation
- [ ] GO SLOW
- [x] Remove Fans w/ Petioles up to Center Bar of tent.
- [x] Selectively Defol above
Note: Last time we defoliated, we thereafter had a flush of new green. (Week 5) May be correlated with CalPHOS (Applied same time) or Not. Point is, GO SLOW.
Runoff:
- [ 0.25, gal] # Leaving Irrigation Parameters overnight. Will gauge amount being taken up SUNDAY
__
Sun May 18, 2025
TH 1Q25 59:F:8:3
The Veg is almost overwhelming. I’m continuing this grow with some encouragement from GrowCast, but:
1. Pistils have integrity, the bracts are completely loosened, but larfing on uppers apparent.
2. IF This plant finishes, they’ll largely be TRIM MONSTERS.
3. I could grow my clones today - without having clones to take -
*** Frustration***
Harvest Dehu
- [x] AMOUNT: [ 2.5, gal]
Refresh Reservoir
- [x] Amount: [ 2, gal]
- [x] Primer A&B: [ 12, ml, gal]
- [x] SLF-100: [ 5, ml, gal]
- [x] EC: [ 1.8, mS/cm]
Runoff
- [x] Amount: [ , gal]
- [x] Installed Lateral Supports for Leaning TALLS
__
Mon May 19, 2025
TH 1Q25 60:F:8:4
We’re using more water than Dehu is providing . . .
Refill with pH’d FILTERED TAP
__
Tue May 20, 2025
TH 1Q25 61:F:8:5
__
Wed May 21, 2025
TH 1Q25 62:F:8:6
__
Thu May 22, 2025
TH 1Q25 63:F:8:7


Processing
Likes
14
Share


@OilyEliteOrganics
Follow
Smells sweet and robust.
A birch bender at the sight of the crown.
Growing heavy and dense .
Smeels like strawberry with a dab hint of coffee .
Likes
Comments
Share

@Dottgreenthumb
Follow
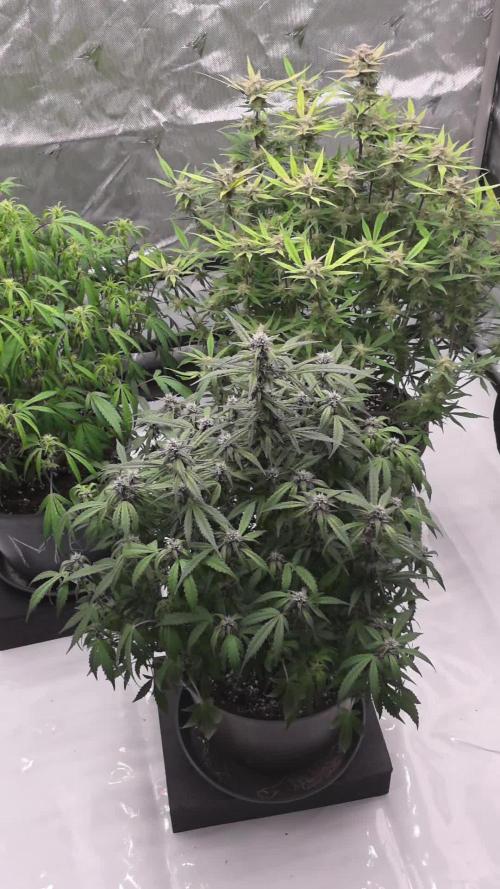
Ho dovuto spostarli nella box piu grande perché stavano po stretti adesso prendono piu luce e co2 mi aspetto un risultato molto generoso da questi strain per la predisposizione strutturale che hanno
La prima davanti la purple punch rf3 cresce rispettivamente piu chiusa rispetto alla papaya cookies che stra si sta allargando sempre di piu ottima per un sistema di coltivazione a scrog
La gelato sembra che la fioritura sta tradendo non vedo problematiche per quanto riguarda ph e sali minerali il fenotipo sembra rispecchiare una genetica sativa
Run off 1.8
Ph 6.1
Likes
3
Share

@midnitrtoker
Follow
They’re chopped we will be checking in again in 7-10 days and start the the whole weighing process. They have beautiful color they got dark now I see the why the name lol. I’m glad I was able to keep her and give her a proper grow. Make sure to check out the other diary we are at week 3 of Veg and we flip to flower next week.
Likes
26
Share


@MOSS_FIGURE
Follow
Start flushing Wedding Glue on day 61, flush until ppm water same normally water.
56-62
(Hope you like and enjoy my diary)
Thank you so much for checking out my grows. Feel free to leave a comment, push the like or give the follow.
Likes
226
Share


@Kitties_and_Colas
Follow
~_~_~_~_~_~_~_~_~_~_~_~_~_~_~_~_~_~_~_~_~_~_~_~_~_~_~_~_~_~_~_~_~_~_~_~_~_~_~_~_~_~_~_~_~_~_~_~_~_~_~_~_~_~_~_~_~_~_~_~_~_~_~_~_~_~_~_~_~_~_~_~_~_~_~_~_~_~_~_~_~_~_~_
08/21/21:
🐱 Week 6 is here!! The new growth is coming in a little limey, we insist on reusing Promix so PH is always a bit of a rollercoaster lol.. no sweat, usually a gallon each PH'd to 5.5 with 5ml/gal N solution will get them back to baseline..we seem to have the same issue with most plants grown in our basement during summer, I'm sure the super high humidity and
low evaporation rate has something to do with it... if they don't come around after the adjustment, they'll spend some time under the HIDs, this always straightens them out..we topped the mainline for the last time today
for 8 mains per side, as well as another full round of toppings on the x2 LST plants... thanks for reading if you made it this far and happy growing everyone!!! ❤️🐱💡🌱
~_~_~_~_~_~_~_~_~_~_~_~_~_~_~_~_~_~_~_~_~_~_~_~_~_~_~_~_~_~_~_~_~_~_~_~_~_~_~_~_~_~_~_~_~_~_~_~_~_~_~_~_~_~_~_~_~_~_~_~_~_~_~_~_~_~_~_~_~_~_~_~_~_~_~_~_~_~_~_~_~_~_~_
8/22/21
🐱 Quick update, the mainlined plant is showing signs of calcium deficiency which is odd, with our routine we almost never have Calcium or magnesium issues..its really only noticeable under the florescent lights on this one but we'll have to make changes.. they all have plenty of calcium in their media so I'm wondering if the PH has gone screwy in that pot.. we reuse promix which gets really acidic sometimes and we add lime to buffer this but we guess a lot and may not have used enough (or waited long enough)..I know when our media gets around 5-5.5 calcium deficiency is a huge issue..ill add a little more calcium to be sure and will try using water PH'd higher (6.5-7) and see if this helps anything. Thanks again for reading growmies!!
~_~_~_~_~_~_~_~_~_~_~_~_~_~_~_~_~_~_~_~_~_~_~_~_~_~_~_~_~_~_~_~_~_~_~_~_~_~_~_~_~_~_~_~_~_~_~_~_~_~_~_~_~_~_~_~_~_~_~_~_~_~_~_~_~_~_~_~_~_~_~_~_~_~_~_~_~_~_~_~_~_~_~_

Likes
7
Share


@KushSorbet
Follow
On day 81, the plant has shifted resources into bud development and the results have been beautiful, the plant has also flourished with low doses of nutrients in order to avoid nutrient stress. The buds are sticky to the touch and give a slight citrus and cherry/raspberry smell, with continued purple transformation of the plants cells.

Processing
Likes
9
Share


@Winged_Grower
Follow
Buds are just packing on weight now. I’ll begin the flush sometime in the next 7 days. I’ve seen just a few amber trichomes and still a few clear, so I’ll give them a few more days. Then a 10ish day flush then chop!

Likes
16
Share


@Shotiie
Follow
This week I've been watering them like 2x a week with 3 liters of water. Rep Lemon is about ready for harvest, i think. tris aren't cloudy but the way she's looking it can't be too much longer.
Likes
23
Share


@HomeGrownFamz
Follow
Dense bud all the way down. The +Speed auto can be chopped at 7 weeks but generally require 8-10 for best results. My environment is steady and temps are perfect. VPD was kept on point for the majority of the run and nutrients fed at just over half of what was stated on the bottle. The amount that can be grown in such a small area and in such a short space of time is unbelievable. Only one plant has been harvested at the moment so I will update the harvest week of the diary with the other two once they are ready.

Likes
17
Share


@LuvSDreams
Follow
Last two plants are flushing now. My stunted mango smile yielded about 36 g which I made about 7g of rosin from and kept a few nugs. My first sour crinkle yielded about 55g. They seem like they will yield much more. Seems like if you want smaller faster plants use airpots or bigger plants w a longer lifecycle do fabric pots.
Processing
Likes
6
Share


@AbbyRose
Follow
These chef anna white label autos are just amazing. The smell is so pungent it just smacks you in the face from 10 feet away. I cant wait to smoke these lovely ladys. Not to mention look at all those pistols.


