Likes
Comments
Share


@jmsky
Follow
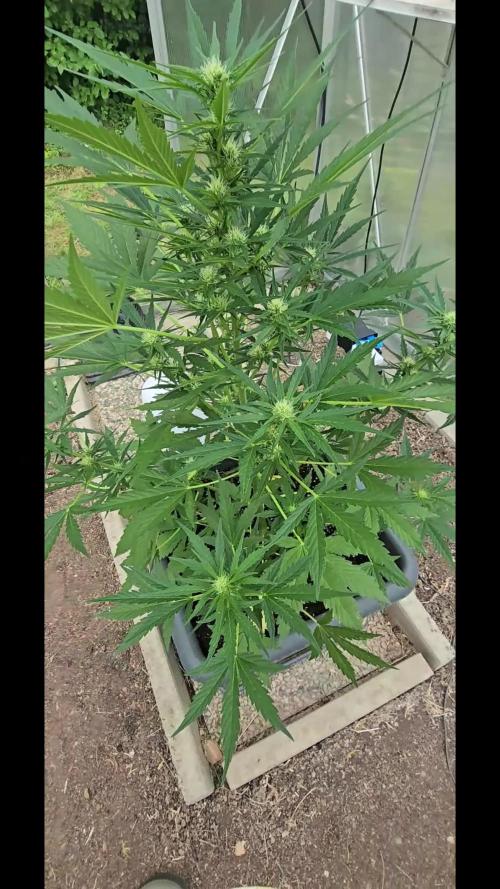
Permanent Marker was the last one standing and got the chop at day 75 of flower, nearly 11 weeks. The trichomes were still not very amber anywhere except the top sugar leaves, but it was about 90% milky white, and the leaves were all drying out.
I bagged 36g of larfy buds and trimmings, 20.5g top buds, and 12g small buds. 32g smokable is not bad.
I will update with smoke report in a couple weeks, but initial tests were promising. Strong chemical taste not far off from its namesake, with a KO strength punch.


Likes
32
Share


@PEAKYPLANTERS
Follow
Respect for all of you, brother farmers! masters and beginners! thank you again for gathering on the pages of my diaries! we carry out our work with dedication and live on ambitions! come on guys!🙌👽🙌

Likes
15
Share


@Uwish
Follow
With the last heat wave, I had an answer to one of my questions, clearly my chiller is not doing the trick.
I have water temperatures that went up to 27°, which is way too much, the plants deprived of oxygen, started to declare several deficiencies due to an assimilation slowed by the lack of oxygen.
It is then that a nasty fungus came to say bijour, it is me MR pythium!
It was necessary to act, at the risk of having to restart the culture.
So I applied hydrogen peroxide and ROOT ROT X, and both products are doing harm to this nasty pythium, things are now back to normal.
On the other hand, the plants had a decreased growth for 10 to 15 days, so I'm going to extend my growth for 10 to 20 days, that is to say 1 or 2 soups, I'll choose according to the root development of the plants. Before going to flowering, I have to catch up this delay in order to make a nice crop.

Likes
9
Share


@Siriuz
Follow
Guys Shes looking very good but I am noticing that she is kinda short and I believe she got stressed out after all the techniques we applied on her, I think I will only go with LST/HST and defoliation for next time with the auto flowers, I think they don't have enough time to recover and I think we get to see it here because otherwise she would have grown like the cream Mandarine, she is an XL but not looking like that tho.
Everything else is good, either that or too many nutes and she got locked out with nutes which I don't think so since she is giving nice smells and flowers and the main trunk got many compact buds forming sites, I just think I need to let them be since auto genetics are too delicates to fuck with, specially this strain not all the strains responds equally, in my experience amnesia, grapefruit and even cream Mandarine XL are warriors, they will resist and recover fats but this lady os very delicate and need to be trates carefully, we did a lot of experiments on this one and I bet the high is wicked bomb just the fact that will produce ultra high quality bud but not as much as you would expect im guessing 15g dry bud top and probably 40 wet but I will let you know at the end, I think I am going to harvest this girl in about 4-5 weeks from now what do you think?
Feel free to leave your comments below and please enlighten me with your experience brothers
Happy growing :)
@cannagrowersiriuz #Instagram

Likes
116
Share


@Kitties_and_Colas
Follow
~_~_~_~_~_~_~_~_~_~_~_~_~_~_~_~_~_~_~_~_~_~_~_~_~_~_~_~_~_~_~_~_~_~_~_~_~_~_~_~_~_~_~_~_~_~_~_~_~_~_~_~_~_~_~_~_~_~_~_~_~_~_~_~_~_~_~_~_~_~_~_~_~_~_~_~_~_~_~_~_~_~_~_
10/21/20
😻 We're documenting a day early because we'll be gone for a weekend camping trip...The plants are progressing beautifully and perpetually praying, they're absolutely loving this new MarsHydro! We decided to move the light from 24" to 30" to try widening the nodes a little before dropping back to 24", we're in unamended Promix so we typically start thinking about feed this week but being autos we're going to take it slow and wait on color ques before making that move (probably next week for sure)...thanks for reading and happy harvests everyone!! ❤️💡🌱😽💨
~_~_~_~_~_~_~_~_~_~_~_~_~_~_~_~_~_~_~_~_~_~_~_~_~_~_~_~_~_~_~_~_~_~_~_~_~_~_~_~_~_~_~_~_~_~_~_~_~_~_~_~_~_~_~_~_~_~_~_~_~_~_~_~_~_~_~_~_~_~_~_~_~_~_~_~_~_~_~
10/25/21
😺 We gave all plants a very, very light feeding (<3ml/gal) to see how they tolerate it, its super early but a few were already beginning to wash out ..We started bending plants today, low stress only for these girl and everything looks great so far! This MarsHydro is intense, the node spacing is extremely tight on all plants and growth has been really steady (especially these last few days), we couldn't be happier! Thanks for reading and love all around growmies!! 😻
❤️💡🌱..
⚡Mars Hydro/SP-3000⚡ Specifications ⚙️:
Diodes: Samsung LM301B / Osram 660nm (960 total!)
Driver: Meanwell 300watt 🔌 (300W±5% @AC120V-277V)
PPF: 824umol/S ☢️
PPE: 2.8 µmol/j 〰️〰️
Lifespan: >50k hrs ⌛
Veg Coverage: 3 x 5 ft 🌱
Flowering Coverage: 2 x 4 ft 🌼
Weight: 10.1 lbs (4.6kg)
-The SP-3000 uses an aluminum heatsink (no fan) and the driver can be placed outside the tent 🌡️⬇️
-IP65 waterproof ratings, tolerant to high humidity grow environments 💦 ..
-Up to 30 of these lights can be daisy-chained together and all controlled from a single light! 💡~💡~💡~💡~💡
~_~_~_~_~_~_~_~_~_~_~_~_~_~_~_~_~_~_~_~_~_~_~_~_~_~_~_~_~_~_~_~_~_~_~_~_~_~_~_~_~_~_~_~_~_~_~_~_~_~_~_~_~_~_~_~_~_~_~_~_~_~_~_~_~_~_~_~_~_~_~_~_~_~_~_~_~_~_~_~_~_~_~_


Likes
3
Share


@Moon_garden
Follow
Week 5 since light switch to 12/12
The terps are AMAZING and very very strong. Entire place smells when I open the tent. And lingers for way too long. So hard to pin down the exact smell as it changes through the weeks. Sweet creamy skunky gas with a slight new shoe smell. Like that strong brand new fresh rubber or plastic smell you get when you open a brand new pair of sneakers.
Everything the same as last few weeks. Same feeding and nutes. I switched to nutes that have zero nitrogen around week 3 but wish I waited another week as my leaves are getting yellow pretty fast already. Assuming it is the nitrogen that's causing it. Buds look super frosty though!!


Likes
91
Share


@Salokin
Follow
Hi Growmies,
I'm excited to share some big news today! Although there have been some unexpected twists, it's all part of the incredible journey of gardening.
I've just completed the harvest, a tad earlier than initially planned, due to finding a bit of mold in one of the buds. Despite this minor hiccup, the trichomes were already at a decent 10% to 15% amber. So, all things considered, the timing ended up being pretty spot-on. The harvested weight was a solid 609 grams after trimming, which is quite a feat!
A lesson learned for next time: perhaps I let her grow a few too many buds, leading to a denser canopy than ideal. But on the bright side, the aroma is absolutely divine. I sampled an airy bud that had dried a bit, and wow, it packs a stronger punch than its clone mother. And the flavor? Pure, unadulterated cheese – no hint of pineapple here!
Now, the anticipation builds for the final dry weight, which I should know in about 3-4 days. It's always exciting to see the fruits of our labor fully realized.
A huge thanks to everyone who's been following along on this journey. Your interest and support mean the world.
And now, the adventure continues! I've started on Epic Buzz by Anesia Seeds. The diary for this new chapter is up and running, and the seedlings have already sprouted, marking the beginning of another exciting phase.
(https://growdiaries.com/diaries/185718-grow-journal-by-salokin)
I can't wait to share more updates with you all. Here's to the continued growth and learning in our gardening adventures!


Likes
44
Share


@Aedaone
Follow
The temperatures, humidity, height, and watering volume(if measured) in grow conditions are all averaged for the week. The pH is soil pH. Any watering done by me is well water which is 7.6 pH and 50° F. Coop Poop, Molasses, Feather Meal, and Soluble Kelp are ml/gallon of soil top dressed. Everything else listed in nutrients is ml/gallon of water fed to plants without checking the solution Ph.
Day 1 We had a high temperature of 89°F. Skies are clear and sunny, humidity is about 50%. I watered about 5 gallons.
Day 2 we had a high temperature of 78°F. Skies were clear and sunny. Humidity was mid 50%'s. I watered about 4 gallons each pot.
Day 3 was cooler. We had a high temperature of 70°F. Skies were sunny and humidity was around 59%. I took advantage of the low humidity and washed the plants in bio fungicide and I clean up some powdery mildew in the leaves. I watered about 4 gallons.
Day 4 we had a high temperature of 72°F. It was very sunny and the air was dry. I watered about 4 gallons per pot.
Day 5 we had a high temperature of 76°F. It was a perfect day for cannabis. Low humidity and I watered about 4 gallons
Day 6 we had a high temperature of 81°. There was abundant sunshine. I watered about 5 gallons per pot. The girls are loving the weather.
Day 7 we had a high temperature of 84°F. Abundant sunshine low humidity and I watered about 4 gallons.
Overall this week was a success. The weather is finally cooperating. These girls are on cruise control getting ready for their ripening phase.
Likes
39
Share


@J4kpvp
Follow
Hello:)
Man, these plants are really taking their time:( The front 2 plants are ready, I could‘ve cut them even a week ago and the back two still look the same as last week in terms of trichomes. It looks like I need to wait at least a few more days for them..
I also cut the two buds which I thought had some mold, luckily there was nothing… I‘m still thinking about an early harvest though… don‘t want to risk all 4 plants…
RH is under control again, my dehumidifier was just broken:)

Likes
14
Share


@TPBzh
Follow
I still had some spots on leaves, but look like the calmag is doing the job. New leaves look better for now. It smell stronger, and plants are drinking a bit more now. Not sure, but i think no more than 3 weeks b4 harvesting HulkBerry 1 and the cookies gelato familly. Royal Bluematic 1 seems to take more time, but is growing well.
HulkBerry 2 and mostly Royal Bluematic 2 are really late and weak compared to the others.

Likes
43
Share


@TheCannaProphet
Follow
~ FastBuds PAPAYA SHERBET Photoperiod~
Well here we go on another journey together through 'Canna-land' and this one's kinda special... forget that, it's VERY special because this is FastBuds newest surprise for the community, a FEMINIZED PHOTOPERIOD STRAIN!🤯
I was fortunate enough to score these seeds, of which only 1000 were available and can't wait to see what this strain can do! This Papaya Sherbet, according to FastBuds, is a hybrid with a 9-10 weeks flowering period. For a more detailed and accurate description of this strain the following from FastBuds says it best:
"Combining the massive stature of Papaya (Oni Selection) with the strength and resilience of one of our best keeper cuts (Sunset Sherbet), this strain develops into a big, expansive bush adorned with numerous bud sites that later transform into a generous harvest of medium-sized buds. Papaya Sherbet flowers deliver a signature flavor of premium cannabis with subtle citrus undertones that emerge upon inhaling. During growth, her aroma makes for a sweet yet pleasantly bitter fragrance, giving you an idea of what the smoke will taste like. Notably stress-resistant, Papaya Sherbet is a great choice for growers working in challenging environments. She is very forgiving and rebounds quickly from any adversity, allowing growers the freedom to experiment with confidence that she will take everything like a champion she is. This strain embodies resilience, flavor, and abundant yields in every grow cycle."
Sounds like an epic strain and I personally cannot wait for this lady to strut her stuff!😍
________________________________________________________________________________________________________________________________________________________________________________________________________________________________________________________________________________________________________________________
The Setup:
This is going to be an outdoor grow, but I have started the Papaya Sherbet photoperiod indoors as our weather is still a bit too chilly to put a newly sprouted seedling outside (nighttime temp's dipping regularly into the 40's℉).
The plan is simple... let her grow inside under a 19/5 light schedule until the nighttime temperatures are in the mid 50's℉, which shouldn't be long. After which, she'll be moved outside and transplanted into the soil which I have already setup and inoculated with beneficial microbes from BioTabs and slow release dry amendments from Gaia Green. Once she's established herself outside she'll be given periodic top dressings of Gaia Green 4-4-4 and 2-8-4 along with worm castings and Compost Tea's. Her grow area is approx. 5'x5' and I have posts and a trellis net set up already for when she gets bigger to aid in training her. Let the fun begin!🤪💚
________________________________________________________________________________________________________________________________________________________________________________________________________________________________________________________________________________________________________________________
Weekly Updates:
9/20- Here we gooo... Week 6 of flower and the FastBuds Papaya Sherbet photoperiods flowers are exploding now!
9/22- My daily routine of watering, removing dead foliage and checking over the Papaya Sherbet continues. She is unfortunately starting to show signs of Septoria which is a bummer, but at least it's showing up late in flower so it hopefully won't affect the outcome too much.
9/24- Our weather has now cooled off dramatically, with daytime highs in the mid 60's℉, and nighttime temperatures dipping into the low 50's℉. As a result I have cut back on the amount of water the Papaya Sherbet photo is receiving daily.
9/26- There's another exciting week of flowering on the books for the FastBuds Papaya Sherbet photo and from the looks of her, she only has a couple of weeks to go! I'm so excited!🤩
Thank you for checking out my diary, your positive comments and support make it all worthwhile! 💚Growers Love!💚😎🙏
Processing
Likes
2
Share


Likes
17
Share


@EduardoLV885
Follow
Ya padamos el jiffy con la planta al sistema hidroponico , usamos floraflex en la solucion de nutrientres con un ph de 5.5 y una electroconductividad de 400 ppm


Likes
77
Share


@Ol_Greg
Follow
moving on along. Amazed every time i open the tent. Anxiety waiting is the worst. So i also started another gsc in coco a few weeks back.