





Processing
Likes
18
Share


@eezeegrow
Follow
I've switched on also the bloom light on my lamp but I've kept the light schedule (will change next week or so). 😊

Likes
71
Share


@ThrashedTV_BakedByGlaze
Follow
Made sure I posted a "Championship" QUALITY VIDEO according to @Fast_Buds :D
suck it to @Fast_Buds and whoever has been running the site for the past year because HOLY SHIT has the quality been down ACROSS the board 😴
The site wasn't even ready for the FLASH change over on new years and they had to scramble to do obvious backend work lolol
*Fart Noise*
😂

Likes
54
Share


@BudXs
Follow
What makes an outdoor grow successful? Is it dodging a hurricane and pulling pounds? Is it avoiding the sticky fingwrs of AstroThieves? Is it looking wpm and botrysis in the eye and telling em they stand no chance? Is it defeating all cockshit fucker parasites? Is it finding solitude and happiness in making something work? Something thats yours and only yours? Is it distraction from reality? Is it trolling the GD platform as the current presidenr and not growing at all?
Dunno. See my solo

Likes
1
Share


@eLeMeNt3de
Follow
This is it for the Blueberry Auto from i49, I am completely Happy with the turn out, came in a a bit hot at the end but the buds are fine and flushed

Likes
17
Share


@Grow420
Follow
Very first day of week 6 and what can I say my tent is full had one small problem of over watering one of my plants but this is resurrected now. Smell is great and lovely to see bud sites coming along well.

Likes
4
Share

@Smev1337
Follow
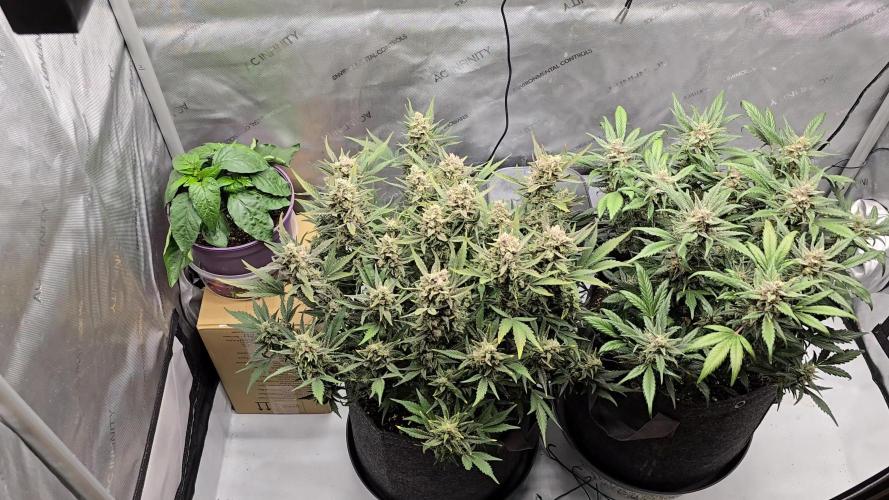
Hey all! this week both ladys are going good just the left plant started to yellow on the leaf tips so i don't know what that might be but we are in late flower anyways i guess! everytime i enter this room i smell these fruity terps and its really nice, the right plant also is producing lots of trichomes under the leafes hehe👽 happy growing all!💚✌️😎
Likes
7
Share


@MatimaisterWeed
Follow
No se si pueden ver el gif pero me ha costado mucho controlar el problema de carencia de calcio porque desde un principio creció asi, no tengo muchas fotos ni videos porque he estado enfocado en cuidar de las bebes <3

Likes
37
Share


@DogDoctorOfficial
Follow
Week 4 Veg Report: Croco Girls - The Mutant Chronicles 🌱
Hello Grow Fam! Week 4 of veg is here, and what a unique and eventful week it has been for the Croco girls! These funky mutants continue to surprise and amaze with their one-of-a-kind growth patterns. While the colder weather has introduced a few challenges, we’re adapting and thriving together. Let’s dive into the details!
Environmental Updates: A Chill in the Air 🌬️
This week, temperatures in the grow room dipped to around 21-22°C, with relative humidity (RH) holding steady at 65%. While not drastic, this slight chill is enough to slow down growth a bit as the plants adapt. Cooler temps can encourage tighter node spacing, but they can also delay development slightly. Here’s how we’re addressing it:
Proactive Monitoring: Keeping a close eye on temperature and RH trends to ensure they remain within optimal ranges.
Gradual Adjustments: Slowly warming the environment with indirect heat sources if necessary, without shocking the plants.
Remember, plants are incredibly resilient—and this slight delay will only make the Croco girls’ eventual growth even more rewarding.
Feeding Updates: All in One Pellets & Organic Boost 🌾
This week marked a significant milestone: I introduced Aptus Holland’s All in One Pellets to the soil mix. Here’s how it went down:
Preparation: Added a generous dose of the pellets to each pot.
Soil Enrichment: Topped the pots with Pro Mix soil, bringing the total soil volume to 1 liter per plant.
Feeding Transition: While I did one last watering with All in One Liquid, I’ll now rely primarily on:
Regulator (0.15ml/L): To support stress resistance and strengthen cell walls.
CalMag Boost (0.25ml/L): For calcium and magnesium supplementation, essential for strong stems and vibrant growth.
Start Booster (0.25ml/L): To continue promoting robust root development.
The combination of organic pellets and the Aptus liquid lineup ensures the girls have everything they need for a slow, steady nutrient release while maintaining microbial activity in the soil.
Watering Technique: Bottom-Up Hydration 💧
This week, I switched to bottom-watering, a game-changer in preventing fungus gnats and promoting healthier root development.
How It Works: Water is added to the tray, allowing the soil to wick moisture upwards through capillary action.
Advantages:
Reduces surface moisture, deterring gnats from laying eggs.
Encourages roots to grow deeper as they seek water, resulting in a stronger root system.
To further combat gnats, I’ve also placed yellow sticky traps around the pots. This dual strategy—bottom-watering and sticky traps—is already showing promising results.
Mutant Marvels: The Funky Leaf Phenomenon 🍃
Each Croco girl is a masterpiece of mutation, with unique leaf shapes and growth patterns. No two plants are alike, and that individuality is part of what makes this grow so exciting. I’m patiently waiting for them to grow large enough to identify their sex. Here’s the plan moving forward:
Option 1: Flip to 12/12 Temporarily: A one-week light flip to identify sex, then returning to veg.
Pros: Fast and straightforward.
Cons: Slight delay in veg growth.
Option 2: Clone & Flip: Take cuttings from each plant, root them, and flip the clones to flower.
Pros: Preserves the main plants in veg.
Cons: Requires additional space and time for cloning.
I’ll decide based on how the girls progress over the next week or two. Either way, I’m excited to unlock their potential.
Photography: Capturing the Magic 📸
This week, I focused on showcasing the Croco girls’ beauty through a mix of macro photography and behind-the-scenes shots. Using both my Sony and Nikon cameras, I’ve been able to capture intricate details—from water droplet reflections to the delicate veining in their leaves.
Why Use a DSLR/Mirrorless Camera?
Greater sensor size allows for higher-quality images compared to even the latest smartphones.
The ability to swap lenses provides flexibility for macro shots, wide angles, and close-ups.
Depth of field and manual focus control ensure every shot is intentional and artistic.
Lens Choices:
Macro lenses (e.g., 90mm) for close-ups of leaf textures and water droplets.
Standard lenses (e.g., 50mm) for portrait-style plant shots.
While phone cameras like the latest iPhone can take great photos, they can’t quite match the level of detail, depth, and creative control a dedicated camera offers.
Shoutouts & Gratitude 🙌
As always, a massive thank you to:
Terpyz Mutant Genetics for these one-of-a-kind Croco seeds.
Aptus Holland for their exceptional organic-mineral nutrients.
Pro Mix for the reliable soil base.
Future of Grow for their stellar LED lights.
TrolMaster for keeping the environment dialed in.
Grow Diaries for being an amazing platform to share this journey.
The Grow Community for your endless support and love—haters and lovers alike, you’re all part of this adventure!
Join the Journey 🌱
Be sure to check out my Instagram and YouTube for more behind-the-scenes action, including videos showcasing how these photos and macro shots were taken. Let’s grow together and keep inspiring each other with creativity and positivity!
Until next week, stay green, stay growing, and remember—every mutant is a masterpiece in its own right. 🌟 Let’s grow, let’s grow, let’s grow! 💚
Grower’s Love,
💚
Genetics - Mentha De Croco
https://terpyz.eu/products/menta-de-croco-fern-type?_pos=1&_sid=e9237cbcb&_ss=r
DogDoctorOfficial Discount Codes @ terpyz.eu - DOCTOR 15% off
Nutrition - @aptusholland
https://aptus-holland.com/
Led Power @ F.O.G. Future Of Grow
https://www.thefuturofgrow.com/en/online-store/BLACK-SERIES-600-p489093171
Controls @ TrolMaster
https://www.trolmaster.eu/tent-x
As always thank you all for stopping by, for the love and for it all , this journey of mine wold just not be the same without you guys, the love and support is very much appreciloved and i fell honored with you all in my life
With true love comes happiness Always believe in your self and always do things expecting nothing and with an open heart , be a giver and the universe will give back to you in ways you could not even imagine so
As always, this is shared for educational purposes, aiming to spread understanding and appreciation for this plant. The journey with nature is one of discovery, creativity, and respect. Let’s celebrate it responsibly and continue to learn and grow together!
Growers Love To you All 💚

Likes
4
Share

@Cukito
Follow
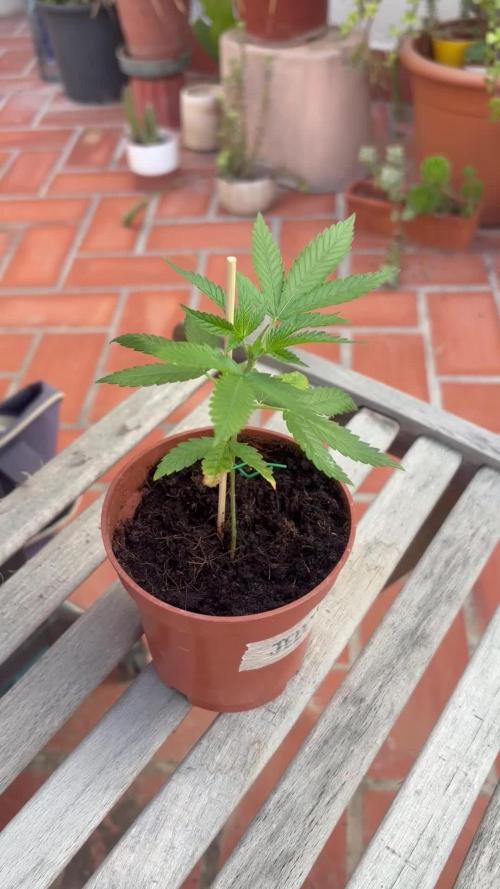
The tomatoe is doing great!! As you can see Ive been away for a week but my dad kept watering the plant nicely. Its growing fast but the base is not getting big :(


Likes
Comments
Share


@BenDidKnEe
Follow
The clones are doing ok. I might have the humidity to high because they haven’t had water this week, the soil is still moist from the transplant. Once the roots hit the bottoms of the pots they should spread out causing the foliage to explode. In week 8 I’ll come back and edit and tell myself I told me so. Happy growing folks




Likes
10
Share


@BasedBuds_89
Follow
Had a great week. These babies grow slowly but thoroughly. Definitely will be running more.
Likes
6
Share


@mikheil007
Follow
Vanilla Latte is very special strain for me: I've never grown the plant like this: thank you Humboldt Seed Company for such a good job

Likes
1
Share


@Trinidad
Follow
04.08.25. Day 70
10 weeks and I think she still has about 2 more weeks left. She is a big girl. 98cm tall. I gave her a fresh reservoir change out today. She has developed some symptoms on her leaves. Maybe nutrient burn or maybe the onset of some kind of deficiency. She is looking good. I will continue to monitor and update.
Likes
8
Share


@CalGonJim
Follow
4/13 11AM MONDAY RQS Gelatto 44 and Punch Pie Tyson 2.0 are Finished!!! I will let them go a couple weeks longer but they are good to go! 9/10 Srong, good in coco/ no problems at all!
MONTEL DREAM WIDOW 11/10 ANOTHER WINNER!! So much resin, AMAZING BUDS SHAPED LIKE SPIDERS...SO GREAT. My ICE t is a little small, I didnt have enough space so she stayed compact and perfect small. Bubbles, Julinan and Ricky are doing better than ever
4/14 4:09 AM I just had an idea flash for my next grow so I need to make some notes. I have a cutting I took from a gorilla gas F1 fast flower by seedsmen I did it last year. I took the cutting when she was in flower. I put her in an organic grow plug that I got from seats man as well and I tortured her and I forgot to water it and I left it in there and then I put her in 1 gallon and I haven’t tried to do anything but she survived everything so I’m gonna grow her out into a full-size plant. I’ll probably put it in a bigger pot and do a small smaller grow not so many plants next time I think she’ll really be something.
4/14 1;23pm I turned the light up to 114 W and I’m just under 120. I’m trying to feel the driver and keep it cool so it doesn’t heat the room up. I have some plants in there that I didn’t veg right so they’re kind of screwed up and I have too many of them. I’m gonna have to take some down. The extra plants are preventing the better plants from growing so my experiment making my own seeds, it actually worked, but it’s still not as good as getting it from the actual breeders. And I have a series of medical problems that disable me for several days at a time so plans not look good and then I get behind a little bit so that.


Likes
38
Share


@Cariboo_OG
Follow
Utopia Haze is a rare heavily sativa dominant hybrid (90% sativa/10% indica) strain created through back crossing Brazilian Sativa strains. This tasty little bud took home 1st Place for Best Sativa in the 2008 High Times’ Cannabis Cup and for good reason – with its potent 18-22% average THC level and long lasting cerebral effects, Utopia Haze is one powerhouse smoke. The Utopia Haze high comes on soon after you finish your first toke, hitting you with a strong cerebral lift that infuses you with a sense of hazy relaxation.
Type: Feminised/Photoperiod
Cultivation: Indoor/Outdoor
Flowering Time (days): 70-75
Indoor Yield (g): Up to 650
Feminised Outdoor Harvest Month: October
Feminised Outdoor Harvest Month Week: 3rd-4th week
Aroma: Citrus, Woody, Pungent, Mint
Effect: Cerebral Lift, Hazy Relaxation, Sleepy
Welcome Everyone to the Final Entry of my Utopia Haze Grow !
There is so much to discuss ! I have been extremely busy as of late trying to get this Harvest together, but i am happy to have it here for you now !
I Seriously under estimated the amount of time, help from others, and my own necessary skills to pull this off.. and i still kind of screwed it up lol !
But its worth noting i have never actually done this before and trying to document it during....was extremely hard.
It is next to impossible to work an iPhone with rubber gloves on !
First I want to discuss everything step by step so before you jump straight into the comments on how the end product is so small in "quantity"
Rest assured i am happy with its"quality"...and thats all that matters to me because Life is a journey not a destination! and i have learned so much from this grow that I couldn't be any happy even if i messed some things up :)
But at the very least I hope you read through this entry in its entirety with an open mind and focus more on the process, rather than just the outcome!
I ran out of Ice & i was only able to wash three times..(normally I've heard you should go sometimes 5-6 washes)
Preparation is Key & things will be much better next round :)
Photos 1-22
These are pretty self explanatory but for those of you just tuning in now.. this is what happens to a very happy plant when you don't have the necessary tools to monitor key components of growing cannabis.. Ph, as well as EC levels play a very key role in the outcome of your grow lol that being said I was just able to save this plant by purchasing both tools but that doesn't mean the plant didn't suffer because of the prior events.. This was a Huge reason behind me choosing to turn this harvest into what i would consider
"Solventless Hash Rosin" from "Ice water extracted Bubble hash".
Pictures 23
The idea here is the process of using "fresh Frozen Cannabis" this has been discussed many a time online on such sites as instagram and here on grow diaries as well.. I personally have Never tried the process so i decided to try it out and make a judgement for myself..
Video 24
The Cannabis has now been in the freezer for 72 hours making it very well frozen.. as you can tell i struggled getting it all into the 25u Screen Wash Bag. One thing of note i would do differently is i will de-stem my next batch as i also believe this played a part in the amount of plant matter that escaped through the sieves.
Photo/Video's 25-28
The idea here is "ice water Seiving" & especially with the bags that I am using here that are only have screen material on the bottom portion of the bag it is very important to have spaces in-between the screens to allow the water to pass directly through the screens into the bottom bucket with the least amount of resistance.. because the hash is so extremely temperature dependant if it gets warm on the side of the bag.. it will stick there and not make it to the bottom to become use able product..
29
You do not need to use as much Ice as i used here lol... the idea is to keep everything very cold..i certainly achieved that but at the sacrifice of using so much that i ended up grinding product and producing "contaminants" but in the end they are just plant matter that i would be smoking when i rolled up my joint either way so.. I'm not super disappointed..
But it should be noted that what you want to achieve here is a Layering effect where you have the wash bag between two small layers of ice while the "water current" washes the Trichomes away allowing them to be separated by the screens setup below :)
Before Starting the machine you should allow some time (i.e.;10-12minutes pre soak to allow the product to become saturated) before the first cycle.
By video 32 I have just ran out of ice lol..
Video 33-34
Here I have a tip for you.. to separate the screens that you sieve through.. cut 5 gallon buckets to stretch them across nice and tight.. it'll make scooping your Bubble that much easier ! i learned this from the many "Frenchy" videos I have watched :)
Picture 35
Here in lays the problem for most people.. drying your hash without loosing vast amounts of "Terpenes" whilst also stay ever vigilant against mold !
Thanks to all those videos I've watched on youtube.. id like to think this was one of my most successful parts of this process..
Things to Note; Terpenes start to seriously evaporate at temperatures 68F or 20C
you need to stay as cold as possible whilst bringing the Relative Humidity in the space down into the 40-30% to stay away from that nasty mold !
I used my cold storage room in the basement.. with a dehumidifier running to keep the space at 45% RH & staying at a constant 15c.
All while spreading the hash as thin as possible across parchment paper, on top of the white screens with a fan moving air across both sides of the paper.
Pictures 36-38
These are some macros i took in the middle of my drying session I fell in love with the colour.
Yes i know the black spots are plant material but they will get caught when i bag the hash & squish the oil out.
Thing to Note; at this stage it is important to ensure you 'micro plane" the hash down as fine as you can whilst staying weary of the temperature... any "chunks" will hold pockets of moisture.. that lead to potential problems..ie; mold ...
Picture/Video 39-41
Successfully planed bubble hash ready to be bagged and Squished !
Picture 42
Ive decided to follow Pedro.. from Pedros Grow Room and double bag to be on the safe side so i don't have any blow outs.
So thats One 25u bag inside one 160u bag ! :)
Pictures 43
This is almost 3 grams of the bubble hash from above, already melting in the bag.. this is where i ran into trouble again lol things started getting to warm in the house and i was only able to get one of the three squish's i did on video :( things started getting sticky.
Picture 44
This is basically just a photo of the equipment I'm using; 3x5 LowTemp Cage in the frame I built myself, with a 20Ton bottle jack.
Something to note here is this is an older Lowtemp model with only a single heating zone which is which i have it closed here heating Both sides of the press :)
As well as the importance of having adequate pressure on your plates.. my rig is very overkill for the size of hash bags..lol
Video 45
Here is the lovely press video.. its didn't quite work the way i wanted either lol my directional folding wasn't quite tight enough for a big "drip" :)
&the Press was set to 65°c
Photo's 46-50 are pretty self explanatory :) I had a blow out.. but still managed to pull an 80% return from the hash once squished...& yes it tasted amazing :)
Was it worth it in the end... that could be debated.. for some..i understand..its not your thing, but for those of us that are interested in making our own concentrates.. free from Solvents...
I wouldn't make it any other way :)
If even ONE of you reading this diary finds it helpful to reference for ANYTHING.....even if its "what not to do" ill consider it a success !
Thanks again for tagging along on this garden adventure.. its been one heck of a journey !
Much Love from B.C. Canada,
Until Next time,
Cariboo
Likes
24
Share


@MadeInGermany
Follow
Hi everyone 🤗
We are in the second week after changing the lighting time to 12/12 h.
The actual proper flowering begins in the next 3-7 days, but the flowering days are counted 😊.
It developed very nicely in the current week and got a real growth spurt 😍.
Next week I'm going to take the bottom shoots that don't make it upstairs, so that she puts her energy in the upper part of the plant and not in the lower popcorn buds 👍.
She will get Canna Vega Bio this week, and next week when the flowers start to develop, she will get Canna Flores.
I wish you all a nice start into the new week, stay healthy 🙏🏻 and let it grow 🌱
You can buy this Strain at :
www.Zamnesia.com
Type:
Runtz
☝️🏼
Genetics:
Zkittlez x Gelato
👍
Vega lamp: 2 x Todogrow Led
Quantum Board 100 W
💡
Bloom Lamp : 2 x Todogrow Led
Cxb 3590 COB 3500 K 205 W
💡💡☝️🏼
Soil : Canna Bio
☝️🏼
Nutrients : Canna Bio
☝️🏼🌱
Water: Osmosis water mixed with normal water (24 hours stale that the chlorine evaporates) to 0.2 EC. Add Cal / Mag to 0.4 Ec Ph with Organic Ph - to 6.0 - 6.3

Likes
17
Share


@RakonGrow
Follow
**** HAARVEST ZOE ****
Nice Strain ,
My little Zoe really made all the mistakes you could possibly make. No matter when I give light or want water or fertilizer. It grows and grows and grows, the main thing is that there is light. It was one of my free seeds from Zamnesia. So far all seeds have germinated. I store my seeds in a dark, airtight container at 6°C. Tastes kind of sweet after curing.
Greenhouse Feeding is a really easy fertilizer to use. I used the BioEnhancer again and again. My little Zoe thanked me. The BioGrow was used as topdressing and is doing its job. The BioBloom also does its job at the right time.
And that's really great and easy if you don't have an autoflower. Of course there is a corresponding product. But I was happy to get anything here at all. Legalization has wiped out the market. But for next time I have an appropriate soluble fertilizer for fast-flowering plants. It doesn't work for 8 weeks :))
I use a Sanlight Evo 3-60 1.5 with Bluetooth dimmer. There's nothing to complain about there. Set daily cycle via app. Helpful if the weather or environment is so bad that you have to regulate the light intensity.
33g after 5 days dry . 24.5 °C to 22°C with 50%-60% .
curing in a vaccum box at 18°C .
It looks like I'm drying too long. // It tastes a bit crunchy.
Day 79:
trim , slow vacuum box to cure 22°C and 61%rH .
Day 76:
videostuff: been drying for 4 days (res 640x480) ( optical zoom x200 - x250 )
Day 72:
DLI usage total this Plant : 2236.6 DLI in 70 Days .
wet trimmed, cut off, hung upside down. see you after 14 days
Day 71:
preparing for harvest . 24h long night session .
DLI : 0
Day 70:
- Sanlight DaylightCycle
- + ON 200PPFD (00:00) - 800PPFD (03:30) - 800PPFD (16:30) - 200PPFD (18:00) OFF
video and photo tryouts with the digimicro mobil x300 optical zoom , mostly freehand
Day 69:
- Sanlight DaylightCycle
- + ON 200PPFD (00:00) - 1000PPFD (03:30) - 1000PPFD (14:30) - 200PPFD (18:00) OFF
incredibly hot and rain. lost some terpene :)) Well, summer is coming,
Day 68:
- Sanlight DaylightCycle
- + ON 200PPFD (00:00) - 600PPFD (00:30) - 800PPFD (03:30) - 800PPFD (14:30) - 600PPFD (17:30) - 200PPFD (18:00) OFF
- Added 1L bottle of water
It's hot, hot, hot, Zoe would like more water.
changed daylight cycle so it match the weather problems. tent is open until my real night comes.
103 flowers (including popcorn) counted, due to an accident about 15 flowers are missing.
Day 67:
- Sanlight DaylightCycle
- + ON 200PPFD (00:00) - 600PPFD (00:30) - 900PPFD (03:30) - 900PPFD (14:30) - 600PPFD (17:30) - 200PPFD (18:00) OFF
- watering bottle water 1.75L
weather to hot , changed daylight start time and daylight cycle so it match the weather problems.
I'm lucky, buds are still growing :)))
Day 66 (we are on the road with maximum sanlight )
- analyse some trichome .
- make some Zoom Pics and Video stuff .
- Sanlight DaylightCycle :
- + ON 200PPFD (00:00) - 1000PPFD (00:30) - 1000PPFD (13:30) - 800PPFD (17:30) - 200PPFD (18:00) OFF
- DLI will stress alot ...
Anyway, it's too hot in my room... I open the tent and now everything is fine with the temperatures and I increase the Sanlight to 100% for the first time. May Zoe love it or leave it :)) We'll see what happens
Day 65 :
Sanlight DaylightCycle : ON 200PPFD (00:00) - 800PPFD (00:30) - 850PPFD (13:30) - 800PPFD (17:30) - 200PPFD (18:00) OFF
It will soon be ready for harvest.
Likes
Comments
Share

@Organic_bud21
Follow
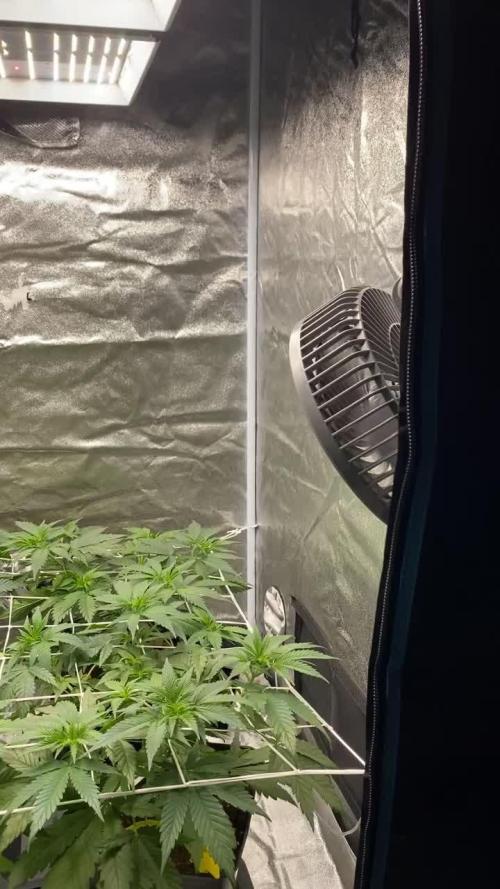
In der 6ten Woche Lag der Fokus auf Erholung von umtopfen, damit ich vor der Blüte Blätter und Triebe entfernen kann, die ich nicht benötige. Zum Ende der Woche habe ich dann das Erste Netz eingezogen und mich geärgert, warum ich es nicht schon früher gemacht habe. Naja man lernt jedes Mal dazu. Den Abstand zur Lampe habe ich auf 60cm verringert.
