Likes
Comments
Share


@420DeepGrow
Follow
Gracias al equipo de Kannabia Seed, Marshydro, XpertNutrients y Trolmaster sin ellos esto no sería posible.
💐🍁 Moby Dick 🐋:
Criada a partir de dos parentales icónicos, como es el cruce de White Widow y una Haze pura G13, este choque de titanes provoca un híbrido que golpea a las puertas de las sativas más fuertes disponibles en el mercado.
Estamos ante una criatura impresionante en todos los sentidos, con ejemplares que florecen en solo 9-10 semanas en interior y arrojan un peso en lonja de 550 gr./m²
Al igual que su padre Haze, nuestra Moby Dick ofrece agradables notas cítricas, pero con efluvios de vainilla y eucalipto, una mezcla de aromas que genera una combinación intrigante, que puede llenar cualquier habitación con una fragancia inolvidable.
El sabor es muy parecido a su olor, con toques de limón agrio que harán que tu lengua cosquillee al inhalar, convirtiéndose lentamente en un humo dulce y terroso, con pinceladas de madera e incienso que se adhieren al interior de la boca al exhalar.
💡TS-3000 + TS-1000: se usaran dos de las lámparas de la serie TS de Marshydro, para cubrir todas las necesidades de las plantas durante el ciclo de cultivo, uso las dos lámparas en floracion para llegar a toda la carpa de 1.50 x 1.50 x 1.80.
https://marshydro.eu/products/mars-hydro-ts-3000-led-grow-light/
🏠 : Marshydro 1.50 x 1.50 x 1.80, carpa 100% estanca con ventanas laterales para llegar a todos los lugares durante el grow
https://marshydro.eu/products/diy-150x150x200cm-grow-tent-kit
🌬️💨 Marshydro 6inch + filtro carbon para evitar olores indeseables.
https://marshydro.eu/products/ifresh-smart-6inch-filter-kits/
💻 Trolmaster Tent-X TCS-1 como controlador de luz, optimiza tu cultivo con la última tecnología del mercado, desde donde puedes controlar todos los parametros.
https://www.trolmaster.com/Products/Details/TCS-1
🍣🍦🌴 Xpert Nutrients es una empresa especializada en la producción y comercialización de fertilizantes líquidos y tierras, que garantizan excelentes cosechas y un crecimiento activo para sus plantas durante todas las fases de cultivo.
Consigue aqui tus Nutrientes:
https://xpertnutrients.com/es/shop/
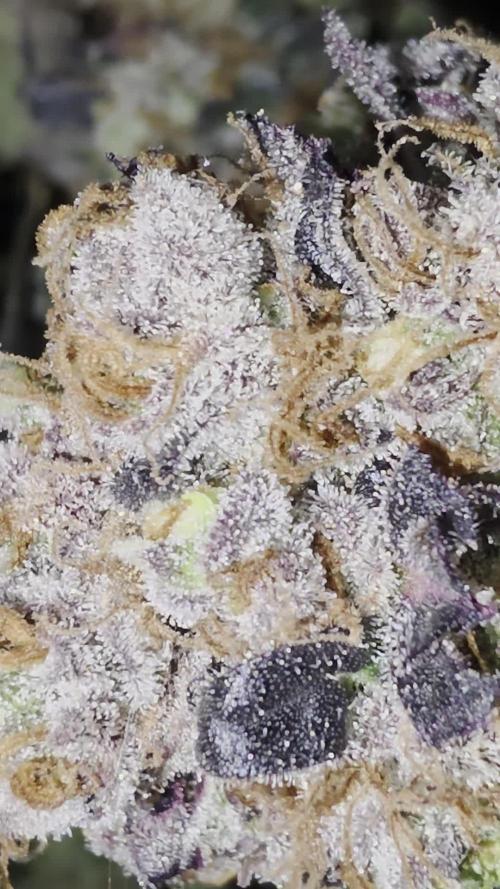
📆 Semana 6:
Esta semana ha explotado 💣, los cogollos comienzan a tomar densidad y llenarse de resina, me hubiera gustado aplicar algo mas de nutrientes en la fase vegetativa, la próxima vez será.


Likes
8
Share


@DeepRootsGrowTrees
Follow
Week#5 Baby Boom By Kannabia Nov. 25th- Dec.2nd.
Baby Boom has grown at a rapid rate this week growing to 15 inches and also growing side branches with multiple tops and has started to flower this week.


Processing
Likes
52
Share


@CBD_Sweden
Follow
@MephistoGenetics,
Hi all the happy people here in GrowDiaries.
This is my second cultivation ever and it will be fun to try a bigger space than my closet grow.
First, I'm just going to say I'm done with the construction of my new growroom.
The room is 2.14 meters by 1.7 meters and has a ceiling height of 2 meters.
It provides a floor area of 3.6 square meters.
I use a 54 Watt Lightwawe T5 for germination and 2 Pcs 400 Watt HPS lamps.
I have a channel fan that replaces the room air about 40 times an hour to get a comfortable environment in the room, the air enters a fresh air intake from the outside.
The air is purified through a carbon filter to then leave the room to the rest of the basement.
Then I use that heat to heat the rest of the basement.
I will use 10 pcs 15 liter Autopots to grow with and a 100 liter water tank that supplies the pots of water and nutrition.
I will grow completely organically in soil and will watercure my buds to get the best possible medicine for me.
But there are no cultivation rooms to be displayed here, so I continue with what is most important.
I am very excited to see how the new growroom will work and how this Stilton Special will turn out.
Strain Name: Stilton Special F1
Genetic heritage - Sour Livers F3 x Northern Cheese Haze F3
Strain behaviour - Stilton grows well from the off, and develops into a stout but branchy specimine that leads to a fine yield of awesome flowers. She's not too stretchy but also is sizeable enough with good growth, to train and shape to your liking. Flowers develop pretty fast and grow to a good size, it may to advised to clear out some undergrowth and if needs be a very gentle defoliation mid-way through the grow, although leaf tucking may suffice well enough.The end product is of top shelf quality and she doesn't lack in yield either.Give your garden, nose, and body a treat and be sure to indulge in a slice of Stilton this year, You won't regret it.
Size - 50 - 70 cm
Structure - Medium height but bushy
Flower Density - 9/10
Indica/Sativa - 65/35
Cycle Time - 65 to 70 days from sprout
Yield - 90 to 140 grams as a single plant
Best Method for overall high yield - 9-12 per 1,2m x 1,2m sq in 10-15 Liter pots (Soil)
Aroma - Very strong, Cheesey/fruity/sour/spicey/ with a dash of coffee.
Taste - Dank berries
Effect - Good hybrid powerful but balanced effect
Medicinal Benefits - TBA
Best Grown - Indoor/Greenhouse
Cannabinoids - TBA
Extract information - Ideal extract candidate - High in resin, oil and terps.
--------------------------------------------------------------------------------------------------
2017-10-02. New week, im starting to increase the nutrients now. Added video and pics. The girl is 31 cm high and very bushy. She is in some early stages of flowering.

Likes
16
Share

@DogDoctorOfficial
Follow
🍋 Lemon Cherry Gelato — Week 7 from Seed
Flower Week 3 | 12/12 from Seed
Welcome back everyone — and welcome to anyone just joining the journey 👋
This is our Lemon Cherry Gelato update, currently Week 7 from seed, which we’re considering Flower Week 3 in our 12/12-from-seed room.
There’s a lot to talk about this week, so let’s start by bringing everyone up to speed.
⸻
🌱 Quick Recap — How We Got Here
This run is part of a larger 8×8 mixed-genetics environment, where multiple cultivars share the same room, light strategy, and environment.
The approach from day one has been:
• low stress
• observational
• plant-led decisions
• learning in real time
No chasing perfection — just paying attention.
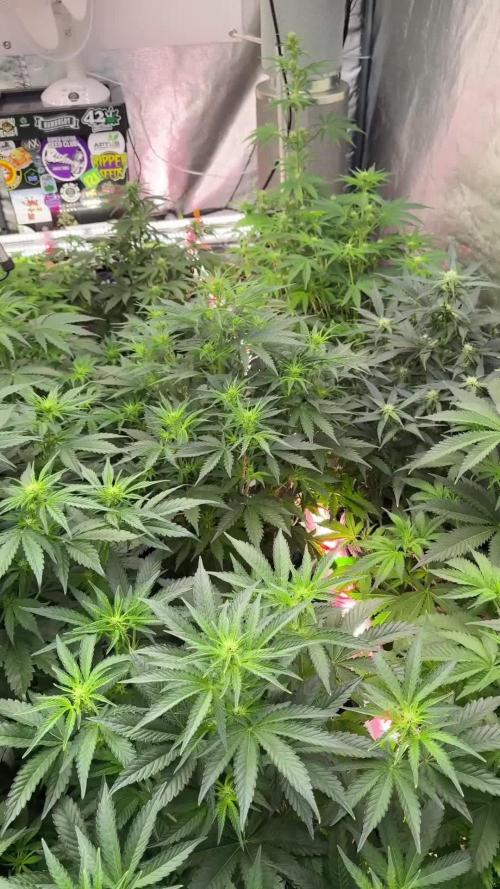
The Lemon Cherry Gelato plants have been vigorous and very bushy since early on, with strong branching and dense foliage that required intervention as flower development began to accelerate.
⸻
✂️ Defoliation — Why This Week, Why This Way
This week we performed a fairly deep defoliation, similar to what was done on a few other girls in the room.
Why?
• The plants were extremely bushy
• Light penetration was becoming limited
• Airflow needed improvement
• Bud sites were stacking fast
We removed a significant amount of inner and overlapping foliage to:
• allow photons to pass through the canopy
• improve airflow
• help the plant focus energy where it matters
It may look aggressive in photos, but it was done intentionally and carefully.
⸻
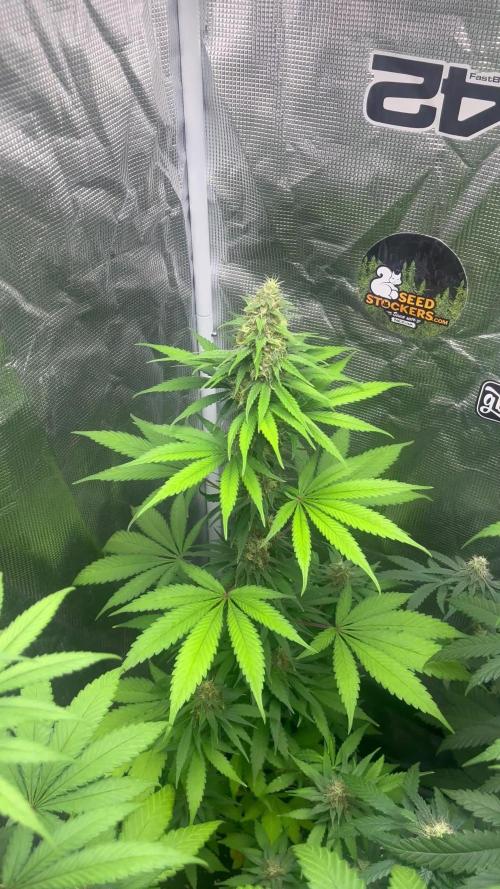
🌿 Plant Structure & Phenotypes
You’ll notice two slightly different expressions in the photos:
• First photos → Lemon Cherry Gelato
• Second one → what we’re calling the “other” Cherry Gelato
Both plants:
• very bushy
• beautifully structured
• incredibly lush green
One plant showed some funky leaf expressions, but nothing concerning — genetics being genetics.
Both were defoliated deeply, but not excessively — just enough to give them room to breathe.
They are not alone in the room, and in a shared environment, balance matters.
⸻
🔥 Minor Observations
• A few burned leaves from under-canopy lighting
• Nothing serious
• Easily managed
• Already addressed
You’ll spot them in some of the mini photos.
⸻
🌡️ Environment & Feeding — Why We Changed Nothing
This week, nothing was changed on purpose.
Current parameters:
• Day temperature: ~28 °C
• Relative Humidity: ~65%
• EC: 2.4
• pH: 6.5
• Plant height: ~40 cm to ~80 cm
• Lighting: LED
Many growers would say these temperatures are too high for flower — but context matters.
Under LED lighting, leaf surface temperature runs ~2–4 °C cooler than ambient room temperature.
Because of that, we focus on leaf VPD, not room VPD.
The plant is what matters — not the number on the wall.
We are not chasing numbers.
We are paying attention to them.
⸻
🌱 Plant Response
The plants are telling us clearly that they’re happy:
• deep, lush green foliage
• no visible stress
• strong internodal structure
• uniform nutrient uptake across phenotypes
When the plant is happy, stability beats adjustment.
That’s why the feeding stayed exactly the same this week.
⸻
🔮 What to Expect (and Not Expect) Next Week
What we expect:
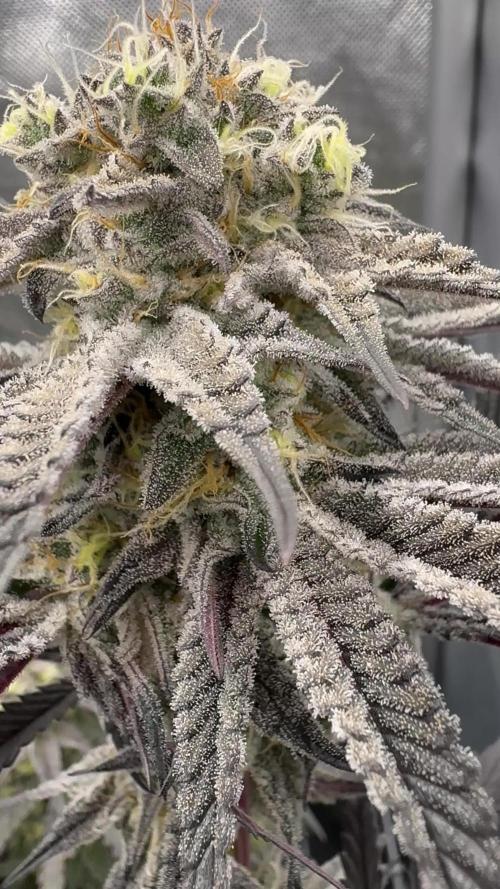
• visible bud stacking
• calyx development accelerating
• stretch slowing down
• energy shifting fully into flower production
What we don’t expect:
• major environmental changes
• aggressive interventions
• unnecessary corrections
Next week is about watching, listening, and letting the plants work.
⸻
🙏 Final Words
To our humble eyes, this garden is looking outstanding — but we’re always open to:
• criticism
• suggestions
• questions
• different perspectives
Lovers, haters, followers, OGs, newcomers — everyone is welcome here.
This is a shared space, and interaction is how we all grow.
Big thanks to:
• the GrowDiaries platform
• the sponsors
• and everyone who takes the time to read, comment, and exchange energy
If you have thoughts, ideas, or see something we could improve — please drop it below 👇
Let’s keep learning together 🌱💚
📡 Please stay tuned they can try and take us down but we never quit https://www.youtube.com/@DOGDOGTHEDOCTOR NEW
🙏 Thank you for your patience and continued support.
FOR DISCOUNT CODES AND MORE JUST FOLLOW THE LINK https://website.beacons.ai/dogdoctorofficial
📲 Don’t forget to Subscribe and follow me on Instagram and YouTube @DogDoctorOfficial for exclusive content, real-time updates, and behind-the-scenes magic. We’ve got so much more coming, including transplanting and all the amazing techniques that go along with it. You won’t want to miss it.
GrowDiaries Journal: https://growdiaries.com/grower/dogdoctorofficial
Instagram: https://www.instagram.com/dogdoctorofficial/
YouTube: https://www.youtube.com/@dogdoctorofficial Deleted by Youtube
Vimeo : https://vimeo.com/dogdoctorofficial Under construction stay tuned ⸻
Explore the Gear that Powers My Grow
If you’re curious about the tech I’m using, check out these links:
🔆 Lighting & Environmental Control
• Future of Grow — Advanced LED lighting technology
https://www.futureofgrow.com/
DISCOUNT CODE: DOG20
• Lumiflora — Under-canopy LED lighting
https://lumiflorade.com/
• TrollMaster — Environmental controllers and automation gear (past collaboration)
⸻
Genetics
• Zamnesia Seeds — Genetics used in this project
https://www.zamnesia.com/
⸻
🌱 Soil, Substrates, Boosters & Root Support
• Plagron — Substrates, bio mixes, and supportive products
https://plagron.com/en/
⸻
🎒 Storage, Curing & Preservation
• Grove Bags — Curing and storage solutions
https://grovebags.com/
⸻
📸 Photography Equipment & Tools
(Not sponsors, but part of my creative toolkit)
• Sony A6700
• Sony full-frame macro lens + few more
• Stacking photography workflow - learning
• iPhone (for behind-the-scenes shots)
We’ve got much more coming as we move through the grow cycles. Trust me, you won’t want to miss the next steps, let’s push the boundaries of indoor horticulture together!
As always, this is shared for educational purposes, aiming to spread understanding and appreciation for this plant. Let’s celebrate it responsibly and continue to learn and grow together.
With true love comes happiness. Always believe in yourself, and always do things expecting nothing and with an open heart. Be a giver, and the universe will give back in ways you could never imagine.
💚 Growers love to all 💚
📸 P.S. – The Eye Behind the Lens
All photos in this diary (for now — except for the ones showing the camera, which I took with an iPhone) are taken with a Sony A6700 paired with a Sony full-frame macro lens and a few more.
Photography is part of the story — it’s how we share the fine textures, the glow, and the quiet details that words can’t always capture.
I’ve also started experimenting with photo stacking — a technique where multiple images, each taken at a slightly different focus point, are layered together to create one perfectly sharp image from front to back.
It’s not digital enhancement or AI; it’s pure photography — a way to reveal the plant’s beauty in microscopic depth, from trichome to petal.
You’ll even see a few shots of "ghost me" capturing the shots — camera, lens, setup — because every grow deserves not just to be cultivated, but documented like art.
FOR DISCOUNT CODES AND MORE JUST FOLLOW THE LINK https://website.beacons.ai/dogdoctorofficial
NEW DISCORD - Official Server Invite Link : https://discord.gg/ksjAkA5T74

Likes
Comments
Share


@Dankmark420
Follow
We have flipped about 2-3 weeks ago and now we finally see some signs of flower🙌🏼😍


Processing
Likes
2
Share


@wavycannabis
Follow
Just trimmed up the girls one last time before the flip, took about twelve clones off of them all in total because I need to select a blueberry x zamal mom from them. really hoping they stretch quickly in the first couple weeks to give me some extra room to work with in the canopy.


Likes
2
Share


@CannaIGrow
Follow
Trop Cherry #8 x BeeJayz hasn’t been topped, I transplanted the girls this week from a 1 gallon pot to a 3 gallon pot. Trop Cherry was in a plastic pot but now in a fabric pot. Plants seem to be growing well.
Processing
Likes
2
Share


@nodesign
Follow
I changed the water and raised the nutrients this week, I'm going to start 12/12 today. Not much to report but they're growing fast, power plants are already out pacing the rest like last time.


Likes
3
Share


@arzaq
Follow
We made some adjustments to the LST.
We try to stop Thrips from spreading, using Neem oil with water spray. Continue with the fertilizer as the last week.

Likes
6
Share

@eldruida_lamota
Follow
Vamos familia, actualizamos la quinta semana de floración de estas Runtz Punch de Herbies.
La temperatura que estuvo entre los 24-26 grados y humedad dentro de los rangos correctos.
En cuanto a las plantas las veo verde sano, estiraron bien y ensancharon bastante también.
Se nota que los nutrientes de la marca Agrobeta, añadí Thor y Mega Pk, hacen sus funciones.
Las flores empezaron a engordar y a llenarse de tricomas, por el momento todo correcto, os dejé también alguna novedad y un cambio en la sala, agradecer al equipo de Mars hydro por el nuevo TSW2000. (los últimos 5 años cultive solo con los leds de esta marca).
- os dejo por aquí un CÓDIGO: Eldruida
Descuento para la tienda de MARS HYDRO.
https://www.mars-hydro.com
Hasta aquí todo, Buenos humos 💨💨💨

Likes
23
Share


@RadDad
Follow
Blueberry is on her way and doing well. I've moved her from the propagation area to the grow tent so hopefully the better conditions will get her growing big and strong. One more week and I will transfer her to her final pot.

Likes
49
Share


@Secretflower
Follow
Hello my friends,
...May 30 , 2022....Day N°79..
...Flowering day N°23...
My three Feminized Watermelon Candy are fine, there are beautiful, flowers smells awesome.
I feed them with the Hybrid powder and some Boster from Green House Feeding Nutrients. I gave them some CalGreen from Metrop, the best Cal-Mag of the market.
They are under a MarsHydro TSW 3000 at 60% of power and at 30cm of the canopy.
www.zamnesia.com
www.mars-hydro.com
Thank you very much for passing by.
Wish you only the best with your green projects, peace.
See you soon 💨💨💨

Likes
12
Share


@Growfun
Follow
Everything's going well. The Maverick has fattened up a little bit which is nice she does smell kind of funky too not a strong smell but can't wait to try her.other than that it's just a waiting game. ✌️
Edit: I said blue cheese in the video when it is actually blue dream. And you can thank kosher kush for helping me make this video. 😉🤯

Likes
18
Share


@VI_Cannabis
Follow
June 7 - We ordered some new lights last week, they are 240w kingbrite samsung lm310h with uv/ir, 3000k, and meanwell drivers.
We setup the new room and moved the girls into there. After a bit of LST and a watering (with nutrients) at roughly 7ph, they were ready to go under the 2 new lights and the same SF-1000 we have been using in this grow.
The new room is a 12 ft enclosed trailer. I moved everything from the small tent into this. I put clear poly on the walls, floor and ceiling. I put poly on the shelf I am going to be keeping in there as well. I bought 50ft of 6mm mylar and lined the floors, roof and sides with it. I plan to get some reflective tape to seal everything and to cover the wood. I did not get much of a chance to watch temp's today as they it was later in the evening after all was said and done. The inline fan blowing in air from outside.
June 8 -
9 AM i checked the plants, they were at 25.2 and 50% RH. Late through the day I had checked and we had gotten up to around 32 degrees. So I moved the inline fan to the closer vent, hooked up to that, and had the air blowing out of the trailer with the inline fan sucking it from above the lights.
I then added oscillating fan and had it blowing air on the left side of the room so it would somewhat circulate once I closed the doors. I then checked at about 9pm and we were at 22 degrees. Definitely noticed a decent amount of growth already. I have the lights on a 22/2 cycle as I was worried about the heat at night time.
June 9 -
Some great growth from the girls, still having problems controlling the temps in the afternoon. I decided to prop the door open a bit to have a constant breeze throughout the day while I am at work. Decided to do some more LST and also a bit of defoliation. I took about 25% of the leaf's that were blocking the new growth as it was getting a bit bunched up. I was then told the leaf's are almost solar panels for them. So from now on I will be trying to just do some tucking unless needed. The leaf's I removed were most of the damaged leaf's, I am not to sure if that makes much of a difference. I gave them a watering with only water as there is a potential I am getting a bit of a nutrient buildup along with the PH problem. Or potentially the reason for the ph problem is nutrient buildup. After watering with A PH of 7 I got some run off and tested it. The smaller plant gave me a PH of about 5.5 where the bigger one is around 5.0.
June 10 -
Plants are looking happy and showing tons of growth. Seems to be trying to stretch outwards. Not a ton of sign of PH issues showing so potentially getting it under control. Still a bit of damage to previous leaf's but it is what it is! The last few days I have been leaving the door open a bit in order to keep the temps down. I decided to test something and turn the lights off (automatically) at 11AM and back on at 5PM so light schedule has now changed to 18/6 and it seems I may have figured out the issue. We haven't had lots of sun the last couple days so it hasn't been to hard and I have yet to know if it truly fixed the heat issue for now. (I will be looking into a ac unit as well since it typically gets to around 30-35 around here.
June 11 - Pulled some of the branches back down and added a few more LST spots. Seems we have a good amount of growth from the smaller plant out of the 2 topped spots. Unfortunately it looks like I fucked up on the bigger plant and only one of the nodes seems to have new growth. I will continue to monitor that but I think I cut the node to low and also to soon. Other then that, the girls are doing great. They seem to be absolutely loving these new lights. I gave them some nutrient water today as well. roughly 3L each. They seem to be A hell of A lot more thirsty under these new lights.
June 12 - The girls are doing great , they are still just doing growing away. Lots of progress everyday. I am going to be getting a go-pro so I can set-up a time-lapse for the rest of this grow. I received my new inline fan, I got A ac infinity CLOUDLINE T4 with the temperature humidity controller. I am going to be having one fan pushing fresh air in and one fan pulling out the hot air. I will be doing that tomorrow since I have to work today.
June 13 - I ordered another 50ft of mylar and that showed up today. I have decided to remove the shelf and add another 3+ feet to the grow space. So today I installed more poly, mylar, the ac infinity fan. I have it set-up to pump in air if it gets to warm. I am thinking of switching it to the output that way if it gets to hot or to humid I can have that air pulled out of the trailer. Right now my other inline fan is the outtake and I just have it set on full. Overall I think everything is set-up a bit better and more accessible. I will be putting my 2x2 tent in there at the left of the doors so I can have a veg room when these 2 are in flower. I plan to have 4 in veg and 4 in flower for the next grow. Still waiting on JOTI seeds, ordered 3 weeks ago and still have not been shipped. I will be getting those going the moment they arrive.
The girls seem to be happy still, did a bit more LST to try to keep everything even, mainly I'm just pulling down on the spots I already have tie wire on.
Likes
Comments
Share