The Grow Awards 2026 🏆 


Likes
Comments
Share
@Salokin
Follow
Hello Growmies,
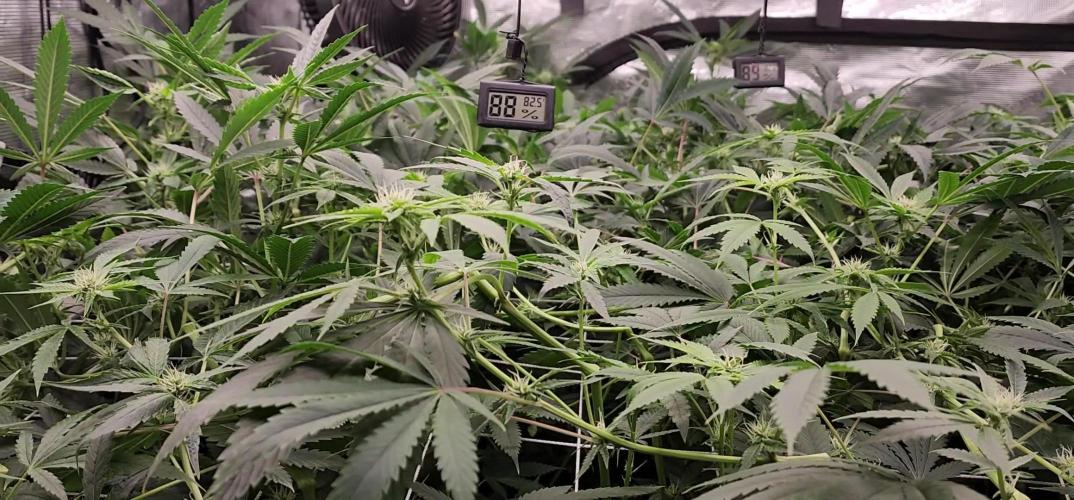
The time has come—harvest week is here for our G.M.O. #1 and G.M.O. #2! These plants have completed their journey, and the Mars Hydro FC-4800 at 55% has been the perfect companion throughout. The consistent flushing with water only has ensured a clean finish, ready for harvest.
G.M.O. #1 stands tall with its central cola a dense, resinous marvel. The pungent aroma fills the air, signaling the potency within. The foliage remains a rich green, and the trichomes are a perfect milky white, indicating that these buds are ready for harvest. The bud sites are swollen and heavy, promising a generous yield.
G.M.O. #2 continues to impress with its unique structure. The top cola is a tower of resin, surrounded by equally impressive satellite buds. The green hues on the leaves reflect perfect light absorption and nutrient balance. The lateral branches are heavily laden with buds, showing significant weight and density. The slight curvature in the stems adds a final touch of wild elegance.
Based on the attached pictures, the plants look exceptionally healthy and ready. The wet weight of the combined harvest is an impressive 800 grams, with G.M.O. #1 contributing 200 grams and G.M.O. #2 a remarkable 600 grams. The smell is absolutely delightful, reminiscent of juicy fruit bubble gum, filling the air with a sweet and enticing aroma.
The meticulous care and attention over the past weeks have culminated in this moment. The journey of G.M.O. #1 and G.M.O. #2 has been remarkable, and I'm thrilled to share the final results with you all. The rich, flavorful yield promises to be worth the wait.
Stay lifted,
Salokin

Likes
10
Share
@SolitudeCorners
Follow
Last week of flowering (72days from the light switch) Gonna cut soon when the dirt is dry. A quite late harvest. Many buds denser more, and stem can’t longer resist.
This season so satisfy. Thank for all mentor and comment. You all are my inspiration for grows.
Feeding 💦🌱
23/1 Water 13.5L+Flawless 20ml ppm80 ph6.2
MDR 3L 2Lx5
Runoff
MDR 1400 /1155
Zkittle 1600/1300/1150
Pineapp 900/600
Purp 1300 /1200
Sapp 2000/1100
Dozdos 1100/1000
25/1 10.42 6L ppm9 ph6 1L per pot
3L+Flawless6ml ppm116 ph5.9 1.5/1.5 Purp, Zkittle
4.5L+ Flawless7ml ppm119 ph6 1.5/3 Sapp,MDR
Runoff
Purp 1300
Zkittle 1500/1200
Dozdos 1400
Sapp1300
Pineapp850
MDR950
27/1 runoff
Pineapp 500
Purp 900
MDR 600
Zkittle 400
Sapp 300
Dozdos 400

Likes
17
Share
@JuicyFruit
Follow
Day 69 - 15/11/19
Were finally here at harvest and im happy with the result :) i planned as much as i could and winged the rest :)
I collected lots of small, early harvest buds and left them to dry. kept a small bit for bongs and put all the really sticky trim in the freezer! gonna make cannabutter with it next week :)
I liked the strains i chose from RQS, they took every newbie mistake i threw at them :D ive learned so much and it shows in my other diaries :)
Il update this harvest a couple of times through this last week to show the effects of drying and curing, other than that thanks to all for helping and check out my other diaries to see how ive progressed :)
Update - 18/11/19
I dried the buds for a couple of days and wow they dry well :) smoked them in a bong and it got me over a rough few days.
I didnt see the point in curing this as i only got a couple grams. and to even get a couple of grams off a plant that had such a bad transplant just shows how resistant they are.
I loved this strain, the smell was funky and it was a joy to grow. Thank you RQS!

Processing
Likes
70
Share
@Kid_Colombia
Follow
Finally back to the garden after 4 weeks away.
They were really in need of love by the time I got back to take care of the garden.
BIG NEWS! Now running a California Lightworks Solarxtreme 500 as my main light.
Will add a second SX500 light into the room once I start flower.
Hit the LST on the again and just making sure they are getting fed and lots of love.
Will have to push back my starting flower by another few weeks. See how the recover


Likes
16
Share
@Chubbs
Follow
420FASTBUDS
FBT2107 WEEK 8
The two of these girls are growing amazing. One definitely is much larger than the other but both appear happy & healthy. I decided to do some LST training on them to allow more light to the lower flower sites. So far it looks like they're enjoying it and bounced back without skipping a beat. I did back off on the feeding of nutes since I started seeing crispy edges on my leafs and since then doesn't look lime it's got worse so back on track. Happy Growing

Likes
33
Share
@Titoff
Follow
Depuis la fin de la semaine 10, j’avais commencé mon rinçage après avoir observé les trichomes à l’aide de différents appareils, microscope de poche vendu dans les Growshops, microscope à fixer sur son smartphone ou encore les lentilles macro de type Apexel lens 2 en 1.... Les lentilles macro m’ont permis de voir de manières assez aisées que ceux-ci étaient pour la plus pars laiteux, j’avais donc pensé que c’était le moment pour moi, d’entreprendre ma période de rinçage. J’avais lu sur différents sites qu’il fallait effectuer 2 semaines de rinçages afin d’éliminé tous trace de nutriments et d’avoir un weed savoureuse. Je pensais donc que le timing était bon et que mes 2 semaines supplémentaires me donneraient les 15 à 20% de trichomes ambrés mais j’arrive à la fin de la première semaine de rinçage et très peu d’ambré. J’ai donc ce weekend redonné un peu d’engrais, car les feuilles sont en pleines sénescences et la maturation des trichomes demande encore un peu de temps. Un peu perdu, pour être honnête, le contrôle de ce jour montre un stress plutôt bénéfique pour les filles qui vont être à nouveaux rincées. Afin de m’aider au mieux, j’ai commandé l’appareil Higrade analyseur de cannabis que je recevrais lundi, je vous donnerais donc plus de détails par la suite mais cet appareil est sensé nous donné de précieuses données quand coupé, taux de THC, carence, maladie bref un gadget qui promet de belle prouesse à voir donc. Cependant après plusieurs recherches, j’ai appris que l’on commençait son rinçage seulement quand les trichomes devenaient ambrés et après 10 jours de rinçages et après on coupe....
Likes
4
Share
@Ensign420
Follow
|»» LOG DISCLAIMER: Not intended as a grow guide. Grow log entries are usually posted 3 weeks later and are for my learning reference. ««|
Introduction - Week 18 Summary -
Ensign's log, stardate 17559.9,
Another pretty epic week in the garden!
Growth has been healthy and wow the canopy is getting stacked for the beginning of flower. Heady OG managed to reach the grow light so super-cropped the canopy once more. Also lollipopped and defoliated the under canopy. Cleaned the best I could, but can’t reach TKO (in the back of the tent) so mainly cleaned Heady OG.
Both are still recovering which could mean growth is starting to prioritize bud development over vegetative growth. Bud sites are already starting to swell up nicely!
The veg tent has been thriving and growth has been all around healthy! Watered the spare Heady OG clone and transplanted the rooted mother cuttings into solo cups.
Onwards to next week Ensign!
[START OF WEEK 18]
==========================================================
---------- [ 4x4 MAIN TENT ] ----------
Heady OG BX1 #1 [Round4 ~Wk11] - WEEK 18 - Full Bloom Wk2
TKO [Round2 ~Wk16] - WEEK 18 - Full Bloom Wk2
----------- [ 3x3 VEG TENT ] ------------
TKO - WEEK 01 - Full Veg
Heady OG BX1 - WEEK 01 - Full Veg
08/18/25 → 08/24/25
This Week's Estimated Goals
----------------------------------------------------------------------------------------------
DLI: ~20 mol/m²/d
PPFD: ~463 μmol/m²/s
VPD: ~1.0 kPa
This Week's Meter Readings & Averages
----------------------------------------------------------------------------------------------
Light On/Off: 19:00 - 07:00 | Wattage: ~326.5W [LV04]
Distance From Canopy: ~11.5”, 11.5”
DLI: ~19.22 mol/m²/d
PPFD: ~445 μmol/m²/s
VPD: ~0.58 kPa
Soil %: [49.0, 45.7, 25.3, 48.7, 42.6, 41.3, 42.7, 42.0]
==========================================================
Day 01 - Monday - 08/18/25 - Total Days: 127
-----------------------------------
Daily Averages ~[+01:00]
- Temps: 84.4°F [29.1°C]
- Humidity: 85.7%
- VPD: 0.58 kPa
- Soil %: [49, 47, 24, 50, 41, 43, 45, 44]
-----------------------------------
- [+00:10]: Night check on the 4x4 tent.
--- CA-CAW!! Wow the garden is thriving and perky!
--- Heady OG (BX1 #1) is a lot more even and she has already perked up again from the super-cropping!
--- TKO is also looking really healthy and she’s clearly starting to flower and swell up with bud growth!
--- This is why we grow! Let’s go girls!
- [+00:14]: Checked the Ecowitt soil moisture sensor data:
------------------ [ 4x4 MAIN TENT ] ---------------
------ 52% - [CH01 FT » G30 - Heady OG BX1 #1]
------ 47% - [CH02 FB » G30 - Heady OG BX1 #1]
------ 23% - [CH03 BT » G20 - TKO]
------ 48% - [CH04 BB » G20 - TKO]
------------------ [ 3x3 VEG TENT ] ----------------
------ 40% - [CH05 BL » GR7 - Garlic Budder OG#1]
------ 43% - [CH06 BR » GR7 - Garlic Budder OG#2]
------ 44% - [CH07 FL » GR7 - Gorilla Goat #1]
------ 44% - [CH08 FR » GR7 - Gorilla Goat #2]
--------- Veg: 38% - 45% | Flower: 45% - 55%
--------- General: 30% [Dry] «| 45 - 60% [Moist] |» 70% [Wet]
- [+00:18]: Checked the 3x3 veg tent.
--- Looking great in the veg garden!
--- Both Heady OG and TKO mothers look healthy and established in the their new homes.
--- Removed the clear cups from the spare Heady OG clone cuttings. They still look a little stressed, but going to acclimate to the veg tent.
- [+00:23]: Checked the propagation dome,
--- Spare mother cuttings are looking beautiful
--- The rooting cuts are all looking great as well!
--- Did not mist the top growth.
--- Plan to check for roots soon.
--- Refreshed the RO water for the spare mother cuttings.
- [+00:39]: Checked the humidifiers.
--- Tanks are still full and no leaks found.
Day 02 - Tuesday - 08/19/25 - Total Days: 128
-----------------------------------
Daily Averages ~[+01:00]
- Temps: 83.8°F [28.8°C]
- Humidity: 84.2%
- VPD: 0.63 kPa
- Soil %: [49, 46, 21, 45, 44, 42, 43, 43]
-----------------------------------
- Oops! Forgot to update the soil sensor names.
- [14:35]: Updated the Ecowitt sensor names:
------------------ [ 4x4 MAIN TENT ] ---------------
------ [CH01 FT » G30 - Heady OG BX1 #1]
------ [CH02 FB » G30 - Heady OG BX1 #1]
------ [CH03 BT » G20 - TKO]
------ [CH04 BB » G20 - TKO]
------------------ [ 3x3 VEG TENT ] ----------------
------ [CH05 BL » GR7 - TKO]
------ [CH06 BR » GR7 - Pheno #2]
------ [CH07 FL » GR7 - Heady OG BX1 #1]
------ [CH08 FR » GR7 - Pheno #4]
- [15:03]: Also swapped the batteries for all six WittFlow units.
--- Marked the names on each unit with a bit of painters tape.
--- Also removed the screws from the battery lids. Currently, I’m keeping the units outside the tent so don’t need them to be completely water proof. Sealed the lids with a strip of masking tape. This should make future battery changes a lot easier.
- [16:05]: Evening check on the 3x3 veg tent.
--- Ooo yea! The veg garden is clean and looking healthy!
--- The spare Heady OG clones seem to be a bit stressed, but should bounce back as soon as roots are more established.
- [16:07]: Okay! Time to check for roots!
--- It’s been 10 days since the cuttings were planted into the Coco Coins.
--- Well there are roots. But not a lot.
--- Going to wait a bit longer before transplanting into solo cups.
--- Misted the top growth with RO water before closing the propagation dome.
--- All vents are still fully closed.
--- Refreshed the RO water for the spare mother clones before placing the cup on top of the propagation dome.
- [19:18]: Checked the Ecowitt soil moisture sensor data:
------------------ [ 4x4 MAIN TENT ] ---------------
------ 47% - [CH01 FT » G30 - Heady OG BX1 #1]
------ 46% - [CH02 FB » G30 - Heady OG BX1 #1]
------ 21% - [CH03 BT » G20 - TKO]
------ 44% - [CH04 BB » G20 - TKO]
------------------ [ 3x3 VEG TENT ] ----------------
------ 44% - [CH05 BL » GR7 - TKO]
------ 42% - [CH06 BR » GR7 - Pheno #2]
------ 43% - [CH07 FL » GR7 - Heady OG BX1 #1]
------ 43% - [CH08 FR » GR7 - Pheno #4]
--------- Veg: 38% - 45% | Flower: 45% - 55%
--------- General: 30% [Dry] «| 45 - 60% [Moist] |» 70% [Wet]
- [19:22]: Quickly checked on the 4x4 tent.
--- Wow the garden is full!
--- Heady and TKO have completely filled the canopy and growth is looking healthier than ever!
--- Both cultivars are showing signs of bud development and the canopy is starting to stack up with bud growth!
--- Glad that vertical growth has finally started to slow down. I think.
--- Anyways, plan to defoliate soon.
--- Ca-Caw!! Keep growing strong my girls!
- [19:35]: Checked the humidifiers.
--- Tanks are still full and no leaks found.
Day 03 - Wednesday - 08/20/25 - Total Days: 129
-----------------------------------
Daily Averages ~[+01:00]
- Temps: 84.9°F [29.4°C]
- Humidity: 84.4%
- VPD: 0.64 kPa
- Soil %: [49, 46, 20, 40, 41, 41, 42, 42]
-----------------------------------
- [23:58]: Quick night check on the 4x4 tent.
--- Woah the canopy is still stretching upwards!
--- Both Heady OG and TKO are perky and soaring upwards again!
--- The canopy is still pretty even so not going to train.
--- CA-CAW!!! Grow strong my girls!
- [12:02]: Checked the Ecowitt soil moisture sensor data:
------------------ [ 4x4 MAIN TENT ] ---------------
------ 49% - [CH01 FT » G30 - Heady OG BX1 #1]
------ 46% - [CH02 FB » G30 - Heady OG BX1 #1]
------ 25% - [CH03 BT » G20 - TKO]
------ 40% - [CH04 BB » G20 - TKO]
------------------ [ 3x3 VEG TENT ] ----------------
------ 40% - [CH05 BL » GR7 - TKO]
------ 41% - [CH06 BR » GR7 - Pheno #2]
------ 41% - [CH07 FL » GR7 - Heady OG BX1 #1]
------ 42% - [CH08 FR » GR7 - Pheno #4]
--------- Veg: 38% - 45% | Flower: 45% - 55%
--------- General: 30% [Dry] «| 45 - 60% [Moist] |» 70% [Wet]
- [+00:07]: Checked the 3x3 veg tent.
--- Wow the veg garden looks healthy and growth is looking great!
--- Both the Heady OG and TKO mothers are green and perky!
--- The spare Heady OG clones are still recovering from the transplant and are both looking better.
- [+00:08]: Checked the propagation dome and cuttings,
--- Surprisingly, the extra mother cuttings are still looking green!
--- The rooting mother cuttings are looking good too!
--- Did not mist the top growth and all vents are still closed.
--- Refreshed the extra mother cutting’s RO water before placing the cup back on top of the propagation dome.
- [+00:18]: Checked the humidifiers.
--- Tanks are still full and no leaks found.
Day 04 - Thursday - 08/21/25 - Total Days: 130
-----------------------------------
Daily Averages ~[+01:00]
- Temps: 84.0°F [28.9°C]
- Humidity: 85.6%
- VPD: 0.58 kPa
- Soil %: [49, 46, 27, 50, 43, 41, 42, 42]
-----------------------------------
- [16:21]: Evening check on the 3x3 veg tent.
--- Looking healthy in veg garden!
--- The spare mother cuttings on top of the propagation dome are still looking green!
--- Both the Heady OG and TKO mothers are looking beautiful!
--- The extra Heady OG clones are still recovering.
- [16:23]: Checked the propagation dome,
--- Nice! The rooting cuttings are still looking good! Plan to transplant into solo cups soon.
- [16:26] Refreshed the spare mother cutting’s RO water.
--- After using the PVC rig for a week or so, I’m quite impressed and makes water chances really simple!
- [16:38]: Checked the Ecowitt soil moisture sensor data:
------------------ [ 4x4 MAIN TENT ] ---------------
------ 48% - [CH01 FT » G30 - Heady OG BX1 #1]
------ 46% - [CH02 FB » G30 - Heady OG BX1 #1]
------ 27% - [CH03 BT » G20 - TKO]
------ 51% - [CH04 BB » G20 - TKO]
------------------ [ 3x3 VEG TENT ] ----------------
------ 42% - [CH05 BL » GR7 - TKO]
------ 40% - [CH06 BR » GR7 - Pheno #2]
------ 44% - [CH07 FL » GR7 - Heady OG BX1 #1]
------ 42% - [CH08 FR » GR7 - Pheno #4]
--------- Veg: 38% - 45% | Flower: 45% - 55%
--------- General: 30% [Dry] «| 45 - 60% [Moist] |» 70% [Wet]
--- Unlike most growers, I determine the start of flower when pistil hairs start to form (technically called the stigma) and vertical growth slows and switches to bud development.
--- When growing indoors, it makes sense to set day one of flower as soon as the light cycle is changed to from 18/6 to 12/12. But what about outdoor growing?
--- As far as how I determine flowering,
--- My personal logic and opinion is that nature does not change immediately. So I usually don’t count the beginning stretch phase as part of flowering. If anything, I think of it as the end of veg.
--- The stretch phase usually lasts between 14-21 days. As far as day one of flower development, this is different with every pheno.
--- Anyways!
--- Plan to clean the main tent tonight. While still in early flower, the under canopy needs to be defoliated.
- [19:05]: Checked on the 4x4 tent.
--- Wow the tent is raging with growth!
--- Both Heady OG and TKO are swelling up with bud growth!
--- Okay! Need to do a bit of under canopy cleanup!
- [19:54]: Cleaned and defoliated the growth under the scrog netting.
--- Removed as much as I could and mainly focused on the front quadrants, but can’t reach the back quadrants.
--- Using a vacuum clean with a hose did help, but still could not defoliate all of the back.
--- Thankfully there is plenty of airflow, so hopefully that will be enough.
- [20:19]: Checked the humidifiers.
--- Tanks are still full and no leaks found.
Day 05 - Friday - 08/22/25 - Total Days: 131
-----------------------------------
Daily Averages ~[+01:00]
- Temps: 85.1°F [29.5°C]
- Humidity: 87.2%
- VPD: 0.54 kPa
- Soil %: [49, 45, 27, 52, 43, 40, 43, 41]
-----------------------------------
- [22:25]: Night check on the 4x4 tent.
--- Wow the garden has blown up with canopy growth!
--- Both Heady OG and TKO look perky and healthy!
--- Heady OG has reached the grow light!
--- Need to train!
- [22:51]: Super-cropped and lowered the canopy a good 6-7in lower.
--- Can’t reach the back tops, but glad TKO is not as stretchy and Heady OG.
- [22:56]: Took the weekly height and light distance measurements.
------ Both phenos were about 42" tall.
------ Both Heady OG (BX1 #1) and TKO were about 11.5" away from the grow light.
- [22:59]: Took the weekly general PPFD readings.
------ Both phenos were around 445 μmol/m²/s which gives a DLI of 19.22 mol/m²/d under a 12/12 light cycle (at ~326.5W).
- [23:03]: Checked the Ecowitt soil moisture sensor data:
------------------ [ 4x4 MAIN TENT ] ---------------
------ 52% - [CH01 FT » G30 - Heady OG BX1 #1]
------ 45% - [CH02 FB » G30 - Heady OG BX1 #1]
------ 25% - [CH03 BT » G20 - TKO]
------ 50% - [CH04 BB » G20 - TKO]
------------------ [ 3x3 VEG TENT ] ----------------
------ 41% - [CH05 BL » GR7 - TKO]
------ 40% - [CH06 BR » GR7 - Pheno #2]
------ 43% - [CH07 FL » GR7 - Heady OG BX1 #1]
------ 41% - [CH08 FR » GR7 - Pheno #4]
--------- Veg: 38% - 45% | Flower: 45% - 55%
--------- General: 30% [Dry] «| 45 - 60% [Moist] |» 70% [Wet]
- [23:06]: Checked the 3x3 veg tent.
--- Mother garden is ramping up with growth again!
--- Both Heady OG and TKO mothers look healthy and soaring upwards!
--- The spare Heady OG clones are looking better! Will need to water soon.
- [23:07]: Checked the propagation dome,
--- All rooting mother cuts are looking green and healthy for the most part!
--- Gorilla Goat #1 is looking bit stressed, but okay.
--- Need to transplant these ladies soon!
--- Refreshed the RO water for the spare mother cuttings before placing the cup on top of the propagation dome.
- [23:24]: Checked the humidifiers.
--- Tanks are still full and no leaks found.
Day 06 - Saturday - 08/23/25 - Total Days: 132
-----------------------------------
Daily Averages ~[+01:00]
- Temps: 84.9°F [29.4°C]
- Humidity: 86.6%
- VPD: 0.56 kPa
- Soil %: [49, 45, 29, 52, 43, 41, 42, 41]
-----------------------------------
- [08:00]: Quickly checked on the 3x3 veg tent.
--- Veg garden is thriving and looking healthy!
--- Both Heady OG and TKO mothers are healthy and vegging along beautifully!
--- Need to water the extra Heady OG clones tonight.
--- Also the spare rooting cuts need to be transplanted into solo cups.
- [19:36]: Night check on the 4x4 tent.
--- Looking good girls!
--- The canopy is recovering nicely and tops are already facing upwards towards the grow light.
- [19:39]: Checked the Ecowitt soil moisture sensor data:
------------------ [ 4x4 MAIN TENT ] ---------------
------ 47% - [CH01 FT » G30 - Heady OG BX1 #1]
------ 45% - [CH02 FB » G30 - Heady OG BX1 #1]
------ 28% - [CH03 BT » G20 - TKO]
------ 52% - [CH04 BB » G20 - TKO]
------------------ [ 3x3 VEG TENT ] ----------------
------ 42% - [CH05 BL » GR7 - TKO]
------ 42% - [CH06 BR » GR7 - Pheno #2]
------ 47% - [CH07 FL » GR7 - Heady OG BX1 #1]
------ 40% - [CH08 FR » GR7 - Pheno #4]
--------- Veg: 38% - 45% | Flower: 45% - 55%
--------- General: 30% [Dry] «| 45 - 60% [Moist] |» 70% [Wet]
- [19:58]: Checked the 3x3 veg tent.
--- Veg tent is healthy and mothers and clones look green and perky!
--- Need to water the spare Heady clones!
- [20:04]: Took the initial starting weight range of both clones before watering,
------ Heady OG BX1 #1A » 237.7g → 300.3g
------ Heady OG BX1 #1B » 244.4g → 305.6g
--------- General Solo Range: [Dry] «| [Initial Cup Weight] + ~55-100g |» [Wet]
--- All cups were last watered 6 days ago.
--- Took the starting weight of both clones before watering,
------ Heady OG BX1 #1A » 232.5g
------ Heady OG BX1 #1B » 232.4g
--- While on a scale,
--- Gently misted the straw mulch of both cups with RO water.
--- Focused on the straw and sprayed as evenly as possible.
--- Misted 10-20 sprays. Waited a moment, then misted again.
--- Repeated this process for both cups.
--- There was no runoff.
- [20:25]: Took the saturated weight of both clones after watering,
------ Heady OG BX1 #1A » 310.6g
------ Heady OG BX1 #1B » 315.1g
--- Marked the final wet weight on the back of each cup. Also marked the watering date on the front.
--- Placed both phenos back into the tent.
--- Got more to do! Also need to transplant the rooted cuttings in the propagation dome.
--- Let’s go Ensign!
- [20:37]: Took 4 old solo cups (has bottom corners cut for drainage) and partially filled each with some fresh dry BuildASoil 3.0 potting soil.
--- Made sure that the soil was well packed.
--- Also made sure to mark each cup with the name and pheno number.
--- Misted the dry soil with a bit of RO water (~3 sprays).
--- Inoculated each cup with Great White mycorrhizae.
------ Sprinkled 1/16tsp of Great White
--- Time to plant! One clone at a time,
- [21:49]: Took a rooted clone and placed them into each solo cup.
--- Made sure the solo cup had enough room for more soil.
- [21:54]: Inoculated each Coco Coin with Great White mycorrhizae.
------ Sprinkled about an 1/16tsp of Great White onto each Coco Coin.
--- Made sure to get the sides evenly.
- [22:09]: Gently filled each solo cup with more soil.
--- Completely covered the top of each Coco Coin and made sure to tuck the sides fairly snug with soil.
--- Evened and patted down the top soil smooth. Each Coco Coin is about 1/4-1/2 inch below the top soil.
- [22:12]: Added some BuildASoil Organic Straw Mulch to the top.
--- Using the small straw bits at the bottom of the bag is great for solo cups.
--- Time to water!
- [22:30]: Filled a measuring cup with 2 cups of RO water.
------ Added 1/64tsp of Quillaja Saponaria Extract [60]
------ Added 1/16tsp of Horticultural Coconut
------ Added 1/16tsp of Horticultural Aloe
------ Added 1/8tsp of Mycrobe Complete
--- Mixed and poured the solution straight into a spray bottle.
- [22:35]: Took the dry soil weight of each pheno before watering,
------ Gorilla Goat #1 weighed 256.1g
------ Gorilla Goat #2 weighed 255.4g
------ Garlic Budder OG#1 weighed 263.5g
------ Garlic Budder OG#2 weighed 256.4g
--- Marked the starting weight on the back of each cup.
--- While on a scale,
--- Gently misted the straw mulch of each cup.
--- Focused on the straw and sprayed as evenly as possible.
--- Misted 5-10 sprays. Waited a few seconds, then misted again.
--- Repeated this process until each cup weighed at least 300g
--- There was no runoff.
- [22:53]: Took the weight of each pheno after watering,
------ Gorilla Goat #1 weighed 300.4g
------ Gorilla Goat #2 weighed 300.4g
------ Garlic Budder OG#1 weighed 305.2g
------ Garlic Budder OG#2 weighed 300.2g
--- Marked the saturated wet weight on each cup.
- [23:00]: Placed each cup into the propagation dome.
--- Removed the side extensions along with the plug tray and have the cups resting in the main drip tray.
--- Have the lid and lights suspended above the tray (~13 inches).
--- Refreshed the RO water for the spare mother cuttings before placing the cup onto the drip tray.
--- Also increased the propagation dome’s bar lights.
------ Increased the intensity from 1 to 5
- [23:06]: Took general PPFD readings.
------ Clones were around 88 μmol/m²/s which gives a DLI of 5.70 mol/m²/d under an 18/6 light cycle.
- [23:08]: Checked the humidifiers.
--- Tanks are still full and no leaks found.
Day 07 - Sunday - 08/24/25 - Total Days: 133
-----------------------------------
Daily Averages ~[+01:00]
- Temps: 85.0°F [29.4°C]
- Humidity: 86.7%
- VPD: 0.55 kPa
- Soil %: [49, 45, 29, 52, 43, 41, 42, 41]
-----------------------------------
- [08:00]: Quickly checked on the 3x3 veg tent.
--- Ooo yea! The veg garden is vibing and growth is looking healthy!
--- Both the clones and cuttings look healthy and growth is perky!
--- Also the rooting clones look great as well!
- [19:02]: Night check on the 4x4 tent.
--- Ca-Caw! Looking great in the garden!
--- All tops are perky and the canopy looks even for the most part.
--- Grow strong ladies!
- [19:05]: Checked the Ecowitt soil moisture sensor data:
------------------ [ 4x4 MAIN TENT ] ---------------
------ 53% - [CH01 FT » G30 - Heady OG BX1 #1]
------ 45% - [CH02 FB » G30 - Heady OG BX1 #1]
------ 32% - [CH03 BT » G20 - TKO]
------ 53% - [CH04 BB » G20 - TKO]
------------------ [ 3x3 VEG TENT ] ----------------
------ 43% - [CH05 BL » GR7 - TKO]
------ 40% - [CH06 BR » GR7 - Pheno #2]
------ 40% - [CH07 FL » GR7 - Heady OG BX1 #1]
------ 40% - [CH08 FR » GR7 - Pheno #4]
--------- Veg: 38% - 45% | Flower: 45% - 55%
--------- General: 30% [Dry] «| 45 - 60% [Moist] |» 70% [Wet]
- [19:11]: Checked the 3x3 veg tent.
--- Wow veg growth is perky and soaring upwards!
--- Both the Heady OG and TKO mothers are looking really healthy and growth is ramping up! Plan to top both next week.
--- The spare Heady OG clones also look healthy and have recovered! Nice!
--- The rooting mother clones are also looking great!
--- Refreshed the RO water for the spare mother cuttings.
- [19:17]: Checked the humidifiers.
--- Tanks are still full and no leaks found.
--- Wow what a week!
--- Since the mother clones are now in solo cups, going to need to select two for transplanting soon (for the left side of the veg tent).
--- Been pheno hunting the past two harvests and am pretty sure that the #2 phenos of both Garlic Budder and Gorilla Goat are going to be the ones!
--- Anyways onwards to next week!
[END OF WEEK 18]
Likes
19
Share
@jst4kicks420
Follow
first pic is second day this week its may 12 well i think they are doing pretty dam good if you ask me bt i only know so much soo lol let me know what everyone thinks let see i added hydro plex to the mix not really sure if it added to my growth i my opinion growth had already been amazing aha bt we will see spent quite a bit of time pushing big leaves out the way under the second net ehh don’t really think i did any harm bt i cut out everything tiny and under the blanket mid of to nets and down if it look bigger then my fingers it’s survived this round aha broke one water leaf up top on accident ehh oh well not much else just been watching them grow gonna have to change the chains that hold my light they hand about 12 in of the top that i can’t move up any more and plants started catching bit more light burn sadly i definitely need more space bt in the end things are looking good to me end of the week i’m feeling more then blessed with the progress everything just getting fatter tried crimping two branch way to low about to days ago bt there still alive and growing again so all it well decided to try to pull the other two down instead lol hope all had a great week and happy growing (not that you guys should care bt is my birthday today 17th )aha til next time

Processing
Likes
4
Share
@Andres
Follow
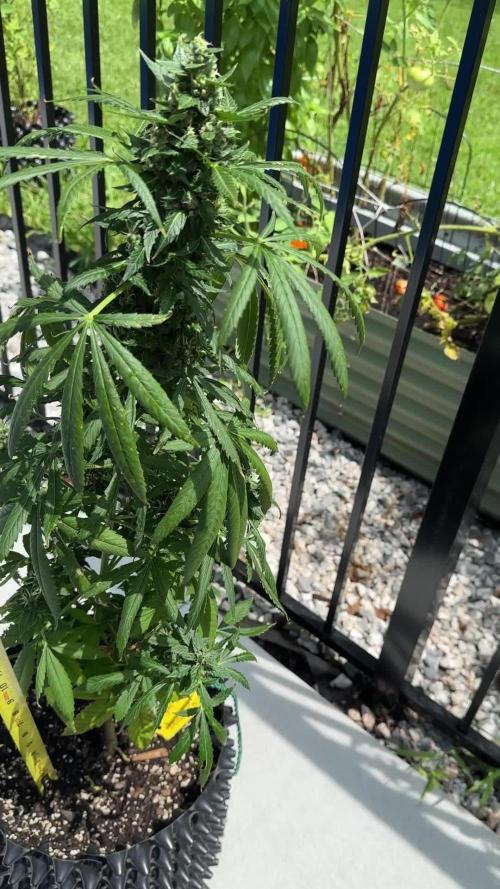
she grows healthy outdoor ... the flowering begins for her .. we will see the process hopefully it will be a good...
Processing
Likes
126
Share
@Th3L0rAx
Follow
So.. the flush begins for DD#1 and #2 checking trich’s and these to ladies are showing about 70% clear to 30% cloudy may finish in week nine. DD#3 still in bloom throwing tons of white hairs and purple flowers 100% clear trichs so she’s gonna get another feeding. DD# 4 is the showcase cause not only did she start out slow but she’s the only 1 of the 4 that’s started purple flowers and and is also purple leafed.
I’ll continue to post some picture tonight wanted to get this up as I am flushing and pulling them out of the tent to do so. Also continue to add photo every 2 days.
Updated 4/30 day 58 posted video and some new photos
Day 60 really started to look at trich’s since plants are definitely getting close.
DD#1 looks to be my heaviest producer trich’s are 60/40 no amber yet
DD#2 80/20 no amber
DD#3 90/10 no amber but it must be a mutation or something in the genetics cause it’s no longer thickening up its foxtailing all over so she still got time and we’ll see
DD#4 is looking good and has a few weeks before I’ll start checking trich’s on her, pistols popping white all over the place.

Likes
18
Share
@420DeepGrow
Follow
Gracias al equipo de Fast Buds, XpertNutrients y Marshydro, sin ellos esto no seria posible.
💐🍁 Gorilla Melon:
La Gorilla Melon crece más hacia fuera que hacia arriba, lo que resulta en una planta tupida y manejable. Produce cogollos pequeños, sólidos como rocas y muy pegajosos, que envolverán sus ramas al final del ciclo de cultivo. Esta variedad desarrolla muchas colas, así que no te preocupes por el rendimiento: te cubrirá con un suministro de flores agridulces de primera calidad. Al fumarla, mostrará sus terpenos de melón, heredados de nuestra cepa keeper cut of Melon, con los toques de un sabor clásico heredado de GG#4 (Murdock GG Strains). Otra cosa que hereda de sus padres es su fuerza de gorila, que le permite resistir a cualquier tipo de estrés. Puedes hacer toda la defoliación que consideres necesaria, o coger todos los clones que quieras, y verás cómo se recupera casi instantáneamente y vuelve más fuerte que antes.
🚀 Consigue aqui tus semillas:
https://2fast4buds.com/es/seeds/gorilla-melon
💡FC6500: Eficiencia líder en el mercado: la lámpara de cultivo LED FC-E6500, que ostenta un estatus líder en el mercado, es una solución rentable con un PPE de 2,8 µmol/J y un rendimiento máximo de 2,5 g/vatio. Ofrece un PPF alto de 2026 umol/S y es adecuada para una cobertura de vegetación de 1,50 m x 1,50 m y una cobertura de flores de 1,20 m x 1,20 m.
Iluminación versátil y uniforme.
https://marshydro.eu/products/mars-hydro-fc-e-6500-730w-commercial-led-grow-light/?gad_source=1&gclid=Cj0KCQjw1qO0BhDwARIsANfnkv9IIrYSbmJqz8PqpJOIyWwJfp5bc3SGJgUV68USLQ4tjmXDYwoBuAsaAue3EALw_wcB
🚥 MarsHydro ADLITE UV/IR/RED:
Para lograr un crecimiento óptimo de las plantas y maximizar los rendimientos es un arte simple que depende en gran medida de las condiciones ambientales adecuadas. Reconociendo las limitaciones de la iluminación natural y las soluciones de iluminación tradicionales para satisfacer estas necesidades únicas, lanzamos ADLITE. Estas luces especiales UV, IR y roja están diseñadas para llenar áreas del espectro, proporcionando las altas longitudes de onda que las plantas necesitan para un crecimiento y desarrollo óptimos.
🚀 Consigue aqui tu Adlite:
https://marshydro.eu/collections/adlite-supplemental-lights/
🏠 : Marshydro 1.50 x 1.50 x 1.80, carpa 100% estanca con ventanas laterales para llegar a todos los lugares durante el grow
https://marshydro.eu/products/diy-150x150x200cm-grow-tent-kit
🌬️💨 Marshydro 6inch + filtro carbon para evitar olores indeseables.
https://marshydro.eu/products/ifresh-smart-6inch-filter-kits/
🍣🍦🌴 Xpert Nutrients es una empresa especializada en la producción y comercialización de fertilizantes líquidos y tierras, que garantizan excelentes cosechas y un crecimiento activo para sus plantas durante todas las fases de cultivo.
Consigue aqui tus Nutrientes:
https://xpertnutrients.com/es/shop/
📆 Semana 11:
¡Está siendo una experiencia increíble! Los cogollos siguen engordando y están cubiertos de una capa gruesa de tricomas, lo que promete una buena potencia. El aroma es dulce y afrutado, con toques de melón y una ligera nota de gas que le da un toque muy especial. Las plantas están sanas y fuertes, con hojas que mantienen un verde intenso, y los brotes de los cogollos son densos y pegajosos al tacto. Estoy viendo un crecimiento impresionante en su fase final de floración
Likes
9
Share
@Susquihanna
Follow
This was another hot, hot week with a big rainstorm. Take a look at the measuring cup, it is full of rainwater. Dosidos continues to smell and is very sticky. It is a tall with stacked buds. I am interested to see how big the buds will be.
Half way through this grow, I had to stop using Miracle Grow and change my grow plan. I decide to use Advance Nutrients Jungle Juice for the rest of the grow. Jungle Juice’s selling point is that it is the only nutrient that I should need during the entire grow. One just need to make the solution stronger as the plant matures.
The directions say to “stir vigorously” and that is true. It is very clumpy and I had to stir and shake the bottle a lot. As your plant is in veg and growing larger, directions say to up your Jungle Juice to 4 ml per liter. If my calculations are correct, I am using approx. 5 tablespoons per 5 gallon bucket.
1 gal is 3.78 liters
5 gallons=18.92 liters
4ml jungle juice per liter x 18.92 liters= 75.7 ml which is = to 5.119 tablespoons per 5 gallon bucket of water
As the end of the summer is quickly approaching, I have spent some time reflecting this week on all of the contests that I have entered and not won this summer. It can be a little frustrating because of all the time I have spent taking pictures and writing commentary. But, instead of it getting me down, I have to think about all of the positive take aways and I want to share them on this platform.
I have read a lot of diaries and now know why I am just an apprentice. I have a lot to learn from all of you. There are some really good growers with a lot of experience and crazy grow techniques. So much knowledge is on this platform-it’s mind boggling.
To be a great grower, you must be willing to be vulnerable and put yourself out there and try different suggestions and new techniques. I have made a few friend that I enjoy chatting with. I enjoy reading comments versus just seeing likes.
My best friend on grow diaries is @Natrona and my neighbor as well. She has been growing longer than I have been so I routinely learn from her. This summer I learned to mix 1 cup of Perlite into my soil. I can see where my plants need the air flow. And, I now I only defoliate fan leaves that absolutely need to be gone. I let the fan leaves stay on until they fall off. I want my buds to pull all the nutrients they can out of the fan leaves. I also bought 2 new tools that @natrona suggested. The first was a water PH tester and the second was my Max-ee Magnifier which is informative and fun to use.
As always, Let’s Chat it up AND Likes and comments are appreciated
Likes
422
Share
@Crashoverite
Follow
Hi everyone.
Welcome to my🍌💜👊 week update.
Hope everyone keeping well and having a great week.
Daily updates and uploads so if week not over yet. Please revisit to see full week content😊
Thank you all for such amazing support 😊🤗💜
So far everything is going great. No issues at all. Both girls started preflower on Tuesday and already I can see that they started stretching nicely. Scrog net will be installed by the end of this week.
Week 5
13-19 Nov.
13/11 day 36
First runoff experience for girls. Loaded both pots with approx. 2.5 ltr each in 4 stages of 500-700ml. Runoff 100-150ml from each. Runoff PH 5.9. Nutrients for this watering were same as on previous week and added only calmag. Next watering possibly Friday but with new measurements.
14/11 day 37
Both 🍌💜👊 girls started preflower on same day. Xena is catching up quick to her larger sister and possibly soon they will be sharing this growing space 50/50
15-16/11 days 38-39
Just happy and healthy days 😁 nice steady growth.
17/11 day 40
Second watering for this week. 5.5l beetwen both. Runoff Ph 6.1
19/11 day 42
Most busiest day so far. Both girls got very bushy in last few days and they stretched enough to install scrog net. Before installing net applied selective defoliation on both girls. 8-10 fan leaves from each.
It's the end of this amazing week 😁
Thank you all again for such a great support 🤗✌️💚
Likes
12
Share
@Ieiogrow94
Follow
Eccoci qui...
Ormai manca davvero poco ci siamo quasi.... Ora niente più fertilizzanti solo acqua ed attendiamo la maturazione..
Seguiranno aggiornamenti, grazie a tutti per il supporto🔥🌲❤️
Likes
4
Share
@adam_pawloski87
Follow
@twenty20mendocino Ateam R&D Update ~ Let’s Go day 18 of 🌸almost 3 weeks in an we are looking great! Gave em another aggressive trim up some lollipops this week hopefully wasn’t too early but hey it’s we learn as growers, but they are bouncing back super nice, praying a looking happy y’all! Can’t wait to see what these girls do over the next few weeks, y’all have to keep them eyes peeled for next weeks update. Y’all have an amazing productive rest of your day as well as great rest of your week! Hope y’all enjoy, peace love an positive vibes to all y’all Cheers an blaze on 😶🌫️💨💨💨💨


Likes
16
Share
@SeshHouseCannabis
Follow
This strain give us a highest yield so far with 924g of dry buds after trimming and ready to be cured. And this pheno is pretty strong, it grows super fast, and have a very strong smell of jackfruit.


Likes
41
Share
@TerpTurtle
Follow
15 Day dry then trimmed using the Trim Bin.
Curing with Grove bags, first harvest filled 3, 1/4lb grove bags.
*Updating with clone pictures of this pheno in late flower labeled in diary as you look through, If I pop a new seed of this strain Ill start another diary
Likes
4
Share
@Rupertsox76
Follow
After a bad wk 4?where it was touch and go for a mo that see to have pulled thru touch wood
Likes
Comments
Share
@BruWeed
Follow
24/04 - Comenzó su cuarta semana en etapa de crecimiento.
Se encuentra perfecta, tiene poda apical y LST en la parte baja.
Las chalas se encuentran muy bien sin ningun problema.
En crecimiento va a estar en total 5 semanas y ya despues la paso a floración.
En estos dias estare publicando mas imagenes de como viene.
Podes seguirme en Instagram como @bruweed_

Likes
48
Share
@Regenwurm
Follow
In dieser Woche gibt es nichts besonderes zu berichten ausser…..
Umgetopft von 1 l in 12,5 l Air pots.
Wurzeln extrem gesund (siehe Bild)
Heute die Ladies getopt und das Training beginnt für ca. 2-3 Wochen. Lichtleistung noch auf 30 % , ich werde ab morgen steigern. Ebenfalls Erhöhung der Düngemenge auf die Hälfte des Düngeplans von Green Buzz. Klima dank Growcontrol sehr sehr gut und konstant. Beim umtopfen etwas living organics beigegeben. Sehr enge Internodien, so soll es sein….