The Grow Awards 2026 🏆
Likes
Comments
Share
2024-06-06 
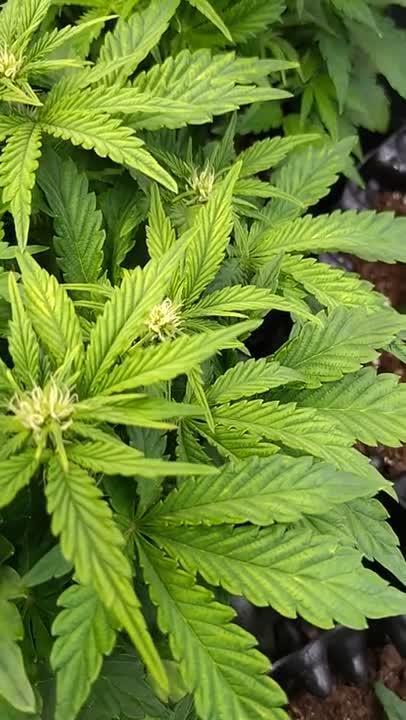
Finally Weather turned to sunny and warm So i placed the Outdoors 2 days ago. they are quite stressed because of the changed conditions, but ia sure they will look fine soon i kinda under watered them the last 10 days and i fertilised them, so not enough water and fertiliser- they are burned. shit happens iam sorry Girls. next update in a few days because this pne is 11 days from the last, big Progress on the plants, as they already show good Flowers. Fatso GMO F1 Auto, a feminized hybrid strain, emerges from the crossbreeding of two autoflowering varieties: Fatso Auto and Cotton Candy Auto. This California-derived cultivar leans slightly towards sativa, offering growers a straightforward cultivation experience coupled with impressive yields, robust THC levels, and a delightful palate featuring sweet, candy, and fuel undertones. Thriving both indoors and outdoors, Fatso GMO F1 Auto exhibits above-average resistance to mold, while still benefiting from adequate ventilation, particularly in environments with higher humidity levels. Its exceptional resistance to pests and pathogens ensures hassle-free cultivation. While indoor plants maintain a compact stature of around 100cm or less, outdoor specimens can stretch a bit taller, reaching heights of up to 130cm when grown in open ground. Completing its entire lifecycle within a maximum of 75 days from germination to harvest, Fatso GMO F1 Auto delivers yields considered average yet impressive for an autoflowering strain. The combination of high resin production and elevated terpene levels renders it an excellent choice for cannabis extract production. Its terpene profile presents a sweet and funky aroma with savory hints of Skunk complemented by pine and floral notes. On the palate, it delights with flavors reminiscent of sweet candy underscored by subtle fuel undertones. With THC levels reaching a high of 24% and minimal CBD content, Fatso GMO F1 Auto delivers a balanced and uplifting effect, appealing to enthusiasts seeking a satisfying and harmonious experience.
Likes
3
Share
@Dirizhor
Follow
Didn't expect much after fertiliser burn, but it became small plant with dence buds. Let Next update in 2 weeks after initial dry and smoke test
Likes
Comments
Share
Best Ventilation Fans Brand 2025 AND Best Grow Tents Brand 2025
Double triumph! AC Infinity snags Best Ventilation Fans Brand 2025 AND Best Grow Tents Brand, voted by our growers! Huge shoutout to our community! #GrowDiaries @acinfinityinc @spannabis_official
Likes
56
Share
Bonjour à tous les padawans et maîtres jedis Jour84 arrosage avec 2 litres d'eau ph6.3 Jour86 arrosage avec 2. 5litres d'eau ph6.3 Jour89 arrosage avec 2 litres d'eau ph6.3 LE MEILLEUR MOMENT POUR RINCER SON CANNABIS Le rinçage commence en général deux semaines avant la récolte. Si le plant a une période de floraison de huit semaines, le rinçage doit commencer six semaines après le début de la période de floraison. Il est préférable de regarder de près les trichomes sur le plant pour déterminer quand votre cannabis est prêt à être récolter. Si les petits trichomes commencent juste à passer d’une couleur transparente à une teinte laiteuse et blanche, c’est une bonne indication que les plants peuvent commencer à être rincés. Il faut s’arranger pour que la majorité des trichomes aient changé vers la couleur désirée pour la récolte après deux semaines – ça devient plus facile à faire avec l’expérience, alors accrochez-vous ! Le rinçage peut également être un bon moyen de remettre à zéro la terre quand un plant est toujours en phase de croissance végétative. Parfois, un cultivateur suralimente par accident son cannabis, ce qui provoque un changement de couleur et un flétrissement du bout des feuilles. Ceci est appelé une « brûlure par nutriments ». Rincer la terre peut éliminer les nutriments excédentaires, ce qui aide à résoudre le problème. Cependant, c’est une mesure drastique à ce stade de la culture, alors assurez-vous que le problème soit bien une brûlure par nutriments et non quelque chose d’autre. Le rinçage ne concerne pas que le moment de la récolte. Cette technique peut aussi être mise en place durant la phase de croissance afin de débarrasser le sol des nutriments. Bien évidemment, les nutriments permettent à votre plante de rester en bonne santé et vous assurent des rendements maximaux, mais une trop grande quantité peut causer une accumulation et un état statique durant lequel la plante ne peut plus y accéder. Le blocage des nutriments peut être causé par une accumulation saline ou des niveaux de pH incorrects. Ces deux causes peuvent être résolues par un rinçage de votre plante à l’eau claire. Les fluides viendront pousser les nutriments en dehors du substrat et le débarrasseront de l’accumulation, permettant ainsi aux racines de pouvoir accéder à nouveau aux nutriments. EMPÊCHER LE BLOCAGE D'ABSORPTION DES NUTRIMENTS AVANT QU’IL NE POSE PROBLÈME Au mieux, le blocage des nutriments peut être un problème, au pire, il peut être un vrai désastre. Comme le dit l’adage, il vaut mieux prévenir que guérir. Il vaut mieux prendre de l’avant pour empêcher le blocage des nutriments plutôt que de s’y atteler lorsque c’est trop tard. Empêcher le blocage des nutriments peut se faire par le biais d’un rinçage de routine. En rinçant vos plantes une fois avant la floraison et une fois au milieu de cette dernière, vous minimiserez l’accumulation de nutriments. LES ENZYMES À LA RESCOUSSE Après le rinçage pour contrer l’accumulation ou le blocage des nutriments, vous remarquerez peut-être que vos plantes ont une apparence vert foncé, c’est le signe d’un excès de nutriments. Dans ce cas, certains cultivateurs choisissent d’ajouter une formule riche en enzymes à leur substrat. Au cas où vous auriez oublié vos cours de biologie, les enzymes sont des protéines qui catalysent les réactions. Elles aident à rincer le substrat en décomposant l’amidon, les glucides et les nutriments. Il existe sur le marché toute une variété de produits qui contiennent des formules d’enzymes très efficaces. Si l’eau ne suffit pas à vos plantes, ces petites protéines ne feront qu’une bouchée de l’accumulation de nutriments ! COMMENT BIEN RINCER SON CANNABIS Rincer votre plant de cannabis est un processus simple. À chaque fois que vous apporteriez normalement des nutriments, vous rincez à la place. De l’eau du robinet non traitée est tout ce dont vous avez besoin pour rincer, assurez-vous juste que son pH est sans danger pour le cannabis. La plupart de l’eau de puits a un pH sain et ne nécessite pas de traitement, mais s’il est nécessaire de traiter l’eau de rinçage pour avoir un pH adapté, faites-le. Les ajustements du pH seront donc la seule chose à considérer. Inonder la terre avec autant d’eau fraîche qu’elle puisse contenir. Laissez l’eau durant quelques minutes pour qu’elle puisse absorber les nutriments, puis inondez la terre encore pour rincer les nutriments loin du plant. Si vous cultivez en intérieur dans des pots, notez la couleur de l’eau qui s’échappe du fond des pots. Elle sera tâchée et aura une couleur sale. C’est à cette étape qu’un appareil de mesure des TDS (Total des Solides Dissous) est utile. Si vous récupérez et mesurez le TDS de l’eau « évacuée », elle devrait avoir un taux de 1300ppm, ce qui est assez élevé. Il est important de rincer le plant jusqu’à ce que total baisse à un niveau de 50ppm, ou du moins qu’il s’approche du TDS de l’eau fraîche que vous utilisez pour rincer le plant. La couleur de l’eau d’évacuation va s’éclaircir et apparaîtra plus propre. Vous devez tirer autant que possible de minéraux dissous du plant. Comment et Quand Rincer les Plants de Cannabis Rincer les plants de cannabis avant la récolte peut faire la différence entre les meilleurs têtes ou la plus rude pour la gorge. Cette petite tâche est simple et facile à faire. Ajoutez juste de l’eau ! Attention car le moment du rinçage joue un rôle critique. Le b.a.-ba du rinçage de ses plants de cannabis. Sommaire: 1. Qu’est-ce que le rinçage ? 2. Le meilleur moment pour rincer son cannabis 3. Empêcher le blocage d'absorption des nutriments avant qu’il ne pose problème 4. Les enzymes à la rescousse 5. Comment bien rincer son cannabis 6. Comment rincer ses plantes en hydroponie 7. Les résultats du rinçage de son cannabis 8. Quand éviter de rincer son cannabis Vous avez enfin fini vos cultures et vous vous retrouvez avec un magnifique plant couvert de super têtes, maintenant sèches, vous avez fait le curing et vous êtes prêt à fumer – et pourtant quelque chose ne va pas. La weed semble ne pas vouloir se consumer et quand vous tirez une bouffée, c’est comme si on vous avait donné un coup de poing dans les poumons et vous toussez en craignant pour votre vie ! Le goût est rude et décevant. Si c’est une situation que vous avez vécue, il y a des chances pour que vos plants n’aient pas été rincés correctement avant la récolte. Cette fumée bien loin d’être agréable est provoquée par la présence dans le plant des nutriments et minéraux utilisés lors de la culture, ce qui altère la façon dont le plant se consume. Rincer le plant élimine ces nutriments restants, ce qui améliore la qualité des sensations. Heureusement, le rinçage des plants de cannabis se fait facilement et sans effort, et cela vous permet de produire des têtes douces et délicieuses en un rien de temps. ARTICLE LIÉ Comment Utiliser les Nutriments pour Cannabis QU’EST-CE QUE LE RINÇAGE ? L’acte de rincer un plant implique d’utiliser de l’eau pour éliminer tout nutriment présent dans la terre. Une grande quantité d’eau est passée à travers la terre et drainée sur une base régulière. Tous les minéraux et nutriments présents dans la terre sont rincés avec le temps avec l’eau, ce qui laisse une terre propre. Mais pourquoi vouloir éliminer tous les minéraux de la terre ? N’est-ce pas mauvais pour la récolte ? En fait, cela aide à la récolte de manière significative. Quand les nutriments sont éliminés de la terre, ceci force le plant de cannabis à utiliser tous les nutriments toujours présents dans le plant. C’est comme pour le corps humain. Quand on consomme beaucoup d’aliments, ce que nous n’utilisons pas est transformé en graisses. Dans les situations extrêmes où la nourriture est rare, le corps s’appuie sur cette graisse stockée pour tirer de l’énergie. Comme rincer force le cannabis à utiliser tous les nutriments restants dans le plant, aucun ne devrait rester et altérer les têtes récoltées. Cependant, si vous le faites trop tôt, cela peut nuire à la santé du plant, le moment est donc clé. LE MEILLEUR MOMENT POUR RINCER SON CANNABIS Le rinçage commence en général deux semaines avant la récolte. Si le plant a une période de floraison de huit semaines, le rinçage doit commencer six semaines après le début de la période de floraison. Il est préférable de regarder de près les trichomes sur le plant pour déterminer quand votre cannabis est prêt à être récolter. Si les petits trichomes commencent juste à passer d’une couleur transparente à une teinte laiteuse et blanche, c’est une bonne indication que les plants peuvent commencer à être rincés. Il faut s’arranger pour que la majorité des trichomes aient changé vers la couleur désirée pour la récolte après deux semaines – ça devient plus facile à faire avec l’expérience, alors accrochez-vous ! Le rinçage peut également être un bon moyen de remettre à zéro la terre quand un plant est toujours en phase de croissance végétative. Parfois, un cultivateur suralimente par accident son cannabis, ce qui provoque un changement de couleur et un flétrissement du bout des feuilles. Ceci est appelé une « brûlure par nutriments ». Rincer la terre peut éliminer les nutriments excédentaires, ce qui aide à résoudre le problème. Cependant, c’est une mesure drastique à ce stade de la culture, alors assurez-vous que le problème soit bien une brûlure par nutriments et non quelque chose d’autre. Flushing Le rinçage ne concerne pas que le moment de la récolte. Cette technique peut aussi être mise en place durant la phase de croissance afin de débarrasser le sol des nutriments. Bien évidemment, les nutriments permettent à votre plante de rester en bonne santé et vous assurent des rendements maximaux, mais une trop grande quantité peut causer une accumulation et un état statique durant lequel la plante ne peut plus y accéder. Le blocage des nutriments peut être causé par une accumulation saline ou des niveaux de pH incorrects. Ces deux causes peuvent être résolues par un rinçage de votre plante à l’eau claire. Les fluides viendront pousser les nutriments en dehors du substrat et le débarrasseront de l’accumulation, permettant ainsi aux racines de pouvoir accéder à nouveau aux nutriments. EMPÊCHER LE BLOCAGE D'ABSORPTION DES NUTRIMENTS AVANT QU’IL NE POSE PROBLÈME Au mieux, le blocage des nutriments peut être un problème, au pire, il peut être un vrai désastre. Comme le dit l’adage, il vaut mieux prévenir que guérir. Il vaut mieux prendre de l’avant pour empêcher le blocage des nutriments plutôt que de s’y atteler lorsque c’est trop tard. Empêcher le blocage des nutriments peut se faire par le biais d’un rinçage de routine. En rinçant vos plantes une fois avant la floraison et une fois au milieu de cette dernière, vous minimiserez l’accumulation de nutriments. LES ENZYMES À LA RESCOUSSE Après le rinçage pour contrer l’accumulation ou le blocage des nutriments, vous remarquerez peut-être que vos plantes ont une apparence vert foncé, c’est le signe d’un excès de nutriments. Dans ce cas, certains cultivateurs choisissent d’ajouter une formule riche en enzymes à leur substrat. Au cas où vous auriez oublié vos cours de biologie, les enzymes sont des protéines qui catalysent les réactions. Elles aident à rincer le substrat en décomposant l’amidon, les glucides et les nutriments. Il existe sur le marché toute une variété de produits qui contiennent des formules d’enzymes très efficaces. Si l’eau ne suffit pas à vos plantes, ces petites protéines ne feront qu’une bouchée de l’accumulation de nutriments ! Comment et Quand Rincer les Plants de Cannabis COMMENT BIEN RINCER SON CANNABIS Rincer votre plant de cannabis est un processus simple. À chaque fois que vous apporteriez normalement des nutriments, vous rincez à la place. De l’eau du robinet non traitée est tout ce dont vous avez besoin pour rincer, assurez-vous juste que son pH est sans danger pour le cannabis. La plupart de l’eau de puits a un pH sain et ne nécessite pas de traitement, mais s’il est nécessaire de traiter l’eau de rinçage pour avoir un pH adapté, faites-le. Les ajustements du pH seront donc la seule chose à considérer. Inonder la terre avec autant d’eau fraîche qu’elle puisse contenir. Laissez l’eau durant quelques minutes pour qu’elle puisse absorber les nutriments, puis inondez la terre encore pour rincer les nutriments loin du plant. Si vous cultivez en intérieur dans des pots, notez la couleur de l’eau qui s’échappe du fond des pots. Elle sera tâchée et aura une couleur sale. C’est à cette étape qu’un appareil de mesure des TDS (Total des Solides Dissous) est utile. Si vous récupérez et mesurez le TDS de l’eau « évacuée », elle devrait avoir un taux de 1300ppm, ce qui est assez élevé. Il est important de rincer le plant jusqu’à ce que total baisse à un niveau de 50ppm, ou du moins qu’il s’approche du TDS de l’eau fraîche que vous utilisez pour rincer le plant. La couleur de l’eau d’évacuation va s’éclaircir et apparaîtra plus propre. Vous devez tirer autant que possible de minéraux dissous du plant. COMMENT RINCER SES PLANTES EN HYDROPONIE Le rinçage des plantes en hydroponie est bien plus simple que de se débarrasser des nutriments en terre. Les cultivateurs en hydroponie pourront simplement drainer leur système et le remplacer par une eau au pH neutre. Le rinçage des plantes en hydroponie est aussi un processus bien plus court. Une fois que la réserve d’eau aura été modifiée, les plantes en hydro n’auront pas accès aux nutriments externes. Pour cette raison, un rinçage de deux jours suffira. LES RÉSULTATS DU RINÇAGE DE SON CANNABIS Après la récolte des têtes, prenez du temps pour bien faire le curing pour atteindre le potentiel le plus élevé. Un affinage correct par curing permet de réduire encore plus le côté rude des têtes, en éliminant des choses comme un excès de chlorophylle. Vous serez étonné de voir la différence que ce petite effort peut avoir sur votre produit. Tout votre travail se sentira dans la première bouffée de cette weed douce comme de la soie, qui caresse la gorge comme du miel. Le plus doux de la nature. Vous pouvez donc améliorer la qualité de votre cannabis en ajoutant juste de l’eau ! QUAND ÉVITER DE RINCER SES PLANTES Le seul moment où nous recommandons d’éviter le rinçage de son cannabis est lorsque l’on travaille avec une terre biologique amendée ou un super soil. Ces substrats ont été développés avec précaution afin d’héberger des micro-organismes bienfaisants tels que des bactéries ou des champignons. Cette délicate biodiversité pourrait être éliminée et endommagée par le rinçage. Une fois de plus, l’absence de rinçage ne devrait pas poser de soucis, car aucun nutriment externe ou synthétique n’aura été ajouté au substrat. À la place, les plantes comptent sur les micro-organismes pour décomposer la matière organique et la livrer aux racines. May the force be with you 💪
Likes
12
Share
**I am glad I saved pics. from weeks 1-3 because I was lagging in getting this account setup** - with that's being said, the "girls" (speaking it into existence) are coming along quite well. My last grow I used Green Planet's: Medi-One from veg - harvest, and although the overall turnout was pretty good, I just felt like I was a little heavy handed. This time I am trying something a little different and I'll be feeding the plants coconut water and potentially: -rice water** -banana peel water -boiled egg shell water -onion skin water* I am trying to do this as organic/affordable as possible, and although I haven't seen many cannabis forums talk about these natural fertilizers in depth (if at all), I have found that they are quite common practices in Indian gardening (if anyone is interested I'll link the YouTube videos). I can only imagine that these techniques are not isolated but, most likely common in Eastern gardening in general.... *if anyone can confirm this let me know Also, I did go ahead and top 3 of the 4 plants at the 5th node. I am going to hold off on topping the runt for a while and will go ahead and solely focus on LST for now. I don't want o stress her any further. **Lastly I am not the type of grower that measures things and has schedules, I admire that style of regiment and see it being beneficial commercially... but this is ENTIRELY about observation and the pleasure of growing personally so, forgive me if I don't have detailed notation lol... Feel free to ask me questions about: feedings, lighting, or anything else you're curious about
Likes
40
Share
22 dias de vida,ultimo dia en maceta de 1lt...
Likes
75
Share
@Dedon
Follow
Hi everyone ! it's the end, a bit sad for these ladies, but happy to taste my own production and i hope i can be self sufficient i learn a lot from this first experience, and i want to thanks all people who support me 🙏. I have a goal for the next session, keep a healthy plant / root system until the end 💪 thanks for all the advices. if i can leave a feedback and some advice for my next grow and for people who are interested by this method : - NEVER use a (too big ) rigid frame if you can't walk around your plant. you need full access to remove leaf, cut some branch, etc ... and check plant/root health during the whole session. - For NFT Setup, Change the nutrient solution frequently and if you are a beginner and don't know how to keep a healthy system, Don't take risk ! and change the solution each week or 10 day MAX, "you are not a wizard Harry !" - Oxygen is life ! Oxygen is life ! Oxygen is life ! Oxygen is life ! Oxygen is life ! Oxygen is life ! - Don't try to make too big buds. with a 400W HID & cooltube, buds are correct 40cm from the top, after 40cm, bud are fluffy, popcorn bud 😕 so i think i'll keep only 40/50cm for plant who are under the light, 30 for plants on the edge and cut everything lower. - Check water consumption daily ! the better way to know about plant health : 1: - Thanks for support and see you on next grow 😁 - Here's your potatoe & a timelapse from 2018/11/02 to 2019/01/06 ( 4115 photos / 60 Go )
Likes
23
Share
Day 50 (22 of flowering ) flowering is really bloom ing now, i’m playing a little with lamp distance cause is a 100 watt non dimmerable so i hope to increase light to bud, they need now. Now she really needs a lot of feed. I give 1 lt every2 days. Day 51 (23 o flowering ), another 1 lt full. Now she’s eating 1 lt every 48 hours, and when she need it anyway. But she need à lot more thème before. Day 53 I had to supercrop this branch that was too close to the heat ventilation. I hope it will save the branch and increase maybe that bud. Today another 1 lt of feeding, and I think that from the end of this week is going to need more. Let’s go!
Likes
49
Share
IVE MADE MORE VIDEOS BUT THEY JUST DON'T SEEM TO UPLOAD AND IT'S FAR TO SLOW TO DO IT FROM HOME 6/27 Made last week a five day week to get back on track. It's still overcast and rainy. It's not raining a lot bit it's consistent. Despite the weather the plants are doing phenomenal. I'll update later. It's 1pm. It's been raining consistently since 11. Just a sprinkle but it's steady. I'm going to begun uploading the weeks weather on my diary. I may start a new diary for the plants I light depped as they are flowering pretty good. Rain stopped and it's just overcast for now. I looked at some videos and did a comparison of videos one week ago and videos today and HOLY SHIT! WHAT A DIFFERENCE. Especially the light depped 10th planet. Well everything but that was the most significant difference. I'm astonished at the health and growth despite the crummy weather. Continued to rain. Just got harder. Plants are taking it but it's flooding underneath the pallets a little but it will be fine. The light dep however has me concerned. The 10th planet is looking spectacular. The bigger purple punch I'd looking good too. The smaller one though looks to have a pollen sack coming off one of the branches. Considering its not on the otherside I assume it's not just a swollen calyx. I don't mind chucking it especially if that means I don't hurt my other girls so I want to make sure. I sent videos to a few other growers and I'll add a question on here. Those three plants have been isolated from the rest for a few days due to rain. I have the suspect isolated alone until I can confirm. It sucks cause the light Depp was going good and the6ve all got little flowers. 6/28 Well that fucking sucks. ALL THREE plants I tried to light depp hermed on me. I could see male flowers. Luckily I had been keeping a really good eye on them and it was preflowers mostly. At least I caught it. One or two stamines on each plant. Would've been really easy to miss. Only one had STARTED to elongate into a stem so I think I caught it early enough. Plus since all this rain they've been kept in a different location then my big girls. Glad I did that now. Boy the roots looked good on those plants. I just grabbed the stalk and lifted and it came right out of the pot. I held it there admiring it for a minute. This sucks. At least the real plants are doing good. As far as I know. No male preflowers that's for sure. I've got some feedback from other growers and the videos are a little blurry but I had found a light leak and I'm certain these plants hermed. I know I could've tried to save them but I didn't want to risk it. I compared what I was seeing with Google photos and other websites. Aside from the larger ball with its stem, there were also several little bumps besides developed calyxes that were weaving into little buds. Trust me that I wouldn't cut down my plants if I wasn't 110% sure. I might've been able to "save them" but to me it's just not worth the risk. 6/29 I was second guessing myself pretty hard last night due to some responses I got on my light dep and messages I got from other growets. Made my anxiety horrible but I looked on several video's I'd taken again and I know what I saw. I felt better after that. This was after I researched and waited THREE days until I saw the ball on the stem and the groupings of small nubs under a fresh yellow flower. These plants were flowering good and it sucks to lose them. One MAY have been ok but one was a runt and had all the characteristics of a true hermaphrodite. They were only in 3's and I couldn't risk my harvest for an experiment. Still sucks. Oh well. Sun is starting to come out. Plants seem to be doing fantastic. I have one spot on a leaf that looks like a pillar munched on a leaf so I'll probably get the bt out soon as I have a dry day that I can apply it. I'll have to check the weather. I need to start a nute regiment but the plants aren't telling me they need anything yet. 6/30 I fucked up dates or dodnt do it yesterday or it didnt save right so I'm leaving this blank today is the 1st. 7/1 I have still only watered s couple times and I haven't had to feed. This week I'm going to start nutes. I had some external ersonal situations that have kept me from my plants. I'm hoping to get back on track. I noticed some pillar damage so I'll need to dig out the BT. This morning I saw this giant ground hog by my cage. Hated too but had to get rid of him. Of course some of the blowback landed on the leaves of one of my plants. I tried to clean it as best I could. Better than that fat bastard eating everything in one night. I broke a branch either falling around it or bulling through when I was pissed or I LST it the wrong way and the wind broke it against the tomato cage. Nice big branch too on top. I tried to fix it with duct tape but we'll see. The plants need me to spend sometime with them. I need to clean them up. Apply bt and give them their first feeding. I'll update as I go. They don't seem nutrient deficient by any means but I don't think it would hurt to start the nutes. 7/2 Bags were lighter today and if it wasn't going to rain tonight and tomorrow I'd he watering. Plants look great so soil isn't depleted yet I guess. They're growing rather rapidly. The branch I broke didnt make it. Had an idea it wouldn't but I had to try. I waited on the BT on account of the rain. I may go back over and change my mind and water with silica or a mild nute solution or maybe apply the BT. Depends what time I get back. I have some work I need to do over there. There's a few that I need to clean up the bottoms on. Pest damage is minor and limited to one or two plants and a leaf or two only. 7/3 More rain. It was supposed to rain this morning too but it didn't. We got .33in yesterday and through last night so I thought that was ok. Looking back on my previous diaries I'm doing things significantly different than before. I had used a lot more nutes earlier on. This morning I mixed two gallons of 2tsp of big bloom and fed it to the 9 plants in smart pots leaving the container plants as they have much more water in them. Looking back at other diaries I previously had, WPM and septoria by this time not to mention a shit ton of other pests I was fighting by this time. Since I poisoned where the cagexwas multiple times and sprayed the cage before it was moved I luckily don't have that problem yet knock on wood. I'm planning to apply BT tonight to deal with the moth larvae if there are any. I'm looking at plants around this area and im seeimg SOME septoria and pm on raspberry bushes and burdock so it is around. I made sure my cage is not by any other vegetation this year and is sitting on asphalt with the bags on raised pallets. Good thing I did or I guarantee they'd be flooded by now. I've been seeing multiple complaints from maine growers online (AND THEY HAVE HEALTHY PLANTS!) saying this is the worst year ever. Maybe they need a dose of fusarium oxysporum to keep them humble. This is maine. If you don't like the weather just wait five minutes. Meanwhile I'll be doing my sun dance hoping for sun. "Hard to grow cannabis with no sunlight" said another grower on my forum.
Likes
332
Share
Germination date 🌰 10/03/2021 Day 99 🌱 22/06/2021 Strain 🍁 Purple Matcha, Humboldt seed bank Nutrients 💉 Advanced nutrients PH perfect sensi grow A+B (veg) PH perfect sensi bloom A+B (flower) B-52 (through veg until week2 of flower) Voodoo juice (🖕🏻) Tarantula (🖕🏻) Piranha (🖕🏻) Sensizym (all the way through) Rhino skin (🖕🏻) add first leave for an hour Big bud coco (week2+ of flower Bud xfactor (🖕🏻) Nirvana (🖕🏻) Bud igniter (first 2weeks of flower) Overdrive (last 2weeks of flower) Flawless finish (flush week) RockHoldings Rockresinator(week2+ of flower) Vitalink calmag Set Up ⛺ amazon special 1.2m x1.2m 💡 spiderfarmer sf4000 📤📥 AC infinity 6inch 💧 10lt dehumidifier Notes🗒️✏️ We are done 🌱👍🏻 dripping in ❄️❄️❄️❄️❄️ Another beauty of a grow finished, I just hope I can get the cure right with no a/c. Humboldt have seriously smashed this strain. Great for beginners as it will take everything you give it. Stand by for the havest results and thanks for following everyone means alot ❤️🍁 Massive thanks to PharmaZ for sorting us out and helping us along, top bloke go follow 👍🏻 Stay turned and happy growing fam ❤️🍁🌱👍🏻
Likes
19
Share
🌸 White Widow — Week 7 Flower (Week 11 from seed) Status: Full flower, bulking rapidly. Vibe: Dark foliage, compact form, heavy frost, 90s aroma profile. Feeding: Aptus + Plagron lineup (Power Buds, Sugar Royal, Green Sensation, Regulator, CalMag, All-in-One) Photos: Sony a6000 — loyal workhorse for studio shots. 📷 ⸻ 🧠 Deep dive — Why 12/12-from-seed makes a plant “go hard” Plants evolved to reproduce. Their primary biological drive is to make seeds. Photoperiod (day length) is one of the most reliable seasonal cues plants use to decide: is it time to flower? Mechanisms at play (simple → nerdy): • Photoperiod sensing: Leaves detect day length via phytochrome systems (Pr Pfr). Short days (or the 11/13 rhythm) flip the hormonal cascade toward flowering. • Florigen & flowering hormones: When the plant senses “short days,” it produces mobile signals (florigen) that travel to the shoot apex and shift gene expression from vegetative growth to reproductive development. • Carbohydrate reallocation: Energy stops making more leaves/branches and is directed into calyxes, resin synthesis, terpene pathways, and seed/flower tissues. • Result: A plant that thinks “the season’s ending — reproduce now!” goes all-in: denser flowers, rapid calyx swelling, intense trichome production. Important point: they don’t know about pollination. The plant can’t tell you whether pollinators exist or whether pollen will land — it simply invests in attractive, resinous flowers to maximize reproductive success. As growers, we exploit that drive to produce potent sensimilla (unpollinated) flowers. ⸻ 🔬 Why your White Widow is exploding in quality right now • Immediate reproductive programming: Starting floral signals early (12/12 from seed) forces the plant to prioritize flower formation rather than vegetative mass. That yields compact, dense colas. • High PPFD + short day = strong DLI in less time: With fewer hours of light, your lamp intensity is higher in those hours → powerful photosynthesis during the window the plant has chosen. • Nutrition tuned to flower: the Aptus + Plagron stack feeds the metabolic surge — PK + biostimulators for bulking, sugar stimulators for terpene pathways, Ca/Mg for structural health. • Genetics: White Widow is resin-happy; give it the right cues and it will frost up like a sugar cookie. ⸻ 🌈 Why her colors are going dark (and why that’s beautiful) Leaf & bud color comes from a balance of chlorophyll + accessory pigments (anthocyanins, carotenoids) and is influenced by: • Genetic propensity (some phenos are naturally darker) • Temperature swings (cooler nights often increase anthocyanin expression) • pH / nutrient balance (some deficits/ratios nudge color pathways) • Light spectrum intensity (strong red/far-red influence can shift pigment expression) Dark phenos often correlate with high terpene and anthocyanin expression — visually stunning and often highly aromatic. ⸻ 🔁 Quick timeline recap (for newcomers) • Germination & early mistakes: initial heat-mat loss → restarted, one strong survivor. • Veg: compact, short internodes under the 11/13/12-12 shuttle → stacked nodes. • Early flower: slow to show, but once she flipped she committed. • Now – Week 7 flower (Week 11 from seed): heavy bulking, thick trichomes, deepening color, classic White Widow aroma emerging. ⸻ 🔭 What to expect next (this week → next week) Expect: • Continued bulking of calyxes and cola weight. • Explosion of trichome coverage — white, cloudy glands multiply. • Stronger terpene smell (earthy, spicy, resinous 90s profile). • Possible color intensification — deeper greens, potential purples depending on phenotype & nights. Do not expect: • Major new stretch — she’s committed to flower and will remain compact. • Immediate harvest — typical White Widow still wants its weeks; plan for patience (mid-late flower bulking happens over several more weeks). ⸻ ⚖️ Should you run all seeds 12/12 next cycle? (pros & cons) You asked if you might run every seed 12/12 — here’s the honest rabbit-hole: Pros • Much faster cycle → less time to harvest. • Compact plants → ideal for small spaces or stealth grows. • Often denser single-plant yields; less training needed. • Great for experimentation, multi-strain rapid rotation. Cons • Generally lower total biomass per plant vs. long veg runs. • Some genetics need veg time to express full canopy & branching; yields may be lower for those strains. • Root systems can remain smaller → may stress under high PPFD if not supported. • Less flexible for heavy-topping/lst/manipulation strategies. Bottom line: for strains with good genetics for flowers (like White Widow), 12/12-from-seed can be very rewarding. For sativa-dominant, tall strains you might lose yield without long veg. ⸻ 📷 Gear love — Sony a6000 shoutout I’ve got to echo it: that camera is a workhorse for growers. Compact, responsive, great color fidelity, and perfect for low-light studio shots when paired with proper exposure. The a6000 captures the leaf texture, color depth, and bud gloss in a way phones struggle to match. Long live the loyal shooter. 📸✨ ⸻ 🙏 Gratitude — the usual and the real Thank you to: • Zamnesia — for the genetics & the nostalgia. • Aptus & Plagron — the chemical & biological push that lets the plant sing. • ThinkGrow / Future of Grow / TrolMaster — lighting, control, and environment orchestration. • You — the makers, lovers, critics, curious readers — your energy fuels this diary. And to our White Widow — for showing up, forgiving mistakes, and giving back in beauty. 💚 ⸻ Week 7 flower — Week 11 from seed. Darker colors, heavy frost, the classic 90s scent, and a compact structure that proves 12/12-from-seed can produce absolute fire. We went full-in on Aptus + Plagron, kept the Emerson red-lead sunrise/sunset, and trusted the genetics. Watching her build is pure joy. Come see the series in 4K on YouTube — every detail, every shimmer. 🌿🔥📷 #WhiteWidow #Zamnesia #GrowDiaries #12fromSeed #EmersonEffect #Aptus #Plagron 📲 Don’t forget to Subscribe and follow me on Instagram and YouTube @DogDoctorOfficial for exclusive content, real-time updates, and behind-the-scenes magic. We’ve got so much more coming. You won’t want to miss it. • GrowDiaries Journal: https://growdiaries.com/grower/dogdoctorofficial • Instagram: https://www.instagram.com/dogdoctorofficial/ • YouTube: https://www.youtube.com/@dogdoctorofficial ⸻ Explore the Gear that Powers My Grow If you’re curious about the tech I’m using, check out these links: • Genetics, gear, nutrients, and more – Zamnesia: https://www.zamnesia.com/ • Environmental control & automation – TrolMaster: https://www.trolmaster.eu/ • Advanced LED lighting – Future of Grow: https://www.futureofgrow.com/ • Root and growth nutrition – Aptus Holland: https://aptus-holland.com/ • Nutrient systems & boosters – Plagron: https://plagron.com/en/ • Soil & substrate excellence – PRO-MIX BX: https://www.pthorticulture.com/en-us/products/pro-mix-bx-mycorrhizae • Curing and storage – Grove Bags: https://grovebags.com/ ⸻ We’ve got much more coming as we move through the grow cycles. Trust me, you won’t want to miss the next steps, let’s push the boundaries of indoor horticulture together! As always, this is shared for educational purposes, aiming to spread understanding and appreciation for this plant. Let’s celebrate it responsibly and continue to learn and grow together. Friendly reminder all you see here is pure research and for educational purposes only, With true love comes happiness. Always believe in yourself, and always do things expecting nothing and with an open heart. Be a giver, and the universe will give back in ways you could never imagine. 💚 Growers love to all P.S. — Deep dive on DLI (Daily Light Integral) — short, clear, and a little nerdy (in the best way). 🌞🌿 1) What is DLI, simply? DLI = the total amount of photosynthetic light (photons) a plant receives over one day. It’s expressed in moles of photons per square metre per day (mol·m⁻²·day⁻¹). While PPFD (μmol·m⁻²·s⁻¹) tells you instantaneous light intensity, DLI tells you how much light the plant actually used that day. ⸻ 2) The formula (how to calculate it) Use this exact formula: text{DLI (mol·m}^{-2}text{·day}^{-1}) = frac{text{PPFD (μmol·m}^{-2}text{·s}^{-1}) times text{seconds of light per day}}{1{,}000{,}000} Where seconds of light per day = hours of light × 3600. I’ll show worked examples so it’s easy to follow. ⸻ 3) Worked examples (digit-by-digit so it’s crystal clear) Example A — your reported PPFD ≈ 766 μmol·m⁻²·s⁻¹ and 11 hours light • seconds of light = 11 × 3600 = 39,600 s • photons per day = 766 × 39,600 = 30,333,600 μmol·m⁻²·day⁻¹ • convert to moles: 30,333,600 ÷ 1,000,000 = 30.3336 mol·m⁻²·day⁻¹ So: 766 μmol·m⁻²·s⁻¹ × 11 h → DLI ≈ 30.3 mol·m⁻²·day⁻¹ Example B — same PPFD but 12 hours • seconds = 12 × 3600 = 43,200 • photons = 766 × 43,200 = 33,091,200 • DLI = 33,091,200 ÷ 1,000,000 = 33.0912 mol·m⁻²·day⁻¹ Example C — other quick refs • 700 μmol × 11 h → DLI ≈ 27.72 • 800 μmol × 11 h → DLI ≈ 31.68 • 400 μmol × 11 h → DLI ≈ 15.84 • 1000 μmol × 12 h → DLI ≈ 43.2 (You can plug any PPFD and hours into the formula — those are ready-made reference points.) ⸻ 4) What DLI targets are useful for cannabis? • Vegetative (gentle): ~12–25 mol·m⁻²·day⁻¹ • Flower (typical good range): ~25–40 mol·m⁻²·day⁻¹ — most home/pro growers aim here • High-intensity/CO₂-enriched commercial: 40–60+ mol·m⁻²·day⁻¹ (needs CO₂, stronger conditioning) So your example (≈30 mol·m⁻²·day⁻¹ at ~766 PPFD × 11h) sits very nicely in the flower range. That explains the dense bulking + heavy resin you’re seeing — our DLI is right where White Widow loves to convert energy into flowers. ⸻ 5) Practical implications — what DLI affects and what to watch • Higher DLI → higher photosynthesis → more carbohydrate to drive bud bulking and terpene/trichome production. • Higher DLI requires more water and nutrients. Plants transpire more and pull more minerals; be ready to feed and irrigate appropriately. • Leaf temperature / heat stress: pushing PPFD up increases canopy energy/heat — keep airflow, VPD, and room temps under control. • CO₂ matters: if aiming beyond ~40 mol/day, elevated CO₂ (e.g., 800–1200 ppm) becomes productive; otherwise additional light won’t be used efficiently. • Distribution matters: DLI is an average over the canopy. Hotspots or shaded pockets mean some flowers get too much or too little — even light spread (and PAR mapping) matters. ⸻ 6) Actionable tips for your run (based on your 11/13 / 12/12 experiment) • We’re hitting excellent flower DLI (≈30 mol/day at 766 μmol × 11 h). That’s why buds are dense/frosty — keep the rhythm. • If you shorten hours (e.g., 11 h) keep PPFD high to maintain target DLI. If you lengthen hours (12 h) you can reduce peak PPFD slightly and still hit the same DLI. • If you raise PPFD to chase more DLI, ramp slowly (a few μmol/sec per day) to let stomata and roots acclimate — avoid sudden bleaching. • Watch watering & EC — higher DLI → faster uptake → more frequent but measured feeding. • If you ever push DLI 40 mol/day consider CO₂ enrichment and perfect VPD control to have that extra light used efficiently. ⸻ 7) Quick rules of thumb • Want to hit ~30 mol/day with 11 hours on the clock → aim for roughly 700–800 μmol·m⁻²·s⁻¹. • Want ~33 mol/day at 12 hours → ~766 μmol·m⁻²·s⁻¹ matches that nicely. • If you see leaf cupping/bleaching, you’ve likely exceeded safe PPFD for that canopy or temps are too high — back off, check VPD.
Likes
2
Share
@BabaPott
Follow
Woche 8 hat super angefangen und auch sehr gut zu Ende gebracht. Durch die kühlen Temperaturen sind die Blüten lila geworden. Ich habe die Tanks nach ein paar Tagen auf nur Wasser umgestellt, damit die Damen die letzten Nährstoffe aus dem Boden ziehen können und sich fürs Ende umstellen. Das einzigste was ich noch weiter einstelle ist das ph wert vom Wasser auf 6.0
Processing
Likes
10
Share
@BodyByVio
Follow
This week I Supercrop all the plants and spred them out over both lights. One more week of Veg and they are ready to explode Check me out on Instagram @growmorestressless
Likes
45
Share
@AsNoriu
Follow
New week, seems ok for first morning, will do heavy feed on day 52. I already gave away one plant ( strawberry cough photo ) now one of fast diesels still stucked in pre-flower, would love to return to 18/6 regime, just dont want any reveg or hermie. Still lost. Fingers crossed ;) Day 53 Morning, leaves a bit down after night, everything looking not bad, thinking to defoliate two midle babies. Had a big mistake on day 52, they where down, i stayed for one night out and was late with watering for a day, they looked totaly down, like my mobile, thats why no photos, never seen any plant so bad in my hole life... But they are ok now, quess it was on the verge, but damadge was done 100 % Day 53 evening. I wouldnt be me if i wont be searching ways to screw up the crop ;))) After many hesitations i decided to do very light defoliation. And ..... They hated it. Lets give couple days, but 2 huge stresses in 3 days dont give me and girls joy for sure .... In that rush forgot to make third Fast diesel photo, but i quess she didnt made mind to flower, took like 5 leaves down and left her for a bit,very annoying , she will be a big delay at the end or very early harvest, both ways waste of time.... Plus had to reduce light to 15.5 of day, maybe those 30 min will force her ... All 3 Fast Diesels are very mag hungry, fed them with epsom salt extra. Day 54 . Fast Diesel 3 went to 24 hours darkness prison with a heater ;))) hope that will teach her a lesson ! Others got feed with silicic acid, they drink, thats a good sign tho ! Fast Diesel 3 was a day behind from all, even 5 leaves was too much. But its a good time for me to give last trick i can, before downgrading day hours even more. Day 54 Evening. Girls are praying again, silica always boost them to hapiness ;) Day 56. Girls are growing, looks like last Fast Diesel starts to make buds from preflower, but a lot of pistils going brown, so either its heat, which i will check today or its hermie ;))) Could be wind damage, i will check all options today, returned from work, made short shitty video and thats all ;) End of week.
Likes
9
Share
They look great for free beans 😉🌿 Just topped these girls at going into week 5🔝
Likes
114
Share
@GMSgrows
Follow
Late in the day update. Sorry, pics aren't the best. Girls are starting to spread out now that the daylight hours are nearing the 14 hour mark. Hormone change is starting to happen. The Gelato once again., what can I say. Hitting ove 8 and a half ft now. The Silver Widow is pushing up to where it always grew like a round bush. It is close to 6 ft. The Breakup Cake is going on 7 ft. Stalks are getting very large., just healthy all the way around. Thanks to all my growmies, grow um big.
Likes
8
Share
@Froggman
Follow
The ICE is almost done; the NL doesn’t even seem close. Interesting since ICE sprouted a day later than the NL.