
Likes
Comments
Share


@4Haut
Follow
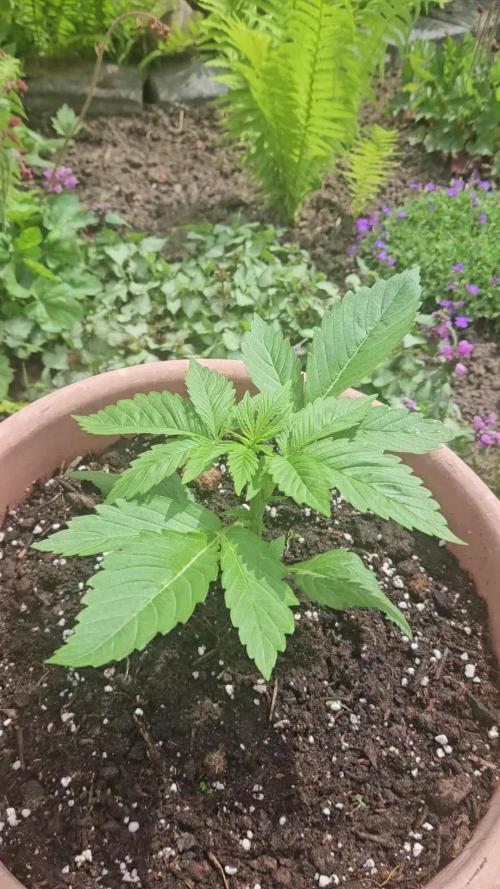
Hi@ALL,
it's the end of the second flowering week, unfortunately, I’m dealing with fungus gnats. As a countermeasure, I’ve used nematodes. The challenge is that during the flowering phase, I prefer to let the soil dry out completely before watering. However, nematodes require consistently moist conditions to survive. Additionally, I’ve read that nematodes can take three to four weeks to eliminate all the eggs – quite a long time. I might also try neem oil.
Also, I’ve noticed that the tips of 20%-25% of the leaves have turned brown and become crispy. This occurs both at the top and bottom of the plant. I suspect I’ve provided too much light. My biggest challenge currently is finding the right light intensity. I’m using an AC Infinity Ionframe EVO3 with 280W. According to the instructions, I should operate it at 100% intensity during the flowering phase when it’s 30 centimeters away. However, that feels like a full-blown laser show for the plant. (supposedly around 1600 PPFD). Now I’ve positioned it at 45 centimeters and 70% intensity. According to the Photone App, the upper part of the plant receives approximately 900-1000 PPFD. Unfortunately, I can’t fully trust my smartphone an the app… well, that’s what happens when you turn everything into science 😅
And one more thing caught my attention: the smell. It’s not there. I can hardly smell anything. My GG#4 is three weeks old and fills the entire room with its strong odor, but the L.A. Amnesia simply doesn’t smell like anything. Somehow, that worries me a little 😩
Overall, the plant seems "healthy" and does its thing, but I’m unsure whether to prune the lower branches. Although they receive light, they’re about 10-15 centimeters below the upper ones 😓
Wish you a nice day. 👋😀👍
GrowHard.GoPro. 💪

Processing
Likes
13
Share


@MG2009
Follow
Week 3 males developing right on time! Pollen will be dispersing soon.
So now trying to nail down who daddy was? Week 3 day 1 males looking very nice, no sign of either one showing female flowers( no hermaphrodite/ true male) but I will stress them more after reveg for severe stress test. For final results.
Looks like I forgot to feed mom! Shit! But I did not.I used bio tone starter
5-1-1 by Espoma gonna feed in am. With tomato tone with myco 3-4-6 it's all I got and organic to boot 👍
Last grow with Captains cake went to 11 weeks 2 - 3 applications should get me to finish line. No flush should be needed, it's feeding the seeds growth.
Looking at 07/01/2018 harvest. Fingers crossed!
05/05/2018
First burst of male pollen is flying in the air, gonna try to get video of it as I shake the males. I am brewing tea with worm castings unsulphured molasses,topped off with protilizer immediately after brewing it.
Give them a little love (Tea) while they are making seeds👊
Likes
100
Share


@AsNoriu
Follow
Day 111. First is ready, second week behind, third maybe even 3 weeks behind ....
Plus they are LEAFY ,!!!!
Trim jail ...
Wet trim for all of them - no doubts !!!
Day 115. Still hanging, slowly drying and result should be decent at the end ... A week more I guess, very humid in UK ...
Day 118. First trimmed - 175 g. Other is chopped ! One still grows ...
Day 136. Chop day for the last one !!! Long run ....
Happy Growing !!!

Likes
11
Share


@cannacat777
Follow
Here we go! Just sort of keeping an eye on the pistils and trichomes. Still need a little time. Won’t be a large harvest but smelling and looking amazing.
5/16. No joke these ladies smell so amazing. Fruity and sweet. Hopefully coming up on harvest shortly.
5/20- harvested one of the gals. So smol! But I love her. She smells like grape jelly. This time I am READY with my dry tent. I think I’ll give the other pot just a few more days…


Likes
8
Share

@Mannirumpel420
Follow
Der Unterschied ist wirklich groß und ich bin gespannt ob es Unterschiede im Zeitpunkt der Blüte geben wird.Der Stamm von der aus dem Zelt ist absolut robust und macht es schwierig die herunterzubinden,jedoch machte ich es dennoch da es für Automatics die beste Methode ist.
Likes
16
Share


@Chocolopeison
Follow
La verdad que está semana no hicimos mucho, más que nada esperamos día 22 de floración para la esperada desfoleacion.
En la próxima semana se va a pillar mucho más info. Solo hemos estado sacando una que otra hoja. Nada más que eso.
En instagram @chocolopeison, pueden ver más detallada todo esto que subo historias.
Saludos


Likes
5
Share


@coihue_ancestral
Follow
La planta más pequeña evidencia debilidad pero no sé a que se debe
Las hojas se doblan hacia abajo en los nodos mas cercano al sustrato
Saludos


Likes
11
Share


@LiamF
Follow
So after 106 days + 11 days drying im finally done with my first grow.
Got 97g dry buds + 30g shake
Way more then i anticipated.
Alot of the buds are pretty airy but the top ones qre pretty solid and all of them have amazing coat of trichomes.
Im so greatful i had this experience. I learnt alot and have way more confidence to grow more and my plan was to have my first grow to anwser all the questions i had.
Im cant believe i spent less then 300$ on this setup and harvested equals to like 1,500 - 1,700 $ of buds(prices in my country) thats definitely going to help me with the economy situation right now. And all this was stealth inside my closet, i had family members comming and didn't notice nothing i just had to turn off the blower fan since it's the only thing in my setup which isn't stealth.
I know i didn't gave her the best conditions but she showed me how strong is a Cannabis plant 😍
Im just starting my 2nd grow - Auto Northen Lights. Stay tuned


Likes
7
Share


@Mrg7667
Follow
Amazing week! Starting to smell absolutely Devine! Some cherry funk to cherry funk with a hash back and some with just lighter hashy lind of smell all looking great except one oheno growing funky finger nugs (one of the better smelling phenos tho)
Need to clone 4,6,3!

Likes
5
Share


Likes
24
Share


@GR0WER
Follow
New week starts!
☀️18.10.2023
Nothing for today. I'll water my garden tomorrow.
☀️20.10.2023
I've watered my plants yesturday using 30% concentration of TA Tripart solution + 'Advanced PK' nutrient in 100% of recommended dose. They have a 'Third week haircut' already and I will make big defoliation of lower floors near the week ends.
☀️21.10.2023
Huge defoliation today. I've cleared nearly all big leaves all over my plants and branches in a bottom. Made LST and sprayed them with 'TA Bio Bloom' solution. That's all what I'll do till the every harvest, I guess.
☀️23.10.2023
Spraying with 'TA Bio Bloom' today.

Likes
5
Share


@Pureleelove
Follow
This was an amazing experience for my first grow. Was super unsure of what I was going to yield, but I think 27 grams is a realistic harvest and Im looking forward to see if I can get bit larger of a yield on the next run. I want to try main-lining, see for better energy distribution and more equal bud growth. Also investment into a proper reflector and possibly enclosed space.
Note- I trimmed my plant the night before harvest morning. I removed than fan leaves to start, and then proceeded to trim the plant. I pulled out a lot of the leaves with no frost by hand. The sugar leaves had so much crystal on it I thought I would leave the smaller ones on the bud. I gave it a light trim, and used all the trim to make Isopropyl Alcahol (99%) based extract. Got about 1 gram from the run. I also had a nice little ball of finger charas from the trimming.
I harvested it in the morning at about 04:30 am before the light cycle triggered at 7am. She hung and dried for about a week, where I then chopped her into buds. She cured for 2 weeks before i started smoking.
Ask anything you want to know! Or if I can be more clear on any areas of the grow!
One Love!

Likes
22
Share


@bypado_farm
Follow
Day 29:
Watered each plant with 0.75L with nuts
1485 ppm, 3150 us/cm, 3.1 EC
Day 32:
Watered each plant with 0.8L with nuts
Day 35:
Watered each plant with 0.8L with nuts
1616 ppm, 3438 us/cm, 3.4 EC
Likes
31
Share


@SkunkyDog
Follow
Hallo zusammen 🤙.
Sie wächst sehr schön und macht keine Probleme.
Sie erhalten 25 Prozent Rabatt in unserem Shop
Mindestbestellwert beträgt 75 Euro
https://greenbuzzliquids.com/en/shop/
Code: GD42025

Likes
16
Share


@VIPgrower
Follow
Forgot to add my room pics and details so I added a week just to show you don’t need a expensive grow tent so list grow room size 9x6x7 plus some thinking and tools to it all together and hardware
1/ double sided white and black Mylar $80
2/ duct tape had already and tuc tape red to seal joints of room $25
3/temp/humidity monitor $30
4/1000watt ballast and hps bulb and mh bulb $400
5/parabolic shade vertical $80
6/ temp / humidity controlers $100
7/pots $70
8/ nutrients $230
9/humidifier Vick’s x2 $130
10/arerator $40
11/fans 2 oscillating and one window $130
12/8 inch exhaust fan and all the fixings $200
13/ co2bottle yeast and co2 bag plus refills for bottles $200
14/ ec and oh meters for solutions $200
15/ plus miscellaneous items not mentioned $400 but you get the idea
16/ seeds Barney’s farms $90
17/clones from seeds from Barney’s farm off a friend of a friend thanks Johnny $80 👍
18/anything else I have forgot cause of my stoner brains learned a hole new with light and par and PPFD and dIL thanks
