The Grow Awards 2026 🏆 


Likes
Comments
Share
@pHilosophy420
Follow
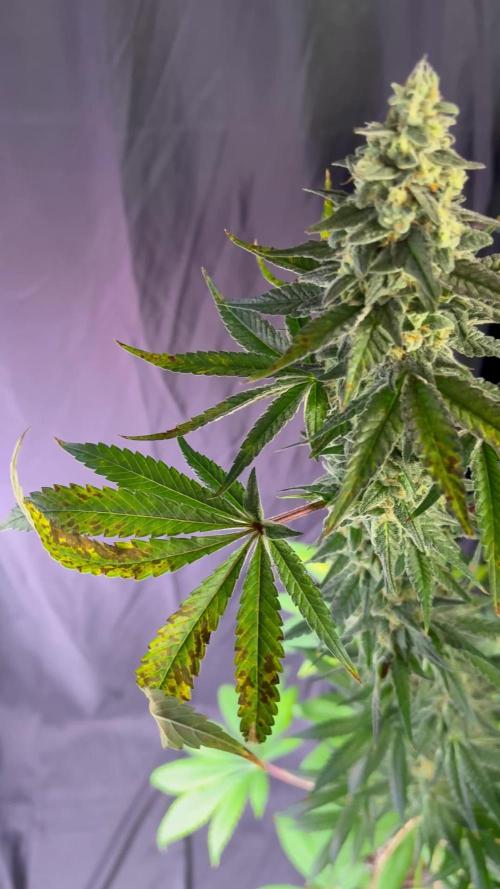
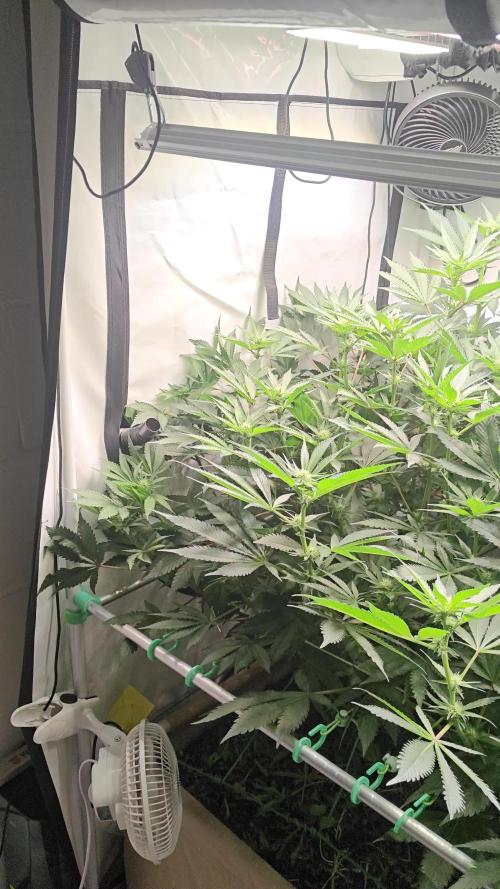
The green beast is growing very well so far and next with should get much bigger 👹

Likes
7
Share
@Cogollo_eu
Follow
**Encontrarás la traducción a español al final de la descripción**
From/Desde: 12/04/19 || To/Hasta: 18/04/19
From day/Desde día: 50 || To day/Hasta día: 56
You can find the Gorillas Diary here:
** Podéis encontrar el diario de las Gorilla aquí:**
https://growdiaries.com/diaries/25675-makingmoney-with-gorilla-mm-vs-gorilla
-----IMAGES & VIDEOS-----
I'm sorry for not having a tlapse video this week, i slaved the cam onto my 60x60 tent to record the first growing week of another plants, next week i will return with more tlapse videos.
-----WEEK SUMMARY-----
To have a visual size of the plants take into consideration that the SCROG net it's fixed 24 cm abobe the top part of the soil.
Remarking what i've told last week, i must say the SCROG is not a true SCROG, as some colas begin below others, and also colas are of different heights among all plants. Anyway i'm very happy on how everything is going. And insisting again, I have very very few experience growing cannabis, this is my 3rd grow, 2nd indoor, and first time with photo-period at indoors, and of course is the first time too i'm trying to apply growing technics on a serious way. I really don't know if i'm doing things right or wrong.
-----WATERING CALENDAR-----
13/04/19 - 1.250 ml with all week nutrients -(Sensizym, bloom stimulator, bloom nutrition & amino complex) @ PH6.4 & 1.3 E.C.
17/04/19 - 1.250 ml with Silica Power, Pro Active, Bloom Stimulator, Bloom Nutrition, Sensizym & 5 drops of Amino Complex @ PH6.5 & 1.3 E.C.
*****ESPAÑOL*****
-----IMÁGENES Y VÍDEOS-----
Siento no tener vídeos timelapse esta semana, he esclavizado la cámara en el armario de 60x60 para grabar la primera semana de crecimiento con otras plantas que tengo en el.
-----SUMARIO SEMANAL-----
Para tener una idea más o menos certera del tamaño de las partes de las plantas, tened en cuenta que la red está fija a 24 cm de la parte superior de la tierra de los tiestos.
Remarcando lo que dije durante la última semana, he de decir que el SCROG no es un SCROG real, ya que las colas no empiezan desde la misma altura ni son de la misma altura, ni las plantas son de la misma altura. Pero yo estoy muy contento con como va la cosa, vuelvo a insistir que es mi primera vez con foto-dependientes indoor, mi segundo armario indoor y el tercer cultivo de mi vida, y por supuesto la primera vez que aplico o intento aplicar las técnicas de cultivo. Lo estoy intentando realizar bien y de manera eficaz, pero realmente no se si lo estoy haciendo bien o mal, yo simplemente me lio y veo como responden las plantas.
-----CALENDARIO DE RIEGO-----
13/04/19 - 1.250 ml con todos los nutrientes semanales -(Sensizym, bloom stimulator, bloom nutrition & amino complex) @ PH6.4 & 1.3 E.C.
17/04/19 - 1.250 ml con Silica Power, Pro Active, Bloom Stimulator, Bloom Nutrition, Sensizym & 5 gotas de Amino Complex @ PH6.5 & 1.3 E.C.

Likes
7
Share
@Thigh
Follow
It was a very dark week. Not much sun. Hopefully it will get better 😄👨🏽🌾 I think 10 degree is the border of outside Temperatures.
Likes
84
Share
@Mrs_Larimar
Follow
Friday, Feb. 19th.
Today Iam going to make a Grow just for me
I bought in November the 25 Years Anniversary Box from T.H. -Seeds
Today ive chosen the Bubblegum
Its just because ive grown it once and only had 1 Plant ( clone)
and it was soooo delicious
We will see if i can repeat that Taste with the " Legendary Bubblegum" from T.H.-Seeds
As I have a bigger Growspace, these Girls are going to
start under 12/12 Lightschedule
Starting in 3l Airpots and then transplanting into
11l Amended Soilmix ( RQS Easy Boost Organic Nutrient)
I took 3 Seeds, they were looking quite lightgreen--------and
put them into a Glass of lukewarm Water for a few Hours
Tomorrow i am going to make Further Germination under a
wet Kitchensponge
Saturday Feb. 27th.
Those seeds took longer to Germinate than the other Strains
But on saturday Roots were long enough to Plant them
Monday
Plants show barely up... still in Shell... one looking like wilted
yeah we will see in the next 2 days who made it
Girls are growing under 12/12 in the Big Tent. its quite dry here ( RH 40 or less)
and they have to fight more, than in the other Tents
But in the End.... Cannabis grows under nearly every Condition... its just the Question how good
so stay tuned for the next update.... in week 1
Stay Tuned
Saturday Feb.20th
After a few Hours sokaing into Water, they moved under a wet Kitchensponge for further Germination
Then they are covered and placed on a warm Spot.
Breeders Information:
Bubblegum is one of the first strain in T.H. Seeds collection. It was created in 1993. Today Bubblegum is an outstanding and famous cannabis variety with a big amount of awards.
The plant demonstrates a good stabillity. It has a quite short size and reaches to 120-160 cm tall. The harvest comes after 55-60 days of the flowering and produces yields of 350-500 gr/m2.
The smoke provides an intense fruity flavor and a mostly indica effect.

Likes
3
Share
@420cfm
Follow
Stretch is done. Defoliation for F21 will be tomorrow. Other than starting these too early. Happy with the progress! Bud sites galore, nice healthy ladies, fungus gnats on the decline. On cruise control soon!


Likes
16
Share
@GreeneScene
Follow
This week was a good one . Stellar initial growth this round after upgrading lights & using homemade super soil. My 3 day old plants looked like 9 day old plants of my last run to give an idea . I watered for the first time since planting on 5/17 .
I had to itch to test the runoff since it’d only take a sec right? All the ph’s came out almost 2 points lower than when they went in so I decided on a flush even though I’m using Dry amendments.
Honestly I didn’t have the problem of fluctuating ph’s before I added that Peat Moss to my supersoil in hindsight I wish I would have just ordered 1 more 11lb brick of CoCo Coir .
I had the idea that I may need to flush a day or two prior to watering when I noticed all my stems purple.
I get it could be genetics but ALL of them where purple . Here today it is 1 full day since I flushed & all of the stems are now Green with the exception of my Runtz seedling.
3/17 will make day 7 for Runtz & #1 of the GDP
3/18 will make day 7 for Zkittlez & the 3 remaining GDP.
I intended to transplant these ladies day 13 preferably into their forever homes of 3g fabric pots . Fingers crossed day 14 they’ll be ready to start some LST.

Likes
Comments
Share
@Robom069
Follow
very big buds
not so dense but still very good i guess
left side acid dough
right side black domina

Likes
16
Share
@Marshydrots1000
Follow
Just letting them cruise along now. Hopefully they dense up and start adding a bit of size on. Pushing them pretty hard seem to be taking it. 900ppfd and 2.5 ec only just showing tip burns on one. Seem to be holding nitrogen. 24 to 25 degrees and 50 humidity most the time.


Likes
69
Share
@DogDoctorOfficial
Follow
🌸 Eternity Cup • Week 4 Flower • Runtz Phenos 1 to 5
Welcome back to the garden, my dear growers! This week, we enter Week 4 of Flower, and the energy is shifting — it’s subtle, like a foggy winter morning where everything is still, but alive with quiet anticipation.
Our beloved Runtz girls — phenos 1 through 5 — are beginning to reveal themselves fully, forming those early floral structures (the “ears,” you know the ones 🌱💚), and each one is expressing her beauty in unique, yet strikingly similar ways. This kind of uniformity only proves how stable and powerful these Zamnesia genetics truly are. They are fulfilling the scrog like queens — compact, bushy, and ready for the next phase.
This week, I noticed a slight decoloration in the leaves — just a whisper of pale green — and it felt like the perfect moment to adjust the feeding to bring out that lush vibrancy again. We’re now running the following dosages in our reservoir:
• Regulator: 0.15 ml/L
• System Clean: 0.25 ml/L
• RO Water Conditioner: 0.8 ml/L
• All-In-One Liquid: 2 ml/L
• Plagron Green Sensation: 1 ml/L
This blend brings us to an EC of 2.225 and a pH of 6.07 — right in the sweet spot. Let’s see these ladies rise up and glow 🌞
Since it’s been a little cold — temps started the week around 16°C and are now slowly climbing up to 23°C, with a humidity of about 50%, this gives us a VPD of around 1.50, which is still looking great considering the lower ambient conditions. CO₂ is sitting at 1000+ ppm, and light intensity is cruising around 550-600 PPFD, which we’ll increase in the coming weeks to match their needs as they bloom.
The Autopots keep our medium at 53% moist like clockwork, but I’ve added a water heater to the reservoir — aiming to gently raise soil temperature by warming the solution. That 16°C in the substrate wasn’t doing us any favors, so let’s bring the roots a little cozy love. Everything we do, we do with intention and care.
Visually, this week feels like a quiet fog has settled — like watching the garden through a soft lens. The atmosphere is calm, with the girls standing strong and steady under the ICL 300s and the Model Ones, which are doing a phenomenal job creating the perfect stage for this show.
Let’s take a moment to thank this beautiful community — the lovers, the learners, the OGs, the curious ones just passing by — your presence means everything 💚
Massive gratitude to Zamnesia for the incredible genetics, Zamnesia, Plagron and to Grow Diaries for hosting this Eternity Grow Cup. And of course, deepest thanks to all the sponsors making this magic possible:
Aptus Holland, Grove Bags, TrolMaster, ThinkGrow LEDs, Promix, Cannakan, FOG and Ziggy Papers — your support grows more than plants, it grows stories, friendships, and futures.
P.S.
Before we wrap it up for the week, I just wanted to add a note about one of the biggest tasks we tackled — the defoliation. It was time. The girls had grown into a dense jungle of love and leaf, and it was clear they needed more room to breathe. More airflow, more light. More photons reaching deep into their hearts. That’s what we aim for.
So, leaf by leaf, gently, carefully — with respect for each one — I went in. Four, maybe five hours of focused silence (with my jam on the back ground), removing what needed to be removed. It was a lot. And as I moved through them, it became clear: the Scrog net, too, had done its part. But now? It was just in the way. These girls are so compact, so thick, so full of presence and power — they can hold themselves.
So, I took the bold move. I freed them. No more net. Just them, as they are, open to the light and thriving on their own terms. It was a beautiful moment — one I wanted to share with you here, just quietly, before we say goodbye for now.
🌬️ Until next week — stay warm, stay growing, and let the fog roll gently through your garden.
Genetics - Runtz https://www.zamnesia.com/6000-zamnesia-seeds-runtz-feminized.html
Nutrients - Plagron https://plagron.com/en/hobby
- Aptus Holland https://aptus-holland.com/
Controls - Trol Master https://www.trolmaster.eu/
LED - https://www.futureofgrow.com/en
LED - https://www.thinkgrowled.com
Soil - https://www.promixgardening.com/en
Germination - Cannakan https://cannakan.com/?srsltid=AfmBOopXr-inLXajXu3QFgKXCXXos4F1oEvScjMKIB5MR5dk8-GJ-F49
DOGDOCTOR 15% off
Smoking Papers - https://ziggioriginal.com/
Terpene saver - https://grovebags.com/
As always thank you all for stopping by, for the love and for it all , this journey of mine wold just not be the same without you guys, the love and support is very much appreciloved and i fell honored with you all in my life
With true love comes happiness Always believe in your self and always do things expecting nothing and with an open heart , be a giver and the universe will give back to you in ways you could not even imagine so
As always, this is shared for educational purposes, aiming to spread understanding and appreciation for this plant. The journey with nature is one of discovery, creativity, and respect. Let’s celebrate it responsibly and continue to learn and grow together!
Growers Love To you All 💚
#EternityGrowCup #RuntzHunt #GrowersLove #CannabisCommunity #AptusHolland #ProMixSoil #TrolMaster #Zamnesia #Plagron #ZiggiPapers #Grovebags

Likes
12
Share
@GarciasGarden
Follow
WEEK 2 DAY 14
Since last week the babies have taken off! They didn’t have much light until yesterday when I added another 100w led and since then I’ve seen a huge difference ! They are looking super healthy the roots said fuck the pot and grew right through it I’m actually super interested in seeing how these grow up..
The 3 clones that were separate last week are now moved into one single pot to further develop the experiment.
They are on the same feed as the mother with flora grow/micro/bloom and cal-mag .
And In the last picture you can see my ghettos man way of cloning .. going to see which 2 out of 4 are better rooted and I will move those to a pot in about a week or so.
If you guys have any questions or want to know where I got these exotic seeds message me!! Or comment below !
Likes
5
Share
@Brickleberry
Follow
July 5 - YES! I know, was beautiful.. i've done this for height problems but.... No worry, stay tuned cause she will return more strong than before😜💚
Likes
158
Share
@love_2_grow
Follow
D29.
We're at the start of the fifth week of veg, and all is well in the tent.
I did some more LST to spread her out as much as possible before she goes into flower.
------------------------------
D31.
I'm fairly confident that she is stunted since she is extremely compact and doesn't seem to grow much. She will go into flower any day now, but she is still pretty small.
I'm adjusting the LST wires daily and today, I did some minor defoliation by removing a few low branches and leaves. Maybe that will redirect some energy and help her stretch out.
------------------------------
D32.
Alright, she is now officially in flower. I was hoping for a few more days in veg, but she wouldn't have it.
I brewed up a quick compost tea using oat flour as the food source. Some people claim that that will result in a fungally dominant tea, so I thought I'd try it out. I also added humic acid and a teaspoon of myco because why not?
Honestly, I'm not sure it is even possible to create a fungally dominant AACT, as the constant water movement will most likely tear the fungal hyphae apart as they form.
In any case, a different food source should promote other bacteria than the molasses I usually use. Diversity is the name of the game in living soil. Well, in life in general.
I gave her around 1 liter (5% of container volume) of tea @ pH 6.1.
------------------------------
D35.
We're on the last day in the fifth and final week of veg, as she is now in flower.
All is well in the tent, and there isn't much to report. One thing I did was buy a mushroom grow kit to keep in the tent. I figured I'd test it out and see how it works. The mushrooms produce CO2 that the plants love, and hopefully, I'll get some tasty Oyster mushrooms to eat — two birds with one stone and all that.
------------------------------

Likes
4
Share
@Nookandplant42o
Follow
previous watering was fed with nutrients this is one with the highest EC of the three that are in the tent, and my temperature is not low so it should go with minimum to medium quotas with more water avoiding burns without much runoff taking place mixing with the soil compounds and mycorrhizae for better performance i know i need calcium magnesium for better performance the problem is money i will continue to use salt Epson the option i have at the moment the direct sulfur in the soil mix has helped me hear a change visible.
water ph 6.2 solution temperature 20 ° - 0.50 g of great white mycorrhiza 2 days earlier were sprayed with water without ppm via leaves - lights off to serve as a cooling shower in the heat is great for stomata .
Simple led panel added as main light source 260watts being divided to 3 plants in the fullspectro tent model, did not get much difference in temperatures compared to HPS, is more the same spectro ratio and UV to reach more directly in the trichomes and terpenes.
this amnesia is not as fast as your sister but from the stress she had back in the beginning, I admire her strength with thinner sativa leaves her trichomes are coming close to the smaller leaves.
LST has reduced its size by half as its sister is 40 cm while her tree-shaped sister is 88 cm.

Likes
26
Share
@Ukfarmer420
Follow
Hi guys do I. On day 35! 5 weeks know from switching lights! Time has flown by, im getting excited now, there stinking!, there swelling, the pistils are browning lol so far so good.
I do think I have a good 5 weeks more 3 weeks nutrients and 2 week flush 🤷♂️ 1st time running photo seeds so not sure lol these are a so say 45-50 day flower, but thats 2 weeks and i know that's not going to happen lol.
Let me no what your thoughts are people, many thanks and keep growing 👊💪😊
hi guys I hope your all well, so I'm on day 38 now from switch, leafs look a bit sad today as I have only feed them nutes once this week on sunday and I fed them molasses on Tuesday but with the heat they are thirsty! Just gave them there last feed of nutrients for week 8 on schedule so next week is last week of nutes before im going to try shogun dragon force for the last 2 weeks instead then a 5 day just water at the end. Its getting closer and I won't miss using 7 part nutes 🤣🤣🤣 happy growing guys.

Likes
4
Share
@Nientjexo
Follow
Hi All,
This baby has become huge in the past 2 weeks.
I still tried doing LST on it and as far as I can see it really worked.
She became much wider and is even producing more side branches then before.
The smell is great, it actually does smell like lemon.
Still not using any nutrients (First time growing) to see how the plant is growing.
Any tips or tricks are always welcome.
Happy growing
xo Nien
Likes
6
Share
@Ninjabuds
Follow
The Eldorado OG harvest was exceptional, yielding tightly stacked buds that showcased the plant's impressive structure. Unlike other high-yielding strains, this one delivered on both quantity and quality, with dense, aromatic buds that are a testament to its superior genetics.

Likes
10
Share
@BodyByVio
Follow
This week I Supercrop all the plants and spred them out over both lights. One more week of Veg and they are ready to explode
Check me out on Instagram @growmorestressless

Processing
Likes
25
Share
@PrairieFrostGrow
Follow
******** Week 8 - Jan 27 to Feb 2/20 (Days 50 - 56 from seed popping out)
She has continued to swell this week and stacking her buds. The hairs have remained a nice bright white all week pointing up. Noticing some curling a bit of the hairs towards end of the week. They are white but there is a small red hair here and there now. Giving her a couple more days of feed no idea about flush. She has been slow going all along in her growth........at this stage I want that to continue......drag out her swelling/bud growing stage😋😋 On the down side.....I did see very small red hairs here and there.....unfortunately.
Heavier leaf strip on Wednesday and have continued through out as rotating her in the tent under the light. Took off probably 25%. Took off a few more of those fan leaves down low that I when removing bud sites. She is long and lanky so don’t feel side lighting is much of an issue.
She is dark in my opinion and hope she will continue to feed and work through all that nitrogen. I didn’t realize how many purple streaks she has on some stocks. She was also given a feeding this week with Epsom Salts. A lot of red on one of the the other plants so worked Magnesium Sulphate in that way. I think I could have gone harder on the CalMag earlier and/or introduced epsom salt earlier as well.
Changed the light schedule this week. Moved her to 19 hours of light because she is not falling to sleep at lights out. I know that I could have the lights closer but given how Skywalker has grown I can’t lower them as much as I would like. Will try compensating with longer daylight period.😉 Worth a try! Have seen other Mephisto comments where they say run 24hrs......not my style though.
Will keep up Liquid Weight and Rezin to the end and see how she is as a result. Not used these supplements before. Not sure if I will use AN Flawless Finish this run or not?
Little more detail:
Jan 27/20 - Day 50
- Feed: 2L - Sensyzime @ 2ml, Liquid Weight @ 1.5ml = 45ppm 6.0pH
- plain water. She is showing brown spots on leaves. High Potassium?? Lots with supplimentals.
Jan 28/20 - Day 51
- 2L: Rezin @ 2ml, CalMag & LW8 @ 1.5ml = 360ppm. Left a lower pH this feed.
- Used heavier CalMag today as purple stems is increasing.....looking at using Epsom Salts.
- striped some leaves today...heavier than normal.......think it was 5 😄
Jan 29/20 - Day 52
- full feed today as listed above.
- 5L - 1125ppm with 6.2pH....low pH trying to raise it by lots of run off with 5L.
- runoff: 950ppm with 5.6pH
- There is a lot of branch on this girl.....continued the leaf strip though and took more today.
- Evening - 2L plain water 6.4pH............figured if I am going to over water her I may as well try and raise the pH more.
*******this should have been about 12 litres of water given the way I was going about it.......or let the pot dry out completely first.
Jan 30/20 - Day 53
- 2L feed: Epsom Salt @ 1tsp/G, Rezin & LW8 @ 1.5ml, Dual Fuel A and B @ 1ml = 1000ppm 6.15pH
- used Epsom Salt today.
- They were very happy today in the morning. Swelling up.
- They are not falling to sleep at night so moving to 19 hours light. First day.
Jan 31/20 - Day 54
- Feed: 2L - Sensyzime @ 2ml/L - 30ppm 6.15pH
- plain water feed today. Sensyzime to clean up the roots.
- She keeps chugging along with growth and packing on some growth now. Looking awesome actually!!
- She reacted well to Epsom Salts......or didn’t negatively react
- Colas forming larger and longer.
Feb 1/20 - Day 55
- dry out day. Nothing at all today. Pots felt heavy all day
- She is very happy in evening. All leaves up on almost all buds....very nice! Filling in cola too! FROST on fan leafs......may have to press her fan leaves:)
Feb 2/20 - Day 56
- pot nice and dry today. She was happy this morning and given a large feed.
- 4L of full strength for the week.
- run off 1080ppm and 5.85pH......Hmmmm, I like it:)
- Pots were really light in AM.
- See very little red hairs. Still mainly nice straight shinny white.....keep going girl.....no rush!
Looking forward to bringing this girl to the end and watching her swell......fingers crossed😁 Hope your garden is making your smile fellow growers....cheers!


