
Likes
Comments
Share


@Naujas
Follow
for the girl, several yellowed leaves were removed :) everything looks not bad, maybe I would even say very beautiful :) I already increased the light intensity to 85%, I'm a little afraid that there might be a problem due to excessive heat, well, you have to watch :) the girl drinks a lot ,in a week I poured her 12 liters :) I also gave the girl a really strong food mixture with almost 1100 ppm, but I also gave completely clean water with 20 ppm and 6.3 ph :).


Likes
6
Share


@Moss420
Follow
Run-off got pretty high on the plants in the main tent when I tested it this week (2300ppm) so I flushed the plants down to around 900 over a few water events with half-strength nutes (~450). I think this, plus (mainly) the plants being too close to the LED caused them to throw some foxtails - particularly the middle plant (although I still think that spindly shit is also partly due to the bag seed pheno). Noob mistake on my end and I didn't realize until it was too late. Now the light is turned down and the run-off is back in a good range. It got high because my auto-watering halos were mostly running off the pots and not sinking in - this is because I filled the pots to the brim with coco (another noob mistake). Looks like I'm hand watering until harvest :)
Big Mumma in the blurple tent on the other hand is still killing it..
Apologies for having to upload videos of the microscope - too hard to hold it still and press the button for photos lol.

Likes
39
Share


@Bluemels
Follow
Tag 21 war es zeit die Shogun umzutopfen und sie in ihr eigenes Grow Zelt umgezogen 😁
Schon an Tag 22 konnte ich die Pflanze bei 4 Nodien toppen 😃

Likes
58
Share


@GreenHouseLab
Follow
Leave are still droopy, oh well she says been like that since day 1 but is clear contender in front of the Cheese started same time. Nice bushy structure just like in the 1960-70s👍😂

Likes
22
Share


Likes
28
Share


@MadeInGermany
Follow
Hey everyone ☺️
Both phenotypes are great 👍.
The leaves look like a nice sativa 😍.
Because of training I am still thinking about it because for some time now I have wanted to do one round completely without topping etc.
I will decide that in the next 1-3 weeks 😀.
Both were poured this week with 1.3 l.
I'm really excited about the coming week and until then I wish you all a lot of fun with the update 😃.
Stay healthy and let it grow 🍀🍀
You can buy this Strain at :
https://www.royalqueenseeds.de/feminisierte-hanfsamen/115-amnesia-haze.html
Type:
Amnesia Haze
☝️🏼
Genetics:
Original Amnesia Haze
👍
Vega lamp:
2 x Todogrow Led
Quantum Board 100 W
💡
Bloom Lamp :
2 x Todogrow Led
Cxb 3590 COB 3500 K 205W
💡💡☝️🏼
Soil :
Canna Coco Professional +
☝️🏼
Fertilizer:
Green House Powder Feeding
☝️🏼🌱
Water:
Osmosis water mixed with normal water (24 hours stale that the chlorine evaporates) to 0.2 EC. Add Cal / Mag to 0.4 Ec Ph with Organic Ph - to 5.5 - 5.8 .
Likes
75
Share


@DogDoctorOfficial
Follow
Week 6: Nurturing the Monstrous Beauty of Panty Punch Auto
As we embark on Week 6 of our cultivation journey with Panty Punch Auto, it's time to reflect on the remarkable evolution of this botanical marvel, from a tiny seed to the towering giant adorned with lush foliage and bountiful buds. In this report, we delve deep into the intricate fixings, sticks, and bendings that have shaped her growth, alongside an exploration of the revolutionary TrolMaster technology, with a special focus on the unveiling of the Tent-X controller.
From the earliest days of her life, Panty Punch Auto has been a testament to resilience and determination. Through meticulous care and strategic interventions, we've guided her growth, ensuring she thrives in our grow space. Fixings sticks have been instrumental in supporting her weighty branches, while gentle bendings have encouraged optimal light exposure and airflow, resulting in a robust plant with an abundance of branches and buds.
At the heart of our environmental control strategy lies the TrolMaster system, a game-changer in precision cultivation. This week, we're thrilled to introduce the Tent-X controller, a cutting-edge addition to our arsenal of tools. In an unboxing video, we'll unveil the Tent-X controller and explore its myriad features, including its integration with the Lumatek Zeus using the LMA-14 interface.
The Tent-X controller represents a paradigm shift in grow environment management, offering unparalleled control and flexibility. With its advanced capabilities, we can fine-tune every aspect of our grow space, from temperature and humidity to lighting schedules and CO2 levels. The LMA-14 interface acts as a bridge between the Tent-X controller and the Lumatek Zeus, enabling seamless communication and synchronization for optimal plant growth and development.
But the innovation doesn't stop there. The Tent-X controller comes equipped with a 3-in-1 sensor, providing real-time monitoring of temperature, humidity, and light intensity. This invaluable tool allows us to maintain the ideal growing conditions for Panty Punch Auto, ensuring she thrives in her environment.
As we marvel at the extraordinary progress of Panty Punch Auto, it's essential to express our gratitude to those who have made this journey possible. A heartfelt thank you to TrolMaster for providing the revolutionary Tent-X controller, to Aptus Holland for their unwavering support and exceptional nutrients, to Grow Diaries for the platform that connects us with fellow growers, and to the vibrant community for their endless encouragement and inspiration.
In conclusion, Week 6 marks another milestone in the cultivation of Panty Punch Auto, a testament to the power of innovation, dedication, and community. As we continue to nurture her growth, let us anticipate the wonders yet to come and celebrate the beauty of this monstrous plant.
Stay tuned for more updates as we witness the ongoing evolution of Panty Punch Auto and explore the boundless possibilities of modern cultivation techniques. Together, we'll continue to push the boundaries of what's possible and cultivate excellence in every leaf and bud.
#PantyPunchAutoAdventure #RootsAndFruits #TrolMasterControl #GrowDiariesCommunity #CultivationExcellence
Genetics - Panty Punch Auto - https://seedstockers.com/
Plant nutrition - Aptus Holland - https://aptus-holland.com
LED Photons - Lumatek - https://lumatek-lighting.com
Controls - Trol Master - https://www.trolmaster.eu/
Watering - myself
Love and attention - Me, myself and i
As always thank you all for stopping by, for the love and for it all , this journey of mine wold just not be the same without you guys, the love and support is very much appreciated and i fell honored and blessed with you all in my life, With true love comes happiness. Always believe in your self and always do things expecting nothing and with an open heart , be a giver and the universe will give back to you in ways you could not even imagine so
More info, the ocasional give-away and exclusive updates from all my adventures can be found - links in the profile description
Friendly reminder all you see here is pure research and for educational purposes only
Growers Love To you All 💚 💚 💚

Likes
2
Share


@MT_Farmer
Follow
The plant rose above the ground on the 24.6., this is Time Lapse ends on the 13th day of vefetation.
I started the grow in my old cupboard grow sed up. I opted to upgrade the the Home Box Q80+ in the coming week.
As i was using the Pro Mix i dont need to ad any nutrients for about 4 Weeks. Therefore for now I am only monitoring the amount of water i give them. As I decided to give Air Pots a try for this grow, I am intersted to see how much i can water, relative to my previouse grow with a fabric pot.
Likes
422
Share


@Crashoverite
Follow
Hi all,
Welcome to my🍌💜👊 week update
Thank you so much for all support on this bananas journey. Much appreciate all your likes, follows and comments. 🙏💚❤️💜
Week 14
Jan 15- Jan 21
Flushing and preparation for harvest 😁 on Jan 15 feed girls for the last time with nutrients. It was reduced dose by 60% 5ltr no runoff. Following morning topped up with 6ltr of ph down and only fish shit. Runoffs PH 6.2. Second watering Jan 18 6tr and 7ltr on Jan 21. It was last watering. Week went very well. No white pistils hairs on Athena for a good while and barely few left on Xena. Many buds have different shapes and colours but all of them are equally hard as rocks, sticky and smelling so deliciously. This week trichomes development was just like I wish for. Just milky and amber in play Status on Jan 22. Mostly of buds 20-50% amber. It's just perfect for my needs🤤 On Jan 21 lights were on for the last time and girls will be harvested after 48 or 72h of darkness.
Stay tuned for the final week update!
Peace and love brothers and sisters ✌️💚👨🌾
Links
https://2fast4buds.com/seeds/banana-purple-punch-auto
https://plagron.com
https://www.biobizz.com/
https://fishheadfarms.com/


Likes
11
Share


@Newbie5648
Follow
Love this 1st grow. Even though its small.
Hope I got good weight out of this.
Smells great whenever I open my cupboard.
Cant wait for my next grow green gelato auto. 😁


Likes
3
Share


@Mett420
Follow
Effettuato topping, lst con clip e defogliazione degli strati più vicini all internodo (questo la settimana scorsa), e si può vedere un importante espansione delle foglie e irrobustimento degli steli. Tagli e tecniche necessarie per questo tipo di genetica e setup

Likes
8
Share

@Growbody
Follow
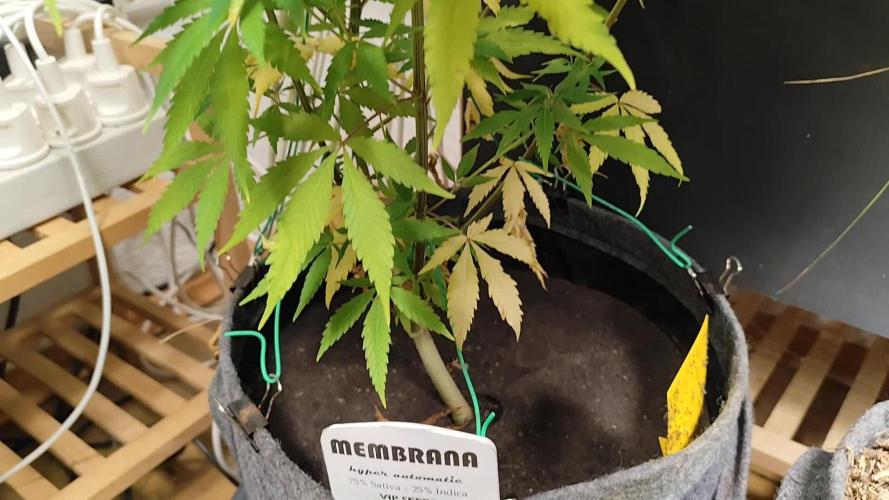
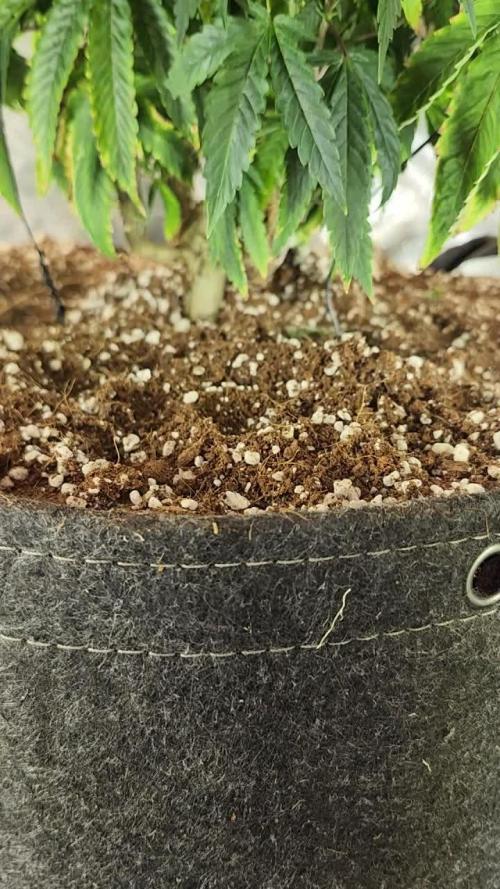
Herzlich Willkommen zu meinem Growbericht der Membrana Hyper Autofem von VIP Seeds.
Die URL für den Strain findet Ihr hier:
https://www.vip-seeds.com/membrana
Für den Grow verwende ich den großen 15 Liter WideVersion Stofftopf von ROOTIES. Bei meinem ersten Grow mit den ROOTIES kam nur die 9 Liter Version zum Einsatz, da haben die sich gut bewährt.
Auch die Smart Start Plugs von Zamnesia werden wieder verwendet, dieses Mal ohne den Samen vorher einzuweichen.
Und die Erde und der Dünger von BioBizz findet wieder Verwendung.
Tag 97: Die Membrane Hyper Autofem von VIP-Seeds bleibt filigran und streckt sich weiter.
Schön, dass du dir mein Tagebuch angesehen hast. Schöne Weihnachten 🎄✋😎

Likes
26
Share


@UkDank420
Follow
Smells beautiful really can’t wait to crop her only 7 days left now this has been such a nice plant to grow she takes to topping very well and micro topping well and I now know where the name shinning silver haze comes from as she shines with thc proper happy with her
Likes
17
Share


@ButterfliesLittleFarm
Follow
Hello Diary.
It completed the last week of flowering, a total of three weeks of vegetation and seven weeks of flowering. A total of 80 days since Purple Punch # 1 sprouted, while Purple Punch # 2 I had to put on germination again because it didn’t sprout at first.
In the end it was 5 days late but as you can see, the harvest was the same day.
The conclusion in the end is that Purple Punch exceeded my expectations, although they look totally different, the height and build of the stems are the same, the flowers are totally different.
It is well seen in the photos. While it doesn’t have the purple color I might have expected given the name, the flowers are hard, full of trichomes and have a strong sweet scent.
We’ll see after drying what we made.
There were only two waterings this week, I wanted him to consume all the water to make the drying faster.
The condition in the growbox is satisfactory, the temperature is around 25 degrees while the humidity is below 40%.
Here’s what the last week looked like.
31/04/2021 - Day 64.
Watering. I regulated p.H. at 6.3 and with 7 liters of water I evenly watered all three plants on the “farm”.
Temp / Humidity on the farm - 25 degrees and 37% humidity.
03/04/2021 - Day 67.
Watering. The procedure is the same as three days ago.
Temp / Humidity on the farm - 25.3 degrees and 38% humidity.
07/04/2021 - Day 71.
Harvest. After I did the photography, first one plant and then another, I cut the plants at the bottom of the stalk and hung them upside down in a growbox to dry.
The temperature in the Box is about 25 degrees and the humidity is slightly lower than 40%.
I turned off the lights and left only the ventilation on while I also turned off the fans.
And now all three plants are hanging upside down, two Purple Punch and their roommate Watermelon.
They are preceded by about two weeks of drying, maybe a little less, so I call with one last review. See you soon.


Likes
7
Share

@GREENPHOENIX6262
Follow
01/19 - Tied her down completely (HST) - full light coverage - running in 2x2 until clones in 3x3 are complete then transplanting into 3x3 - offsetting clean water and nute feeds.

Likes
7
Share


@Aircoholic
Follow
Today was the big day, at exactly 3 weeks old, she got topped. She looks healthy and vital, with good growth, so I figured it's the perfect time. Now she gets a bit of recovery time after the high stress, before we begin the LST.