The Grow Awards 2026 🏆 


Likes
Comments
Share
@Smoking_Joe_Frazier
Follow
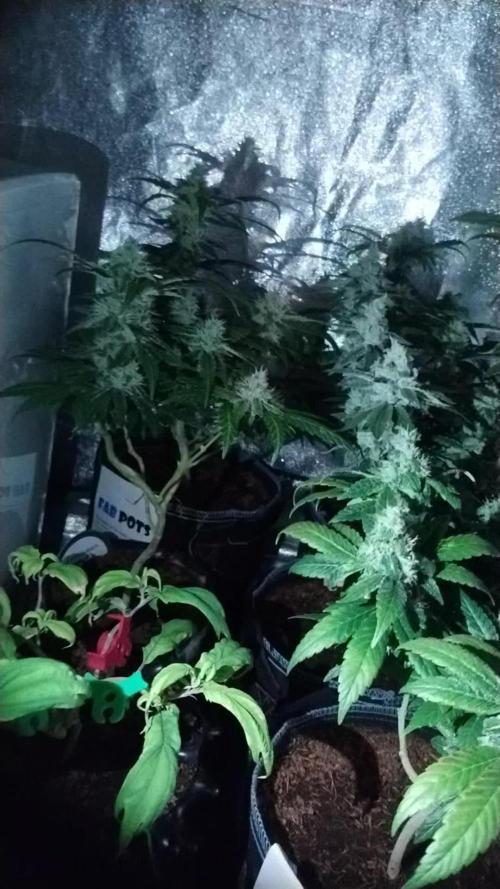
Week 4: Growth Spurts and New Challenges
Continued Growth and Health
As we move into the fourth week, the plants are showing impressive growth. Their leaves are a lush, vibrant green, and the stems are becoming stronger. The transition to the larger 11-liter fabric pots has clearly paid off, providing the roots with ample space and better aeration.
Adjusting Nutrient Levels
Given their positive response to the nutrients, I decided to continue with 2/3 of Terra Aquatica Tripart feeding schedule, adjusting slightly to meet their increasing demands. Here's the updated feeding plan for this week:
CalMag: 2.5 ml/l (Starting EC before adding nutrients: 0.50 mS/cm)
Grow: 1.5 ml/l
Bloom: 1.0 ml/l
Micro: 0.5 ml/l
EC: 1.2 mS/cm (600 ppm PPM-500/TDS)
pH: 6.0
Each plant is watered with approximately 20% runoff to ensure there's no nutrient buildup in the coco mix. I will maintain this nutrient level until the pre-flowering stage to avoid the risk of nutrient burn due to over-fertilization.
Weather Improvements and Adjustments
The weather has been steadily improving, with temperatures expected to rise to around 25°C starting Wednesday, accompanied by abundant sunshine. This upcoming forecast is excellent news for my plants, as I anticipate a final growth spurt before flowering begins. Every centimeter of growth counts at this stage, and I'm optimistic about maximizing their potential under these favorable conditions.
Strengthening with Wind Exposure
On days with good weather, I move the plants out of the greenhouse to expose them to natural wind. This practice helps strengthen their stems, improving overall stability. Additionally, the wind creates a more challenging environment for pests, helping to keep them at bay.
Smart Watering Strategy
I only water the plants when the pots feel noticeably lighter. This encourages the roots to search for water, promoting the development of a stronger and more extensive root system. This method helps ensure the plants remain healthy and resilient.
Pest Management: Observations and Actions
At the beginning of the third week, I noticed dark discolorations on the undersides of some leaves. A few days later, these spots turned into yellow patches. I am still unsure about the cause of these spots. To prevent a potential insect infestation, I sprayed all the leaf surfaces, both top and bottom, with a mildly dosed neem oil mixture. Since then, the spots have not spread further.
Because these discolorations are only affecting the lower leaves, they are not causing me significant concern at the moment. Regular inspections and preventive measures are crucial to maintaining the health of the plants and ensuring that any issues are caught early.
Decision Against LST
At first I have decided against using LST. But some of your comments made me try some LST on two of my plants. I choose Tangie and Gorilla cookies to try out and learn some stuff. Blue dream and Banana purple punch stay without any training. Thanks guys for your advice 👍
Monitoring and Care
My daily routine involves checking the plants every morning and evening. This includes:
Monitoring the moisture level of the coco mix.
Inspecting the plants for any signs of pests or nutrient deficiencies.
Growth Observations
The plants are responding well to the controlled environment and balanced nutrition. They are growing rapidly, with new leaves appearing almost daily. The stems are thickening, and the overall structure of the plants is robust and healthy.
Looking Ahead
As we head into week 4, I am optimistic about the continued growth and health of my plants. The combination of a stable environment, appropriate nutrient levels, and diligent care is proving successful. I’m excited to see how they progress and adapt as they move closer to the flowering stage.
Seeking Feedback and Tips
Your feedback and tips are valuable to me! If you have any suggestions on how I can improve my growing techniques or insights based on your own experiences, please feel free to share them in the comments below. Let's grow together!

Likes
32
Share
@Arcadium
Follow
Finally cooled down this week, maybe 5mm of rain, not much. Did some light defoliating, lollipoping, really doesn't need too much this early, especially with the height the Hugel gives me, keeps the bottom nice and clean with great light penetration. 2 hours of drip irrigation, and weekly foliar spray of Neem, Kelp, Aloe, Epsom is all she's had. Still top dressing Gaia Green mix every 3 weeks, but I really doubt she even needs it. I gather it might make a bigger difference during flower but we'll see.
Haven't fimmed or topped in 3 weeks, may just leave it, shape looks great to me. Will defoliate harder closer to flower or if it gets wet and rainy, but weather looks great.
The trunk is getting HUGE, going to need a chainsaw to take this bad girl down come Oct!

Likes
16
Share
@SenhorCamarao
Follow
Já é quase hora de fazer a colheita, mais uma ou duas semanas. Organico é lindo!

Likes
1
Share
@MADMANk
Follow
Flush time , been giving compost teas up until about 4 days ago, lookin dope


Likes
48
Share
@Theia
Follow
I am not sure what the deal is with the Chibans. They look mutant to me maybe due to pollination. There is so much crystal forming up on them and they still look beautiful.
Plant 1 is huge with big colas that are fragrant and very very sticky to the touch.
Plant 2 looks the most normal as far as bud structure to me. She has not got the same flattened of tops but instead are more cone like . Also very very crystal heavy
Clones 1 and 2 look like monsters to me. Their buds are bulbous and fat with a very flat round top and quite a bit larger then golf balls! I have never seen bud look like this but then I have never had pollination issues and watched the plants quite as much as I am at the moment.
We will keep going with them and see what we get. I hope for some smokable bud and also some Sherbert banana seeds maybe🤪👍👍.
Thanks for looking.
Stay safe.
Grow well.🌱🌱

Likes
38
Share
@GroloCup
Follow
She's moving along into flower and I've started using a little bloom nutes now that the stretch is tapering off. Took off a few fan leaves that were blocking some bud sites and removed some lower growth that wouldn't make much more than underdeveloped larf. She's definitely crowded in the tent, but she's continuing to go through her paces and should stay on track. She's starting to effervesce and it's a sweet earthy note with a more skunky stem rub. Lets see where this week takes us!

Likes
7
Share
@Cogollo_eu
Follow
**Encontrarás la traducción a español al final de la descripción**
From/Desde: 15/03/19 || To/Hasta: 21/03/19
From day/Desde día: 22 || To day/Hasta día: 28
You can find the Gorillas Diary here:
** Podéis encontrar el diario de las Gorilla aquí:**
https://growdiaries.com/diaries/25675-makingmoney-with-gorilla-mm-vs-gorilla
-----IMAGES & VIDEOS-----
Video 1:
Exactly the same video as 2 but accelerated +300% to fix it to 1 minute for instagram.
Video 2:
4 days (25~28) TimeLapse, 1 image each 60 secs @ 30 fps
Video 13:
General video of the 4 plants and it's trainings, i'm sorry for being so repetitive with the music.
Video 16:
Video of the main Money
Video 19:
Video of the secondary Money
Photo 22:
Last main branches toppings
-----WEEK SUMMARY-----
This week i will just say, an image worths more than a million words... so now let's talk about a video 👊
-----WATERING CALENDAR-----
18/03/19 - 400 ml with all "LAST" week nutrients @ 0.95 E.C. PH5.9 (i had some rests from the last watering)
- Also i applied a foliar irrigation with the same mix as the last week
20/03/19 - 1.000 ml with all week nutrients @ 0.9 E.C. PH5.9
*****ESPAÑOL*****
-----IMÁGENES & VÍDEOS-----
Vídeo 1:
TimeLapse, exactamente el mismo vídeo que el 2 pero acelerado a un poco más del 300% para ajustarlo a 1 minuto para Instagram.
Vídeo 2:
4 días (25~28) TimeLapse, 1 imagen cada 60 segundos @ 30 fps, vídeo increíble en el que se ve com responde la Gorila al Man Lining, en aproximadamente el minuto 2 podo y entreno un poco a la otra Gorila y la principal de las Money Makers, al final del vídeo podaré la última Money Maker.
Vídeo 13:
Vídeo general de las 4 plantas y sus entrenamientos, siento la repetitividad de la música entre los vídeos.
Vídeo 16:
Video enfocado a la Money principal
Photo 10:
Los cortes nombrados (Top&Bottom) de la foto 11
Photo 22:
Los toppings de las ramas principales.
-----SUMARIO SEMANAL-----
Como una imagen vale más que mil palabras, ahí os dejo varios vídeos 👊
-----CALENDARIO DE RIEGO----
18/03/19 - 400 ml contodos los nutrientes de la "ÚLTIMA" semana @ 0.95 E.C. PH5.9 (me quedaba un resto del útlimo riego)
- También he hecho un riego foliar con un resto del ultimo riego foliar
20/03/19 - 1.000 ml con todos los nutrientes de la semana @ 0.9 E.C. PH5.9

Likes
12
Share
@L_Choppa
Follow
I don’t know what’s going on with my big girl I think is wind burn by me increasing the airflow I’m thinking it’s windburn well anyways I don’t know if it’s budrot cause I really want to chop thoses two tops off just incase help anyone if you know what this is

Likes
9
Share
@Smokey_J26
Follow
Growth slowed a little due to lights off temps dropping during the snow we had early December. Not worried about it. For the love of ganja

Likes
8
Share
@Chubbs
Follow
420Fastbuds-Week 2
Orange President Auto
These girls have definitely rooted and started upward. They're about 3in tall and showing daily growth. I stopped watering by spraying the soil and started hand watering 250-500ml daily. I use calmag 5ml/gal every feeding. So far they've responded well and I look forward to the weeks to come.
Happy Growing
Likes
116
Share
@Tropicannibis_Todd
Follow
💩Holy Crap Growmies , we are outdoors and in the Ground💩
👉It's been another full week 28 days from seed and she's doing great , very nice Growth, considering shes been up against the wind and rain 👈
No problems 😊 so far so good 👍And she's showing more of her preflowers 😁👈
I GOT MULTIPLE DIARIES ON THE GO 😱 please check them out 😎
👉THANKS FOR TAKING THE TIME TO GO OVER MY DIARIES 👈
👉NutriNPK NUTRIENTS USED FOR FEEDING 👈rain water to be used entire growth👈
👉www.nutrinpk.com right now get 10% off using SPRING2022 as the coupon code👈
Likes
100
Share
@AsNoriu
Follow
Day 99. All 3 girls down. Wet trim . Can't wait to try them out. Scissors hash was so sweet ...
1.6 kg for wet plant is not bad too I think. Plant A should be biggest in this grow from all strains ... She has to beat 202 g. of AD.
Happy Growing !!!

Likes
11
Share
@GrowingNBlowin
Follow
Flipped the lights to 12/12 for flowering on 01/25
Showing the white hairs to prove she's female.
Tried to cut the amount of Nitrogen down to limit the stretch but she was still pretty hungry for it so I bumped it back up. She's pretty thirsty as well, watering every two to three days..
Stretched a good bit so far..
Did some light defoliation and cut two branches I thought were pretty weak to focus energy on stronger colas..
Pretty easy week and ready to see the buds start forming!! She's looking healthy and strong!!


Likes
22
Share
@TrickzGrowz
Follow
Eine absolute Washer Genetik. Jedes Blatt ist komplett voll mit Trichomen.
Likes
6
Share


Likes
103
Share
@HighTV
Follow
| 📅 Week 13 | 10/10 - 10/16
| 💡 1000w 📏32' |
| 🌡️️🌞 76- 84 |
| 🌡️️🌑 68 - 75 |
10/10 Started the flush on one of the remaining two plants. Phed reservoirs to 5.8
10/11 Trichomes are are getting near half cloudy, no signs of amber yet. Phed to 5.6
10/12 Water added and Phed to 5.8 Trimming finished on chopped plant that's drying.
10/13 Adjusted Ph to 6.0 and topped of the reservoirs. Harvested plant will be drying for another day or two.
10/14 PH was really low on the Flushing plant. Adjusted it to 6.2. The other plant had its reservoir topped and PH set to 5.8.
10/15 Started the flush on the final plant. Will probably do a shorter flush this time and test the difference. I think a week in DWC feels long.
10/16 Reservoirs topped and PH adjusted to 5.6. Flush started on the Final plant 😎 Extremely excited for the smoke review of these badgirls.
So far so good! Two of Three plants remain.
One of them has less mature trichomes the other is coming down any day now.
These plants are amazing to handle. You can Smell that these girls are not playing around one bit.

Likes
20
Share
@SkunkyDog
Follow
Hallo zusammen 🤙.
Sie wächst sehr schön.
Sie erhalten 25 Prozent Rabatt in unserem Shop
Mindestbestellwert beträgt 75 Euro
https://greenbuzzliquids.com/en/shop/
Code: GD42025
Likes
16
Share
@Northern_Ent
Follow
July 5: starting fourth week and she is finally getting some traction. The conditions are good for some fast vegetative growth. I need to remember to not over-fertilize this auto.
July 8: faster growth starting. She’s bigger than the Chemdawg auto.
July 10: topped this auto early in the morning. Likely needs some N.
July 11: fan leaves are getting bigger after being topped. She’s about 50% bigger than the Chemdawg auto which was started at the same time. Other diaries have the auto overdose not autoflowering and we’ll have to see what happens.
My autos were started about 3 weeks later than I wanted this year but it turned out to be a very cool spring. These autos are catching summer heat and hopefully it’s not too much for them at this early stage.
July 12: she’s noticeably bigger this morning. Done with heat wave now and back to ideal cannabis growing temperatures.

Likes
2
Share
@Yiyis_Grow
Follow
Lámpara: Bestva Quantum Board LED LM301B
Sustrato: 2 Jiffy fino : 1 Floragard
Especies: Charlotte Dream CBD - Auto Dark Purple - Purple Kush - Triping 25 - Gelato Ice
Acontecimientos
1. Hoy 11/01/2022 se completarán las 10 macetas con tres plantas que ya germinaron y están listas para poner bajo la lámpara. Van a tener 1 semana de diferencia respecto a las otras 7.
2. Agua reposada, viento y Luz 20 h/día.
Buenos humos


