
Likes
Comments
Share


@pHilosophy420
Follow
She has stretch 17 cm this week, nice stretch. Is is getting tall. Next week she should get more bushy after this week defoliation.

Likes
121
Share


@Tropicannibis_Todd
Follow
💩Holy Crap Growmies We Are Back💩
Well after another short break we are back at it 😁
So what do you say we have some fun 👈 We got some FASTBUDS TESTERS FBT2307 😛
Seed soaked for 24 then placed in a tub with paper towels , once it cracked and rooted , placed into its main pot 👌
Lights being readjusted and chart updated .........👍rain water to be used entire growth👈
👉I used NutriNPK for nutrients for my grows and welcome anyone to give them a try .👈
👉 www.nutrinpk.com 👈
NutriNPK Cal MAG 14-0-14
NutriNPK Grow 28-14-14
NutriNPK Bloom 8-20-30
NutriNPK Bloom Booster 0-52-34
I GOT MULTIPLE DIARIES ON THE GO 😱 please check them out 😎
👉THANKS FOR TAKING THE TIME TO GO OVER MY DIARIES 👈

Likes
36
Share


@MadeInGermany
Follow
Info:
Unfortunately, I had to find out that my account is used for fake pages in social media.
I am only active here on growdiaries.
I am not on facebook instagram twitter etc All accounts except this one are fake.
Have fun with the update.
Hey everyone 😊.
This week has continued to develop great :-).
It was poured once with about 200 ml because it is still under the hood with very high humidity that is enough :-).
Next week the hood will be opened bit by bit so that it can get used to the surroundings :-).
Otherwise the tent was cleaned and the humidifier refilled every day this week.
I think I'll repot next week and then start training :-).
Until then, I wish you lots of fun with the update.
Stay healthy 🙏🏻 and let it grow 👍
You can buy this Strain at :
https://www.zamnesia.com/de/3271-zamnesia-seeds-blue-dream-feminisiert.html
Type:
Blue Dream
☝️🏼
Genetics:
Blueberry x Haze
20% Indica / 80% Sativa
👍
Vega lamp:
2 x Todogrow Led
Quantum Board 100 W
💡
Bloom Lamp :
2 x Todogrow Led
Cxb 3590 COB 3500 K 205W
💡💡☝️🏼
Soil :
Canna Coco Professional +
☝️🏼
Fertilizer:
Green House Powder Feeding
☝️🏼🌱
Water:
Osmosis water mixed with normal water (24 hours stale that the chlorine evaporates) to 0.2 EC. Add Cal / Mag to 0.4 Ec Ph with Organic Ph - to 5.5 - 5.8 .

Likes
38
Share


@PapaNugs
Follow
This was a week. The drama at the beginning was one of the fans falling down onto my gorilla cookies. It snapped a branch off really bad but the girl hung onto it by threads. I duct taped her up and somehow took. 😎😢
I defoliated and did a little lst on a couple of the girls. Nothing major. Also increased the light to 80% now. I think I'll stay there until late flower when I switch to 12/12.
I also added blocks to a couple of the girls to make the canopy level. That put the light at 15" as recommended by Medic Grow.
This Gorilla Cookie is a beast. Even took a beating from a falling fan but kept going. She'll do the best out of the group I bet.
Dimmed to 80%
Here are the lights details:
Medic Grow Mini Sun-2 150W LED
Model: MN150-022
Spectrum mode: V1
Efficacy: 2.8 umol/J
Thanks for stopping by!
You can find the light on Grow Diaries:
https://growdiaries.com/grow-lights/medic-grow/mini-sun-2-150-watts
You can find the light on Medic Grow's website:
https://medicgrow.com/
Likes
12
Share


@GREENPHOENIX6262
Follow
*Week 5 of flowering*
Mimosa 1 & 2 are progressing accordingly, 0 signs of deficiencies.
Though both plants are coming along fine Mimosa 1 is lagging a little behind but not a cause for concern.
Water/Nute feeds have increased and the light cycle remains the same.
Mimosa (2) appears to have shrunk in size but that is incorrect, Main colas were tied down to trellis.
Likes
36
Share


@JeyGanesha
Follow
4 settimana e tutto procede come programmato. Questa settimana si allungheranno per l'entrata in fioritura......inizierò dalla prossima settimana la conta dei giorni di fioritura..... Grazie a tutti gente 🙏🕉️
Likes
17
Share


@Bobo_Zion
Follow
This week, we just did some light feeding and basic garden maintenance. We'll be using the next 2 weeks to get the greenhouse ready for the flowering stage.
Likes
7
Share


@Staffedition
Follow
Всем привет. Вот и вылезли мои маленькие малыши!
Выглядит растение счастливым и здоровым!
Сегодня 4 день от каски.
Увидимся на следующей недели друзья!

Likes
6
Share


@AutoCrazy
Follow
Week 2 of flower
The Red Hot Cookies and Lemon Orange are really stretching out. Glad I put them at the back of the tent. The Mimosa X Orange Punch is taking her time as far as flowering goes. The Black Apple Hitchcock (there is a separate diary for this plant) has been even slower transitioning into flower. But all in all the plants are happy so I am happy.
6.0 pH
500 ppm
65F water temp
71 tent temp
41 % RH


Likes
5
Share


@Steevoh978
Follow
Plants growing good. Just gave them their first dose of nutrients. Seem to be taking well so far.


Likes
48
Share

@MadeInGermany
Follow
Hey everyone :-)
I am so glad that all the clones are looking great again because the pump failed overnight in the last few days and everyone hung their heads the next day 😔.
Once again you notice how fast it can go as soon as the electronics fail.
But everything was fixed in time and, as always, I have all the parts available for replacement.
They look great again and stretch their heads towards the light :-).
It remains exciting to see which lady stays in the end because, as mentioned in the last diary, I will only leave a single clone to train him to a single bush with topping and ScrOG ☺️.
I hope the next electronic failure will stay away for a long time 😅🙏🏻.
Otherwise, the water was remixed again during the week and will be refilled in the next few days because the EC value went directly over 1 after a few days.
I wish you a lot of fun this week and we hope for a few first roots next week :-).
Stay healthy 🙏🏻 and let it grow 👍
You can buy this Strain at
https://www.amsterdamgenetics.com/product/kosher-tangie-kush/
Type:
Kosher Tangie Kush
☝️🏼
Genetics:
Kosher Kush
X
Tangie
👍
Vega lamp: 2 x Todogrow LED CXB3590 COB 55 W
1 x Sanlight S2W 62 W
💡
Flower lamp : 2 x Todogrow LED CXB3590 COB 55 W
1 x Sanlight S2W 62 W
💡 ☝️
Grow Aero System : Growtool 0.8
☝️
Fertilizer:
Canna Aqua Vega A + B , Canna Aqua Flores A + B , Rizotonic, Cannazym, CANNA Boost, Pk 13/14, Canna Cal / Mag, Canna Ph - Grow, Canna Ph-Bloom
☝️🌱
Water:
Osmosis water mixed with normal water (24 hours stale that the chlorine evaporates) to 0.2 EG. Add Cal / Mag to 0.4 Ec Ph with ph- to 5.2 - 5.8
💦 💧

Likes
8
Share


@Shalma_kush_420
Follow
Buenas gente
Una vez más aquí, está vez un poco tarde por motivos de trabajo.
Pero no, nos olvidamos de nuestra querida planta.
Se le práctico otra poda apical, se cambió de maceta y se pasó a floración hoy mismo después de un riego foliar.
Llevada con riegos de The hype company en breve empezamos con los de flora para estimular un mejor desarrollo.
Así que veremos cómo sigue en la siguiente

Likes
148
Share


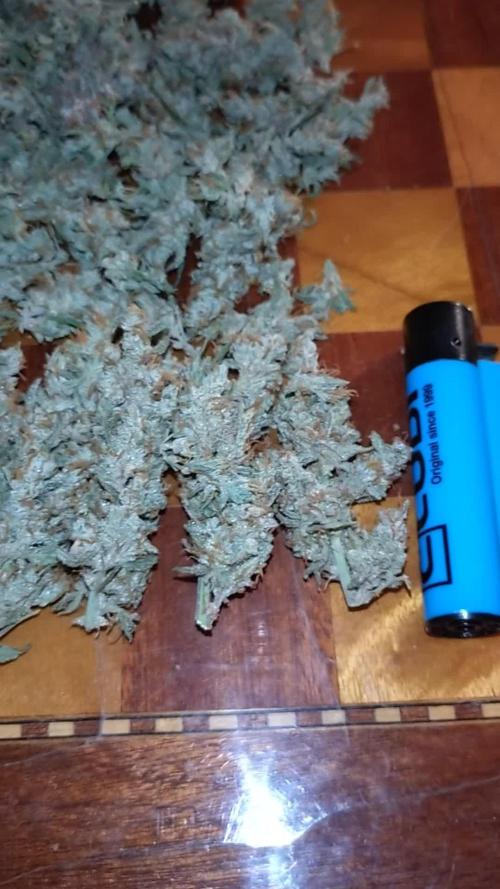
@love_2_grow
Follow
Boom! Touchdown! I let her dry for 13 days before the trim. The humidity in the grow tent was maybe a bit lower than what I usually prefer, but I wanted to be extra cautious against budrot in the other plant drying in the same tent.
It was a breeze to trim her and the final result was 84.4 grams of pure flower with no larf at all. In fact, I didn't even bother keeping the trim as there wasn't all that much of it.
Likes
5
Share


@SamDoze
Follow
So for now i am free to grow anything. No restriction at all ¡¡¡
Now i use the "" Atami Janeco Lightmix "" substrate for this plant...
I hope this one are the same quality of LIGHT MIX BIOBIZZ

Likes
15
Share


@SweetheartOG
Follow
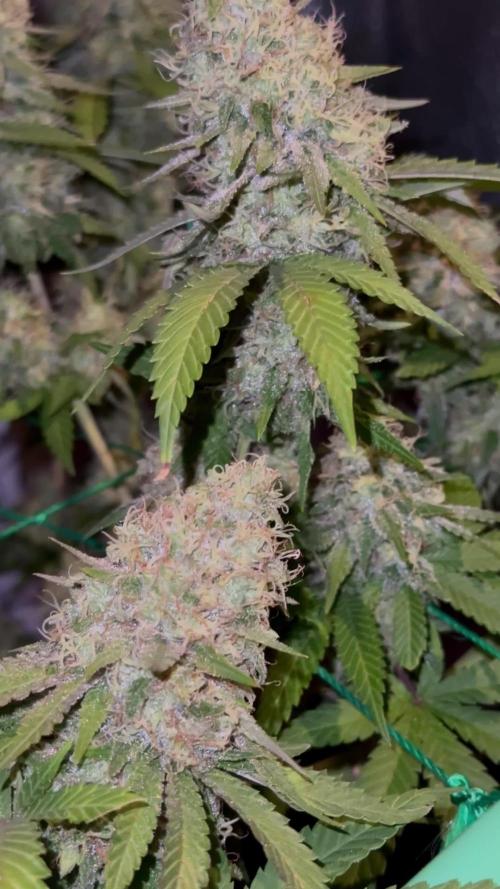
The girls are fully in flower this week which of course is a GREAT sight to see when opening the tent. The smell in the tent is so sweet and fruity it's already making your mouth water!! So this week I feed the girls with a little of the living soil veg so they are still getting a helping hand. They were also given the living soil bloom and some barley which I will admit is the first time using it but so far me plus the girls are very much enjoying!! I have done the necessary light de-foliating on all 4 girls over the past 2 weeks and more LST. Happy toking guys and girls!! Will keep you all posted with more videos through the week so please keep checking back 🙂
Likes
7
Share

@PhinolaGreen
Follow
Harvest
Ooooooh ihr glaubt ja gar nicht, wie Geil die Sorte beim Wet Trim gerochen hat. Es hat was von Tangie, dieses Moschusmäßige, schwer aber mit Noten von Schokolade und Weintrauben... Hätte ich nicht gedacht und echt toll geworden.
Mache nochmal ein Update, wenn die rdy to dry Trim ist 😄

Processing
Likes
24
Share


@Cogollo_eu
Follow
**Encontrarás la traducción a español al final de la descripción**
If you like this week, please hit a like, it costs you nothing! 👊. Thanks in advance 😉!
From/Desde: 26/08/19 || To/Hasta: 01/09/19
From day/Desde día: 35 || To day/Hasta día: 41
-----IMAGES & VIDEOS-----
V1 - It's awesome how she covered all the available space inside the tent, I'm loving this plant and it's totally equitative grow.
P1 ~ P5 - I designed this mobile support structure with GoPro attachment system, it supports a mobile in one of the tent's vertical support bars while it records a full timelapse. If anyone has a 3d printer and feels lazy to design it just ask for it, I can send a blender file or an STL, Cheers!.
P7 & P8: First night shoots, this was a quick test with the new acquired lights just opened.
P16: Second night shoot test, just a bit better than the first try.
P20: As you can see the horizontal branches are too slim, I started this week with Rhino Skin support to see if it helps, but what is going to really help is time I guess.
P21 ~P27: At last some decent shots, I need to improve the illumination and the way I use the lights, but well... I'm a beginner and have a lot to learn.
P28: My nutrients fridge (last year she stands at 15ºc, but this year she's only able to reach 17ºc), and also the foliar products that I'm going to apply.
P29: Those are 4 different Temp and Matt settings for the photo P24, it would be great if you leave a comment telling which of them you like more (visually speaking). That would help me a lot!.
P30: Smoked some Spliff Dutch Auto at night and feel a bit creative, that's what came up of photoshop and P26 & P27 photos ;).
-----WEEK SUMMARY-----
I don't know if this is normal in a growing stage, but Alice K. has started to lovely stink all my home, it's awesome how she's smelling without any flower or pistil on her. I can't imagine how much is she going to smell.
Finally I bought some lights and a background system to learn to make dark background photos, I purchased a normal bg system @amazon with 3 x 2x3 m backgrounds and the support system, it's too big for my living room haha!, also purchased a pair of LumeCubes with all the accessories, they are super versatile lights and awesome for my needings, I'm sure that there are similar performance lights even equal, much much more cheap, but I liked these for various reasons, if anyone is interested just ask me. Along the week I didn't have much time to full test the lights, I was only able to perform some quick tests. Along the weekend I expent some more time, and something is begin to came out of my camera ;).
As you can see on timelapse video, at the end of the week the plant is already fixed to the final 12 points as I told last week, and is already covering all the horizontal space available in the tent. At time I'm not going to make more prunes or toppings as I like the structure she's getting. I still feel that the horizontal branches that are going to support the plant are too slim, so I'm planning some more weeks of growing, until I see them enough strong to support themselves.
This was a terrible mess. Until this week I've been watering with very high PH without knowing it. The PH meter I was using was not well calibrated and I thought so, before yesterday (Week 7) I recovered my PH tester and when I measured I was impressed because I have been watering at PH 7 ~ 8, while I thought I was using PH 5.8. Luckily, things have not going ugly, 💯 for the AK.
About temperature and humidity, this is the last week of imbalance in my cultivation system since it is strongly linked to outside. As September enters, immediately the temperature and humidity stabilize itself inside my tents, so it's time to run the 90x90 one ;).
This week I also applied a foliar irrigation with a bit of organic insecticide "Tec-Forte", just for prevention. I killed a white Spider 2 or 3 weeks ago and also observed som insect white spots in one leaf, after that I did 2 foliar irrigations along last weeks with B.A.C. "Plant Vitality Plus", "Foliar Spray" & "Pro Active", and I haven't seen any more sign. So this is going to be my last foliar with that extra preventive, to keep things clean of unwanted life.
-----WATERING CALENDAR-----
28/08/19 (Day 37) - 3,000 ml with all week nutrients @ 1 E.C. PH5.8
*****ESPAÑOL*****
Por favor, si te gusta esta semana dale un like, no te cuesta nada 👊. ¡Gracias por adelantado 😉!
-----IMÁGENES & VÍDEOS-----
V1 - Es increíble como va cubriendo todo el espacio horizontal disponible en el armario, me estoy enamorando de esta planta y de lo equilibrada que crece.
P1 ~ P5 - Este diseñado este soporte de móvil con acople tipo GoPro, aguanta un móvil en una de las barras del armario mientras este graba un vídeo timelapse de varios días, horas o lo que sea. Si alguien tiene una impresora 3D y se siente vago para diseñarlo que me pida el modelo, lo puedo enviar en un archivo de Blender o en formato STL.
P7 & P8: Primera prueba nocturna, probando las luces recién abiertas.
P16: Segunda prueba nocturna, un poquito mejor que la primera prueba.
P20: Como se puede observar las ramas horizontales son demasiado delgadas, esta semana empezaré a usar RhinoSkin a ver si ayuda, pero lo que va a ayudar es el tiempo me temo.
P21 ~P27: Al final algunas capturas decentes, tengo que mejorar la manera en la que ilumino y uso las luces, pero bueno de momento soy un novato. Ya iremos aprendiendo.
P28: Mi nevera de nutrientes ;) (el año pasado mantenía los 15º constantes, pero este año sólo está siendo capaz de bajar hasta 17ºc), también los nutrientes y productos foliares que voy a aplicar.
P29: Eso son 4 ajustes diferentes de temperatura y mate de la foto 24, sería genial si me dejáis un comentario diciendo cual os gusta más (visualmente hablando). ¡Eso me ayudaría un montón!.
P30: Me fumé un porrito de Spliff Dutch Auto por la noche y me dio la tontería ajajjajajajjaja. Eso es lo que salió de photoshop y las fotos P26 y P27
-----SMUARIO SEMANAL-----
No sé si es normal durante el crecimiento, pero Alice K. ha empezado a oler por todo mi piso, es increíble como huele sin tener aún ni una flor ni un pistilo. No puedo ni imaginarme lo que va a acabar oliendo.
Al fin esta semana me he decidido a comprar unas luces y un fondo para aprender a hacer fotos con fondo negro, el fondo he comprado uno normalito de 2 x 3 m, aunque me queda muy grande en el salón de casa, de luces me he comprado una pareja de lumecubes con los accesorios, son una luces super versátiles y excelentes para mis necesidades, seguro que hay cosas de rendimiento parecido o igual y mucho más baratas, pero a mi me gustaron estas por varios motivos. Si alguien está interesado que me pregunte. Durante la semana no tuve mucho tiempo y sólo pude realizar unas pruebas cortas. El fin de semana me puse un poco más a fondo y ya empieza a salir algo decente ;).
Como se ve en el vídeo semanal, al final de semana ya he atado la planta a los tres puntos que comenté la semana pasada y ya está cubriendo todo el espacio horizontal disponible en el armario, por el momento ya he acabado los cortes y las podas, no tengo planeado realizar más a no ser que lo vea necesario. Sigo teniendo la impresión de que las ramas son quizás un poco delgadas aún por lo que planeo unas cuantas semanas de crecimiento más, hasta que engorden y las vea capaces de hacer buenas colas y resistir su peso.
Hasta esta semana he estado regando con el PH alto sin saberlo. El medidor de PH que usaba no estaba bien calibrado y yo creía que sí, antes de ayer (Semana 7) recuperé el mío y al medir me quedé impresionado pues he estado regando a PH 7~8, mientras yo creía estar usando PH 5.8. Menos mal que las cosas no se me han puesto feas.
Con respecto a la temperatura y humedad esta es la última semana de desequilibrio en mi sistema de cultivo ya que está fuertemente ligado al exterior, ya entra Septiembre y enseguida se estabilizan la temperatura y humedad solas.
Esta semana también apliqué un riego foliar con un poco de insecticida orgánico "Tec-Forte", solo por prevención. Maté a una araña blanca hace 2 o 3 semanas y también observé algunas manchas blancas de insectos en una hoja, después hice un par de riegos foliares durante las últimas semanas con B.A.C. "Plant Vitality Plus", "Foliar Spray" y "Pro Active", y no he visto ninguna señal más. Así que este será mi último foliar con ese preventivo adicional, para mantener las cosas limpias de vida no deseada.
-----CALENDARIO DE RIEGO-----
28/08/19 (Día 37) - 3.000 ml con todos los nutrientes semanales @ 1 E.C. PH5.8


Likes
28
Share


@SmokingTiki
Follow
This week I harvested the Gorilla Punch. I will probably harvest the other ones in a week or two
Parameters :
-------------------------------------------
Humidity range : 30-65% depending on the sun
Temperature range : 21-30°C depending on the sun
SUN Average : sunny
Likes
29
Share


@TightNugs
Follow
Starting to pack a bit of weight now,no problems,steadily feeding.She was only 7 days in veg so happy with the progress.All good 🤞🍁
