The Grow Awards 2026 🏆 


Likes
Comments
Share
@Regenwurm
Follow
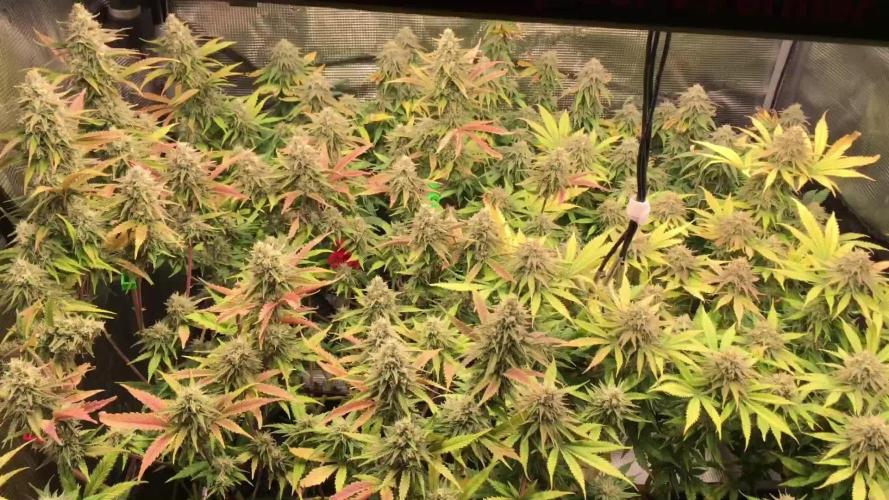
Explosion bei der Tangie!
Unglaubliche Fortschritte in dieser Woche in Sachen Blütenbildung und Wachstum.
Blüte ist im vollen Gange, sie sehen sehr gesund aus.
In dieser Woche Entlaubung ( immer wieder) Lollipopping und ein klein wenig HST
Tage der Keimungsphase = 5 Tage.
Tage in Wachstum = 28Tage
TAge in der Blüte = 14 Tage
Wachstum h = 20 cm
2 mal in dieser Woche mit Purolyt Mischung 1:25 besprüht
Lichtstärke: 85 %
PPFD: ca. 850 umol
Lichtabstand: 35 cm
Std Tag/Nacht: 18/12
Temperatur Tag: ca. 26 Grad
RLF Tag: 60%
Temperatur Nacht: 21 Grad
RLF Nacht: ca. 60 %
VPD Wert: ca. 0,9
PH Wert Wasser/Düngelösung: 5,8
EC Wert: 1,7
Ventilator Oszillation: Stufe 1
Befeuchter: aus
Entfeuchter: 24/7 an um auf 60 % im Zelt zu kommen außerhalb vom Zelt im
Bewässerung: 7* bewässert mit Wasser/Dünger mit den o.g. Mengen
Purolyt Besprühung: 2 mal
Controlling: Grow Control
Dünger: Plagron Coco
Licht: Pro Emit Vollspektrum
Abluft: EC Carbon Active 750 m3

Likes
7
Share
@Adam22
Follow
Transplanted today added another blue CFL 250w +:125w temps gone up nicely.... Looks like it was needed! After a week I will switch to the gavita dual end once these are settled haven't got tent up they seem to be fine so far but they are touching each other
Likes
12
Share
@MaxMo8
Follow
I will be careful every time I encounter an insect problem and use an insecticide, I will eventually get rid of it with a water care method

Likes
6
Share
@HappyGrower420
Follow
i was using bottle water since the firat day but dint realise that the water was filtered (probably) and had only 7mg/l of calcium ,mag and iron.
Instead of buying cal +mag (which i will buy for my next grow) i checked other brands of bottles water and found Evian that has 80 mg/l calcium ,25mg/l mag (i know its not worth it but i was feeling safer to use "bottle" water at the begining because it was also phd at 6.5)
so my question now is : plant had a cal+mag def . Considering that before i was giving it only 7mg/l of cal+mag now that im giving it 80mg/l of calc and Around 40-50mg/l magnesium just by changing water brand also 4 ml of alg a mic that has cal+mag + molasses that iv started this week 1(tablespoon has around 100mg of calcium) .Do you think it will be enought to fill the needs of the plant? As i said buds are still growing normally and plant has another 14-17 days to still fatten the buds :) Today if seen some orange hairs on them .
thank you
thank you.

Likes
13
Share
@NSABND
Follow
Let´s start a new week 😎👌
Day36 very sunny and warm... "Hilde 2.0" goes well 😎👍🙏
Day37 starts with massive cloudy weather but later it turns into a sunny afternoon 😏🙏


Likes
2
Share
@Comfrey
Follow
Die Woche verging wie im Fluge. Purple Punch Auto glitzert in den Morgenstunden wunderschön und verströmt einen sehr angenehmen Duft. Momentan duftet diese hier von unseren vier Pflänzchen am stärksten.
Die Blüten schwellen nach einem krassen Stretch an. Das intensive LST und das Entfernen störender Blätter hat dazu geführt, dass die Blüten sehr gleichmäßig Sonnenlicht bekommen und später in der Blüte die Luft gut zirkulieren kann.
Zwei Tage der Woche standen die Pflanzen unter der Markise, es hat über Stunden heftig geregnet.
Nachdem ich meine Grashüpfer letzte Woche umgesiedelt habe, der Fraß ging mir zu weit, sehen die nachwachsenden Pistillen wieder gut aus. Vorher wurden die von den Hüpfern gerne angeknabbert.
Das Gießen läuft wie gewohnt nach Gefühl. An heißen Sonnentagen bis zu 1,5 Liter.
Soweit die News von unserem Balkon, die nächsten Wochen werden vergehen und dann ist die erste Saison als Weed Gärtner auch schon wieder beendet.


Likes
18
Share
@ButterfliesLittleFarm
Follow
Hello Diary.
I am very happy that we are starting again. I’m going back to Automatics again. Many thanks to Royal Queen Seeds for sending me two of their new strains, Green Gelato Automatic and HulkBerry Automatic. So this is the first of two new diaries.
WHY GREEN GELATO AUTOMATIC?
Green Gelato Automatic is the autoflowering version of a legendary cannabis variety. The original strain is the lovechild of Thin Mint Cookies and Sunset Sherbet. It's one of the most aromatic strains available and produces monstrous levels of THC. Green Gelato Automatic contains both sativa and indica genetics. Her effects can be felt in the body and mind simultaneously. In fact, with a THC content of 24%, she's one of the most potent autoflowering strains you can find. She sends the mind into overdrive and makes a perfect smoke when writing, painting, or doing anything creative. The strain also boasts medicinal properties, taking the edge off pain, elevating mood, and raising appetite.
LET'S START FIRST WITH THE FARM SET-UP:
Box - Secret Jardin DS120W 120x60x178
Lights - MIGRO 200+
Ventilation - Blauberg Turbo - E 100
Fan - Oscillating Koala Fan
Humidifier - Beurer LB 45
Soil - BIOBIZZ Light - Mix
Pot - 11L Fabric Pot from RQS
Seed - Royal Queen Seed
Nutrition - BioBizz and RQS Organic nutrition
I apologize in advance for the detailed documentation, or the large number of photos, but I enjoy it, and I think it will help others around tracking their plants.
LET THE DIARY START OFFICIALLY:
10/06/2020. planting.
I have prepared everything I need for planting. The 11lit fabric pot I got from RQS, also Organic Boost Nutrition and Mycorrhizza from RQS, Soil is Light-Mix from BioBizz and of course the seed of the new strain Green Gelato Automatic. After adding 50g of pellets from Organic Nutrition and 5g of Mycorrhizze, I mixed everything well in the pot. After that I watered well and soaked the soil, I dug a hole with a wooden stick about 2-3 cm, I first put 1g of mycorrhize and then put the seeds inside. I lightly covered the hole with earth and put the pot in his new home. The temperature was about 25 degrees and the humidity about 65%.
14/06/2020. She sprouted.
After 4 days, Green Gelato came out. In the meantime, I sprayed the surface of the earth a little twice. The temperature is still around 26 degrees, thanks to the summer and the high temperature that enters the apartment anyway. I regulate the humidity with a humidifier, I maintain it around 60% -65%.
15/06/2020.
Her first photo shoot, I also watered her with about 2 liters of water, which I only regulated p.H. at 6.3 with Plagron, Lemon Kick.
19/06/2020. Day 1.
Green Gelato is officially one day old. On that occasion I took another photo shoot to celebrate this big day :).
24/06/2020. First Feeding
First feeding. She got a whole meal from BioBizz, Root-Juice, Bio-Heaven and Acti-Vera, p.H of water I regulated with Lemon Kick from Plagron.
25/06/2020. Day 7.
End of the first week. For now, everything is great. It is developing nicely, its conditions are almost perfect. Green Gelato will also have two roommates in the box, HulkBerry Automatic.
Green Gelato - Day 7. - 10 cm
I think that’s all for this week, I’m happy that it’s starting all over again, following its development and looking forward to what’s to come. See you next week.


Likes
109
Share
@MadeInGermany
Follow
Welcome to the Green House Company Cup 🏆.
Day 41 since time change to 12/12.
Hey everyone .
It smells better and sweeter every day 😍.
Your buds are developing beautifully 😄.
The look of the buds is also beautiful.
She takes her GHSC Powder Feeding very well, so I'm really excited about the stuff ☺️. Very easy to feed.
It doesn't take too long until these beautiful flowers reach their end ✌️🏼.
I am very curious how I will like this variety and especially how it will taste 😃.
I wish you all a lot of fun with the update, stay healthy 🙏🏻, and let it grow 😛
You can buy this Strain at :
https://greenhouseseeds.nl/
☝️🏼☝️🏼☝️🏼☝️🏼☝️🏼☝️🏼☝️🏼☝️🏼☝️🏼☝️🏼☝️🏼☝️🏼
Green House Seeds Company Cup 🏆
Type:
Wonder Pie
☝️🏼
Genetics:
Wedding Cake x OG Kush
👍😍
Vega lamp: 2 x Todogrow Led
Quantum Board 100 W
💡
Flower Lamp : 2 x Todogrow Led
Cxb 3590 COB 3500 K 205 W
💡💡☝️🏼
Earth: Canna Bio
☝️🏼
Fertilizer: Bio Grow Feeding ( GHSC ) , Enhancer ( GHSC ) , Bio Bloom ( GHSC)
☝️🏼🌱
Water: Osmosis water mixed with normal water (24 hours stale that the chlorine evaporates) to 0.2 EC. Add Cal / Mag to 0.4 Ec Ph with Organic Ph - to 6.0

Likes
6
Share
@BigGGrows
Follow
This week was a big week for the candy cush. I noticed upon watering her to run off, that in the same day the pot would go super dry and light weight. I also noticed stress in the leaves and roots poking out the bottom of the pot. It was time for a transplant. So far so good! Upon transplanting i performed more LST to help her fill in the pot. She went from a 1 gallon to a 5 gallon. She was also defoliated thia week.

Likes
10
Share
@Reaper
Follow
seeds germinate in rockwool
untill roots hit the water i only use calmag and small amount of nutes

Likes
3
Share
@Krautbauern
Follow
Smell got more intensive and Ladies are more thirsty
At day 8 of flowering we thought the plants are a bit too small so we gave them more space to the LED, about 70cm with 200watts
Also they got 4ml/l of bioheaven


Likes
27
Share
@adam_pawloski87
Follow
First off I just want to say for some reason it’s not letting me change the right temperatures on my diaries ! Each time when I put it in they stay at 50. My day air stays 75 degrees an , night degrees is 70 !
Today is day 58 for all these ladies! This week has been really great ! Girls really progressed a lot , especially for one the Forbiddin Runtz, looks like is gonna finish up in a week or 2 ! Other then that they are coming along well! Keep those eyes peeled for next week! Cheers😶🌫️💨💨💨💨
Processing
Likes
1
Share
@Nvchods3
Follow
se realizo una 2da poda apical a una de las plants la otra solo quedara con la poda apical inicial y se transplanto a maceteros de 11lts.
Processing
Likes
21
Share
@DudeGrowsWeed
Follow
March 7, 2019 update:
These babies are doing great! I plan on transplanting 6 plants and moving them into the flowering room this weekend. As of right now my plan is to move 1 DinaMed CBD, 1 Medi Kush CBD and 4 Cherry Hemp plants into flower. I'm going to pick the largest/most developed plants for the move. Then I'll keep the rest in veg for another month, next month I'll pick the next 6. I'd like to get the plants on a monthly rotation so I can be harvesting monthly.


Likes
15
Share
@Roberts
Follow
Grape Octane is doing good. She is finishing up. I changed her to just water yesterday. She is on her flush, and fade time now. Next update will be the harvest. Thank you again Medic Grow, and ILGM. 🤜🏻🤛🏻🌱❄️
Thank you grow diaries community for the 👇likes👇, follows, comments, and subscriptions on my YouTube channel👇.
❄️🌱🍻 Happy Growing 🌱🌱🌱
https://youtube.com/channel/UCAhN7yRzWLpcaRHhMIQ7X4g.


Likes
39
Share
@Secretflower
Follow
Hello my friends,
...May 16, 2022....Day N°64...
My three Automatic White Banana are awesome, smells very good.
I feed them with the complete stuff of the Green Buzz Liquids nutrients from Germany.
They are under a Viparspectra P4000 at 80% of power and at 40cm of the canopy.
www.exoticseed.com
www.viparsprectra.com
www.gbliquids.com
15% discount code : secretflower
That's all for now my friends.
Thank you very much for passing by.
Wish you the best with your green projects, peace.
See you soon 💨💨💨
