The Grow Awards 2026 🏆 


Likes
Comments
Share
@AestheticGenetix
Follow
6/28/24
she was about 16 inches before I tried some lst. she wasn't as bendy as before so it turned into supercropping which is fine. after transplant, she wasn't happy at all and I couldn't seem to figure out what was going on. I believe her soil is too compacted and I tried using perlite on top of the soil to top dress easier but it just held a ridiculous amount of water underneath. it became like 3 inches of just perlite and I think she was drowning. she's starting to perk up and be happy again.


Likes
26
Share
@420DeepGrow
Follow
* Actualizo 2 dias antes para cuadrar diarios.
Gracias al equipo de Seedsman y XpertNutrients sin ellos esto no sería posible.
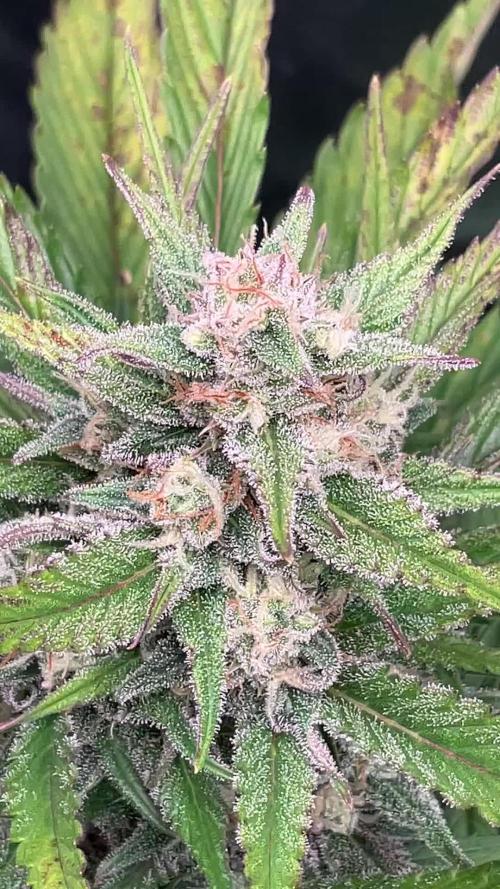
💐🍁 Bubba Cheescake:
Bubba Cheesecake es un cruce de Bubba Kush anterior al 98 con Cheese Cake (Wedding Cake x Exodus Cheese). Se trata de un híbrido 70% índica con muy buenos rendimientos, alto en THC y bajo en CBD. Bubba Cheesecake prospera en interiores y exteriores. En interior se aconseja un corto periodo de crecimiento vegetativo debido a la cantidad de estiramiento que presentan las plantas. Las plantas pueden crecer hasta una altura de 250 a 350 cm. cuando se deja crecer naturalmente al aire libre. En interior, la floración dura entre 60 y 65 días, con rendimientos entre buenos y altos, de 400 a 550 gr/m2. Las plantas de exterior son capaces de producir entre 700 - 800 gr. peso seco. En las latitudes norteñas, en exterior, los productores pueden esperar cosechar a principios de octubre. Los cogollos son grandes y duros como piedras. Las plantas maduras muestran atractivos colores púrpuras y azules y brillan con una resina pegajosa que cubrirá las manos del cultivador si no tiene cuidado. El componente Wedding Cake agrega dulzura al sabor del regaliz y el aroma es terroso y musgoso. La producción de THC es muy alta con un nivel bajo de CBD. El efecto es intensamente narcótico, fuerte y duradero.
🌻🚀 Consigue aqui tus semillas:
🍣🍦🌴 Xpert Nutrients es una empresa especializada en la producción y comercialización de fertilizantes líquidos y tierras, que garantizan excelentes cosechas y un crecimiento activo para sus plantas durante todas las fases de cultivo.
Consigue aqui tus Nutrientes:
https://xpertnutrients.com/es/shop/
📆 Semana 4:
Continuamos la etapa de vegetación, ella se desarrolla muy bien 😎, comienza el buen tiempo, temperaturas agradables para todos.
Esta semana se aplica una solución de trichodermas para una mejor adaptación aunque realmente va genial.
Se mantiene 1/3 de nutrientes Master Root y Master Grow
Likes
56
Share
@Master_weeda
Follow
Merci à tous les padawans et maîtres jedis qui m'ont apportés force conseil et gentillesse pour ce diarie 🙏 @philosopherseeds
@Williamsii @Castafunk @greenhousefeeding

Processing
Likes
49
Share
@The_Projexx
Follow
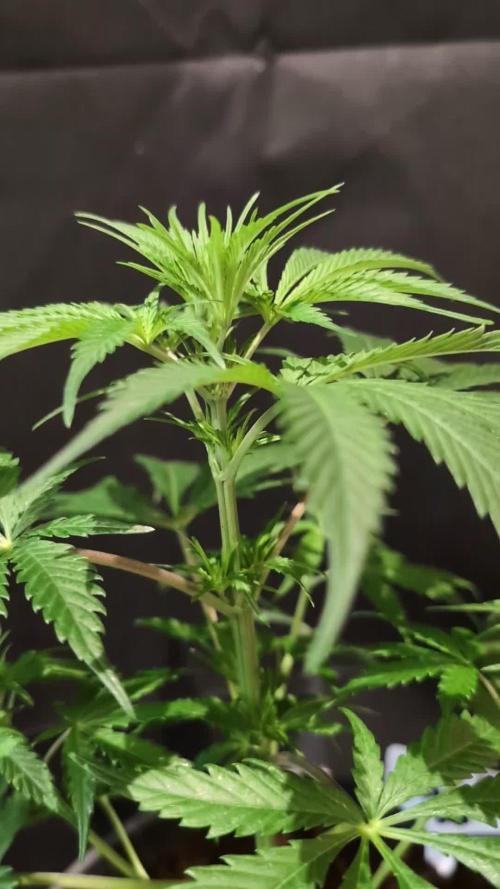
Shes growing well , I will be dialing the nutrients back on her as well I dont think I have to but its to keep it nice and even throughout the grow until she reaches flower . I can really say I have complaints about her for the past week shes been growing and doing her thing :) Shes getting ready to push up a new node so thats always exciting !
I'd like to thank everyone for the continued support as well as a special thank you to all my followers that come in daily and weekly to check out the updates you guys rock !!
-Happy Growing!

Likes
2
Share
@Coman
Follow
Gorilla cookies is doing good and might be ready for harvest in 2 weeks, the other 2 ladies might need 3 more weeks.


Likes
28
Share
@Master_weeda
Follow
Bonjour à tous les padawans et maîtres jedis
Je n'effectue pas de rempotage je décide que le pot de 11 litres sera son pot définitif car la plante mesure déjà 1 mètre et je n'ai malheureusement pas la place pour géré des plantes qui dépasse 150 centimètres
Si j'effectue un rempotage dans un pot plus grand elle les dépassera allègrement
Cette plante fera toute sa floraison sur mon balcon (elle y est depuis 15 jours) ce sera donc une véritable culture hybride
Elle aura effectué la quasi totalité de sa croissance en chambre de culture

Likes
Comments
Share
@Barzenegger
Follow
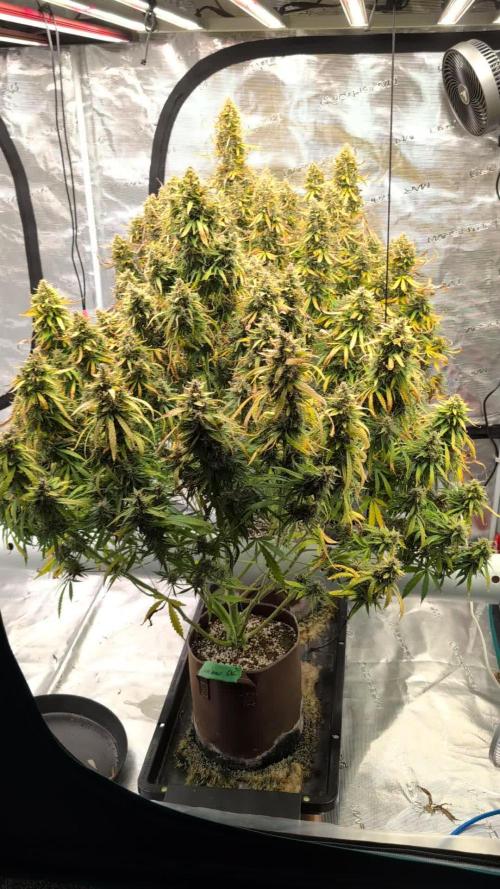
The buds are getting bigger, two plants have started fading to yellow, while the one in the middle is severely overfed, which I did not realize at the time. Still quite happy with how they looked and that the canopy was quite even without much additional training besides the initial topping. I did bend the center plant's (the only one which wasn't topped) main branch to the side however.
Likes
6
Share
@Grow_for_Happiness
Follow
Well the end of the week is here and these girls are looking mighty fine. And by that I mean they're looking like maybe one more week till harvest. Just starting to see the odd red here and there on sugar leaves with the scope, but still about 20% clear so usually that's a good sign of a week of time left give of take a few days. Another giveaway is just the amount of leaves that are fading out and dying off. Not a huge percentage yet, but I'm finding some every day so they're on their way out for sure. A little more leafy than some strains I've grown, but still nice and trichome packed, and those leaves are hiding some nice looking buds. Will be switching to flawless finish and RO in next day or so once reservoir is done.


Processing
Likes
19
Share
@creichs
Follow
both lights are about 8 inches away and holy punch is now 11 inches tall.
did a lot lollipoping on day 54 hop it wasn't to much for the smaller power flower it seems to be coming back fine though

Likes
12
Share
@greenAF
Follow
MW6Bar Controller Level 8(520w)
UVA Bars 365-370nm (54w) 10min on 50min off and 10min at the beginning of the night.
IR 730nm (26w) 10min at start of night.
Front Left Koosh The Magic Dragon #4
Front Right Tricho Jordan #5
Back Left Tricho Jordan #5
PPFD 1025-1275
6.5 pH
Feed EC
Tricho 1EC (Fade formula) Taper down to 0 by day 60
KMD 3 Switching to fade around D59
Sub EC
0-3 TJ
5-5.5 KMD
Dryback Target: 60-70%
Likes
12
Share
@GizaWRZ
Follow
Today its exactly 84 days from seed. This week i start Flush for maximum 7 days And i will cut them down 😀
Likes
17
Share
@EXZELENS
Follow
Bud wet weight : 168,1g of trimmed medium to big sized buds
25,4g of tiny tiny buds/larfs = 193.5 grams of trimmed wet buds.
Details on genetics and smoke report above.
This, as my first grow, is way more than I ever expected it to be. I haven´t had that much fun and enthusiasm in a very very long time.
I can´t even explain the feeling it is to harvest your own cannabis, but I know most of you know what I´m talking about haha.
It was really nice to practice LST, even tho it was SO HARD, ´cause I didn´t had barely any space to work since I used a hard pot and did not fill nearly half the size of it and the walls of the pot were really high. It was even difficult to water without dropping water on the lower buds.
I haven´t learnt much about defoliation tho, I feel I need to study a little more about the phases you should or should not do it.
Also, I discovered thrips are a pain in the ass. I had 2 tough weeks dealing with thrips, but in the end it was alright.
I don´t have any humidity control device, which I intend to buy for the next grows.
Growdiaries was really helpful for me, it kept me motivated everyday (not that I wouldn´t have had it anyways), the Grow Questions are REALLY useful and all the community is awesome. Thanks to all people that helped me here on GD during this first grow!
To conclude it: I am really happy and satisfied with how the grow turned out. They look incredible, it almost feels like I can´t believe it still.
Peace.
UPDATES:
07/10 : The buds are now dry and already in curing jars, one of them with a Boveda 58% humidity pack.
The total grams of the dry buds are: 41.4g (medium to big sized buds)
4.1g (tiny buds) = 45.5 grams!
I´m really happy with the results, I thought it would be around 30g so yeah, that´s a really good surprise!
In 2 weeks I´ll be back to update the smoke report.
Thanks so much for reading! Peace.
09/10 : I managed to fit everything in the same container with some space between them, so now every bud is with the Boveda pack.
14/10: It´s been a week and the smell improved, it still smells a little like hay/plant ( even tho it´s not too dry neither too wet ).
21/10: Now it´s been two weeks and even tho the smell isn´t anymore hay, it´s a lot herbal. I really think the aroma can get better, but the taste is already good enough for me. The smoke report has been done and in case I have something to add, I´ll report here.
Thank you so much for reading! Peace.
Likes
12
Share
@ChitownCannaChica
Follow
She’s getting a little bigger day by day! Popped when it was pretty cold outside, but it’s has been very hot and humid this past week—- and she loves it!
Likes
8
Share
@GoodTimesOrganics
Follow
Hi liebe Community and Welcome Back! 💚
Nach der sechsten Wachstumswochen entwickelt sich die Orange Bud solide. Sie legt jetzt richtig mit der Wachstumsphase los. Vor allem hat Sie ihr Geschlecht offenbart und ja, es ist ein Weibchen.. 😊💚
Daher war es an der Zeit ihr ein neues Zuhause zu verschaffen.
Daher wurde die Erde im neuen Topf (9L) mit der Gesponserten Palette von Biot Tabs vorbereitet! (Ein fettes Dankeschön nochmal 😉)
Hierdurch werde ich die Pflanze grundsätzlich nur mit Wasser gießen und immer Mal wieder noch etwas Orgateex und später dann PK 5-8 hinzufügen.
Die neuen Blätter sehen sehr Gesund aus und insgesammt hat sich die Pflanze gut entwickelt.
Die Seittriebe beginnen nun in die Breite zu gehen und kommen allmählich gut hervor.
Die unteren Triebe wurden rausgeschnitten, damit die Pflanze nun ihr Potential nach oben entfalten kann.
Die Umgebungsgegebenheiten sind aktuell gut:
—————
🌞 Temp: 21
🌚 Temp: 18°C bis 19°C
💨 RH: 48%
VPD: 1,00 kPa
💡ppfd: 330 mpm
—————
Viele Grüße 👋

Processing
Likes
154
Share
@CBD_Sweden
Follow
@FAST_BUDS,
Hi all the happy people here in GrowDiaries.
This is my second cultivation ever and it will be fun to try a bigger space than my closet grow.
First, I'm just going to say I'm done with the construction of my new growroom.
I put some pictures on the construction here in week one.
The room is 2.14 meters by 1.7 meters and has a ceiling height of 2 meters.
It provides a floor area of 3.6 square meters.
I use a 54 Watt Lightwawe T5 for germination and 2 Pcs 400 Watt HPS lamps.
I have a channel fan that replaces the room air about 40 times an hour to get a comfortable environment in the room, the air enters a fresh air intake from the outside.
The air is purified through a carbon filter to then leave the room to the rest of the basement.
Then I use that heat to heat the rest of the basement.
I will use 8 pcs 15 liter Autopots to grow with and a 100 liter water tank that supplies the pots of water and nutrition.
I will grow completely organically in soil and will watercure my buds to get the best possible medicine for me.
But there are no cultivation rooms to be displayed here, so I continue with what is most important.
Today I have put my seeds in my moisture dome and hope the seeds have germinated within a few days.
I am very excited to see how the new growroom will work and how this new secret CBD plant from @FAST_BUDS, will turn out.
..............................................................................................................................................................................................................................................................................................................................................
Update 2017-08-15. Both seeds have germinated and planted in small pots inside the humidity dome.
I'm so glad it worked so well and now it's just hoping they'll start growing and become 2 big healthy girls :)
...............................................................................................................................................................................................................................................................................................................................................
Update 2017-08-16. I have mixed my own soil today. Its 40% sieved peat harrow H2-H4 0-30 mm, 45% sieved peat harrow H4-H6 0-30 mm. 5% sand and 10% of compost soil. And i use 15% of perlite and mix it all together.
....................................................................................................................................................................................................................................................................................................................................................
2017-08-21 The 2 sisters are doing great, Nr2 is a bit after Nr1 . Some new pics.
............................................................................................................................................................................................................................................................................................................................................................................
2017-08-23. Transplanted from humidity dome and the small germinating pots to 15 liter autopots.
................................................................................................................................................................................................................................................................................................................................................................................
2017-08-27. The girls have settled in to there new home of the 15 liters autopot after a little transplant chock. Now the real week 1 starts for me and the girls. 4 new pics.
---------------------------------------------------------------------------------------------------------------------------------------------------------------------------------------------------------
2017-08-29. New movie of the girls. Its no water for 3 days now so the roots develop more and match the plant above the soil. The temp controlled fan is awesome, its easy to set what temp you like to have in the room. Right now its 28 celcius. And humidity is 56%.
--------------------------------------------------------------------------------------------------------------------------------------------------------------------------------------------------------------------------------------------------
2017-08-29.
Hello to you who read my diary, I just want to say that I am pleased that you have chosen to check in with me and in my diary.
I just want to say that I do this for myself and for a steady flow of my medicine.
Everything you read and see in my diary is 100% honest and I will never distort or beautify anything here.
I document my crops so that I can learn from my mistakes and also to look back at those different crops.
I try to update with pictures every day and with text if something special has happened in the garden.
This is my strainhunt for the best medicine and the beginning of my journey with cannabis and the cultivation of it.
-----------------------------------------------------------------------------------------------------------------------------------------------------------------------
2017-08-30. Cleaned the room this morning, just vacuuming and cleaning with chlorine solution. Im testing the fan to control temp and humidity, it works great.
Added some pics with measurements and a movie. Everything is looking great right now.
-----------------------------------------------------------------------------------------------------------------------------------------------------------------------------
2017-08-31. New video of the girls.
-------------------------------------------------------------------------------------------------------------------------------------------------------------------------------
2017-09-01. New pics and videos. Gave each of the girls with 2 ml Alg-A-Mic, 4ml Bio-Grow, 4ml Bio-Heaven and 10 ml Formulex mixed in 2 liters of water.
I hope they like it :)
-------------------------------------------------------------------------------------------------------------------------------------------------------------------------------------------------------------------------------------------
2017-09-02. New pics and the girls liked the water and nutrients yesterday.
-----------------------------------------------------------------------------------------
2017-09-03. Video of the girls this morning.
Kl 16.00. Did some defoliation on the girls. Videos added.
KL. 23.00. New video.
----------------------------------------------------------------------------------
2017-09-04. The start of week 3. New pics. Im trying to LST the girls.
KL 23.00. Added new video.
--------------------------------------------------------------------------------------------
2017-09-05. KL 08.00. Cleaned the room this morning, just vacuuming and cleaning with chlorine solution.
KL 12.00. The girls got 2 liters of water each with nutes in it, added a video.
-----------------------------------------------------------------------------------------------------------------------------------
2017-09-06. KL 08.00. The girls woke up after their beauty sleep, the leaves are always a bit down after 6 h of darkness, but they will stretch now when the HPS lamp starts.
Everything looks good and I keep trying to tuck the leaves so they get the maximum amount of light where needed. Added pics and video.
KL 23.30. Did some LST and leaftucking.
--------------------------------------------------------------------------------------------------------------------------------------------
2017-09-07. This is day 21 from sprouting. I have never tested PH in my grows, when growing organic in soil iv learned that it adapt PH by it self. But im curious by nature so i had to test.
Kl 10.00 Tested PH in the soil, it was 6.9 and tested my tap water and it was 6.8. Added video/pics of the girls, its 10 H after defoliation, LST and leaftucking. I think its looking good.
Kl 22.30. New pics
-------------------------------------------------------------------------------------------------------------------------------------------------------------------------
2017-09-08 KL 08.00. Good morning, added new video.
2017-09-08. Kl 23.50. Gave every girl 3 liters of water and nutes, added new video.
-----------------------------------------------------------------------------------------
2017-09-09. Kl 21.00. Defoliated a lot today, new pics.
---------------------------------------------------------------------------------
2017-09-10. Kl 08.00. Last day of week 3. New video.
2017-09-10. Kl 23.00. 3 New videos.
---------------------------------------------------------------------------------------------