
Likes
Comments
Share


@JohnnyBarrel
Follow
Week 17
Last week before harvest. Just let the plants ending the maturation process. Good synchronization between the different strains, selected with an approximate identical flowering period. I want harvesting all the plants at the same time.
Flowers are dense, hard and thick, pretty resinous. 4 strains = 4 different smells, 4 different colors….🤩
I flushed consciously and stopped watering 4 days before the harvest day. I turned off the light during 48h, with ventilation on.
All is ready for the cut. Date is programmed to the full moon period….why not…🤔
I will trim a little bit the plants before cutting and hanging them in the tent with the same ventilation cycle, no light of course…


Likes
5
Share


@AustinRon
Follow
TH 1Q2025 - Week 11 - Flower 8
(ON Haze X Original Haze) X Northern Lights #2
“Todd’s Haze”
Objective
- 8 Female Plants, Topped ONCE @ Flip, 12” when topped
- Modified Sea of Green
Seeds Wet: 1139PM, 28.2.2025
Germinated: 2.3.2025
Flip: 21.3.2025
Harvest: 77 Days, DATE: 6.6.2025
_________________________________________
__
Fri May 16, 2025
TH 1Q25 57:F:8:1
Harvest Dehu
- [x] Amount: [ 1.5, gal]
- [x] EC: [ 2.9, mS/cm]
Refresh Reservoir
- [x] Primer A&B: [ 36, ml]
- [x] SLF-100: [ 15, ml]
- [x] Amount: [ 3, gal]
- [x] EC: [ 1.8, mS/cm]
Runoff
Amount: [ 2, gal]
EC: [ 1.9, mS/cm]
__
Sat May 17, 2025
TH 1Q25 58:F:8:2
- [ ] Install Line Supports for TALLS!!!
We REALLY need to clean up the foliage, especially lowers.
Defoliation
- [ ] GO SLOW
- [x] Remove Fans w/ Petioles up to Center Bar of tent.
- [x] Selectively Defol above
Note: Last time we defoliated, we thereafter had a flush of new green. (Week 5) May be correlated with CalPHOS (Applied same time) or Not. Point is, GO SLOW.
Runoff:
- [ 0.25, gal] # Leaving Irrigation Parameters overnight. Will gauge amount being taken up SUNDAY
__
Sun May 18, 2025
TH 1Q25 59:F:8:3
The Veg is almost overwhelming. I’m continuing this grow with some encouragement from GrowCast, but:
1. Pistils have integrity, the bracts are completely loosened, but larfing on uppers apparent.
2. IF This plant finishes, they’ll largely be TRIM MONSTERS.
3. I could grow my clones today - without having clones to take -
*** Frustration***
Harvest Dehu
- [x] AMOUNT: [ 2.5, gal]
Refresh Reservoir
- [x] Amount: [ 2, gal]
- [x] Primer A&B: [ 12, ml, gal]
- [x] SLF-100: [ 5, ml, gal]
- [x] EC: [ 1.8, mS/cm]
Runoff
- [x] Amount: [ , gal]
- [x] Installed Lateral Supports for Leaning TALLS
__
Mon May 19, 2025
TH 1Q25 60:F:8:4
We’re using more water than Dehu is providing . . .
Refill with pH’d FILTERED TAP
__
Tue May 20, 2025
TH 1Q25 61:F:8:5
__
Wed May 21, 2025
TH 1Q25 62:F:8:6
__
Thu May 22, 2025
TH 1Q25 63:F:8:7

Likes
3
Share


Likes
72
Share


@Green_Mountains
Follow
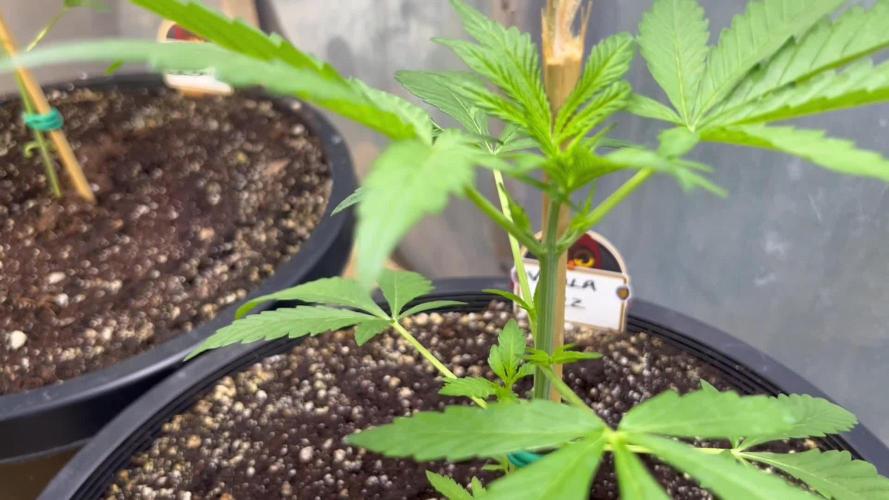
Another good week!! I need to LST and defoliate... probably going to do that tomorrow.
I fed them this week as well as watered. I will add the flowering nutrients going forward!!
Otherwise, I hope this grow continues to go well!!
Cheers!!

Likes
4
Share

@Daddy_farmer
Follow
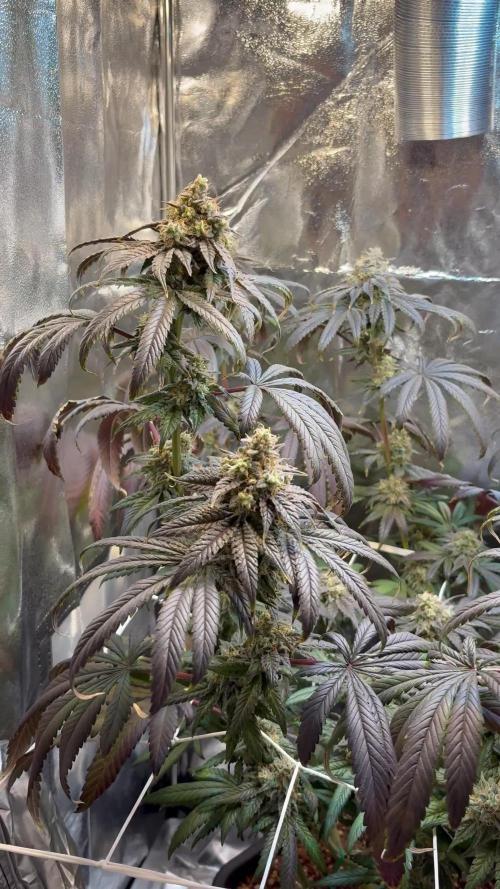
She gets really nice colors now- starting to eats what compensates in fan leaves. 🍁
Flowers not fattening as I expected. I wasn’t able to check and correct past two week due to absence.
Plenty mistakes on the first coco grow but overall I’m really enjoying what I see.

Likes
4
Share


@SuperGluedGrow
Follow
Number 2 pheno might herm on me so I have to watch but I have limited plants and I really want to keep these genetics so I need atleast one female. Number 3 the mutant stopped growing before I topped, or maybe not stopped but it threw out pistils at the apical meristem and not producing leaves so I topped to see if I could promote side growth but it hasn't worked; I'm going to keep her around just for the fun of it. 4 is my hope of producing female and a good clone.
Likes
9
Share


@JardineiroBr
Follow
3 plantas diferentes e lindas , duas menores e bem densas de botões grossos e muito perfumados e uma esticou e agora está enchendo os botões , achonqie as pequenas em duas semanas colho a grande vai demorar mais parece.

Processing
Likes
6
Share


@The_cannary
Follow
Transplantamos a macetas de 11litros. Añadimos mykos de xtremgarden. Estamos utilizando la línea completa de fertilizantes maría green. Mars hydro tsl 2000 300w

Likes
36
Share


@Salokin
Follow
Shout out to Barney’s, freaking love their genetics! Harvest will be plentiful of super quality bud. Something I this far have only achieved with their genetics.

Likes
28
Share


@Felloffthegrid420
Follow
Went on a two day camping trip it was some beautiful stuff out there all is good off the grid top broke putt one

Likes
27
Share


@Wicked_Stix
Follow
The end of week 1 has arrived. We all know how it goes. Just playing the waiting game. At this stage these girls are just working on building their root system. The roots should be hitting the reservoir in the bottom of the buckets soon then they should take off. Got the water pumping and the lights beaming 24 hours a day. Running a low dose of maxigro. Keeping the ph around 6. Will probably be topping them around day 12. Would be amazing if I can get them ready to switch to flower at the end of week 3. But for now I'm just going to check on them 420 times a day hoping they don't die. Might be back next week if they are alive. Happy growing!


Likes
6
Share

@sanibelisl
Follow
Girls had a great week at summer camp! Smiles are found everywhere regarding their new homes. Plenty of room to grow and wiggle their toes in the amended formula 707, which is doing what was expected retaining moisture nicely, bringing the watering to a minimum.
All three girls received merit badges for hiking(survived transplanting), water sports(2 liters), light tolerance(supplemental lighting), physical fitness(color and strength)and kite flying(added a fan). They are all looking forward to this weeks activities.
Girls seem to like what they’re getting at the chow hall, green and growing daily, strong and upright. Plenty of good stuff in the soil.
A fan was added and the benefits are three fold, dry out the top layer of soil, pest control, makes them stronger.
I will update as needed.
***update, the girls are looking good this morning, well rested, well nourished, vibrant. Their roots must be really liking the 707 as evident by the rapid growth. Measured them this morning with the H. W. At8 in. the V. F. at 8.5 and the 91 Grapes at 10 in. And at least an inch wider as well. No water will be needed today.
Note. The greenhouse may be better suited for growing mushrooms than cannabis. Pine trees and shade. No direct sunlight until after 2pm. Dappled sun all morning long, so installed a T-5 4 foot ArgroLed 6550(k) daylight led fixture above the girls. That was a bright idea!
***update, New Video includes new homemade lighting.
*** update, new videos.
Before 7/14 After 7/15 videos of the girls being sprayed with a folier dose of silica. I had forgot to add the silica on Sunday when I had watered them and they needed it! I would not be able to water them again until at least Friday so delivered it via a foliage spray. Worked wonders , will apply again in a week. Let me know what you think.
***update, OMG going to ignore a few people here who seem to interested in my financial status, whom i care to promote and what i do, so let's put this to rest... i'm a hobbyist cannabis grower who enjoys cultivating autoflowers... i'm not paid nor sponsored by anyone , i simply like and trust the genetics from Night Owl Seeds and in my opinion so should anyone else who desires quality autoflower genetics, please feel free to use the breeder of your choice as i don't want any issues because i prefer one over another(happy mOuse).
***update, Three Girls!!! pics will follow. ** ok pics are here. I labeled most of them so should be self explanatory. Can’t seem to get any sunny afternoons. It’s a little disappointing as it is the only time the greenhouse gets direct sunlight. Watered last Sunday, today is Wednesday and they are good no water needed, 707 on the job! Such a difference from the coco grow where I was I nutrient mixing slave.lol

Likes
10
Share


@HerrnLubitz98
Follow
We’re done! Thanks a lot again to Zamnesia and Greenhouse, next big shoutout to Spiderfarmer and Biobizz.
For further updates and more stuff hit me up with a follow on IG @herrnlubitz88
Stay tuned for next run!


Likes
4
Share


@GothBotanical
Follow
Do-Si-Dos Auto is entering her final phase of flower with full-on fade, swelling buds, and thick trichome coverage setting in. This week she showed steady maturity across all sites — pistils began curling in and changing color, but many are still white and active, especially on the lower buds. I gave her a Cal-Mag watering early in the week and have since transitioned to mostly plain RO water as she finishes up. Temperatures climbed to 86°F indoors with 45% humidity, which may have pushed her a bit — I noticed some light upper-leaf clawing from heat stress midweek, but nothing major. The fade is progressing beautifully with purples and yellows coming in across the larger fans. Trichome checks showed mostly clear heads with a few starting to go cloudy — still no amber yet. She’s not ready to harvest, but she’s getting close. Buds continue to stack, and I’ll be checking trichomes daily moving forward to time the final flush and chop.
Processing
Likes
21
Share


@rhodes68
Follow
9/14 Week 9 and she is doing fine
Little vid she is front left
Nuets not changing for now
9/16
Doing well but some white tips are saying we gotta reduce the salts so will be dropping CT nuets 10% and upping PK to 2.5
Extra space is really doing them well
Defoliation again tonight the war on stemmed leaves has begun
9/17
Held a meeting of the minds and decided the best course of action is to flip the light schedule so I can feed them more appropriately, twice a day.
Leaving nuets as they are as this will drop pot EC. Setting the alarm for the AM before lights out at 7:30 and changing the sched to 6AM-6PM summer is done no need for current schedule. Lights be out from 7:30AM to 6AM long I know but should not bother them.
9/19
Lights on girls feed buds look fine
Video enjoy


Likes
1
Share


@Psychoholic
Follow
Sorry had my ratios off last week on my nutes.
Anyway she's turning into a bush I found some balls on the lower half been plucking them off. So I guess technically it's a Hermie not a her.
Top half looks amazing. Since it's only one plant I'm going to grow it out I've got nothing to lose. Had to do some lst because it grew up into the light. EC is at 2

Likes
2
Share


@GrowYourMind
Follow
Starting to smell like chocolate 🍫, I'm going for 2 more weeks before chop
Processing
Likes
13
Share


@MG2009
Follow
Sorry having issues uploading these pic went to week 4 somehow? But is actually week4 flowering, also brewing tea give my plants a little love.
05/09/2018
The boy's have been shaken twice a day last two days,dispersing copious amounts of pollen i mean clouds! It's forming layers in my tent, wish I could capture on video but its not picking it up😕 hoping it relates to strong offspring.
05/12/2018
Fourth week of flowering males are in overdrive! Making clouds of pollen
I am gonna harvest some for later use (it can last 6months or more of stored correctly.
I try and get video. Wish me luck👍🙏
05/14/2018
Harvesting pollen from the the boys. Video not greatest but you get the idea., Picture of #1 pollen and flower,will keep harvesting for a couple days, then cut off flowers and back to veg tent for more test.
06/18/2018
Coming up on sixth weeks after pollination, found two seeds popping out of the buds LAST week and I r germinated today!