The Grow Awards 2026 🏆 


Likes
Comments
Share
@masterofsmeagol
Follow
6/26 Rained last night. Might have showers bur the sky is clear. Real good weather coming. I need to transplant those seedlings. Plants are noticeably bigger every day. I see small spits of damage but it's isolated and in a high wind area. I'll address it and watch for nute deficiencies. Also need to transplant those seedlings. At leastcones an auto.
6/27 Rained overnight again. Looks clear today but we did get some rain yesterday. Tomorrow is all sun. I'm planning to transplant those 3 seedlings today. Also noticed some ragged holes so I've got a few pests. Looks like grasshoppers or something. With all the rain could be slugs or pillars I guess. Need to get ipm up amd running. I've got work to do. Found a plant on my gmo in the 30 bag. It got sun burnt and wind burnt but came out of it and they're all doing great. At first this one was a little behind after transplant but so were the other gmo's. Originally, it was one of my best plant prior to transplant outdoors. That one leaf I found during a thorough inspection of the garden. I'm hoping it's not tmv. Plants growing vigorously and better than but I'll keep an eye on it. I also transplanted the 3 seedlings. I added half new 707 in the 50 (prior soil was this same mix from last year) and transplanted one in that. One in a 10 gallon bag and the auto in a 5 gallon bucket. It will be interesting ingredients seeing how they turn out. All transplants went really smooth.
6/28 It's gonna be a hot one today. I haven't watered in over a week due to rain. Wind was whipping this morning! Looked like plants MIGHTVE been drooping but now that I think about it it was probably just the wind. ANYWAY I WATERED TWO AND A HALF GALLONS on the clones. That wind dries the bags out fast. Some still had some heft to them. Lately I've been going by my intuition which has seemed to be on point. All the seedling transplants look good and show no signs of stress.
6/29 The site was down so I couldn't update. Looks like it's gonna rain. It's noontime. This morning i found and killed two inch worms. There's not much damage so I'm wondering whether bt is necessary. Birds sit on the frame and dart I'm and grab them. I'll have to think on it. I also need to decide what I'm going to use for nutes this year. Don't need it yet. GMO's and sherb pie is putting out pistols everywhere. Same with the event horizon. Looks like I may have an early harvest this year. I certainly hope so. Still.....only did half what I did last year but with everything going on its all I can handle.
6/30 Site was down and it doesn't want to pet me upload my pictures
7/1 Trying to keep this updated. Need to spray bt. I'm seeing some damage. Not much but I need to get a handle on it now. Poured yesterday. Super sunny today. Plants seem to be flowering early this year while I still have a 2 seedlings that haven't shown their sex yet (they are fems but still). The clones are beginning to flower it looks like so I may have an early harvest this year.
7/2 WATERED THE GARDEN WITH 4 GALLONS. Spent some time looking over the plants and decided to hold off on the bt seeing as there isn't much damage. I spoke to a few shop owners and after seeing my garden this wad their advice as well. While watering I noticed red ants coming out of the soil of my GMO in the 30 gal. Some of these strains will be early finishers. The only time I've had stigmas like tjis was when I grew mendo breath and that was a super early harvest. Either way things are looking fantastic. The auto seedling finally showed a stigma. One seedling left (they should ALL be females) but I cant tell by the preflower yet. It looks female but I need to see that little white hair emerge to be sure.

Likes
15
Share
@Uwish
Follow
Nothing special, everything is actually working. Clearly once my water was at the right temperature, no more worries.
The flowers arrived at 12/12 + 11 with the trichromes that pop, it starts to be pleasant! So of course, I'm not going to break any records on this RUN but in any case, I've eliminated a lot of "novelty" and mistakes that I'll make more. I'm counting on the run I'm re-launching to blow all that up, I'm going to go for a performance goal
The stretch is off to a good start, it should settle down around 12/12 +21 - 28, so I will place my second net next week.
I have done a defoliation.
I change the soup in 2 days, so my solution lasts 10 days. I have a slight over-fattening, but really nothing serious, I will switch to an EC of 1.8 - 1.9 instead of 2.0. and I will observe.
Here we can see the delay of one of the plants, it's as if I was shooting with only 3 plants. Next time, only one strain, same size of cuttings and passage by cuttings and RDWV DIY mandatory before passage in the V-system.
Next week, I change the brand of fertilizer for the RDWC, I go to Athena, I will introduce the PK of Athena which according to their recommendation starts at the 21st day at a rate of 2ML/L.
I turn with the base sensi bloom a and b + athena pk
Otherwise, I receive the parts this week for my RDWC DIY system for growth, I'll make it with my friend and I'll test it and I'll give you a feedback on the next update, especially since I'm going to restart right away, I'm going to do 10-15 days in cuttings and then I'll go to the RDWC DIY system for growth until I finish the FLO of the V-SYTEM and then I'll go straight to the next one.
I'm going to put my LEDS at 80% which is the MAX recommendation of SANlight without c0² ( I don't forbid myself to grow at 100% in week 5-6, I'll see... )


Likes
10
Share
@L_Choppa
Follow
i did a light defoliation on fan leaves to free up some bud sites i have only been doing this for some 8months or so but it feels like second nature but i am surprised how my first batch came out but anyways theses are the clones off of my first photoperiods so i feel like im getting shit done lmao but anyways these will stay in veg until there mothers finish with flowers i did a light water today with 5ml of cal-mag and 2ml of fox farm root drench and 2ml of microbe brew im still trying to figure it out not sure when to kick them into flower trying to make this a Perpetual Grow ya digg!!!

Processing
Likes
17
Share
@kcartel
Follow
good flowering, everything is stable, a lot of inflorescences appeared this week, next week it is planned to remove the lower leaves. We had to tilt two branches from the middle, as they stretched out very much and there was a risk of burn, we are waiting for 7 weeks!


Likes
45
Share
@Alpengrower
Follow
(CHOPPED AT DAY 100 ) great strain - long branching - strong lemon pledge smell - gigantic buds - pest resistant
this is the only pheno i grew , but i would definatelly try Lemon-Ak again


Likes
7
Share
@apmcfly76
Follow
Very satisfied and impressed lasted a little bit longer than I expected in vegetation. Enjoying the process and learning
Likes
12
Share
@WaffleTerps
Follow
This week was fully focused on correcting salt buildup and preparing a clean, controlled finish, with quality and terpene preservation as the main priorities.
🔹 Key irrigations
– Final Flush was applied with real 30–40% runoff, successfully reducing EC levels in the root zone.
– Follow-up irrigation with plain water only (pH 6.2) confirmed a consistent EC drop across all pots.
– Plants are now in controlled senescence, with no signs of active nutrient lockout.
🔹 Runoff data
Runoff EC is now within safe ranges (≈1.5–3.0 mS depending on plant), confirming the flush worked and roots are in end-of-cycle mode rather than aggressive uptake.
🔹 Environment & light
– PPFD adjusted (~700–780 µmol/m²/s)
– Stable temperatures
– Humidity tightly controlled to protect dense colas
Everything dialed in to preserve resin and avoid unnecessary stress.
🔹 Plant status
Flowers are fully formed, trichomes mostly cloudy with early amber showing, final structure locked in. At this stage we’re no longer chasing bulk, but ripeness and internal clean-up.
📌 Plan
Final days with minimal intervention, observing real pot weight and plant response.
Harvest window is very close and right on target.
➡️ Next post will be harvest day and the start of drying.
Thanks to everyone following the project and sharing feedback — every cycle is a step forward. 🌱💪
Likes
3
Share
@CreoWeed
Follow
Annnnnnd here we go guys this was her final week.
It went pretty fine even though I was hoping for some more fat colas, but you know, we take what she gave 😂😉.
From day 65 to 67 she stay on a dark room and in day 68 I chopped her.
Now is drying in a room at 26 degrees and 62% RH.
I guess it will be ready in a week, and so I'll post the final results...
That's all pals, stay tuned and stay high!
Processing
Likes
47
Share
@BloodBath
Follow
Sour Wiz is still in veg. 7 weeks. Looking fantastic. EAsiest strain to grow so far. 0 issues and respond so everything well. Once I can sex I’ll separate and start planning to flower. Skywalker OG is still going great in week 9 of flower. STARTING to see a lot of bud structure and white hairs. Northern Lights is still surprising because it was so mutated and now its thriving.

Likes
7
Share
@Mr_nugs_lover_David
Follow
This ladies look absolutely gorgeous and super strong, they're gonna be flipped into flower tomorrow on February 15th when they'll hit the 30th day since they were planted and the first day of flower!
As said, I have flipped this ladies into flower on February 15th so now I think we're gonna see a beautiful stretch specially on this 2 plants which are the biggest one in the tent, very nice genetic, cannot wait to see their performance ❤️💛💚👨🌾 stay tuned everybody! This is gonna be a beautiful run! ✌️

Likes
7
Share
@PrinceOfHerbs
Follow
The plant is now in its 3rd week of flowering, they look very healthy and the first pistils can be seen. The smell starts to become slightly sweet.
The first signs that the fertilizer is working can also be seen, spores are forming on the soil.
I'm very excited to see what these magnificent specimens will bring 💚💚💚
Likes
24
Share
@Weed_marseille
Follow
Cette semaine les plantes grossissent, il y a de beau sujet. 💚J'ai encore un peu de difficulté pendant la germination et cela se voit. J'ai installé l'ensemble des lumières pour la dernière semaine de végétation.🌱
Attention aux tubes d'irrigation ils peuvent se boucher, nettoyer les buses.👨🌾🏼

Likes
10
Share
@6toecat
Follow
Adding Bluetooth details to find your Mac ID of your MyFlora bluetooth adapter necessary to connect it to the MQTT daemon.
Read more here: https://hackaday.io/project/188129-rhaspberry-pi4-basic-watering-system-for-balcony

Likes
244
Share
@DogDoctorOfficial
Follow
And the time for flowers as arrived and here is the first week , she did amazing and is moving quite fast actually,started my flower feedings extra boosters since she as her NPK base mixed with the soil but now wen in flower i like to puches up the game a bit. In this first week i start the top and the P boosters , next will had a K booster to the mix , stopped my root booster since now i want her focus on fruit production, whatever roots she has i am happy with them as they are <3 <3 <3
Gave her a small defoliation and took some clones to preserve genetics, one never know if she is a keeper or not, i know that for the looks she is for sure but in the end what matter is the medicine it self so lets see all i know now is that she is gorgeous and i am in a complicity love with her .
PPFD numbers with her growing are raisin up and have them ate the moment going with an averaged of 700 µMol/m2/S but as they grow i imagine t is will keep going up and should stop at about 1000/1200 µMol/m2/S, my CO2 Levels are always the same and going about 900Ppms and wen i am in the room it goes up to 1500ppmsand more lol
and this is it, for this week this is what happen , provably will defoliate her around day 21 or so but that will be a full defoliation and not just some clones and leafs
<3 <3 <3
For now wishing you all a great Spannabis, i was not hable to came this year but i am sure it will be amazing for you all <3 <3 <3
As always thank you all for stopping by , for the love and for it all, i fell blessed to have you all with me for one more love journey, and a different one form the rest i did so far <3 <3 <3 Thank you Thank you Thank you , you guys are great and have been amazing , thank you for everything <3<3<3
#aptus #aptusplanttech #aptusgang #aptusfamily #aptustrueplantscience #inbalancewithnature #trueplantscience #dogdoctorofficial #growerslove
With true love comes happiness , Always believe in your self and always do things expecting nothing and with an open heart , be a giver and the universe will give back to you in ways you could not even imagine so <3 <3 <3
<3 <3 <3 Growers love to you all <3 <3 <3

Likes
49
Share
@masterofsmeagol
Follow
8/1 Took another video but didn't upload either videos when I was in town. I'll have to upload later. I have a lot going on and I need to consult my diary more often. The Temps dramatically changed. I watered yesterday just a few that were light but then it poured all night. This morning things looked SUBSTANTIALLY better. I think as long as I can get some sunlight the next few days things will be alright. That streak of weather in the 100s really did a number on me and my plants. Everytime I go they seem to be looking better so I hope that they bounce back and I don't lose anything after all this work. Plants seem "strong" though. They appear very healthy. This just seems like a mistake I made that was substantially worsened by severe thunder storms we weren't supposed to get. If they don't come back before rain I may move the plants that haven't recovered yet inside the barn for the night. It really depends. I want them to dry out. I'm thinking of going and putting a fan in the cage on the smart pots. I just need to keep an eye on them.
UPDATE: I was worriedly watching my plants from the cams and got a message from my father saying my plants were "REALLY DROOPY." I got there and noticed they were WAY worse then earlier and it was sunny and 70's. I got my dude on the phone and sent him several pictures. Luckily I had a second opinion also from my father. A 3cu ft bag of 707 is 22 gallons. These pots were light like that. They just have a seven foot plant in them lol. I'm so happy. I was planning on bringing them Inside tonight in case of ANY rain, luckily I was able to ascertain THE REAL problem, consult my diary and askother growers. Things are looking good. I'm so happy I'm not overwatered.
8/2 Thank the Lord! And my father for his constant vigilance and my commercial buddy for always being there for me. I went over this morning and everything is back up. Plants definitely got stressed though. I think I was OVER and UNDER watering during those days where it was 100 degrees. It'd 68 today. I say this because as soon as I watered the plants they started picking right back up. Luckily I had a dry bag of 707 to pick up and compare with my 20 gallon grow bags and had my father check the weight as well. He's a forester and told me the weight was about tge same. I gave the big blue cheese in the back closer to 2 gallons until I saw some water coming out the bottom. The reason I think I may have overwatered is that the water evaporated as i had watered during the day or at night but not the 10% that they needed. I didn't QUITEgive them all their 10% last time more like I split the difference and did a gallon amd half. Some did get two though. I noticed some light yellowing going up one of the plants that I've watered the most. These plants are transitioning fast to flower. I think I've got the watering schedule down better and that's "don't water them on a schedule". I'll have to individually take note of the plants. Also on that plant and a few others I see minor nute deficiencies so as soon as I can feed I'm going too. I'm going to show my buddy all my info and ask his advice before i take the next step though. I can't believe they made it through this. Talk about anxiety. Wow.
UPDATE: Talked to my commercial buddy. He advised to pick off any of the dead leaves, (which I mostly already have there weren't many) and to wait until next water to feed. He broke it all down in a way i could understand. Then he broke the feeding down further for me so I now know where to start. He did say he thinks my only problem this year will be, "finding a place to store it" lol. I thought he was joking but he went out back and brought out five gallon buckets with screw top lids lol. This back and forth dialogue (with a professional) is seriously lowering my anxiety and giving me confidence that im doing the right thing. Hes never led my wrong and hes always been there. So has my dad. He said to take the old man out for coffee because he saved my ass! I opted for the bottle of whiskey instead. I'll be checking them later. I'm waiting to feed until next watering and I'm waiting to apply BT. I don't want to do anything to a plant that has been that stressed. I'm giving them a few days to chill. Then the twenties will get a quart of grow big, big bloom and calmag and I'll convert that measure to the same amount for the 30's, and 50's. I'm not sure EXACTLY how big that tote is but I think it's closet to 30 than to 40. So I've got a solid plan for the week. I think what I'll be looking to do next is get my supports up. The wind has been crazy but these plants (even when stressed) seemed super strong! Still no fungal stuff knock on wood.
UPDATE: Had to take the car to the mechanic and snag my wheeler to make it home. I sefoliated quite a few bog yellow fan leaves and some smaller leaves down low. Plants went through some stress thats for sure. I HAD to leave my phone with the wife as she had a telehealth appointment so I couldn't take pictures. I wish I could've because things are looking great. I can't wait until things dry out a bit and I can feed! I'm STILL in awe of how my plants look RIGHT NOW and how the looked yesterday. Another buddy said If I didn't see it (and I didnt know you) I wouldn't have believed it was even the same garden! I'll check AGAIN later if my car is ready. I'm anxious to feed and get my supports up. Plants are STRONG though.
8/3 Plants looked great this morning. I did notice what looked like nute deficiencies on the plants I've watered most. After speaking with a few local growers I decided to water. I watered everything a gallon. The containers got more. The 10 got less. Then i mixed up a feeding solution of 1 tsp grow big 2 big bloom and .5 calmag and fed the 20s approx 1.5 pints. A little less for the 10 and a little more for the bigger pots. I'm going to go back over and if I see no negative effects from earlier I'll use the rest of the solution. I'm hoping this was the right decision. It hasn't been enough time but the bags were light. Not SUPER light but last time I waited it didn't work out well for me. Two local growers have told me theyve been watering daily and they have plants in raised beds and right in the ground. I want my watering to be in the morning anyway. Hopefully this works out. I'll update.
UPDATE: Went back over and everything was standing up nice. They loved that water and the small dose of nures hasn't burned them so ill be able to use more next time. I used a Gatorade bottle thats 1.25 pints amd went from there. A total of two gallons was used on the garden. Things look amazing. Things are changing on the daily. I'm losing some leaves now. Well they aren't dropping off but I'm plucking them before they yet that far. I need to water in larger volumes I think. Plants are drying out too quick. Others are saying they are watering much more often as well. It really hasn't been raining and these plants are huge. I have lush green leaves but this transition and the added watering I think has leeched a lot of the nutrients from the soil. Since I have the fox farm that's what I'll be using. I still have a couple leaves that are destroyed by a fourkined plant bug. It's very identifiable so theres another I need to find. Also seeing chunks missing from leaves. I need to up my ipm game. I don't want to do more than one thing at a time though so I know what happened if anything goes wrong. Since i did the nutes today the spraying of BT or captain Jack's I'd going to have to wait. Despite losing these old fan leaves my plants are dense. Defoliating really helped with airflow. I also noticed some chlorosis on a few leaves. That's why I'm going to start doing the 10% minimum. I'm waiting until they are real dry then I'll give everyone (but big blue) their 10%. I got run off from big blue just from like a gallon amd a half today. I hope my 2 minute video uploaded. It says it dis but u bet it didn't. I'm trying again and I'm at 12%. Let's see if my patience lasts. Looks like it doesn't want to upload
8/4 Thunderstorms and heavy rain all night. It's supposed to rain steadily all day. Plants werent drooped or blown around looking or anything after this storm and I only have minimal supports up. I defoliated anything that needed it. Just a few yellow leaves on the bottom interior. More like nitrogen deficiency. I am watering to frequently though. Im noticing some chlorosis (minor) on old far leaves. Could just be that the soil is getting depleted but "if the brown surrounds your plant is drowned" and I noticed a few leaves like that. Just a couple bit i know what to look for. I hate to say it but i think ive almost got things dialed in for this grow. I will need to put up further supports. These are some STRONG plants. I shook them all off today. The seemed to love the nutes. Plants looked way better this morning than I was expecting. I need to up my watering volume to 10% everytime. I DID fine more pillar damage when defoliating and a four lined plant bug mark on the purple punch in the ten.
8/5 It's not raining right now but it Rained all day and night. Plants really seemed to likecthise nutes. I'll up it to a quart next feed. I defoliated what needed it. Found my FIRST totally yellow leaf of the season. Big old interior leaf i must've missed earlier. Smell has greatly increased. Seeing that these plants seem to have no ill effect from all this water I feel more confident about my ability to fully water them their 10%. Especially since they are massive plants. I have one daln near 8ft and it's damn near as wide. Real good airflow. I think this is gonna be my year. I certainly hope so. I need to get rid of that fourlined plant big but more importantly I need to deal with pillars proactively so next nice night I'm going to treat with bt. Super proud of myself so far.
8/6 Didn't rain much yesterday. In fact I stepped out my door and the sun was fully visible and bright while rain poured down around me. It wad a cool experience but the plants dodnt get much for water. I checked the weight this morning (heavy) and shook off the plants and did my normal morning inspection. I news to remove a pallet so I have more room. Plants are really trying to flower. Next week I'm gonna yet them with a stronger dose of nutes. Last year this was about the time I lost my crop. Knock on wood but this is the healthiest crop I've ever had. I MAY apply BT tonight. Haven't decided yet. I'll keep the diary updated.
UPDATE: Went over to check the plants that were WET and HEAVY this MORNING because of the windstorm. If dried the bags out completely. Everything but the 10 was drooping right over like before. Good thing I've got some pretty good intuition. I took two videos. I gave everything their 10% 2 gallons each and for each container plant. Plants were back up by the time I was done adding supports.
8/7 Sunny this morning. Plants looked good. Had to defoliate some dead leaves. I can't believe those grow bags dried out so fast yesterday! Its just the wind was so strong! Plants were right sideways! They got some syrong roots thats for sure. One of them (my canary) seemed light this morning! But we are getting an inch and a half of rain starting tonight into tomorrow so im not watering ANYTHING. I'm not sure what I'm going to do IF anything. I added to my supports. I COULD put EVERYTHING in the barn where we put heavy equipment. I'll probably at least bring a couple inside in case something horrible happens. Things arecreally doing good. Flowering up nice. Found a cicada on one yesterday. First time I've ever seen one. I'll update with what I decide to do.
UPDATE. My canary seems a little light and is losing lots more leaves im not sure if it's because of the transition to flower but I assume that has something to do with it. Plants still have MORE than enough leaves. Found a couple pillars and killed them. Took a video. I have one blueberry cheese that I hope doesn't have a fungal infection as it's losing more leaves. But it takes more water and is greener and fuller up top. I think I'm just worried because of last year. I've done what I can gor the storm so let's see what happens if I NOTICE it get too bad I can bring some indoors.


Likes
7
Share
@GrownyStark
Follow
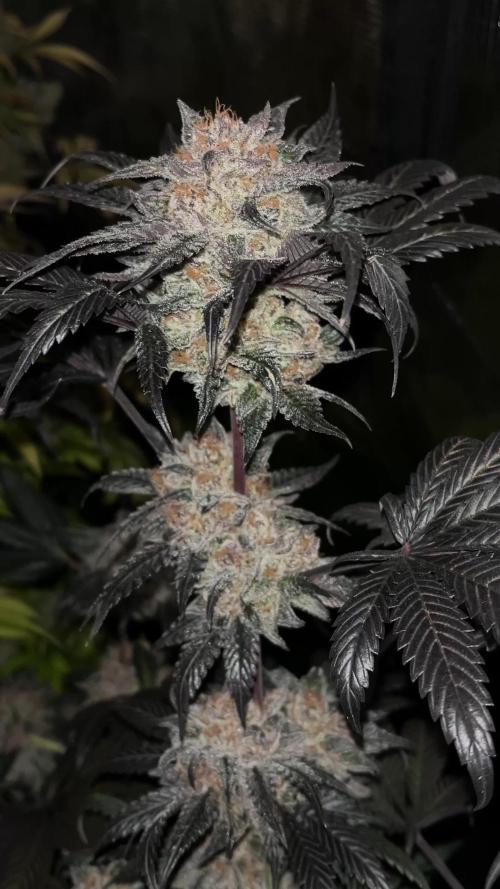
I'm 90% sure this one is in her finishing week here. More amber trichromes are coming in daily.
I don't wanna push her too far like last time because this strain turned pure amber and kinda lost some crystaly luster during the curing process. My light timer, grow tent, and light upgrades really made a big difference in bud development compared to my last run with Runtz basically leading to bigger more frostier buds. I'm dropping temps lower at night. I give it a couple liters a day to keep the top soil moist. Flushed water comes out 6.8 ish. My CO2 exhale bag was the biggest flop as it was expired and did not activate.
I plan on 48 hours darkness before harvest starting today: the day of the eclipse. With the new moon we have a high pressure system that is peaking at night around 1028 dB. Water should be pushed up into the plant from roots. Coupled with lights out....all theoretical witch craft.
I have a small 2x2 dark tent pictured which needs to have AC bring in cold fresh air from outside. If no fresh air added the tent gets humid and stagnant after a while.
The darkness period is bringing out that strong and sweet 'medicinal' smell. If you ever tried weed labeled medicinal youd have an idea of what I mean. I guess thats the orange bud/chemo lineage traits. Before lights off the smell was more towards yeast fermentation smell and not soo sweet.