
Likes
Comments
Share


@Sour_D
Follow
This girl took a little longer to trim up. Me and two grow buddies got her done in about 4 hours. Boy is she a sticky one! And stinky. 😁 There were plenty of scissor hash hits, which slowed us down a bit. The buds seem dense and tight and should dry and cure up nicely. I can't wait to dive head-first into this one. It's like I want it to take it's time hanging and drying, but at the same time, hurry the hell up! 😉 All in all, I'm very happy with how this grow went. 💪
SMOKE REPORT
This girl was a pleasure to grow, she had no issues start to finish. And even better, she produced a very nice yield of 5.6 ounces of very nice, potent, flavorful buds. The buds have a nice earthy flavor, which is my favorite type. They're nice and dense too. It's not quite as couch-lock as the Opium I grew from Divine, but it's still a night time smoke. Overall, great stuff! 😎

Likes
57
Share


@Silverback_Guerilla
Follow
2/8 - 2/14:
Still have the BJ's and GG's on plain water with Liquidsoil. I expect their last night alive will be next Friday.

Likes
8
Share

@Weedprinzessin
Follow
Ich bin mehr als zufrieden, freue mich schon auf die Ernte 😋
Sone frostigen Buds hatte ich bisher noch nie, vielen lieben Dank an Fast Buds 👌
Likes
2
Share


@Dsant
Follow
D24 - 10/02/2025
Last week was really good, none of the girls showed any signs of toxicity after the full strength feed, which is good.
I’m already seeing signs of pre-flowering on some of the girls, next week for sure we enter flower mode.
Applied some LST to the girls and some defoliation. Fan leaves were taking a lot of space, now internal nodes should have more light to use. Not going too crazy on this though.
Unfortunately snapped a branch of Northern Lights #1 while applying the LST, must take extra care next time.
Still haven’t changed the reservoir, should do that later this week.
—
D27 - 13/02/2025
Changed the reservoir and mixed nutrients for pre-flower.
I’ve been adjusting the LST, but other than that there’s not much of an update. Girls are looking really great and growth is exploding.
PPFD is around ~500 on canopy level.
—
D28 - 14/02/2025
Did another defoliation session. Went a bit more heavy this time. Now we let them recover for a few days.

Processing
Likes
1
Share


@Neelbilly
Follow
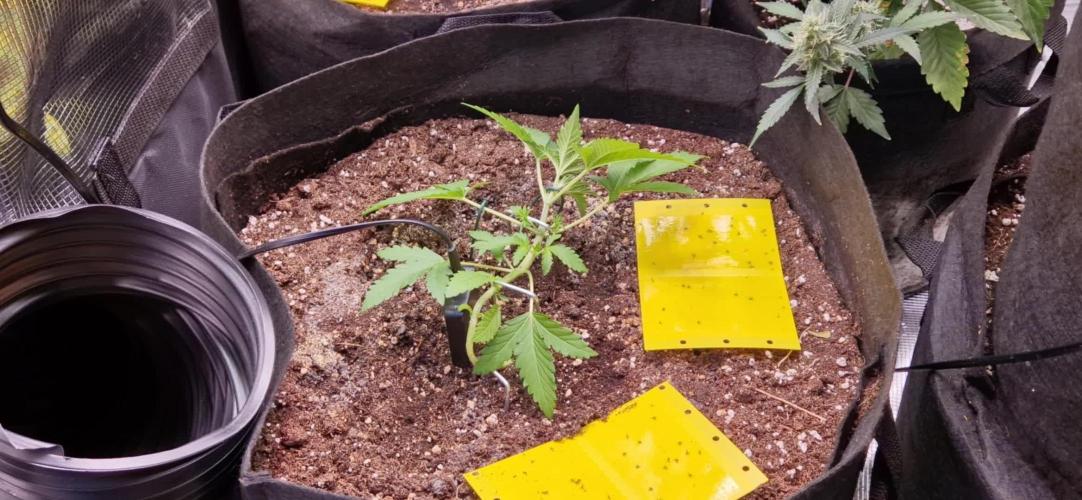
After Week 4 Defoliation and Scrog. Removed plant on right outside, is having slow grow, and it allows for more space fo the other two plants too spread better.
Plant 1 on the left possible female
Plant 2 on the right Not sure of sex yet
Plant 3 moved outside, slow bottom stem growth
12/12 lighting
One day feeding, one day water
Likes
18
Share

@Durango
Follow
Hey everyone!
On July 18, I harvested all the remaining plants: 1× Lemon Cherry Cookies (green pheno) and 5× Strawberry Gorilla.
Everything finished at the same time, including the lower branches, so I was able to harvest all the plants in one go. I didn't feed them during the final week before harvest.
Strawberry Gorilla nr.1 could have used a few more days to fully finish, but the weather forecast was calling for heavy rain and thunderstorms. I didn't want to risk mold or broken branches, so I decided it was the safest time to harvest. That was 83 days and 90 days from seed to harvest.
I don't have any photos of the dried buds or the final dry weights yet, but I'll be adding those, along with smoke reports.

Likes
15
Share


@JeyGanesha
Follow
Súper. Apple strudel.una delle tante varietà della fast buds.sapore intenso.profumo forte. ha dei fiori belli compatti.,belli da vedere e tanto più buoni da cremare SICURAMENTE 🤣😂


Processing
Likes
2
Share


@BigGGrows
Follow
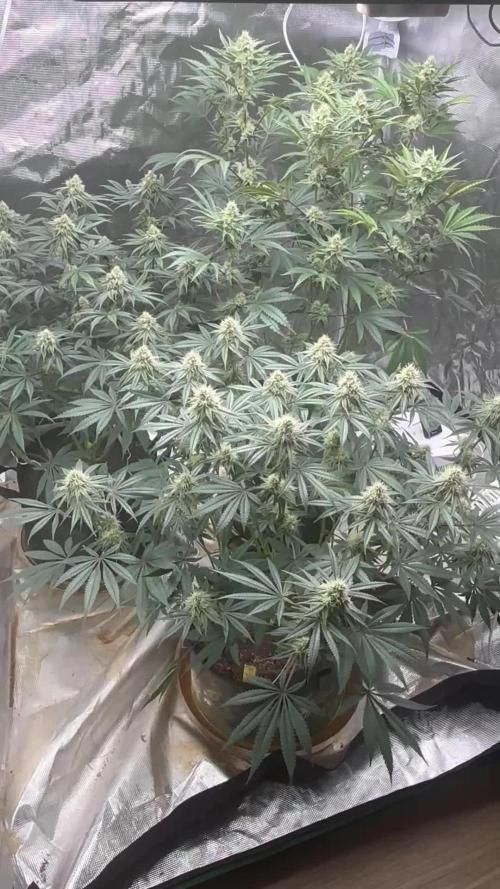
She is now coming into preflower and loving the new T5's. She is growing nice and bushy with future tops shooting for the stars. The stretch is definitely near. She will continue to be tied down and has been pruned and defoliated as needed to give her that sexy shape i want her to have in flower. Her terpines are beginning to be noticeable and is of lemons, earthy notes, and loud gas. She is now also getting kelp extract added to the nutes. She is growing very nicely and i could not be happier at the moment. So far OSSC has my attention as their phenotypes have been very nice.

Likes
7
Share


@StonedandSteady
Follow
Growing the Distance and Got those Leaners into her 11th W/Flower: 10th Feed of #HumboldtCountysOwn this Week! I'm getting ready to get a pack of 32" bamboo skewers and stake her Up to help prevent her Bodacious Budz from breaking off! She's Packed, Stacked Up and Lights Upgraded!!! Cloned with my Steady's Saliva!!! We'll definitely Grow back to everything here soon! #Pre-Sexed 4/9/21 #Opium/#PabloEscobar *Fems* breed by Team #DivineSeeds #DivineSeedsSquad #DivineSeedsBreedingCompany I'm Very Excited and Extremely Gracious!!! These Cannabis plants are Camping out in the Closet for a week or so! Lol
My #PabloEscobar and #Opium *Fems* from #DivineSeeds Regs: SalamiLegF3's×2 and FireAlienRomulan look$ Outstandingly Awesome and Finished Up Phenomenally Fine into thier 9th week of Flower! Thanks Again for All the Love and Support my fellow Growmies and Growmets!!! These Magnificent and Magical Ladies were Growing in our 48×24×60 ViparSpectra Official Club 🌿 ®️ Grow Tent and under our #Osree QB1000w and #GrowStarStore Kokokala QB1000w but Finished out in Flower under our #BloomPlus BP1500w! #TNBNaturals The Enhancer Co2 Despersal canister and ph'd them w/ Declorinated watering w/ TNB ph Up and Down! Totally Top Quality Topz all Around! Thanks Again #GallowGlas420 #HarleyGrower #thehumancannabiniod #AlienBloodGenetix #TNBNATURALS #www.as420.ca #divineseeds #divineseedssquad #divineseedsbreedingcompany #HumboldtCountysOwn Family's and Teams!!! Your Genetics are Merry Magnificent, Mega Marvelous and Mighty Medical! Love um!!! I really Can't stress enough how Thankful and Grateful I am of All of you and what you've Shared with Us! Means the World!!! It's definitely a Pleasure being able to Grow with these Phenomenal Grow Lights! Please Enjoy! BudBrothers4-Life! Cheers Famz!!! Much Props and Much Topz!💯🔥#BloomPlus #Osree #GrowStarStore #Growatt #TNBNaturals #TNBTeam #HumboldtCountysOwn #GrowYourOwn #Bliss
Bloom Plus BP-4000
CA:https://www.amazon.ca/dp/B08DTDP5FF/ref=cm_sw_r_cp_awdb_imm_86Q7H2D5BGFYB9B6PR9K
US:https://www.amazon.com/dp/B08DTN3B84/ref=cm_sw_r_cp_awdb_imm_4B7XWCAS09M4V3W0AFJH
Bloom Plus BP-2500
CA:https://www.amazon.ca/dp/B08DTCYV9Y/ref=cm_sw_r_cp_awdb_imm_YDNA8G16PH3TB002VKGE
US:https://www.amazon.com/dp/B08DS53THM/ref=cm_sw_r_cp_awdb_imm_SX3AEDKRVAYQECF32BE4
Bloom Plus BP-1500
CA:https://www.amazon.ca/dp/B082XYLHRJ/ref=cm_sw_r_cp_awdb_imm_XEBFV7790EHT53B2J9B5
US:https://www.amazon.com/dp/B082XYLHRJ/ref=cm_sw_r_cp_awdb_imm_MB3PYZEVSQRZY096AB79
BloomPlus Instagram Link: https://instagram.com/bloom.plus?utm_medium=copy_link
Thanks Again Broski #SmokinPlantaz for Hosting your Bright and Tight Amazon Prime Day #BloomPlus-1500w Giveaway! I'm still Blinded by the Light!!! Lol (Song Pun) it's Ultimately Lit, Extremely Powerful and Brilliantly Bright! I also Love and Appreciate Everyone out here! Please! Go Over and Spread That Love to my Bro's YouTube Channel and Team #BloomPlus on their Instagram! I'll have thier Links posted ⬆️⬇️! BudBrothers4-L!!! Cheers Famz!!! Much Props and Much Pars!💯
SmokinPlantaz YouTube Channel Link: https://youtube.com/channel/UCDKJthWoS6-miAhq_lLb_-w
HumboldtCounty'sOwn:
Email: [email protected]
Phone: (707) 725-4119
Toll free: (866) 872-9434
Humboldt Bottling
Po Box 429 · Fortuna, CA 95540
HumboldtCounty'sOwn Website Link: https://humboldtcountysown.com/
HumboldtCounty'sOwn Instagram Link: https://instagram.com/humboldtcountysown?igshid=1qj809qkkwych
https://instagram.com/bloom.plus?utm_medium=copy_link
https://instagram.com/osree.light?igshid=1vrsbdyhzg2h8
https://instagram.com/growstarstore?igshid=2yjn0r00r6ru
https://instagram.com/divine.seeds?igshid=1r90iwe9xiwz8
https://instagram.com/thehumancannabinoid?igshid=17k159pumklkq
https://www.instagram.com/alienblood_genetix_official/
https://instagram.com/as420.ca?igshid=1f116alw054wp
The Grow Bags: https://www.as420
Likes
3
Share

@Wizardgreen317
Follow
Smell at night is stupid crazy smell like cake and weed , the noses are crazy on both strains but yeah I’m definitely growing some blueberry cupcake next go around. Yes, the strains are amazing and available at North Atlantic seed company for 15 dollars for three seeds. I had popped six seeds everything germinated.. really good seed . These plants where about four weeks veg 7 weeks in total but yes very easy but really got moody in transplanting but but yes Im please so far these are pheno hunt seeds photos not auto but they have the same deal for them to. Also the colors are coming in strong very light green with purple outlines on the cheese danish x gmintz and the blueberry muffins x nf90 s1 is smelling like cake straight up when prune the bottom leave it make the room smell amazingly like cake .this could be something special in both these strains .

Likes
40
Share


@Ultraviolet
Follow
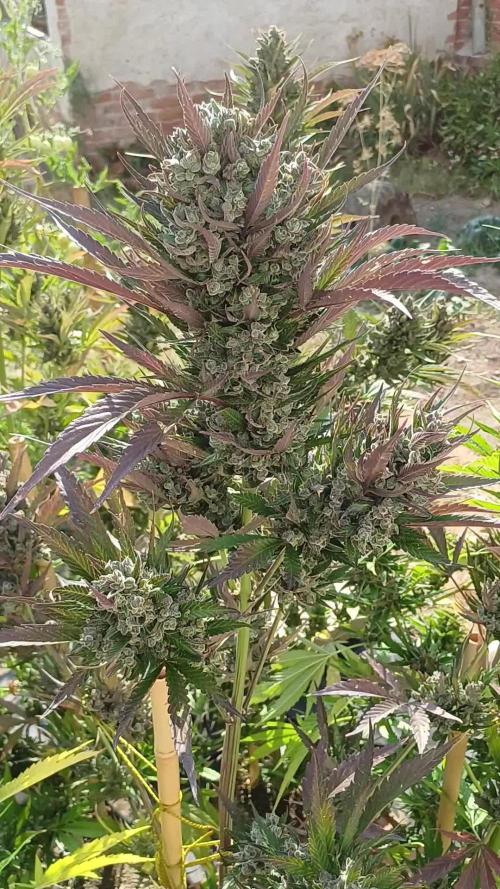
Observe.
The stem that snapped clean off in week 5, the resulting stress seems to have made a 2ft solid massive cola, probably the biggest individual I've grown, albeit she had signs of stress, and I felt like she was a little behind in the floral development compared to others, but as the rest of the plants start to settle down with packing on mass, the stressed colawas just getting started. Super interesting to see the difference that the snap made to the base of the stem overall, as I know before the snap, they were all the same girth or thereabouts. Neat little lucky accident, maybe I'll try something next grow.
Likes
9
Share


@GoldenArrow
Follow
Kok gubresi sonlandirildi. Big bud ve b 52 ye 2 hafta aranin ardindan baslandi evet azot biraz fazla geldigini farkindayim fosfor ve potasyum agirlikli ilerlemeye devam ve bebeklerin bulunduklari ortam geregi boceklenme olmamasi icin duzenli sekilde neem yagi takviyesine devam ediyoruz emegimizin karsiligini alicagimiz bir hasat olucak kalite hic bir zaman tesaduf degildir..

Likes
3
Share

@CaveGanja
Follow
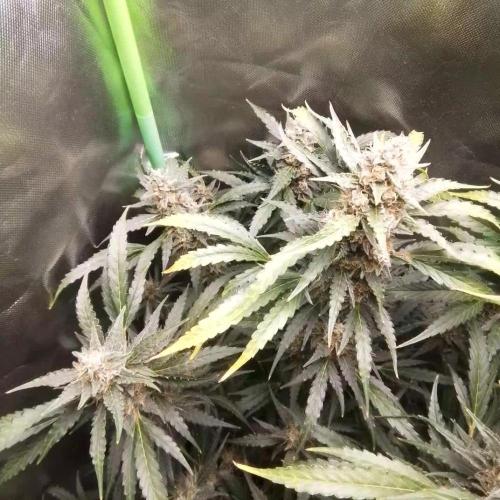
She needs a little more time most trichomes are milkey but i like to get around 5-10% brown.
I think one week more she is ready for harvest ill check trichomes all 2 days.
We will see how she matures.
Kind of crazy still drinks more and more dayli and the buds are getting so heavy that i have to support them.
I hope she slows soon down i need that space for a other plant.
But if she needs more time she will get it for sure.
Likes
44
Share


@Ukfarmer420
Follow
So far so good with this watermelon zkittles from barneys 😁 no issues and responding well to the topping and lst, I am making 3 litres worth of food for the week and will up it as the plant needs it.
I will post more pics and a video later of the room.
The purple lemonade and runtz are doing well, they look lost in there big pots 🤣. Pics to come.
The orange sherbert are on day 3 of there 2 week flush with molasses and phed water, hopefully there fill out, on the plus side there getting purple on them now 😀.
Marshydro tsl2000 is doing a amazing job and is really nice and cool, my hps light use to cook the plants this led is perfect can achieve good temps even cold temps to pull the colour out at the end 😀.
The ac infinity with digital controller is a must have and a real game changer for a grower, I love it my mate loves his and trust me it helps, easy to use and set it up outside your grow area, dangle the thermometer cable at canopy hight and your good to go.
Day 29 day 2 flower, the watermelon zkittles is starting to start her stretch I think she is going to be a nice plant, iv had no issues in the last 4 weeks and never have with the barneys seed selection.


Likes
7
Share


Likes
Comments
Share


@spacetimeman
Follow
Big troubles with LST, I managed to broke two colas, the first one recuperated but the socond one I had to remove. So strange for me why are they so fragile and not flexible. I need to wait more time before switching to 12/12 to get her away from stress.

Likes
4
Share

@cdxxbuds
Follow
PeachClouds Chooped at Day49. Sshe finished earliest among the 3 strains. Na sure if the pheno i got. will update when dried and cured.


Likes
18
Share


@Discepolo
Follow
What a week my buddy growers! What a week!
The dogs literally ate my homework!😳
I understand that they are German shepards and got K-9 insitinct in their blood...but what the fuck!😱
Both my gelato & Nothern got dig out of the ground, leaving me with little hope...plus I had to build a shelter before this happend due to strong wind!
But fast buds really has a kick ass genetic very resistent to all factors, and beside all she doing well!💪
As nutrients I added bio-tabs Pk-Bio and boom boom spray for all the stress she got.
Love to all😘
Likes
10
Share


@Hazehouse
Follow
Lower leaves died and so I needed to defoliate plants grew quite a bit in this stage and preflowering shows they are girls temp dropped outside finally and so dehumidifier is constantly running. With a nice 78 degrees 50 rh
Likes
28
Share


@Salgeezi
Follow
Plants are almost done. Feeding at 400 EC. Slowly getting them ready for flush. The front right lady seems to be about a week behind but it's okay. Shell get cut last.