The Grow Awards 2026 🏆 


Likes
Comments
Share
@Lontra
Follow
Week 7 has started and I'd say, overall she's looking good and healthy.
day 45:
It's time to give her some water and new "food". I took the opportunity to remove a few of the lower and inner leaves and arrange them a little more openly with some garden wire and string.
Regarding those lighter leafs in the top center (pictures under the LED make it really look worse) and the reddish/violet stems i won't do anything for now but observing.
day 46:
just visual checks and refreshing humidation.
day 47:
The soil was already dry again, i guess because of those high temperatures during the last days (up to 38°C inside the box). As she seemed to be doing quite well, I decided to carry out a slightly larger defoliation. Some might even call it “soft lollipopping”. But as a beginner, I want to try the experiment and I'm more afraid of mold than a slightly lower yield. So I removed about 1/3 of the leaves and small shoots in the lower area and also took out some fan leaves and leaves that were growing inwards or covering other shoots. I then used some string to give her a new shape to bring the individual shoots back to a more uniform height.
day 48:
just visual checks and refreshing humidation. I guess she isn't too sad about her new haircut. Additionally playing around with the smartphone microscope I recently bought.
day 49:
The first pistils are beginning to change color. No water needed today, but i guess for a fresh watering tomorrow.
Removed some leafes that wouldn't get much light
The weather should cool down again today and in the next few days, so I'm hoping for lower temperatures inside the grow box. Today I will leave the box open for a while and try to cool down the room in which it is standing.
day 50:
My guess was right, it's watering day. Felt like she needed a little more nutrients so i slightly adapted my plan.

Likes
27
Share
@Silverback_Guerilla
Follow
4/5:
Took 4 cuttings from the shortie
4/12:
All 4 are rooted and growing!
5/1:
Transplanted from 1gallon pots to 5 gallon pots.
5/3:
Decided to grow one of them in my tiny tent and the other 3 will go outdoors.
5/4:
Took 2 of them outdoors under the 270w and sunshine.
5/6:
Trained all of them today and fed some boomerang along with the kelp, molasses, big bloom, and silica. Foliar fed and took the last one outdoors.
The one in the tent is really flourishing!
5/7 - 5/17:
Excellent growth! The supplemental lights are making all the difference.👍
Did some more training on all of them early in the week.
The one in the closet is spreading out nicely and budding up pretty quickly...but what's very cool is that all 4 clones outdoors are flowering?!?!? I sure hope they go ahead and finish rather than starting to revegetate as the days continue to get longer.
Much rain for the past few days, but it let up long enough for me to install another 200w of waterproof 3000k LED lights a couple of feet above them. Very intense lighting, great bang for the buck. So now, I've got 350w of 3000k and 120w of 6500k in the outdoor garden. That's gonna have to do it, as I also am using 1400w in my indoor gardens, plus a/c..bills are getting ridiculous.
5/18 - 5/28:
The clone in the tent is still stacking up really well. I guess the ones outdoors are too, but next to the seedling plants, they seem puny. Many buds though...
Since they decided to flower early, I sprayed them all down with a product that is loaded with hormones and auxins and stuff that's supposed to retard vertical growth and promote branching. It's also supposed to speed arvest time by as much as a week. I hope they can finish before the summer solstice (June 21), otherwise they might try to reveg instead of finishing..
Hopefully it helps keep them from stretching so much that I'll have to supercrop them. Their mamma was a shortie, so they really shouldn't get too tall anyway.
I also foliar fed them several times this week with something called MicroLife Maximum Blooms, Pow! They love the stuff!
5/28 - 5/31:
I did some training on a two of the outdoor clones early in the week between rain showers, and foliar fed with Microlife maximum bloom formula. She was looking a little N deficient, so I assume the dry amendments have petered out. They were dry enough, so I top-fed her with another couple tablespoons of cavern culture and on the 31st. I gave them big bloom, tiger bloom, grow big, beastie bloomz, silica, endoboost, signal, humic acid, liquid kelp/fish emulsion, and liquid molasses. The indoor clone is looking awesome. I fed her heavily on the 30th.
It just feels so strange that I'll be harvesting outdoor photos in June!?!
That's it for week 8-
6/1 - 6/8:
Early in the week I gave them about a half gallon of water with liquid molasses, cal-mag, silica, and beastie bloomz only.
I foliar fed them a couple of times during the week, right at daybreak.
I fed them on Saturday, the 6th..about a gallon each..beastie bloomz, microlife maximum blooms, cal-mag, humic acid, grow big, big bloom, sweet & sticky, and signal.
They are looking very good..buds galore. The indoor clone got the same nutes, but on different days. She's also covered in buds, and they are beginning to fatten up.👍
6/9-7/4:
Busy with other gardens, so not many updates...
Indoor clone got to spend the last 2 weeks of her life in my closet under the quantum boards and UVB. I harvested and washed her buds on 6/28, let her hang dry and weighed and jarred her up on the 4th of July. She came in a 111g of cola and 45g of lower bud with only about 5g of larf. Nice!👍
She smells just like her mommy and has the same uber-dense buds. She was topped, so the buds aren't as mighty as the mamma's, but much more plentiful.👌
Outdoor clones:
I had a massive spider mite attack, and during the same week, I had a grasshopper invasion...I lost a few plants, one of which as a FFT1 clone.
I had just harvested my autos and my indoor clones from the closet, so I moved the remaining two clones in under the quantum boards. I treated them for spider mites several ways for several days and have given them much TLC. Hopefully their buds fatten up some more. They stanky, but they kinda slim...
7/11:
I harvested the last two clones tonight. So sticky!!! I washed them and hung them to dry.

Likes
74
Share
@MrHightimes
Follow
Did a bit of loli-popping and some defoliation on the little guys. They are moved into the new tent and adjusting nicely!
Next week my NEW MARS HYDRO LIGHT! should be here and I'm pumped for that!
I think theses are gonna be some big girls!!!
PH 6.1 and PPM was 1220/550 (yeah! got a ppm meter!)
_______________________________________________________________________
I got my new Marshydro light installed! Its fantastic and after work the first night it was AMAZING to see how the plants had perked up for it!!! Its a very nice study light and totally makes me feel better about having a bigger light!!!
The ladies are having a bit of trouble but I still think things are gonna be just fine. I'll put some pics up of the trouble next week
__________________________________________________________________________
I took em out for a water and realized how much sparkly they are getting! There are some ugly leaves and the plants are a shade lighter green than i want, but really things are going nicely!
I gave the small plant a little booster stand and its canopy is now level with the others but its like 2 weeks behind I feel like. definitely frustrating having 1 plant lag behind the others but it is what it is!


Likes
3
Share
@GermanNoob
Follow
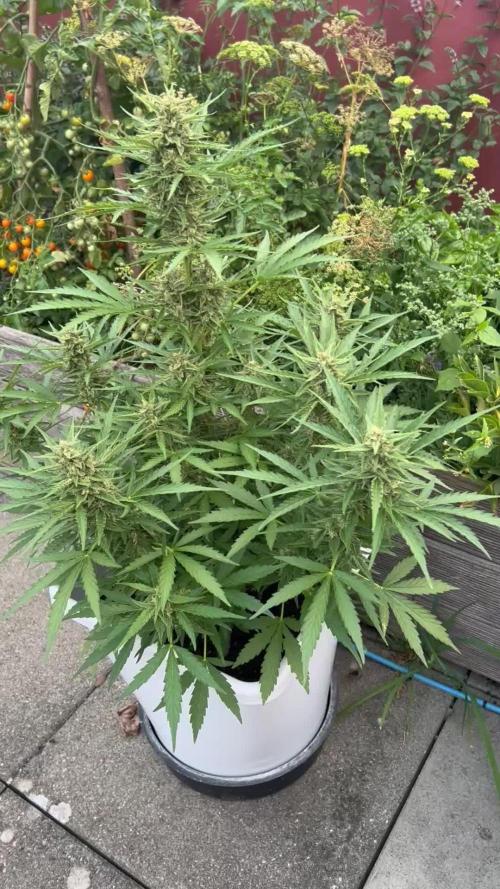
Hey growmies,
The last weeks have been the nightmare of every grower: consistent rain during flowering and so much to do that our hobby takes a lower rank in our list of priorities.
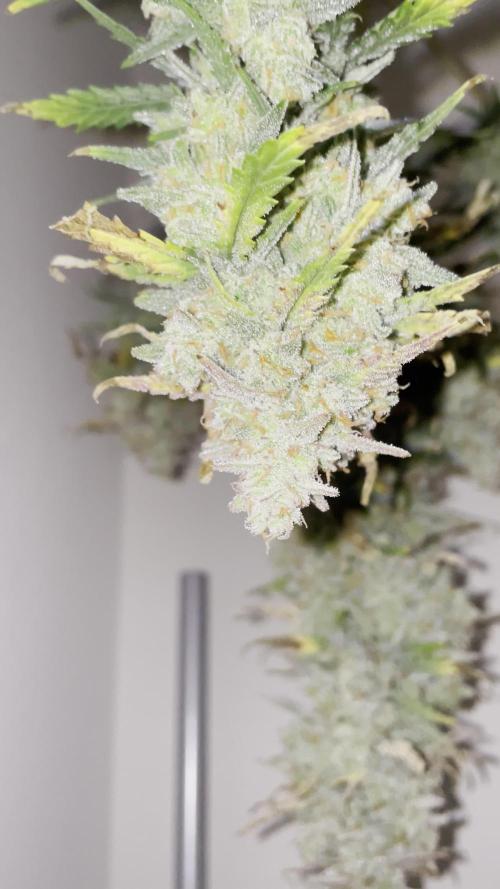
That said: the plant has been the absolute dream! The resistance to pests and insects has been unbelievable. No signs of any mildew. No budrot, no aphids.. nothing.
Instead we have trichome overloaded dense buds. What more could anyone ask for?!
I am super happy with the plant and how everything turned out. Unfortunately I think I can’t participate in the contest anymore but big thanks to fastbuds for this quality of genetics.
Happy growing everyone!


Likes
29
Share
@JeyGanesha
Follow
Quinta settimana di fioritura 💪 forza bella mia,vai avanti così e fammi delle belle e grandi pannocchie 🙏🕉️💚💛❤️

Processing
Likes
8
Share
@GrownwithLED
Follow
After defoliating both Barbarian (=AK-47 x Barbara Bud) plants after week 11 they now develop more and amore flower clusters, since the light can penetrate deeper int the canopy now. The plants are producing trichomes like crazy, even the bigger sugar leaves are covered in them! VERY FROSTY PLANTS! The flower clusters clearly form colas now along all side branches and both plants fill up nicely. The smell is now strong and sweet with a clear peach aroma to it, it makes me smile every time I look into the tent. The plants love the Advanced Nutrients feeding schedule and are getting the recommended dose every watering.
Likes
63
Share
@Wyregrasser
Follow
START WEEK 4/17/22
Not doing anything real crazy. Over time I seem to have removed most of the bigger fans. I am beginning to get an idea of how I want to defoliate what I want the canopy to look like. Having said that... these girls have been very hard to keep under control. I have definitely had some great OJT on my first grow and I still have a lot left to learn. All the plants are "icing up" real nicely, combined with the silver reflective walls everything looks and feels real CoooooooooooooL.🙏😱🙏
+I think the garden is doing well and overall is very healthy
+ppm 1200
+pH 5.9
+temp and humidity are all over the place according to the passing cold fronts. The other day temp was 79 F and Humidity was 74% Today it is 54 F and 58 %
*Ordering seeds today
*Looking at one of the close ups, I think my plant looks like the description of Platinum OG that I have read about and viewed... I must be doing something right. Hey, the Neon Carrot colors are super pretty.
*Oddly enough the smell is beginning to change... at least on the lemon tipped plant, from gas to fruity. Go figure.
? Out of Terpinator, might throw some Bud Candy at them. However, I may be getting close.
AS ALWAYS ANY COMMMENTS, GOOD OR BAD, OR ADVICE, ONLY GOOD :) ARE ALWAYS WELCOME.


Likes
160
Share
@JUNGLE_B4RNS
Follow
Following The Grow Boss tips on YouTube
"...yield is based on light, quality is based on growers talent"
"...number one problem is, too much light, too much water, too many nutrients"
Nutrients : (after having issues with nut burns, I decided to use Grow Boss's perfect ppm calculator)
Invasion T (Glomus intraradices BEG72 and TRICHODERMA atrovide MUCL45632) 1g / plant
Monster X mycorhizes (500 000 propaguls / Kg , made in vitro) 2g / 20cl then complete to make 1l
Humic Fulvic Booster (humic and fulvic acids) 1ml / 1l
Cannazym 2.5ml / 1l
Rhizoponics 0.4ml/1l
Lights: 2 x Adjust-A-Wings Avenger
600w HPS Lumatek 90000 Lumens 1000PAR
600w HPS Philips Son-t Green Power 95000 Lumens
Soil:Platinium Royal Mix premium quality
What is vapor pressure deficit?
Often, marijuana growers who have their plants in indoor grow tents or rooms with artificial lighting, take into account parameters such as temperature and relative humidity to maximize plants growth and bloom, thus obtaining abundant harvest with top quality flowers. As we will see later, these factors affect different processes of the plant, such as transpiration or nutrient uptake.
However, we usually forget about another important factor that is related to the aforementioned ones: vapor pressure deficit or VPD. Broadly speaking, VPD is the difference between the amount of water vapor that the atmosphere is able to retain (which depends on temperature) and the amount of water vapor contained in it (relative humidity). It is usually measured in kilopascals (kPa).
Providing our plants with a correct relationship between temperature and relative moisture will keep us on the right VPD parameters, increasing the plant’s activity and thus improving its growth and showing its full potential during the flowering phase. The ideal would be to adjust both parameters (temperature and humidity) to get the best possible VPD value, so that the development of plants will be amazing.In the chart above you can see the right temperature and moisture values to maximize the development of cannabis plants. The green zone shows you optimal values of VPD, in which it would be ideal to maintain the environment. The orange zone shows correct values, in which plants should not have problems to develop normally. However, red areas show values in which your plants will be very far from hit their full potential, since the relation between temperature and moisture is not optimal.
With relatively high values of VPD (between 5 and 12) plants tend to open their stomata and release a considerable amount of water vapor into the environment (increasing their transpiration). This increase in transpiration results in an increase in the plant’s photosynthetic activity, which will need more nutrients and will improve its overall growth, both during growth and bloom. The best range is between 7.5 and 10.5, which we have marked in green. However, we must be careful that VPD is not too high (dark red zone) since the plant would close its stomata to avoid releasing too much water vapor to the environment, which would result in fast dehydration due to excessive transpiration.
On the other hand, if VPD is too low (light red zone), the plant will also close its stomata for not releasing more water into the atmosphere, which in this case would be already saturated (it would have reached the maximum water retention capacity in a specific temperature). In this way, reducing transpiration will also reduce photosynthesis, which has a direct impact on the plant’s development and yield.
That way, VPD is essential when it comes to offer the best conditions for the development of plants, also to understand its water requirements according to the nutrients used and thus adjust them correctly to meet the grower’s expectations.
N/B: SAY NO TO DRUGS
-[Day 90]
The plants are getting massive, not a lot of space left in the room, each pictures are token back against the wall or on top of a chair.
The Super Skunk shall be ready first , the trichomes are visible without using a microscope, the scent is like an amazing candy floss coated with Skunk pee 😅Boerejongens quality @Home 😊
-[Day 93]
Switching Buld
Lumatek 90000 Lumens 1000PAR
to
SuperPlant Super Red 85000 Lumens 2000K 1498nm
Lightening under the 1500nm wavelength (2000K) just between the NIR and the Microwave length, can't stand in the room too long without getting tears and shining eyes. Buds shall start to blowup like pineapples, increasing yield.
-[Day 98]
Everything is getting frosty. Starting to decrease RH .
-[Day 103]
Today the Y Griega started to push on her terpenes, believe it or not that plant smell stronger than the 6 giants Skunks (the Skunk strain is already a very strong smelling plant), she smell like a coffeeshop front door, the fragrance is absolutely amazing and fantastic, I will definitely grow a full crop of that strain !
-[Day 105]
42 days of Blooming folks ! It's getting serious now 😄 If it can helps you to realize, each plants gots 4 side and a middle, each sides gots 4-6 buds and there's 5-6 buds in the middle, there's 11 plants of 1,60m/5.25ft, how many buds does it makes ?? The correct answer will win 1 like 😅😂😅😂
-[Day 106]
WEEK 7 of flowering, the end is close my friends, I'm trying to give you the best shots as possible, I wish I'd could share a good smoke from this crop with you guys ....😉


Likes
14
Share
@GodZilla_Owner
Follow
Week 11 Update – Harvest Time Approaching! 🌱✂️
BioBizz#1 – BT51
She’s done! She hasn’t had any water for the past five days and will be harvested later this week.
AN#4 – BT51
She still needs a little more time—probably another 1-2 weeks before she’s fully ready.
AN#3 – BT47
Somehow, she’s managing despite the extremely close distance to the light. I haven’t held back on PPFD at all, but she’s handling it like a champ. Super curious to see what kind of yield she’ll bring in! 😅
Likes
35
Share
@Da420Andi
Follow
Howdy it is day 63 and in 2 days it is time to harvest. Since 2 weeks i feed clear Walter only. They get 16 hours darkness before harvest. All the plants are really🔥
My favourites are still 3G and Wedding Gelato. The smell and Look is crazy. You will see i guess Also North Thunderfuck and Hulkberry is good looking. The weight of North Thunderfuck for the dice is insane.
I wish everyone a nice Day and good time. Stay safe 💚


Likes
167
Share
@DeepWaterGrower
Follow
⭐ TrolMaster tracking ⭐
I started to track my crop during week 15, when I got the Tent-X TCS-1 by TrolMaster. First impression was: this is too professional for me, I can't handle setting it up and using it well. Then I started reading some posts on Instagram, I visited their site and in 5 minutes my cultivation experience took a huge step forward with disarming simplicity, I couldn't believe it.
I have uploaded tracking videos from the TrolMaster app for each week from the 15th to the 19th, as well as the two weeks of drying stage.
⭐ Controller Chronicles ⭐
Day after day I appreciated the clarity and precision for data, access to all settings and instant readings by connecting a WIFI router to the controller's LAN port. I loved the possibility to dim my lamps remotely, or even automatically based on the temperature in the box!
🌱 GERMINATION (2 days)
Seeds in a glass of EC 0.4 tap water for 10 hours, then in root riots and under the lamp. They sprouted after 48 hours from dry seed.
🌿 GROWING STAGE (10 weeks and half)
I decided to give these plants a long vegetative growth and this allowed me to do a lot of training on both.
Starting from the 4th veg week I started with defoliation sessions every two weeks, for a total of four during the entire vegetative phase. The last defoliation was done a couple of days before the switch, in order to allow the lower parts of the plant to get as much light as possible.
Furthermore I did Topping on week 6, cutting the apical branch, then on week 8 I did Topping again on several sites, as well as SuperCropping on the highest branches to make the canopy uniform.
The light cycle I used is 18/6 and the last two veg weeks I lowered the light hours to 16/8 first and 14/10 then.
During the veg stage I made 4 DWC change, PH was always between 5.5 and 6, about EC I started with 0.6 and was 1.4 on the last veg week.
🌸 FLOWERING STAGE (9 weeks)
I started this phase after 36 hours of darkness, I then changed the DWCs solution (adding a flowering stimulator).
Then I mounted the ScrOG-net about 50 cm from the base of the plants and I wove the phenotype #1 through the net occupying at least 60% of the available space; the phenotype #2 stretched shortly after the switch and I used the net only to widen the central branches.
They showed the pre-flowers two weeks after the switch, then I made two defoliations on week 3 and 5 flo.
During the last four weeks of flowering (weeks 6-9) I simply paid attention to the PH-EC levels to provide the roots with optimal conditions. I then kept the TEMP-RH-VPD-PPFD values under control and this also thanks to the Tent-X controller by TrolMaster which allows me to provide optimal conditions also above.
I chopped them when trichomes were about 85% milky and 15% amber.
During the flowering stage PH was always between 5.8 and 6.2, about EC I started with 2 and was 2.3 on the last week before flush.
✅ HARVEST
- From dry seed to harvest: 140 days (2 days germination + 75 days veg + 63 days flo).
- Chopped after 4 days flush and 48 hours in dark;
- Wet trim, removed fan leaves.
✅ DRYING STAGE
- Time: 14 days;
- Average: 20° C - 50% RH.
- After that I made a dry trim, removed branches and sugar leaves.
⚖️ DRY WEIGHT
- Phenotype #1: 230 gr buds + 25 gr larf;
- Phenotype #2: 105 gr buds + 50 gr larf.
So, the overall dry weight is: 335 gr buds + 75 gr larf.
✅ CURING STAGE
- Curing is done after 30 days with Boveda 62%.

Likes
4
Share
@Ferenc
Follow
Lovely buds sweet and fruity with citrus smell. Taste is the same ;) She has a potential to have a good yield if you have a good lamp. Nice buds really sticky, with nice trichomes. :) It must be tried.

Processing
Likes
20
Share
@FlavoursUk
Follow
Day 15. Girls are steady but no major growth yet.
Day 19- stardawg girls seem to be just a bit infront in terms of growth rate compared to the GSC. 2 stardawg, 2 Girl Scout cookies in soil. One of each in rockwool cubes which seem to be growing nicely. Just double stacked them today. Used the rockwool along side soil as a little experiment as I’ve had good results in the past. Due to these being autos I’m wondering if they would of all been better in cubes. Time will tell.
Also had one of the Girl Scout cookies showing possible overfeeding but keeping a close eye on all plants and feeds will be just water till I establish what’s caused it.
Any questions feel free to ask!
Likes
85
Share
@CRiSPrGrow
Follow
Last week of smart proteins she got it once maybe twice by now, had a tough week not gonna lie the travails of the grower what are you gonna do 😅 drinking a bit, no nutrients yet, she might get a pk boost who the tf knows 😎 dropped her lights to 10/14 to induce resin production now these absolutely reak lol can't quite put my finger on it , sometimes it's really sweet citrus sometimes it's dankier 🚀

Likes
5
Share
@Adkguerrilla44
Follow
So she got hit with some fricken bugs pretty bad and I tried combating them and in doing so I ended up stunting her quite a bit or I think my buds would be 2x the size. Thats alright though I should still end up with a good amount of golf ball sized buds. They really started packing on the trichomes since I moved her into a much sunnier area so I think the quality will catch up just not the size. All in all I'm happy that I am going to at least get her to harvest!! I will be using neem seed and some other biological methods next season so I won't have to spray any of my plants with any pesticides or fungicides. The ones I saturated with flower shield and organishield didn't like it very much and it ended up stunting them for up to 3 weeks which really sucks considering I'm gone on for the next 2 weeks and will need to pull everything before I leave whereas if they hadn't of got stunted It would have been in the exact time frame I needed them to be before I leave....sigh
Processing
Likes
12
Share
@Therbalist
Follow
Lowered the hours as it's pretty hot and moved the time schedule by a few hours. Lights on at 5PM lights out at 7am keeping them in veg but allowing for heat management. Slow growth all round really think my lights could be lower, as the heats more manageable I may leave my 450W blue CFL plugged in. I've turned it on and off as the Temperature shot up. 26°c outside now so may have to flower early if it doesn't cool down a bit.
Liking the Kalini Asia's growth structure a true Indica for sure!