
Likes
Comments
Share


@Mrs_Larimar
Follow
2024-07-23
A few months ago, I germinated three opium poppy seeds. Each seedling was given a different setup:
1. Outdorgrow in a 30L container
2. Outdoorgrow in a 75L container
3. Indoorgrow in a 30L Airpot
This post focuses on the indoor plant, which was trained using various techniques such as mainlining, topping,
LST (Low Stress Training), and some supercropping.
The indoor plant thrived from the beginning, showing vigorous and healthy growth. It responded well to training,
consistently displaying a robust appearance. Its growth seemed effortless, requiring only adequate water and minimal nutrients.
Training began with topping and continued for 9 weeks during the vegetation phase.
The main technique used was mainlining, shaping the plant into a circle using pipe cleaners.
The plant's soft stems and branches made it easy to train without causing stress.
After 9 weeks of vegetative growth and training, I was satisfied with the result and initiated the flowering phase.
The plant continued to flourish, primarily needing water and care. Only a few NPK feedings were necessary,
but it received many beneficial supplements with watering.
The growing medium used was Terra Preta MJ-Mix, and I applied a mycorrhizal inoculant called DYNOMYCO.
This significantly enhanced root development and nutrient breakdown. Essentially,
And i applied aTodpressing with Insectfrass, so they stayed lovely green.
I was feeding the microorganisms in the Terra Preta mix, which in turn kept the plant healthy.
The plant developed beautiful colas while maintaining its circular shape. Harvesting was straightforward.
The aroma was fruity (reminiscent of apricot) with a strong, gassy undertone.
The buds are currently curing. I've taken photographs of the plant's "skeleton" and some pre-cured buds,
showcasing the impressive trichome development.
The OutdoorPlants are still growing, and the Diary will continue

Likes
28
Share


@Foggedaboudit
Follow
We are nearing the end with these! What a stunning display of trichomes! Some of the stickiest genetics I have ever grown for sure! Phenos are all over the place but I am excited about most of them!

Likes
2
Share


@kissrubb
Follow
Buenas, cultivadores.
Día 08708/2024: actualmente tienen 22 días de vida, hemos regado con fertilizante de crecimiento y también enzimas; utilizamos agua de osmosis con un pH de 5.9 y un EC de 0.9 en las siguientes semana le daremos su última semana de crecimiento y le añadiremos silicio para resistir estas altas temperaturas debido al verano, y mejorar paredes celulares, una variedad de sweet seeds ha tenido al principio de su germinación ha tenido un bloqueo nutricional, pero logramos solucionarlo en unos días seguramente hagamos una pequeñita defoliación para quitar hojas satélites y mejorar el reparto de luz entre los nudos

Likes
4
Share


@Xabii
Follow
Found litteral balls on the plant, no bananas but full on pollen sacks right at the topping spot, did remove them since I did not see balls anywhere else, hope this is just a one time thing due to topping.
Values are average of the day.
DATE - EC(us/cm)
20250426 1843
20250427 1893
20250428 1961
20250429 1995
20250430 1952
20250501 1649
20250502 1722
DATE - PH
20250426 6.00
20250427 6.00
20250428 5.99
20250429 5.99
20250430 6.03
20250501 6.24
20250502 6.27
DATE - ORP (mV)
20250426 316
20250427 294
20250428 283
20250429 272
20250430 259
20250501 248
20250502 225
DATE - °C - RH% (Tent Temp/RH)
20250426 24.0 51
20250427 25.0 43
20250428 26.1 43
20250429 26.1 38
20250430 25.9 42
20250501 25.4 47
20250502 26.6 48
DATE - °C (Reservoir)
20250426 19.5
20250427 20.0
20250428 20.7
20250429 20.6
20250430 20.4
20250501 20.4
20250502 21.7
DATE - CF
20250426 18.43
20250427 18.93
20250428 19.61
20250429 19.95
20250430 19.52
20250501 16.49
20250502 17.22
Likes
13
Share


@Growador
Follow
How’s growing everyone, just to let you know that nothing new happened, the babies are in a fantastic shape. One of them is nearly ready so i will begin to flush it a bit. Otherwise, all is great, no defficiencies so i'm very happy. I hope you are all well in this terrific moment. The second wave is coming and i just hope we can all get well and do our crops. Have a nice day and a great weekend


Likes
6
Share


@CalGonJim
Follow
1/19 1am MONDAY...TOO STONED TO TYPE..WHAT THE HELL IS THIS THEN..HEY SHUT UP....WAIT...IS THAT ME?😂
1/19 5 AM.🚨 I GOT THE HOLY TRIANGLE OF WEED THE WHOLE FUUCK'N TRAILER PARK IS HERE!!!!! Finally got black tea Tangie in the ground so Julian bubbles and Ricky are all growing with Montel and ice t.
1/20 1:20PM VEGING PERFECT AT 30 WATTS!!!
1/21 10:11 AM. The whole fucking park is here. Julian sprouted!!! Bubbles and Ricky are doing great. I’m gonna top them and then I’m gonna start them over from clones so they grow roughly the same time as Julian and I’ll keep the Ricky and the bubbles others as mother plants and I’ll just keep them going.
1/21 10:15 AM vegging 12 inches 30 W Samsung LED Mars Hydro light perfect
121 1:10 PM I moved black tea Tangie into the germination station. The 2 gallon fits in here just fine. This will be fine for germination.. She’s sprouted only after about 40 hours so she’s really strong.
1/21, 2:54 PM. I made a my own Star Wars movie. Special effects are incredible. It’s very removing made my own Obi-Wan.A CalGonJim Production 🎥🍿
1/21 11:56PM Stoned Genie bong arrived today. my 2nd from them. Nice, this one has an ice catcher. got here in 2 days. 👍


Likes
18
Share


@DBQush
Follow
Dear diary,
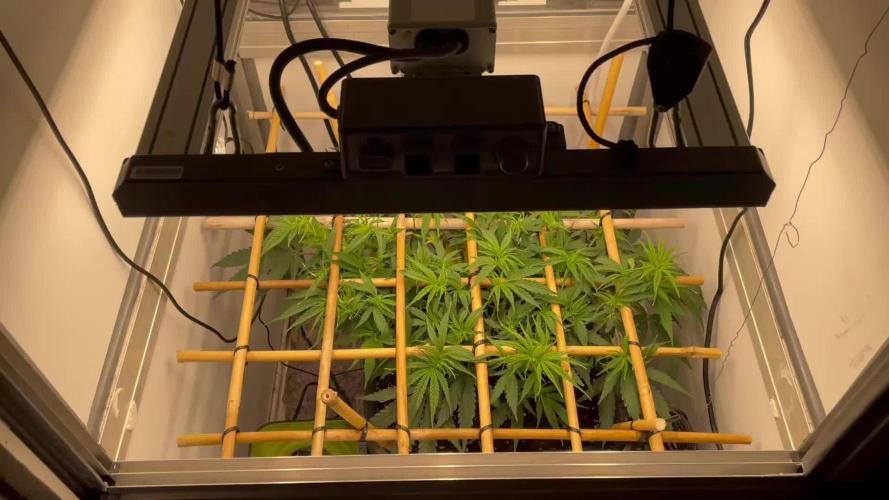
Week 10 total and week 1 of flower is behind us. Will just be making sure all tops are exposed and somewhat in the right place as I let them stretch for about 21 days before some defoliation.
🌸🌸🌸🌸🌸🌸🌸🌸🌸🌸
⏰ Day 67:
Feeding was given in the evening with a solution of 1.87ms and pH of 5.6. During this feeding, I guided most of the tops into their designated positions within the net, ensuring they are adequately spread out to receive optimal light.
I also checked the runoff, which measured 2.3ms, but considering the extra dissolved salts from full draining and collection that would be higher that it really is, I will aim to bring it back to the desired range of 1.65-1.7ms to be sure.
⏰ Day 68:
In the evening, the plants were fed with a solution of 1.64ms at a pH of 5.8.
⏰ Day 69:
Evening feeding consisted of a solution with 1.66ms strength and a pH of 5.9. I also took the opportunity to confirm that the lights were positioned at a 48cm distance from the canopy.
Additionally, I'm testing the exhaust system by venting it outside the room. Currently, the relative humidity (RH) ranges from 53-55% during lights-off and 58-60% during lights-on, while the temperatures remain around 18°C with lights off and 23.5°C with lights on. These conditions fall within the desired vPD (vapor pressure deficit) range of 0.95-1.2.
⏰ Day 70:
Feeding was carried out in the evening using a solution with a strength of 1.66ms and a pH of 5.9. To enhance air circulation, I added a fan at the top of the tent.
Furthermore, I checked the light intensity, which measured around 760-780ppfd.
⏰ Day 71:
During the evening feeding, the plants received a solution with a strength of 1.64ms and a pH of 6.4. The RH levels range from 55-65% as the girls get more bushy, while temperatures vary between 23-18°C, depending on whether the lights are on or off.
⏰ Day 72:
Evening feeding included a solution with 1.64ms strength and a pH of 6.4.
⏰ Day 73:
The plants were fed with a solution having a strength of 1.66ms and a pH of 6.0. As indicated by the feeding schedule, the A+B mix was increased to 3.5ml/l.
I also ensured that the lights were positioned approximately 50cm above the canopy and set to 90% intensity to provide additional heat.

Likes
23
Share


@KarlysCannabis
Follow
Excited to see some growth! Had clean paper towels, a dark dvd case, a nail file and tweezers. The file was just to break the outer shell a little so they suck up water faster. I'm curious if it works!
Likes
5
Share

@eldruida_lamota
Follow
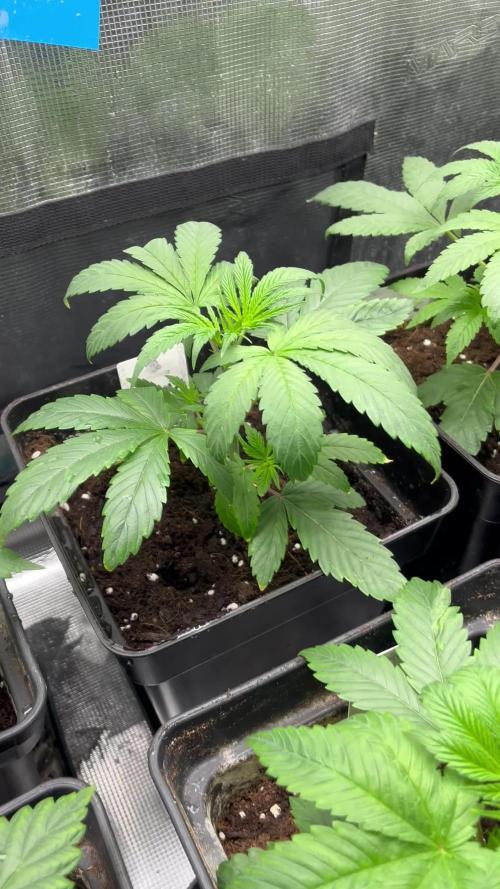
Que pasa familia, vamos con la cuarta semana de crecimiento de estas Green Gelato feminizadas de RoyalQueenSeeds.
Vamos al lío ,se trasplantaron en macetas de 7 litros definitivamente.
El ph se controla en 6.0 , la temperatura la tenemos entre 24/20 grados y la humedad ronda el 50%.
El ciclo de crecimiento puse 16h de luz, el foco está al 50% de potencia.
De momento van creciendo a buen ritmo y tienen un buen color, estaban muy bien enraizadas al realizarle el trasplante se notaba la abundancia radicular.
Agradecer Agrobeta por el envío del kit gold series en cuestión, unos maestros 🙏
- os dejo por aquí un CÓDIGO: Eldruida
Descuento para la tienda de MARS HYDRO.
https://www.mars-hydro.com
Hasta aquí todo, Buenos humos 💨💨💨


Likes
15
Share


@Nookandplant42o
Follow
Week of admiring this girl is drinking water every 2 days without problems something big to take I need a lot more of that in my garden her resistance and incredible leaving in its natural form you only feed and observe because it makes great sprouts with incredible sugar, aroma sweet, previous weeks in veg the defoliation of everything that was underneath made something bigger in equal proportions, it really doesn’t need big lights to show its potential I believe that improving in each specific strain you know each one, being able to understand more and improve. Thanks for another week everyone, the trichomes are taking their best potential, I hope at any time to return with the harvest 😁

Likes
6
Share


@ReggaeShark_420
Follow
Day 74 for the tall monkey. Getting near to finish. Gonna start this week with the flushing And cold temps to get here ready for a hyped up smoke

Likes
10
Share


@Stacy_smokez
Follow
Finishing up week 1 all of them but one have made it above soul except lot o bear by fox genetics .. germinated fine but just a late bloomer .. water with very little water not nutrients at all yet

Likes
3
Share

@Mr_NYceguy
Follow
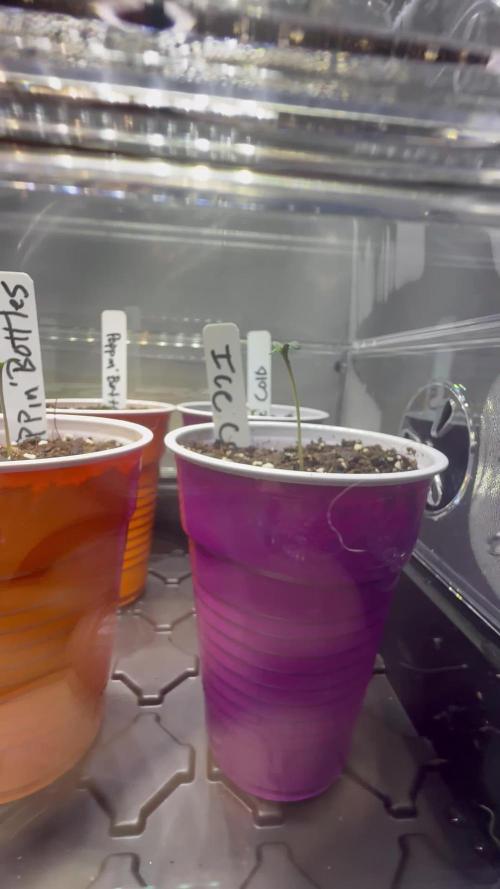
Paper towels placed between two dinner plates, placed on heating mat. 48 hours all seeds had tap roots. Placed in solo cups filled with coco loco, and sprinkled a little Great White in the holes. All seeds sprouted with in 36 hours. 76-78 degrees with 80% humidity. 100% Germination - AMAZING! #nomids

Processing
Likes
5
Share


@Jubaea
Follow
Last time I did defoliation
Now I hoop to get a big harvest of 200 gr dry weight will be nice


