
Likes
Comments
Share


@DogDoctorOfficial
Follow
Hey fellow green thumbs! 🌿💚 It’s harvest time for our Auto Fat Pete’s Cookies from Super Sativa Seed Club! After an exciting journey, we’re thrilled to share the details of this unique plant’s final stage. Let’s dive into the harvest report!
🌟 Harvest Details:
Day 75: Harvest Day
• Harvest Date: Day 75
• Harvest Method: Our Auto Fat Pete’s Cookies was harvested yesterday. While the flowers turned out less dense than expected, the amazing smell has us super curious about the final product. 🌿🌸
• Preparation: Before hanging, we meticulously cleaned the plant, removing all leaves without trichomes to ensure a smooth drying process and to enhance the quality of the final product. 🌿✂️
Current Drying Process:
• Method: The entire plant is now hanging upside down to dry. This method helps maintain moisture levels within the buds, allowing for a slower and more even drying process. 🌿🔄
• Environment:
• Temperature: 18-22°C (65-72°F)
• Humidity: 50-60%
Maintaining these conditions is crucial for achieving a perfect dry and preserving the plant’s aromatic and flavorful profile. 🌡️💧
🌟 Plant and Bud Characteristics:
Auto Fat Pete’s Cookies:
• Bud Structure: The buds are not as dense as we’d hoped, but they are still sticky and resinous, showcasing a beautiful array of green hues with hints of purple and orange pistils.
• Aroma: The aroma is incredibly strong and delightful, filling the grow room with a sweet, cookie-like scent that hints at the strain’s name. 🌿🍪
• Trichomes: A generous layer of trichomes covers the buds, promising a flavorful and aromatic final product. 🌿✨
🌟 Care Tips:
• Drying Process: Patience is key. Allowing the plant to dry slowly will enhance the final quality, preserving both flavor and potency. Ensure good airflow around the hanging plant to prevent mold and mildew. 🌬️💧
• Trimming: Once the drying process is complete (typically 10-14 days), it will be time to trim the buds. This is where we’ll shape the final product and get it ready for curing. ✂️🌿
• Curing: After trimming, curing the buds in jars for at least 2-4 weeks will further enhance the flavor and smoothness. This final step is essential for achieving the best possible smoking experience. 🍁
🌟 Genetics Spotlight:
Auto Fat Pete’s Cookies:
• Characteristics: Known for its sweet and cookie-like aroma, this strain has shown remarkable aromatic qualities throughout the grow. Despite the less dense flowers, the strong scent and generous trichome coverage promise a high-quality final product.
• Harvest Expectations: Sweet, aromatic buds with a rich flavor profile. The slower drying process will ensure the best possible preservation of cannabinoids and terpenes.
🌍🌿 Fun Fact:
Did you know? 🌿✨ The aroma of a cannabis plant can be a strong indicator of its final flavor profile. Strains like Auto Fat Pete’s Cookies, with their unique and strong scents, often translate these aromas into delicious, flavorful buds.
For a detailed grow guide and to see this strain in action, head over to my YouTube channel! 🎥✨ I share tips, tricks, and in-depth reviews to help you get the best results from your grow. This week’s harvest has been particularly intriguing, and I’ll be explaining the reasons behind the less dense flowers in detail.
👉 Join me on YouTube Link in my profile 👈
🌟 Conclusion:
Harvesting Auto Fat Pete’s Cookies at Day 75 has been an interesting and rewarding experience. While the buds are not as dense as we hoped, the strong aroma and generous trichome coverage give us high hopes for the final product. With the plant now drying, we’re eagerly awaiting the final outcome.
Stay tuned for updates on the drying, trimming, and curing process, and get ready for a sweet and aromatic harvest!
Happy growing, and see you next time! 🌿💚✨
#SuperSativaSeedClub #HarvestReport #FatPetesCookies #PlantMagic #GardeningJoy #NatureLovers #PlantPower #InspireGrow #YouTubeJourney
Germination method 🌱 @thecannakan
Genetics @supersativaseedclub_official
Nutrition
@aptusholland 🌿
@aptus_world 🌎
@aptus_es 🌍
@aptusbrasil 🌱
@aptus_thailand 🌿
@aptus_portugal 🌳
@aptususa_official 🍀
@aptusplanttechnz 🌺
@aptusplanttechaus 🍃
Ambient controls🎮
@trolmaster.eu @trolmaster.eu.support @trolmaster.support @trolmaster.agro
Soil @promix_growers_eur @promix_cannabis
LED - @lumatekeu
Watering- @autopot_usa @autopot_global
Love and attention- @dogdoctorofficial
As always thank you all for stopping by, for the love and for it all , this journey of mine wold just not be the same without you guys, the love and support is very much appreciated and i fell honored and so joyful with you all in my life 🙏
With true love comes happiness 💚🙏 Always believe in your self and always do things expecting nothing and with an open heart , be a giver and the universe will give back to you in ways you could not even imagine so 💚
More info and complete updates from all my adventures can be found ⬆️link in the profile description ⬆️
Friendly reminder all you see here is pure research and for educational purposes only
💚Growers Love To you All 💚
Discount Codes :
@thecannakan DOGDOCTOR 15% off
@theneutralizer PORKIT7-DOGDOCTROSO 17% off
@kannabiaglobal DOGDOCTOR 30% off
@seedsmangenetics DOGDOCTOR 10%off
@terpyz.mutant.genetics DOCTOR 15% off

Likes
5
Share


@CannaWolf420
Follow
Week number four.
Man who would have known that a plant such as this could have a smell so prodominant. When I open my tent my nose is overcome by aromas of over ripe blueberries, I feel like I'm sticking my nose right into a jar of fresh blueberry compote. Yummy!
The tricom production thus far is very nice, along with bud development. I will slowly begin to adjust my cal mag along with the bloom B & A lower as the feedings go on.

Likes
2
Share

@JVKdopegrow
Follow
Wow what a stretch! She is now in flower and a real beauty. Very light defoliation of some upper fan leaves and lower flower nodes. I will stake her this week as I am sure buds/colas will tip her branches over.

Likes
7
Share


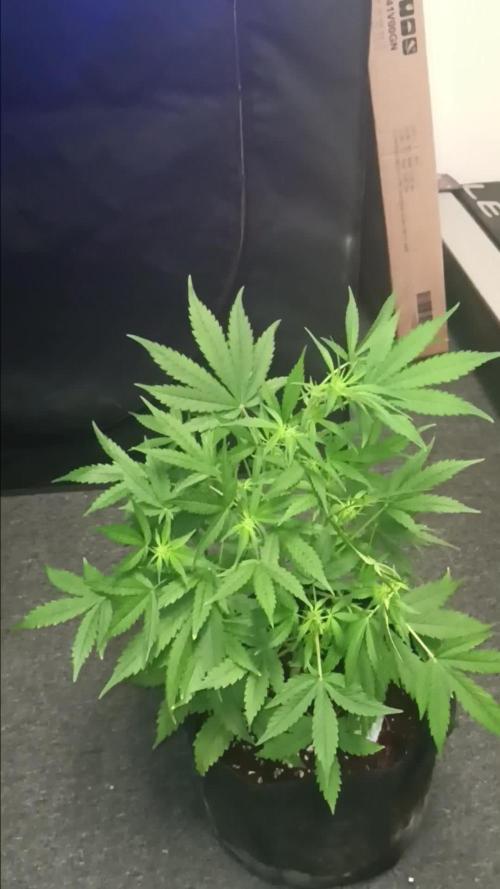
@Meksi2790
Follow
still recovering from the nitrogen def will flip into flower next week still feeding ph 6.5 and 800-900ppm

Processing
Likes
14
Share


@Reforced
Follow
12/3 Gave all the plants a much needed trim & watered ones that needed it.
12/5 Had to throw away one of the blue cookies because it turned into a male.
i think it was because I left the light on for 24 hours accidently. I kept it on the same 12-12 schedule & It didn't seem to phase them much.
12/6 Watered 5 of them

Likes
4
Share


@Jimmy_Jankens
Follow
1/12/23 all plants stretching nicely. P4 is vary one sided and P1-3 have similar structures. Starting 12/12 cycle tomorrow, still no pre-flower but should have signs by the end of next week. Hoping for at least 2 oz of or each plant.

Likes
19
Share


@Black_Widow
Follow
Привет садоводы
началась 2 неделя
растение потихоньку растет (не очень быстро)
но через 2-3 недели будет видно какой она имеет потенциал
будем наблюдать дальше и ухаживать
сегодня произвел пересадку
Likes
Comments
Share


Likes
15
Share


@Venabr96
Follow
Armario posto em fase de floraçao.
Rega de 4 a 4 dias com 2l de agua desmineralizasa.
Deixei a lampada cair sobre elas , piqueno incidente 😣😣
Mas esta tudo bem só perdi uma folha da piquena uma da grande e algumas queimaduras 😣😣

Likes
15
Share


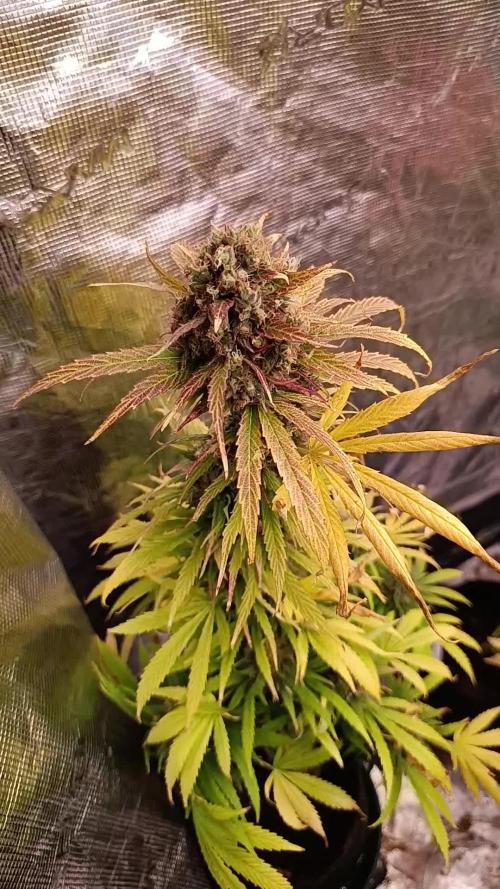
@DabMansGenetics
Follow
Growing strong on beginning of week 5. Buds are turning more purple each day. Smell is weak but I’m sure it will pick up soon. Growing taller each day.started some LST this week. It was growing to straight up is why I started LST training. Starting to put off a pleasant smell.


Likes
9
Share

@420DeepGrow
Follow
📆 Semana 9
La Mental Rainbow sigue afinando, pero sin prisas: esta genética aún quiere una semana más para sacar todo su potencial. Tras el lavado, los colores se limpian, los pistilos avanzan despacio y la resina se mantiene gruesa y brillante. El aroma dulce-terroso se vuelve más claro y profundo mientras la planta consume sus últimas reservas sin perder ritmo.
Ahora solo toca mantener ambiente estable y dejar que termine de redondearse antes del gran final.
🌿 Maduración extendida: una semana extra para llegar al punto perfecto.
¡Seguimos creciendo fuerte 💪!
Likes
26
Share


@pifflestikkz
Follow
Day 29
29/07/24 Monday
Nice feeding today with De-chlorinated tap water pH 6.
Gave her 300 ml and she had a small run off.
Getting chunky in the stem now 💪💚
Day 31
31/07/24 Wednesday
De-chlorinated water pH 6 today with Plagron pk13-14 5ml to 5L
Plagron power buds 5ml to 5L
Used 300ml of the 5L solution.
I will be using these on water days from now on as they are advised to be used every irrigation.
We'll see how they perform 💪💚
Day 32
01/08/24 Thursday
Another feed today using de-chlorinated tap water pH 6, there now taking 300ml every evening.
Day 35
04/08/24 Sunday
END OF WEEK 😁
De-chlorinated tap water pH 6 today with Plagron products. 300ml each.
Had a issue with leaf invaders this week, I have treated and am checking every 48 hrs so far seems ok and not progressive.
All plants look great, very healthy, one of the Overdose is way behind and due to space maybe culled at flower I'll see how she gets on.


Likes
1
Share


@PalmaGrow
Follow
19 - 25 noviembre
Se ve completamente recuperada de la poda apical crecimiento vigoroso se deja crecer libremente queremos crecer plantas más grandes así nos toque tener más paciencia.

Likes
12
Share


@CanadianFillmore
Follow
Week 3 flowering begins! Added B52 to the nute mix this week. Amnesia lemon haze is looking healthy and she stretched a hell of a lot the last week.
Thanks for stopping by 👽🌳💚


Likes
13
Share


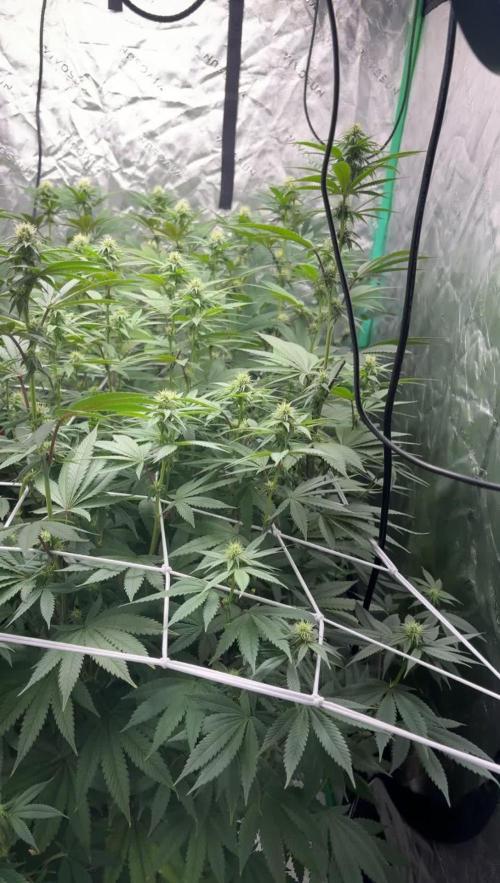
@FlavoursUk
Follow
Day 15 - The start of week 3 and the girls are really taking off, from 1-2 Inches of vertical growth daily. Consuming a good amount of water, almost leaving the bucket empty. lol.
Lightly defoliating to keep the bud sites exposed to light, as they get bushy very fast and recovery is only taking a day for them to bounce back. Pretty happy with how things are going right now. Slightly increased the EC by .2 but not enough to burn them.. which is the goal. Grateful for my trolmaster unit as it has made keeping tracking of my parameters much easier and effortless.
Day 16- Topping up the res with RO water every two days. Otherwise I'm sure it would be empty! Pistils are showing and the bud sites are very visible. Seeing one pheno with slightly more sativa dominant traits. Luckily I took clones so I can run the best pheno next time around, although all these plants are special. Still going through the flower stretch. Excited for what is to come. Stay tuned for the results.
Day 18 - As you can see, the difference is night and day over a period of 2 days they have had an explosion of growth. They were
heavily defoliated on day 17 and bounced back within a day. Happy plants preying. Bud sites are forming everywhere now. Not much to report. Until the end of week 3 in a few days. Bring on week 4.
Follow my Instagram and YouTube (link in bio)

Likes
77
Share


@Basementganja
Follow
Phew! She's growing with insane vigor!!
She was watered with a 2.5 gallon dosage of de-chlorinated tap water today! The previous 1.5 Gallon dosage was "only"(lol) lasting for 3 days before becoming 90% dry, so I've gone up to max dosage! 2.5 Gallons caused 15% of that water to run-off, out of the bottom of the pot. She will likely dry to 90% again, and be ready for another dosage in 5 days!
I'm extremely excited to defoliate her, she's testing my patients! :)

Likes
48
Share


@Theia
Follow
I am not sure what the deal is with the Chibans. They look mutant to me maybe due to pollination. There is so much crystal forming up on them and they still look beautiful.
Plant 1 is huge with big colas that are fragrant and very very sticky to the touch.
Plant 2 looks the most normal as far as bud structure to me. She has not got the same flattened of tops but instead are more cone like . Also very very crystal heavy
Clones 1 and 2 look like monsters to me. Their buds are bulbous and fat with a very flat round top and quite a bit larger then golf balls! I have never seen bud look like this but then I have never had pollination issues and watched the plants quite as much as I am at the moment.
We will keep going with them and see what we get. I hope for some smokable bud and also some Sherbert banana seeds maybe🤪👍👍.
Thanks for looking.
Stay safe.
Grow well.🌱🌱

Likes
4
Share


@el_cultivito_colombia
Follow
Semana 3 (1/8/22 - 7/8/22)
Plantulas mostrando un buen enraizamiento.
Se preparo una solucion de Elite 91 Myco Jordan iniciando la semana con:
-PPM : 80
-pH : 5.8
4/8/2022 se transplanto a macetas de 3 litros con suelo Jiffy.
Las macetas se regaron con agua:
PPM : 10
pH: 6.5
En el transplante se uso Elite 91 Myco Jordan en forma de polvo para cubrir el hueco del suelo y cubrir las raizes de las plantulas para reducir el estres del transplante.