The Grow Awards 2026 🏆 


Likes
Comments
Share
@Skunkiest_bender39
Follow
10tage re-veg hat super funktioniert. Sogar einigeSonnensegel sind besetzt. Die bananas riechen super Süß und fruchtig.
Die Zake haben einen absolut heftigen Basilikum Minze Diesel duft! Alle samt super weiter gewachsen. Habe mich ins Zelt gesetzt und komplett abgedunkelt, stelle in 2 Tagen auf 12/12 um


Likes
9
Share
@Bakeryguy420
Follow
At day 10 today 9/19 so fucking excited they are really started to take off now just fed again with some sweet candy added this time fucking love greenleaf nutrients so easy to manage. The price on this stuff is fucking dirt cheap and the results show !!!
C4 first time growing second week looking good healthy green no issues at all. Almost at the end of the week.and I got my little trooper with me. I love when my cat always taking a look into the garden with me. She always been apart of weed since day 1 her birthday is even on 420 :)!

Likes
10
Share
@Cocogrow1234
Follow
The 3 blue cheese plants are on the left side of the tent under 1 light and the 1 x sunset sherbet plant is on the right side under the other light
Still using veg nutes for first 2-3 weeks of flower till stretch is done then start the boost and will add pk13/14 on start of week 5
I keep tucking them under the net for the first 2 weeks of flower then just let them do there thing and will add another net to support the buds

Likes
5
Share
@Levinho14
Follow
Just letting them grow out now i want them to continue getting taller and i will continue LST-ing throughout .
They will veg for probably 4 more weeks before i flip to flower in the SCROG/Flower Tent where they will receive direct sunlight for 12/12
ALSO I MADE A HUGE MISTAKE WITH THE LABELLING
i actually have 3 Grandaddy Purple clones, 2 Pineapple Express pheno #1 clones and only 1 Northern Lights clone
as the plants grew i noticed the difference and similarities in characteristics

Likes
38
Share
@DeepRootsGrowTrees
Follow
TROPICANA COOKIES 🍪 FF/FASTBUDS
WEEK#13 OVERALL
WEEK #5 FLOWER
This week all good she's looking great buds are getting dense and she's covered in trichomes and she a beautiful looking plant!! 😍 Stay Growing!!
Thank you for stopping by and taking a look it's much appreciated!!
Thank you FASTBUDS!!
FASTBUDS/TROPICANA COOKIES 🍪 FF
Processing
Likes
18
Share
@Silverback_Guerilla
Follow
10/2:
My soil mix was too hot and I accidentally killed 11 of the 12 Fastbuds seedlings I had going. So, I started about 20 Candy Cane hybrids in rapid rooters wetted with myco, tricho, and beneficial bacteria. All but one popped up. One of them did a cobra-basket and petered out.
The beans all came from tray trash that accumulated while I was smoking three diff strains, so I probably won't know what they are until they are flowering.
10/4:
Looks like I'll have enough growing that I have to cull the weakest few. I can feasibly (possibly) squeeze 14 into the lower section of the closet under 720w if they act right and if I do some training, and another 4 in the top under 200w if I keep them at 30" or less in height.
10/6:
I think I'll veg everybody in the bottom section until I'm out of space, then move the shorter 4 or maybe 5 into the top section as necessary...and move the tiniest ones outdoors to finish. I just don't have the heart to kill anything that's got a potential yield of a half-ounce or more. Some of the most diminutive plants I've grown produced the stankiest buds..
I've currently got the 200w 3500k+660nm running at about 32" in the middle of the closet, and one of the 3 pairs of 120w 3000k+660nm quantum boards running at about 36" and should be sufficient coverage for the next week or so. Then I'll kick on the pair of boards closest to the doorway and spread them out a bit..and then I'll move the 200w light to the top section along with the best 4 short plants. At that point I'll turn on the center 2 qb's and install a 2 foot Solacure Flower Power UV light in the perpendicular center channel of my frame.
10/7:
I installed my new AC Infinity 6" fan in the attic and hooked up a 16" carbon filter today. I used some sound deadening foam on the rafter that I mounted it to and removed 100% of the vibration. I haven't programmed the thermo/hygro stuff yet, but tested it on high and I can't hear a thing anywhere in the structure.👍
I'm also purchasing a dual 120mm fan system from AC Infinity in the door, behind the grille I already installed to serve as fresh air intake. It also has a thermostat feature that will allow me to set it to only come on when the temps are too high, so I'm optimistic that it will allow me to manage the temperatures in this closet with about 1000w running for 18-20 hours a day.🙏
I moved the 200w 3500k+660nm to the top section today and lowered my QB frame to 32" above the plants. I have two pairs of them running now, and received the replacement HLG 240-48A driver today for the third pair. I'll hook it up later..dont need it now..
10/8:
I fed most of them today for the first time...about 16 oz of solution containing grow big, big bloom, kelp me kelp you, boomerang, and armor si.
I hooked up the 3rd pair of qb's today....wow that's bright....they're gonna love it!😎
The last of the sprouts has been planted and is growing. That's a total of 19.... 3 of them still in 1 liter pots and getting plain distilled water.
I also foliar fed all of them with a little big bloom and kelp me kelp you.
10/9:
I got some Axiom to apply onto them tomorrow. It's got a good amount of Harpin a|b proteins which trigger rapid plant growth and other defensive traits that are proven to be canna-friendly, like enhanced resin production and increased resistance to molds, mildews, and fungi.
I foliar fed them today with big bloom kelp me kelp you, and the day following the Axiom application I plan to foliar feed them with Biotabs BoomBoom Spray to negate any initial ill-effects caused by the Axiom. I'll probably just mist them with distilled water for a day or two following that regimen to ensure that it's all rinsed off. But, following that break in the foliar feeding routine, I've got some Fulvic/Humic acid to rain gently over them for a couple of days.
10/11:
End of week 1, and I'm happy with their progress thus far.😀
They had no trouble with the "Harpin protein attack" I engaged them with yesterday... at all, and even look quite a bit bigger than I expected. They also had their first "night time* last night...4 blissful hours in 74f temps with 48%RH.💤


Processing
Likes
44
Share
@rhodes68
Follow
9/15
Beginning third week things look well. Getting time to make decisions on training, but not today as we have other matters to attend.
😏
BTW look at the last vid from the previous week and compare. The only change is the four hour dark period was added.
Rest period, It matters
9/18 Decided to stick with bend and secure this grow, will begin in a couple days just letting them stretch out for now.
9/19 Corrected nuet list, no way I would give a plant that much big bloom :)
tried the Fish Sh!t on the girls in a .25 gal feeding for each ... FS 3ml/gal - Fish Mix 5 l/gal - Big Bloom 1tbs/gal - CalMag 5 l/gal - Si 3ml/gal overnight results are explosive
9/20 Mostly all is well in the garden but I am concerned with Jen. See her pic going to list as a problem as I am out of ideas.
Training begun recovered nicely feed tomorrow
On Jen... I am thinking just because... separate feeding at 6.5ph, a drench to 10% runoff with 10ml/gal kangaroots and 5ml/gal bio-grow removing the Fish Mix.
Thats pretty much it for my guess. Something is afoul in the nuet uptake
Watson... the game is a foot! 😉


Processing
Likes
20
Share
@Easygrower
Follow
Hello growers day 36 with the gorilla glue auto growth is very slow she really doesn’t it on the balcony it’s starting to get abit cold at night now days are getting shorter and English weather is very unreliable there’s nearly room in the tent for her that should keep her warm at night she isn’t showing any signs of flowering yet but all is good so until next week be safe and happy ✌️

Likes
9
Share
@Miguels_Fuego
Follow
Will be flushing this week and hopefully harvesting next week. Looking good, strong trichomes production and smell is incredible for both.

Likes
44
Share
@ILoVeThiSpLaNt
Follow
Giorno 70
Tutte le piante sono state raccolte e tra un mese aggiornerò il diario con le foto delle cime essicate.
Sono molto contento perché certi odori mi hanno colpito e non vedo l'ora di sentirli in fumata.
Grazie a chi ha commentato e ha lasciato un like. Un altro giro è appena iniziato. Ci vediamo di là 💪🖐️❤️


Likes
10
Share
@BklynBushRx1
Follow
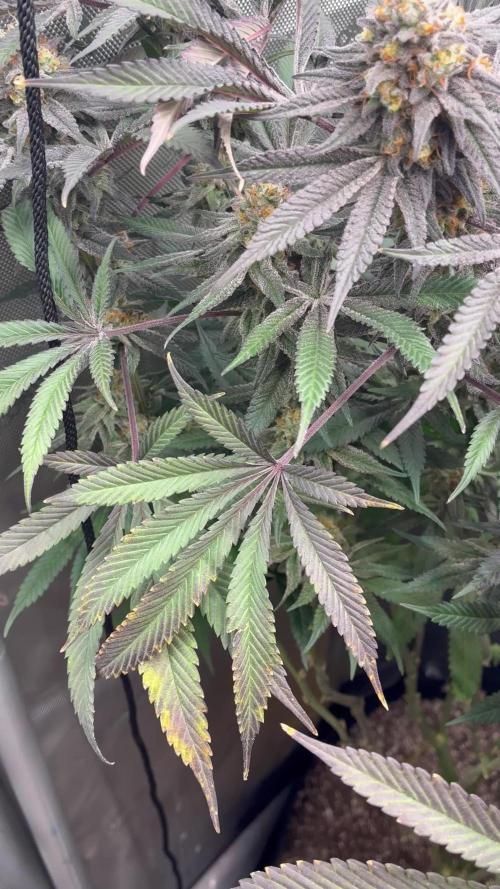
Day 43 of flower - I start counting when I see pistils so for some people it would be day 50 of flower, maturing really fast they are just about done! This will be my last update until they are dried, trimmed, and out in the scale! Thank you all for following along! Last week I did still give them their fish shit and silica watering because I wasn’t expecting the trucks to turn so suddenly ! We also had some beautiful colorful fade and got some nice dark purple from the 2 permafrost ! Well that’s about it and I’ll be back in a couple weeks for the final post and conclusion of the grow!


Likes
10
Share
@Sundance
Follow
This week continues with nice flowering with strong smell. One plant is light green, I don't know why. I also added on more light to my grow tent.

Processing
Likes
7
Share
@x_grower
Follow
Very fast seedling process, seeds stayed soaking for 24h and in the water they were already showing the first white root hair, another 48h in the paper towel and the day I potted them up they showed cotyledons. They took around 11 days to reach third node and complete germination but honestly I belive it could be faster if in better enviroment, mainly the humidity which was low and I transplanted them a day late. From day 5 I started feeding them exact same nutrients and ratio from the first vegetative week but starting at 0.4EC and increasing by 0.1EC/day until 1.1EC

Likes
24
Share
@nonick123
Follow
Día 87 (26/08) Aplicación foliar de Bacillus thuringiensis a 1 g / litro para evitar a las temidas orugas de los cogollos!
Hace un día nublado (29 ºC de maxima) y NO es necesario regar
Elimino la malla de sombreado de la cara sur, ya que las temperaturas son más suaves después de la canicula
Día 88 (27/08) Riego con 500 ml H2O pH 6,5
Empiezan a bajar las temperaturas a 29 ºC de máxima, y se nota en la demanda de agua por parte de las plantas!
Día 89 (28/08) Riego con 500 ml H2O pH 6,5
Cada planta empieza a ir un poco a su marcha en la demanda de riego dependiendo de su tamaño y estado de floración
Día 90 (29/08) Riego con 250 / 500 ml H2O pH 6,5
He detectado un gusano de los cogollos muerto sobre una hoja! 💥 Parece que los Bacillus thuringiensis funcionan estupendamente! 😁
Día 91 (30/08) Riego con 250 / 500 ml H2O pH 6,5
Día 92 (31/08) Riego con 1 litro H2O pH 6,5 + 25 ml de Humus de Lombriz Liquido
Día 93 (01/09) Aplicación foliar Bacillus Thuringiensis
No es necesario regar tras el litro de ayer y dia nublado con pequeños chubascos!
💦Nutrients by Lurpe Solutions - www.lurpenaturalsolutions.com
🌱Substrate PRO-MIX HP BACILLUS + MYCORRHIZAE - www.pthorticulture.com/en/products/pro-mix-hp-biostimulant-plus-mycorrhizae


Likes
24
Share
@AutoCrazy
Follow
Week 6
This Lady is up to 8 tops😎. Now I just have to get each top in the right locations at which point I’ll let them get a few nodes taller and then flip. This Lady is growing a little slower than her roommate (A Mimosa EVO) so I left a few extra fan leaves on her in the hopes that will speed her up a bit. I have noticed that this plant seems to throw the two main branches at a node but it also throws out additional branches. I’ve had a plant do this before and in my experience it makes the buds denser. We will see how it goes with this lady.
Cooler internals are:
6.0 pH
0.4 EC
56 F solution temp.
I can’t wait to flip the tent !!!! 🔥🔥
Onward 😎🍻
Likes
13
Share
@Rangaku
Follow
Orange dream is frosty , sticky and smells oh so orangey, keeping up the defol and bringing her on the home straight . She’s a special breed this one some of those buds are 6 inch around and there’s still a month to fill them out … and I’m gonna smoke it all .. life’s good
