
Likes
Comments
Share


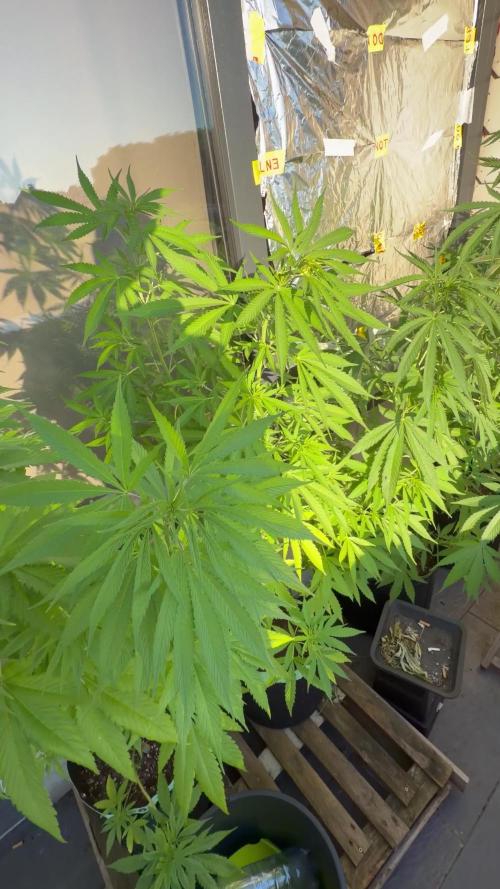
@playerkiller69
Follow
Allot has been done since the seedling stage 2 week and half so far in veg done top them and lst train them hope you like the info


Likes
45
Share


@SherbGrows
Follow
Here we are at week 7!
During Week 6
Noticed earlier on in the week that 1 of the 5 White widows has a slight magnesium deficiency. Amended that with tsp of Epsom salt per 1 gal. PH'd water at 6.7. Noticed new growth looks okay! I think I should have added nutrients a week prior.
Light defoliation on the bottom leaves under the canopy
Added other 1/2 dose of down to earth 4-4-4 (I decided to half dose on the dry amendments to see how the plants respond)
Added 1/2 dose of GEO Bloom 3-12.5-9
Watered dry fertilizer with compost tea brewed for 24hrs
Started PH testing the soil. Reads around 6
Week 7 plans
Going to try using white distilled vinegar as an organic PH down option. I have been using phosphoric acid and read that it is an inorganic. Hoping to not kill any good microbes with future watering. Tap water in my town reads at 7.6-7.8
Keeping an eye out for light stress and adjusted the light accordingly
Light LST on bud sites
Going to PH test run off to make sure soil is at okay PH level.
New clip on fan is on its way to help lower RH in upcoming weeks. Aiming for consistent 40-45%
So happy with how well this grow is going so far. Hoping it continues this way! (try not to jinx myself, yikes!)
Let me know what you all think :)

Likes
6
Share


@EKWCR
Follow
NPK 0.2-1-1
The early SCROG seems to work fine, Both genetics are solid however the Red Poison is bushier and it's more dificult to SCROG her, you need to put the bud spot on top of the leaves every day.

Likes
544
Share

@yan402
Follow
🌸🍏✨🍭🌸🍏✨🍭🌸🍏✨🍭🌸
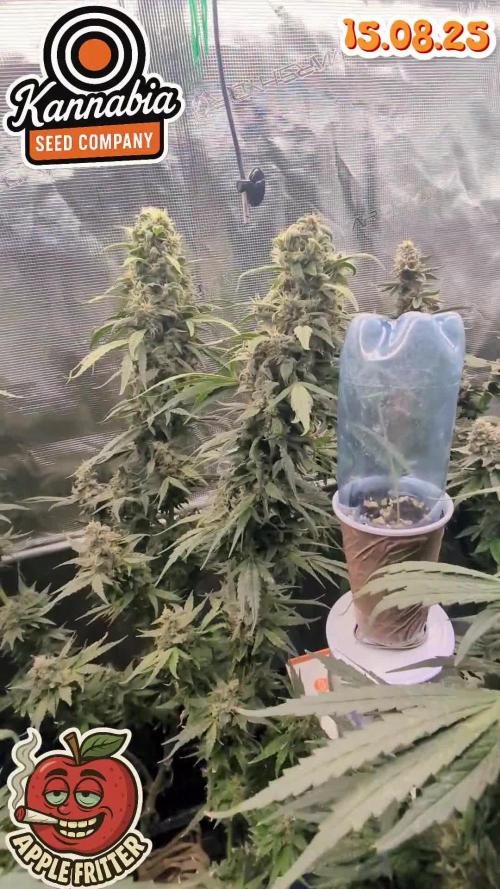
Hi and welcome to another Kannabia grow!
This time I’m running their Apple Fritter (feminized photoperiod). She’s going to veg under 24hr light and be manifolded.
Still cleaning the rest of my Candy Cream GF (11.04.25) — going to sow the seed tomorrow (12.04.25)
*been lazy, sowed on 14.04.25
🌸🍏✨🍭🌸🍏✨🍭🌸🍏✨🍭🌸
---
💭❗💭❗💭❗💭❗💭❗💭❗💭
❗Events & thoughts worth noting❗
💭❗💭❗💭❗💭❗💭❗💭❗💭
12.04.25 (GW1) – Cleaning + flushing the old coco coir. Might need to add another brick. *No new brick needed ✅
This is how I recycle my coco coir — fast, cheap, no BS.
🌿 Harvest plant
✂️ Chop roots small — they stay in for structure (organic perlite)
💦 Hot water rinse — remove salts & dust
🍶 Pre-soak with light feed:
Micro 10ml
Bloom 0ml
GreenBuzz 10ml
Cal-Mag 60ml
FFJ/FPJ 10ml (new disgusting batch)
pH down (citric acid)
♻️ Media stays — Roots stay — Back in service.
14.04.25 (GW1) – Planted seed in final pot ✅
16.04.25 (GW1) – Did last tent clean up + setup ✅📸
17.04.25 (GW1) – Seed germinated 🎉📸 — roughly 48hrs in final pot. Solid start👌♥️
23.04.25 (VW1) – Minimal burnt tips 📸 — not progressing, not a concern.
26.04.25 (VW1) – Started using the new batch of FPJ/FFJ
https://growdiaries.com/diaries/266849-grow-journal-by-yan402
30.04.25 (VW2) – Increased TriPartMicro & GreenBuzzBloom 10ml → 15ml
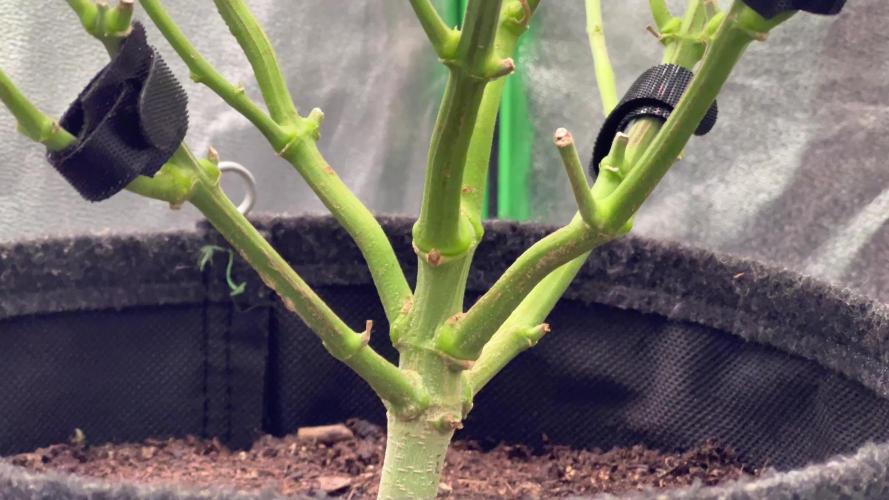
03.05.25 (VW2) – Increased TriPartMicro again 15ml → 20ml, topped the plant, and added final layer of clay pebbles around the base, trimmed side branches and did LST in preparation for "manifold" 📸
08.05.25 VW3 finished manifold📸
13.05.25 VW4 Increased TriPartMicro to 30ml and GreenBuzzBloom to 20ml.
15.05.25 VW4 Done defoliation and LST 📸
18-19.05.25 VW5 pruned all the shoots bellow my "mains" and did a full defoliation📸
24.05.25 VW6 increased GreenBuzzBloom to 30ml
04.06.25 VW7 did a cleanup📸
11.06.25 VW8 increase TriPartMicro to 40ml
17.06.25 (VW9) – Final structure pass 💈🌿
Did a clean perimeter prune + removed weak shoots. Ended up with 12 tops, was aiming for less, but she made the call
Didn’t fight it, just shaped it the best I could
Airflow’s good, structure’s stable
🛑 No more cuts until post-stretch
Pics coming shortly 😘
Flip coming soon — we’ll see how she handles it.
20.06.25 VW9 Switched lighting to 12 hours, may the stretch begin 🤞
22.06.25 VW10 Did a good LST session,made some pics, and came to some conclusions and a small change of plans:
Originally planned for 8 mains — long, spaced colas and maybe a couple stronger “titans” if she wanted to go that way.
But she’s showing me something else, and I’m not here to fight her — just guide her.
Now after stretch, I’m keeping side shoots only if they: Fill real canopy gaps
Don’t crowd neighboring tops (minimum 15cm spacing)
Aren’t growing into walls or toward the next plant
Anything too close, too low, or heading into shade gets removed. No point forcing it.
Looks like I’ll finish with 14–16 solid tops, depending on how she settles.
I’m just trying to give each one enough light and space to stack properly.
No overcrowding, no larf — just letting her do her thing with a bit of structure.
Increased Tri Part Micro to 50ml as well.
28.06.25 VW11 one week since I flipped to 12/12 and she is stretching nicely, a bit shy in showing pistils compared to the Fantasy Feast regulars I have in the same tent.
29.06.25 VW11 increased GreenBuzzBloom 30→ 60ml
06.07.25 FW1 TriPart Micro: 50→ 30ml
TriPart Bloom: 0 → 20ml
Home-made FFJ/FPJ (Watermelon + Pumpkin): 10 → 30ml
12.07.25 FW1 GreenBuzzBloom 60 →40ml, TriPart Bloom: 20 → 60ml, fpj 30→60ml
19.07.25 FW3 Got some bleached tops, been out and about at job interviews and didn't notice a last minute stretch spurt 😭, should recover fine though plenty of time left 😁
22.07.25 FW3 TriPartMicro 30→20ml , TriPartBloom 60→80ml , GreenBuzzBloom 40→50ml
24.07.25 FW3 Cal-Mag 60→40ml
26.07.25 got thrips but handled them with extra airflow and defoliation.
29.07.25 FW4 GreenBuzzBloom 50→20ml, Home-made FFJ/FPJ (new batch) 60→120ml
31.07.25 FW4 Home-made FFJ/FPJ (new batch) 120→200ml
13.08.25 FW6 CalMag 40 →30ml, GreenBuzzBloom 20→0ml
20.08.25 FW7 TriPartMicro 20→10ml, TriPartBloom 80→0ml, GreenBuzzBloom 0→60ml, CalMag 30→20ml
🌱💦🌱💦🌱💦🌱💦🌱💦🌱
🌿 Day to day tasks & actions 🌿
🌱💦🌱💦🌱💦🌱💦🌱💦🌱
16.08.25 FW6 – Fed 5l of #1 → 2l runoff
17.08.25 FW7 – Fed 5l of #1 → 2l runoff
18.08.25 FW7 – Fed 5l of #1 → 2l runoff
19.08.25 FW7 – Fed 5l of #1 → 2l runoff
20.08.25 FW7 – Fed 2l of #1 → 0.5l runoff
21.08.25 FW7 – Fed 3l of #1 → 1l runoff
22.08.25 FW7 – Fed 3l of #1 → 1l runoff
23.08.25 FW7 – Fed 2l of #1 → 0.5l runoff
(*RUNOFF reused for tomato plants)
🍶💧🍶💧🍶💧🍶💧🍶
💧 Nutrients in 30L #1
🍶💧🍶💧🍶💧🍶💧🍶
TriPart Micro: 10 → 15 → 20 → 30 → 40 → 50 → 30 → 20 → 10ml
= 0.33 ml/L
TriPart Grow: 0 ml
= 0.00 ml/L
TriPart Bloom: 0 → 20 → 60 → 80 → 0ml
= 0.00 ml/L
GreenBuzz Bloom: 10 → 15 → 20 → 30 → 60 → 40 → 50 → 20 → 0 → 60ml
= 2.00 ml/L
Cal-Mag: 60 → 40 → 30 → 20ml
= 0.67 ml/L
Home-made FFJ/FPJ: 10 → 30 → 60 → 120 → 200ml
= 6.67 ml/L
pH Down: Citric acid (BuxXtrade) — adjust to ~pH 6.0
📦 TOTAL: 290 ml per 30 L
🔬 9.67 ml/L
🍶💧🍶💧🍶💧🍶💧🍶
⚙️✂️⚙️✂️⚙️✂️⚙️✂️⚙️
✂️ Tools & equipment ✂️
⚙️✂️⚙️✂️⚙️✂️⚙️✂️⚙️
✂️ 2× MarsHydro SP3000
⚙️ MarsHydro 150mm ACF Ventilator
✂️ Trotec dehumidifier (big unit)
⚙️ Mini no-name dehumidifier
✂️ Kebab skewers (LST – stainless)
⚙️ Wire + roast skewers (LST assist)
✂️ Scissors (HST)
⚙️ Vacuum (for spills & cleanup)
✂️⚙️✂️⚙️✂️⚙️⚙️✂️⚙️✂️⚙️✂️⚙️
---
🍏🍪🌬️🍬🍏🍪🌬️🍬🍏🍪🌬️🍬
Apple Fritter (Kannabia Seeds)
🍏🍪🌬️🍬🍏🍪🌬️🍬🍏🍪🌬️🍬
Species: 50% Indica / 50% Sativa
Genetics: Sour Apple × Animal Cookies
THC: Up to 25%
Effect: Euphoric, relaxing, creative
Flavor: Sweet, fruity, pastry notes
Flowering: 56–63 days
Resistance: High
Indoor yield: 450–500g/m²
Outdoor yield: 600g/plant
Structure: Strong, bushy, dense buds


Likes
24
Share


@grow_it420
Follow
Easy to grow plant, was growing faster then I expect, it was my first autoflower plant. I will grow more autoflower plants in future.

Likes
37
Share


@Rabidreject
Follow
UPDATE - Saturday 13th March
This week has been ok but I need to take it easy on the nutes! Especially with the soil one. Ooohhhhh 😵why did I use soil. It’s really annoying because it’s at weedy little seedling stage and iv obviously over fed it.
I added some worm castings to the one on the right in the hempy bucket though , along with ecothrive biosys They should break down fairly quickly given how packed with microbes and micorhyzae to buffer the ph of my hempy buckets to where I need them to be. I don’t even bother with my ph pen now. I’m glad I didn’t spend £69 on one but it would be good to get a decent one at some point. It’s not top of the list though. Grow space number three is looming and this time I actually have the equipment. Only problem is I don’t want to use my old converted wardrobe. It’s too small and pretty pointless. If I’m going to have a tent in my studio flat space where I have to hear the fans or rather the varispeeds hum.
I’m very tempted to take the big grow tent out of that room and then paint the walls bright white and just vent the room. Instead of the tent. The ductings already there.
Then I could move the bigger tent somewhere else in the flat.
The thing is - I started growing to provide me with my medicine,however, I’m in prohibition-land. So far I haven’t had the space to be able to get a monster harvest. My last one was the best so far I think it was 2.5oz between three plants.
I have decided to turn it into an auto tent (shout out to fast buds for sponsoring me)
They are just so easy. At first I was worried because i thought the lights were on longer but they finish so god dam quick from seed to smoking. I’m f surly sure curing autos must take longer than growing them.
That fastberry is coming along nice but It’s such a non bushy plant. Like lanky but in a good way. A lanky green stem with these random bright purple buds on the tops.
This is the first grow I’m
going to use a proper magnification device when I need to check trichomes.
I think iv been harvesting too early. Well actually just last time because I was scared the police were coming. LOONG story. Anyway, I’m looking forward to being able to see those thrich’s get cloudier and cloudier. Will make some nice source photographs for my art also.
I nabbed these awesome plant holder uppers that just poke into the soil in the pot and they are round and have sections to put cola’s through. They look really perfect for auto’s final bushy look once trained.
Likes
6
Share


@CalGonJim
Follow
1/19 1am MONDAY...TOO STONED TO TYPE..WHAT THE HELL IS THIS THEN..HEY SHUT UP....WAIT...IS THAT ME?😂
1/19 5 AM.🚨 I GOT THE HOLY TRIANGLE OF WEED THE WHOLE FUUCK'N TRAILER PARK IS HERE!!!!! Finally got black tea Tangie in the ground so Julian bubbles and Ricky are all growing with Montel and ice t.
1/20 1:20PM VEGING PERFECT AT 30 WATTS!!!
1/21 10:11 AM. The whole fucking park is here. Julian sprouted!!! Bubbles and Ricky are doing great. I’m gonna top them and then I’m gonna start them over from clones so they grow roughly the same time as Julian and I’ll keep the Ricky and the bubbles others as mother plants and I’ll just keep them going.
1/21 10:15 AM vegging 12 inches 30 W Samsung LED Mars Hydro light perfect
121 1:10 PM I moved black tea Tangie into the germination station. The 2 gallon fits in here just fine. This will be fine for germination.. She’s sprouted only after about 40 hours so she’s really strong.
1/21, 2:54 PM. I made a my own Star Wars movie. Special effects are incredible. It’s very removing made my own Obi-Wan.A CalGonJim Production 🎥🍿
1/21 11:56PM Stoned Genie bong arrived today. my 2nd from them. Nice, this one has an ice catcher. got here in 2 days. 👍


Processing
Likes
8
Share


@JaGrowzAuto
Follow
Still having an issue with watering. They don't seem to be drinking as much as I thought... Sometimes it's 36-48 hours between waters, and yes I am watering til a little runoff dribble out.
Likes
2
Share


@LoganatorDude
Follow
I absolutely love to watch them grow! Especially that moment they hit their first growth spurt.
I started with RO water that is remineralized for drinking purposes. The ppm is only 18! My tap is 156! So considering they don’t need much water, I’ve been stealing some of our drinking water. The RO water starts at pH of 7. After I add the nutrients, ppm of 249 @ pH of 5.8 while soil is still sweet @ pH of 7
I think my days are off as a new week begins on the last day of the previous week. I am going to leave that for consistency.
04/21 - Noticing some possible nutrient issues with the Fruity Pebbles for several days now. Going to see what she needs. Up front I’m thinking maybe just a super small amount of Amino Acids with a little Epsom Salt. Maybe she is struggling to access the nitrates from the neem cake. IF it’s a issues with nitrogen. We will see. Maybe she would benefit from some extra calcium?… Any ideas are greatly appreciated.
Day 22 and I am noticing how these girls have been burning up a lot of potassium lately, dealing with the wind and sun 💨 ☀️, getting pushed around all day.
I plant to top dress with some Kelp Meal pretty soon.
Day 24 -> 4/22/22- a quote from the weather on today’s red flag warning and dust storm warning.
“ HAZARD...Less than a quarter mile visibility with damaging wind in excess of 60 mph. SOURCE...Satellite imagery. IMPACT...Dangerous life-threatening travel.”
I’m keeping the girls inside today.
Day 26, I was planning to check the runoff on some of these girls, especially the fruity pebbles, however I messed that up as I also top dressed WAY too much of the seaweed bliss. So I flushed with plain RO water at pH of 7 until there was only slight coloration in the runoff. I didn’t check the runoff as a lot has changed with all that flushing. So next watering/feeding I will make sure I check the runoff on multiple plants.
So the seaweed bliss with its 17 on potassium, seems to be the most likely culprit for why there is a bronze-ish color on the inside of the new growth. Hopefully a foliar feed of Epsom salts can correct the problem. Inside tent, lights on LOW. Noticing similar pattern in all of them to a degree, most noticeable in the fruity pebbles.


Likes
18
Share

@ohcibi
Follow
Final week now. I watered with clear water today and it’ll be the last time. Harvest will be on the weekend probably.
Was a nice ride with some hurdles but it should turn out alright. Excited for the next grow already. Will most probably be Dynamite Diesel. Stay tuned for more.
Update:
All the branches are hanging at half past eight, as we say in German. None of them can hold its weight properly anymore. Only one or two days left. I’m excited to see the roots. The ones in my first grow have been kinda crippled for various reasons mostly my fault. But this time the roots at day 12 when I repotted already looked stronger and even almost bigger than those of my first grow after the harvest. So I’m expecting the entire pots to be filled with strong roots justifying this so far magnificent result.

Likes
10
Share


@BelgianBudtender
Follow
Heya farmers,
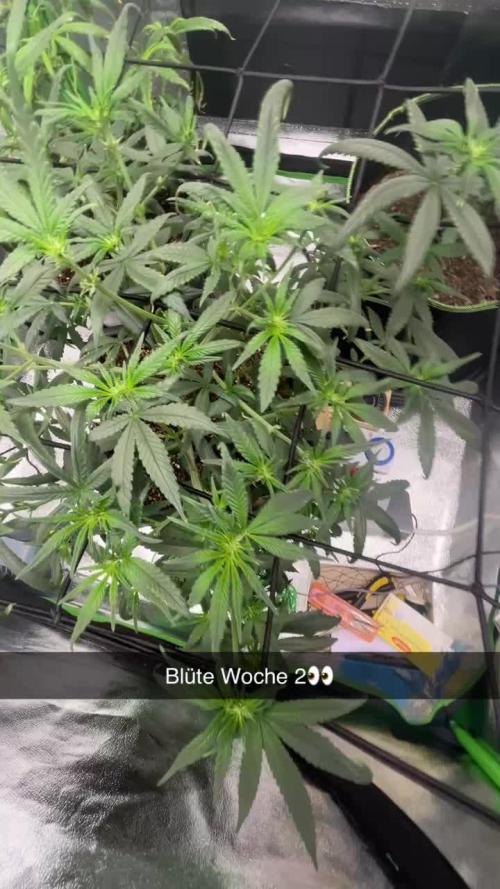
Week 3 and things are still going great, decided to start training.
the splashing from the dripper ring has caused some salt damage to the stem and lower leaves, I managed to fix this by adding more hydroton.
I'm replacing the reservoir every week, topping it off throughout the week, I will keep bending branches down from this point on, trying to create an even canopy.
only recorded part of the week in this weeks video, my little kittens kept disabling the feed by running across the keyboard.
Thats it for this week!
Likes
77
Share


@Baron_Codelli
Follow
report on week 6 :)
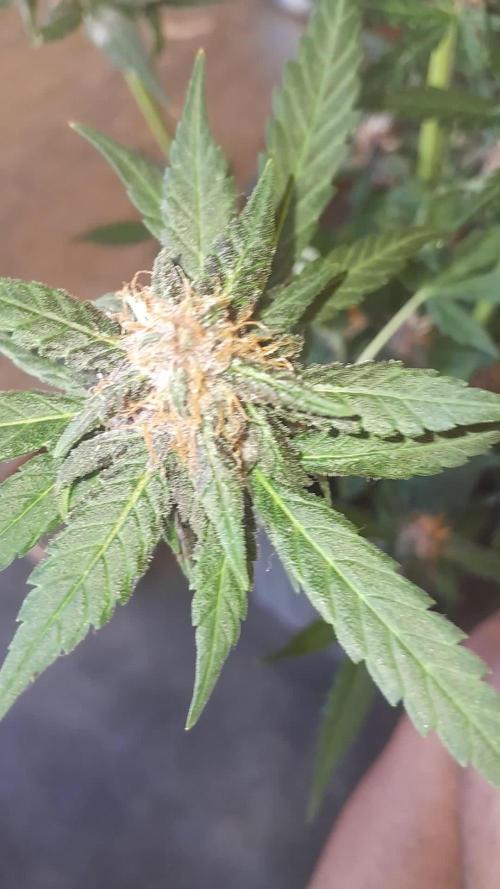
i think they stop growing now, so its time for buding :D i took a shot of a leaf, becouse im confused becouse i dont know whats missing her? maybe is just a light?
i still have problems with hum, it goes from 50 to 70, and thats to much i think....
hope you like the pics guys? ONE LOVE


Likes
8
Share

@Jardineiro_Br
Follow
Começou a janela de colheita das tres plantas a mais adiantada ja colhi as outras duas achonqie em uma semana mais poderei colher as duas uma esta bem robusta a outra ficou pequena .
Likes
4
Share


@eldruida_lamota
Follow
Que pasa familia, vamos con la quinta semana de floracion de estas Rainbow Melon feminizadas de fastbuds.
Vamos al lío, de las 3 plantas, me quede con 2 por espacio, siempre pongo alguna semilla de más por si no abriese alguna por no perder ese hueco del indoor.
También se trasplantaron a su maceta definitiva, en este caso de 7 litros.
Tenían algo de shock por el trasplante pero ya fue solucionado.
El ph se controla en 6.2 , la temperatura la tenemos entre 20/22 grados y la humedad ronda el 50%.
Las flores empiezas a formarse y progresan a buen ritmo.
Hasta aquí todo, Buenos humos 💨💨💨
Likes
1
Share

@HazeMember
Follow
Blüte Woche 7 aktuell, Härchen zu 60% meinst überall braun und trichome brauchen aber noch um sich überall fertig zu bilden und dann noch milchig zu werden.
Likes
5
Share

@MO_PureLeaf
Follow
Die ein oder andere verliert etwas Farbe, werde etwas den Dünger erhöhen müssen. Eine Automatik is jetzt richtig die vorblüte gegangen :) man riecht es auch wenn man auf dem Balkon geht. Schade das ich nicht weiß welche Genetik das genau ist weil die wächst schon ganz gut für mein Balkon :)
Likes
4
Share


@IndigoMist8
Follow
First of the 3 done. The other 2 are not ready and I'm hoping they can get though the next couple of weeks of cold
Likes
12
Share


@DripDrop88
Follow
This is week 3 I only gave this plant just a tab of nutrient and it sent her into a growing frenzy. She has a slight scent and is already showing signs of flowering. Is this normal help!!
