The Grow Awards 2026 🏆 


Likes
Comments
Share
@Le_Duc_Du_Bud
Follow
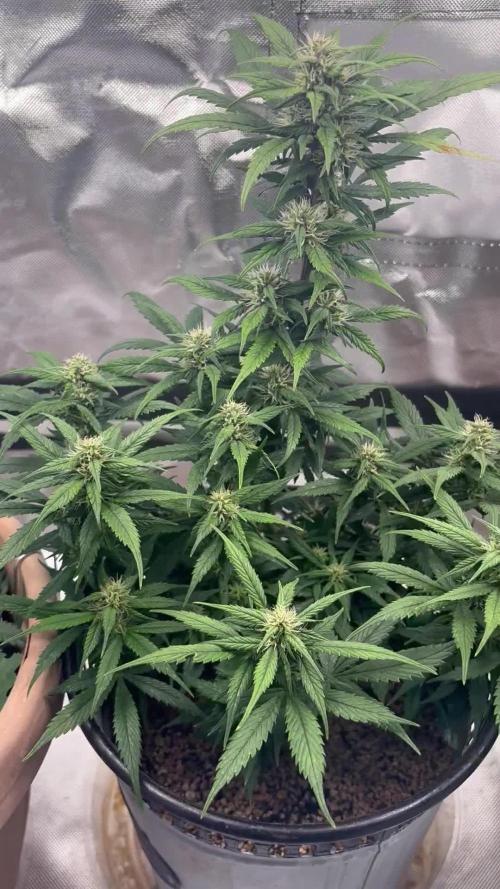
Salut amis cultivateurs ✌️✂️🌿
Aujourd'hui je pose la nouvelle semaine 🗓️
Comment vous dire que je suis impressionnée ❗
Les plante ce développement a merveille voyait par vous même 🙏
Elles ont fortement grandi, je suis monter a 1.5L par plante, elle consomme la totalité des nutriments et me le montre très très bien 😍🤗
Merci Kannabia 🙏 encore des variétés merveilleuses 😊
J'espère que dame nature sera me récompense 🌿🍁
Pour plus d'informations par rapport à ces génétique, je vous laisse cliquer ici : https://www.kannabia.com/fr

Likes
29
Share
@Hashy
Follow
********************************************
Week 16 Fade(week 12 flower)
********************************************
Light cycle=12/12
Light Power=110w 47%
Extractor controller settings (during lights on).
High temp= 26c
Temp step=0c
High Rh= 46%
Rh step=0%
Speed max=10
Speed min=5
Extractor controller settings (during lights off).
High temp= 20c
Temp step=0c
High Rh= 50%
Rh step=0%
Speed max=10
Speed min=5
Smart controller settings (during lights on).
Lights on=9.00am
Smart controller settings (during lights off).
Lights off=9.00pm
VPD aim=1.0-1.5
DLI aim=30-40
EC aim=1.0-1.8
PH aim=6.0-6.5
💧💧💧💧💧💧💧💧💧💧💧💧💧💧💧💧
NPK= 0-0-0
Method= Automatic
Feed=Fade nutes
Neutralise=0.1ml/L
Advanced Nutrients Flawless Finish=2ml/L
Easy Ph down=0ml/L
(1ml=24 drops, 1 drop=0.04ml)
Easy Ph Up=0.0ml/L
(1ml=24 drops, each drop is 0.04ml)
Ec=0.33 PH=7.0/6.9
Runs=10
Run times=3mins (0.75L/0.375L each)
Gap times= 17mins
Total runtime=30mins(6.0L/3.0L each)
Total flowrate= 0.25L/0.125L/min each
Auto start time=10.00am
Auto stop time=1.03pm
💧💧💧💧💧💧💧💧💧💧💧💧💧💧💧💧
********************************************
********************************************
📅24/5/25 Saturday(Day 106)
📋 Put stakes in and spread her out a little now she has all this space to herself.
📅25/5/25 Sunday(Day 107)
📋
📅26/5/25 Monday(Day 108)
📋
💧
Automatic Fade nutes
Ec=0.3 PH=6.5/6.2
Volume=6L
Volume left=2L
Volume used=4L
Total runoff=0.7L
Ec=2.1 PH=/6.8
💧
📅27/5/25 Tuesday(Day 109)
📋Lowered light power to 100w
📅28/5/25 Wednesday(Day 110)
📋Defoliate some spent leaves.
📅29/5/25 Thursday(Day 111)
📋
📅30/5/25 Friday(Day 112)
📋 Day 84 flower.
💧
Automatic Water
Ec=0.2 PH=6.8/6.9
Volume=6L
Volume left=1.5L
Volume used=4.5L
Total runoff=1L
Ec=2.3PH=/6.7
💧
********************************************
Weekly roundup.
📋 She's had a full week under the light to herself, she's almost ready. I'm tempted to chop at least the main top cola any day now and let the rest mature a little more. I may not complete another full week so this maybe my last weekly report before harvest.
Back soon.
Take it easy.
********************************************

Likes
27
Share
@TheCannaProphet
Follow
-----------------------------------------
~BARNEYS FARM DOS SI DOS 33™️~
-----------------------------------------
This strain from 'Barneys Farm’s Cali Collection gets another jolt of super power with this explosive collection of terpenes fused together from some of the world’s most astounding US cannabis phenotypes.
Dos Si Dos was developed from OG Kush Breath, a knockout Girl Scout Cookies pheno crossed with Face Off OG, then crossed again with their legendary Cookies Kush (OG Kush pheno x GSC) AND THAT’S ONLY HALF OF THE STORY.
Add in a subtle blend of Gelato #33 to the pot with its star struck Sunset Sherbet x Thin Mint GSC heritage and boom! A new champion was born: a sativa burst of euphoric energy is followed by tranquility with sedative properties capable of happily tranquilizing an elephant, if you’re overzealous or uninitiated!
DOS SI DOS 33™️ Cannabis Seeds Strain Specifications
~Type: Feminised
~Photoperiod: Normal
~Genetics: Dos Si Dos x Gelato #33
~Effect: Relaxed, Sedative, Happy
~Outdoor Yield (g): up to 2000
~Indoor Yield (g):up to 700 gr/m²
~Flowering Time (days): 60 - 65
~Feminised Outdoor Harvest Month: October
~Feminised Outdoor Harvest Month Week: 1st-2nd week
~Height Indoor (cm): 90cm
~Height: Short
~Indica %: 60%
~Sativa %: 40%
~Indica/Sativa: Mostly Indica
~Taste: Mint, Lime, Spice
~Aroma: Cookies, Sherbet, Lime
*Above information credit to Barneys Farm
__________________________________________________________________________________________________________________________________________________________________________________________________________________________________________________________________________________________________________________________________________________________________________________________________________________________________________________
THE SETUP:
~Planted into Jiffy Peat Pellets that were hydrated with de-chlorinated water with SuperThrive added then ph'd to 6.0 @ 80℉
~Grown 100% organic in 10g fabric pots with Mother Earth 70/30 Coco/Perlite medium amended with 2tbs/g of Down To Earth 4-4-4 / 2 cups/g of Earthworm Castings / 1tbs/g of Dr. Earth Flower Girl 3-9-4, 1tbs/g of Dr. Earth Bat Guano, 3/4 cup of Down To Earth Azomite and 1 tsp/g Down To Earth Fish Bone Meal.
~24hr light cycle during Germination / 19/5 light cycle for Vegetation and 12/12 for Flower
~Straight water ph'd @ 6.2-6.8 when needed and weekly Compost Tea's.
__________________________________________________________________________________________________________________________________________________________________________________________________________________________________________________________________________________________________________________________________________________________________________________________________________________________________________________
Weekly Updates:
9/20- 💥BOOM!💥 Week Six of flower is here and my girl's in high gear, stacking her flowers and pumping out trichomes!
Today I watered her with 1.5g de-chlorinated water with 5ml/g of Botanicare CalMag+ added, then ph'd to 6.2 @ 72℉. I turned her pot and plucked a couple of yellow shade leaves...the basic daily maintenance.
9/22- I didn't water her yesterday as she looked great and was 'praying' hard. Today she was given 1.5g of de-chlorinated water which was ph'd to 6.2 @ 72℉ which I gave her through her drip pan (bottom chuggin) and I also gave her pot a turn.
She continues to pile on the trichomes and is developing exquisite reddish purple hairs in her flowers that look absolutely wicked! She is definitely one of the most photogenic cultivar's I've grown and is looking lovelier by the day! 😍
9/24- We're getting close to wrapping up Week Six of flower in a couple of days, which will put her around two or three more weeks from finishing, with the most exciting weeks yet to come!
I didn't water yesterday and today I went ahead and Top Dressed her with 2 tbsp/g Dr. Earth Flower Girl 3-9-4, 1 tbsp/g Dr. Earth Gold Premium 4-4-4, 1/2 cup Down To Earth Bio-Fish, 1/3 cup Down To Earth High Phosphorus Bat Guano and 2 cups of Worm Castings.
I watered in the Top Dress with 1.5g of de-chlorinated water which was ph'd to 6.2 @ 72℉ and let her enjoy her meal! 😜
9/26- After her heavy watering on the 24th I didn't water yesterday and when I checked her today at 'lights on' and she still had some weight to her pot and her leaves were praying hard so I held off on watering today and will hit her tomorrow with her usual 1.5g watering.
~Thanks for stopping in! Things should be getting a lot more interesting in the coming weeks...Stay lifted and be Blessed! 😎🙏~

Likes
37
Share
@Rob96
Follow
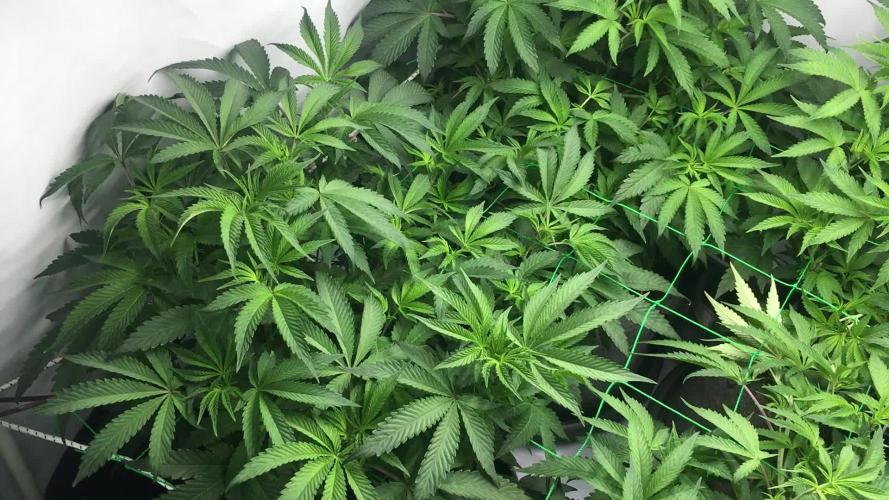
Cut net down this week and had a reshuffle around, dos si dos was a lot taller so move lights up and put other 3 plants on top on boxes to level top as much as i can
Had to do a little late trimming to help airflow down low and just give a little more breathing space as suffered with a little rot on my first grow luckily not too bad though but fingers crossed none at all this time, i managed to avoid it on my secone grow so hopefully will be ok
Plant looks strong and healthy, had no issues so far plenty of tops cant wait to see it fatten up


Likes
6
Share
@Kountryboi90
Follow
She's growing good! Was able to start some LST on this girl. I think I'll be flipping the light schedule in the next day or 2. As I said before, I don't want to veg long as this is my first hydro grow. Can wait to see how she turns out.

Likes
87
Share
@Mrs_Larimar
Follow
2022-02-15
Sweet Puddin is maturating, Buds are swelling, Pisitls are changing slowly.
she has a good Number of weeks ahead, iam guessing for 4 more, we will see
She has grown wonderful, still happy and Green
Feedings once in the week , waterings every 3rd day or second day...depends in how thirsty she is
Visit her on Instagram, to create Likes for the Charity grow we do.
@Weedseedsexpress donates every Month 100 Euro for Woman in Need
If we reach enough Likes, they add 500 Euro in the end of the Growoff
so pls help us
Likes
10
Share
@ButterfliesLittleFarm
Follow
Hello Diary,
Purple Lemonade has reached the end of its third week, at the same time it has completed the vegetation phase and is entering the flowering phase.
This week it grew an impressive 20 cm, it got a bunch of new leaves and now it's at the stage where it looks like a small bush.
Purple lemonade has slowly started to form flowers.
The leaves are a nice green color and look healthy.
It is really developing very nicely, which makes me super happy.
The summer heat is still present which affects the temperature in the grow box,
this week the average was 29 degrees although sometimes the temperature rises to over 31 degrees.
But I don't notice that it is harming them, I make sure to water them regularly,
so that the soil does not remain too dry although that sometimes happens.
Every week, as the plants grow, I increase the amount of water when watering.
I continue to add Bio Grow Fertiliser and CalMg with each watering. pH I drop to 6.0 with Plagron's Lemon Kick.
At the end of the week, more precisely after taking photos for day 21, I increased the power of the led lights to 80%.
Here is a quick overview of the week:
10/08/2024 - Day 17.
Watering.
I prepared 8 liters of water, added Bio Grow Fertilizer and CalMg and with that amount I evenly watered all three plants on the farm.
13/08/2024 - Day 20.
Watering.
I repeated the same procedure as the three days before.
14/08/2024 - Day 21.
Photographing and measuring the height of the plants.
Official end of the vegetation phase.
Purple Lemonade - Day 21. - 33 cm
That's all from me for this week, thanks to everyone for the comments and see you soon.

Likes
7
Share
@hooolian
Follow
04/02/22: Had some mishaps - I visited the grow room and various branches had fallen over due to the weight of the buds - big problem with large sativa breeds. I managed to use large garden sticks, cable ties and plastic clamps to secure them. Other than this plants all looking fine fine fine - large colas throughout - some are even starting to show brown pistils. smell is strong.


Likes
2
Share
@NewbieLearner
Follow
Been slack with the updates as we are busy buidling a new greenhouse. will make sure I take nice individual photos for harvest though.
Likes
17
Share
@chupacabra80
Follow
все идет вроде нормально ,я немного срезал листья но не очень много,высоту сами видите )))))))))
у производителя в indoor написано меньше. у нас очень жарко сами видите 😯


Likes
16
Share
@ChrisNbran
Follow
They been changing colors and thinking up I finally upgraded my light got a spider farmer 2000 and a 1000 in my 2x4 now so they should take off and get a lot beefier I been adding nutes every feed no major problems waiting on my cal mag to come in the mail happy growing until next time peace update they are bulking up and trichomes is really popping now I tried out blackstrap molasses as a dollar spray just to see how it worked if you shop at fast buds use the discount code #kygrow and get you a 15%percent discount on the whole store and it’ll help me out along the way happy growing peace

Likes
28
Share
@foxbberg
Follow
Flipped to 12/12 at day 43.
Raised light-intensity from 60 to 90 %.
Now +70% of the net is filled and i can see potential to make it an evenly shaped bowl full of fruits:-)
The deep, dark colour has turned to a juicy green, shoots everywhere....... everything fine but two little things:
1) run-off-pH is a bit high...... 6.6-6.9. will feed rather acidic next time....
2) Main Colas get a bit tall..... will supercrop them as soon, as the rest of the cannopy is organzied to a clean scrog.
Nutritionwise i lowered N, raised K and gave an extra P-shot (0,05 g/L BLOSSOM-BOOST) on days 43 and 44.
Day 45
fed pH 5.8 - readings immediatly dropped to 6.3 to 6.5 👍
Vigorous stretch.....!!! Mounted some more hooks to get the scrog even - works perfectly now! +80% of the net is filled......and the colas in the corner almost make plants of their own - i will supercrop them, as soon as they don't stretch any more.
Day 46
fed pH 6.1 today..... readings still good (average 6.4)
took out some more leafs today, to give a little more light to young shoots.
Smell is getting stronger, but no visible signs of flowering yet.
Likes
15
Share
@Silverback_Guerilla
Follow
SUNDAY 5/19:
I accidentally left my UV timer in the "ON" position all night and half of the next day...fearing sudden death, I have moved everybody that was almost ready into the dark tent, including the two Tangies and will start harvesting them tomorrow..maximum UVB stress for about 20 hours...if it works out that they are even more potent than expected without turning brown overnight, I'll claim it was "intentional," and purport it as an "advanced technique" 😉
MONDAY:
The both looked fine..no signs of UV damage, so I left them in the dark tent for another day. I'll harvest them both tomorrow and probably wet trim Tina and hang-dry Tanya..she's gonna be a lot of work and I have 5 other plants to harvest as well tomorrow...and I've got to flush several others and water the rest.
Both of these plants absolutely WREAK without even molesting them..delightfully dank!😋👍
Likes
118
Share
@Grow3rPT
Follow
👉 ( Floração ) 👈
📅 Total de Dias 57 (F 27) - 28/09/2021 / Crescimento normal... 😀
📅 Total de Dias 58 (F 28) - 29/09/2021 / 💦 Rega apenas com agua
📅 Total de Dias 59 (F 29) - 30/09/2021
📅 Total de Dias 60 (F 30) - 01/10/2021 / 💦 Rega com nutrientes ( Grow + Micro + Bloom )
📅 Total de Dias 61 (F 31) - 02/10/2021
📅 Total de Dias 62 (F 32) - 03/10/2021 / 💦 Rega apenas com agua.
📅 Total de Dias 63 (F 33) - 04/10/2021
👉 MARSHYDRO
👉 CODIGO PORMOCIONAL : Grow3rPT
👉 Em marshydro.eu 3% de desconto em qualquer produto

Likes
15
Share
@ExterminatorX
Follow
I was out of the tent and forgot to update the HARVEST.
M.1- 14g
M.2- 14g
M.3- 20g
M.4- 16g
M.1.2- GREEN AND SWEET, VALUED AS ONE MY BEST CURED.
M.3.4- FROSTY, SWEET, NOT MUCH THC.
Done
Likes
8
Share
@Zark002
Follow
Segue engordando bem, acho que vai mais 15 dias.
Tirei algumas fotos e ainda não tem tricomas ambar. Também fiz uma desfolhação recente. Acho que vai mas 10 dias
Processing
Likes
21
Share
@LittleBigTrees
Follow
I started Flushing two plants as there nearing the end of there days. I'll start Flushing the others this week apart from the kalimist indica pheno as it started flowering 3 or so weeks after the others even though they were all forced together. (alkward bugger)
Some of the plants are showing red /purple colours a little bit 👍