
Likes
Comments
Share


@Willy_Balls
Follow
A couple of days into first week of flowering. Plants look very juicy, thick and super vigorous. They like the higher ec and co2 this time around.

Likes
7
Share


@Mikeyc420
Follow
Week 2 of flowering
Growing better then my first one now I have learnt abit more about the F1 hybrid
Good amount off bud sites growing with steady feed of shogun fertilisers
Any advice would be appreciated 👍


Likes
13
Share


@NicoKh
Follow
Was a little bit challenging for me, due to the outdated nutrients table, mostly on the Flowering period, also little thing like i have to fill more the pots, also with this kind a strain and also with cuts instead of seeds, may be is better to don't do the topping and don't loose time and energy on the vegetative period. At the same time, more or less about the 8th week of flowering it starts to appear something like Alternalia or Overfeed of Phosphor still don't sure. All this issues have impact the grow in terms of the size of the branches and the whole plant, the size of the buds and the hardness.
In strictly terms about the strain, the quality is out of mind, amount of resin is crazy, just have to improve my skills and get bigger crops

Likes
43
Share


@TheCannaProphet
Follow
~Entry for the 'Best Rarest & Smallest Pot by Seedsman' contest~
Starring 🤩....
~ Seedsman Zkittlez Auto ~
Zkittlez (Grape x Grape Apple) Auto x Auto Fruit (Auto Fruit Cheese x Auto Blueberry)
Zkittlez Auto is one of the very sweetest-tasting auto strains available anywhere. It is a sativa-dominant (60%) strain that was bred from Zkittlez (Grape x Grape Apple) Auto crossed with a male Fruit Kush Auto, the latter a remarkable fruity strain bred from Fruit Cheese Auto and Blueberry Auto. Growers can expect to harvest some good yields of high-THC buds.
Zkittlez Auto remains a fairly short plant, rarely exceeding 120 cm. in height wherever it is grown. This is a vigorous plant which is able to metabolize a high level of nutrients and she's a thirsty girl too! If growing indoors close to neighbors it is strongly advised to ensure good and effective carbon air-filtration in order to neutralize powerful odors. This strain's life-cycle is approximately 90 days from seed to harvest.
The leaves on this plant are big and wide serving to convert every lumen available into Zkittlez goodness. Indoor growers should obtain between 400 - 500 gr/m2 while plants cultivated outdoors will produce slightly more at 500 - 600 gr/m2. Lateral branching is very good and it is recommended to use supports/ties to prevent snapping and keep buds close to the light source.
This strain's scent is sweet and fruity with candy and berry notes. Its high-THC has been measured at between 21 - 24% with less than 1% CBD. The effect is well-balanced, cerebral and euphoric, and is very good for social situations as well as for relaxing in front of the TV either alone or with company. It also has the added effect of helping to relieve chronic pain, helping with nausea, insomnia and depression as well as stimulating the appetite.**
**Credit to Seedsman.com
________________________________________________________________________________________________________________________________________________________________________________________________________________________________________________________________________________________________________________________________________________________________________________________________________________________________________________________
~ The Setup ~
~ Grown in a 2qt plastic popcorn pot filled with Mother Earth Grow 70/30 Coco/Perlite with Xtreme Gardening Mykos added.
~ Seed was germinated directly in the medium without any 'pre-soak'
~ Feeding will be by Dutch Pro Nutrients
~ 24hr light cycle while germinating
~ 20/4 light cycle after first leaves appear.
~ 4x8 Gorilla Tent
~ HLG 650R w/ 30w Supplemental UVA Bar controlled by a Trolmaster Hydro X controller set for a 15min Sunrise/Sunset simulation. (also a HLG Blackbird for additional side lighting if necessary)
~ Supplemental co2 controlled by an AutoPilot APC 8200 co2 controller
~ AC Infinity Cloudline T6 with Controller 67 using a Terrabloom 6x24" carbon filter
~ De-Humidifier and Humidifier when needed.
~ 14k BTU IdealAir portable A/C unit plumbed into tent for temperature control.
~ BlueLab testing instruments
~ Two Hurricane 18" oscillating fans
~ Two 6" Clip-on fans
~ Two 10" floor mounted fans
________________________________________________________________________________________________________________________________________________________________________________________________________________________________________________________________________________________________________________________________________________________________________________________________________________________________________________________
Weekly Update:
11/8- Well here we go into the first week of Veg for the Zkittlez Auto from Seedsman Seeds! I have her nestled in between a bunch of other autoflowers that are one month old now so she's got lots of company!
Since sprouting the Zkittlez has bee doing exceptional, with good color and vigor. I was a little concerned about her when she first sprouted as her first leaf set had a funky color to them and I feared that she wouldn't survive. But low and behold, when she opened up her leaves they turned a beautiful green and she's been looking healthy ever since!
Today I gave her her first water/feed with 20oz of well water with a base ppm of 100, to which was added the following Dutch Pro nutrients: Grow 'A' & 'B' @ 10ml/g, Multi Total @ 7.6 ml/g, Take Root @ 3.8 ml/g, Silica Von Liebig’s Special @ 1.2 ml/g along with Earth Juice's Oily Can @ 5 ml/g. After adding the nutrients I ph'd the solution to 6.1 @ 74℉
11/10- The Zkittlez is doing really well in her little Popcorn Bucket! I didn't water her today, but will wait until tomorrow to avoid over watering her.
11/12- Yesterday I went ahead and watered/fed the Zkittlez with 20oz of well water with a base ppm of 100, to which was added the following Dutch Pro nutrients: Grow 'A' & 'B' @ 10ml/g, Multi Total @ 7.6 ml/g, Take Root @ 3.8 ml/g, Silica Von Liebig’s Special @ 1.2 ml/g along with Earth Juice's Oily Can @ 5 ml/g. After adding the nutrients I ph'd the solution to 6.0 @ 75℉.
The Zkittlez Auto is doing great, has good color, vigor and already has her third leaf set emerging!
11/14- Today when I checked her pot the Zkittlez auto was still pretty moist so I'll be waiting until tomorrow to water/feed her.
The Zkittlez Auto is doing fantastic without any visible health issues, has good color and now has her third leaf set almost fully emerged!
Well it's been a fun week watching this little girl grow and the coming weeks promise to be more exciting as they pass and she gets her groove on! See you next week! 😎❤️
~ Thank you from the bottom of my heart for following my grows and for all the ❤️and support you give! 💚What you grow - Grow what you💚

Likes
Comments
Share


Processing
Likes
21
Share


@JuicyFruit
Follow
Day 55 - 18/11/19
i still think another 1-2 weeks for this one, getting a jewelers loupe for the beginning of week 9 so i can tell exactly where were at in terms of harvest :) anyone got any thoughts on this little plant? have a look at the photos and videos and let me know in the comments below :) oh and i finally nailed what this strains smell is - tropical hubba bubba gum with cheese :'D
Day 59 - 22/11/19
Got my jewelers loupe 2 days ago and ive been having a look at them. its pretty hard to see for a newbie grower. ive looked at harvest guides online and seen pictures of clear, cloudy and amber trichomes. mine look mostly cloudy (60%) and slightly glassy (40%) with barely any ambers. i may be wrong but the reason i think its cloudy is that it looks white against the leaves instead of see through or like glass. so going on this for my first trichome inspection im gonna harvest in the middle of next week.
Smell is getting strong enough to stink out a room, still that tropical cheese smell, although its just so pungent it lingers in the rooms after bringing it out of the tent to inspect it. smell isnt a problem if you put it back in the tent and spray some air freshener stuff in the next room. the carbon filter is doing its job exactly as described along with the fan.
The fan leaves started to get yellow patches and sugar leaves starting to curl. and a friend thinks its nearing the end of its life.
I flushed yesterday and will flush again today to drain out any excess salts and nutes.
Thanks for following along.
im excited for week 9!
Happy Growing!


Likes
23
Share


@Ferenc
Follow
Day 72: 600W LED, 18 hours on 6 hours off the same with ventilation. No more ferilization. Water intake also remains the same 200ml per day. Humidity approx 35 percent.
Day 74: She is done I just checked the trichomes getting amber Friday is harvest. No more water so 3 days no watering.
Processing
Likes
14
Share


@kevgrow
Follow
Hey Friends, end of week 11 from seed ☺️
Not much has changed this week in the growth of plant #2.
I noticed some orange on the leaf tips. This can be due to overfeeding nutrients or because I recently ran into a problem with my Ph meter, it broke so I had to purchase one at a local Hydroponics store, different model so it was giving me different readings. For example, after adding nutrients to the water, ph would read 4.5 - 5.0, with the old ph meter I would add 10 drops of ph up and it would rise to 6.0 - 6.2, with the new ph meter it goes down to 4.2 when adding nutrients and I need around 20-30 drops to bring the ph up to 6.0 +. The old ph meter was less expensive I purchased it for $15, and the new ph meter cost me about $60. I guess the new one gives me the correct reading. The plant was used to the old feeding dosage now it just needs to adapt to the new feeding.
Noticed some of the top leaves had curls so I lowered light intensity.
An increase in red stems so ill keep lowering the light to avoid too much strees
Colas are growing in width
Smell is slowly getting stronger, not sure what strain it could be but it looks and smells like cookies and og.
No amber trichomes yet, maybe there is some already but its not very noticeable yet
QUESTIONS
How long before flushing?


Likes
4
Share


@OranGoodAng
Follow
Наконец примудрил обдув для растихи. На днях придет изолонтейп для шумоизоляции. Немного переделаю выдув и поменяю уголь в фильтре
6й день от перевода на 12/12. Растет активно, но я ее загибаю в ковёр, так как неоднократно были проблемы с недостаточностью высоты бокса. Так что пусть лучше будет поменьше))
По опыту могу сказать, что до зацветания ещё больше 10ти дней. За это время успеет несколько раз ещё порвать бокс.
Лью сейчас удобрения Simplex Coco в минимальной дозе на вегу. Растению хорошо, и в дренаже ппм не растёт. Так что едем дальше)))
Из проблем, только отсутствие нормального обдува для расты. Со дня на день придется что-то решать с этим.
Likes
209
Share


@BioBuds
Follow
It was finally time to harvest her, what good times we had with her. Amazed with how beautiful this plant is, how easy to manage and train and how rewarding Orange Hill Special is.
So we said our thanks and goodbye, thanked her for all the joy she gave while growing her. I realize more and more how I love growing them even more than the end-product.
It takes my mind of all going on for a while, in my miniature jungle world in the attic.
Im sure all of you just sometimes sit there and watch them, in wonder, dreaming away with a good buzz on, watching them wave in the wind of the fans.
So with a heavy hart I apologize, play them their last music, sit with them and feel them and smell them, watch the glistening of the cristals.
In the end we had 209 gram dried Orange Hill Special, I will know the total of the grow, in a few days, since the final big whopper still has to dry: my XtraKush, be sure to check the harvest of that one *in couple of days) and see a one-dollar seed outperform two 10 dollar seeds.
I probably go over 500 grams for the total grow, which would be 1.6 grams per watt. Big success!
Consider an SP-3000 for your next light, you won't be disappointed! Check www.mars-hydro.com for the latest discounts!
Thank you @MarsHydroLED for letting us try out your light, it made this successful grow possible!
Greetings and all the best! Thank you to our friends here, our followers and the whole Growing Diaries community for just being there.
Big Hug,
Sunshine and BioBuds


Likes
89
Share


@nonick123
Follow
Dia 20 (05/02) Han pasado 8 días desde el ultimo riego. El sustrato de PRO-MIX HP se encuentra esponjoso al tacto a pesar de que está seca la parte superior
Riego 1 Litro H20 + Wholly Base 1,25 ml/l + Solid Green 0,5 ml/l + Rise Up 1 ml/l de Gen1:11 - pH 6,23 TDS 660 PPMs
Día 22 (07/02) Vamos a probar a hacer este ciclo con LST
Día 23 (08/02) A +24 horas la planta ha reaccionado muy bien al LST. Se han estirado las ramas inferiores y la rama apical se sigue estirando
Día 25 (10/02) Sigo con ajustes de LST para abrir la canopia. La planta está reaccionando con mucho vigor 😍💥
Este día añado a la carpa el sistema TrolMaster TCS-1 Tent-X
Día 26 (11/02). Riego 1 Litro H20 + Wholly Base 1,5 ml/l + Solid Green 0,75 ml/l + Rise Up 1,25 ml/l de Gen1:11
TDS 780 PPMs - pH 6,36 (mínimo ajuste con pH+ para subirlo desde 6,2)
La planta avanza vigorosa. En una semana pasamos a 12/12 😁
Nutrients by Gen1:11 - www.genoneeleven.com
Substrate PRO-MIX HP BACILLUS + MYCORRHIZAE - www.pthorticulture.com/en/products/pro-mix-hp-biostimulant-plus-mycorrhizae
Controlled by TrolMaster TCS-1 Tent-X System Main Controller - https://www.trolmaster.com/Products/Details/TCS-1
Likes
43
Share
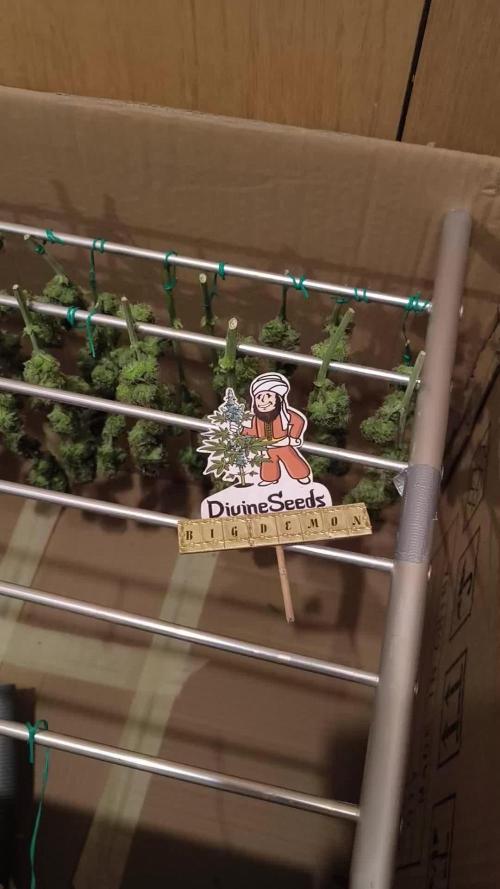

@DevelGrow
Follow
Hallo Freunde 👋 es wurde Zeit und Big Demon wurde der Schere zum Opfer! Dieses Mal wurden die buds am Ast getrimmt und ab in die Kiste! Mal schauen was rauskommt!

Processing
Likes
6
Share


@Growers4life
Follow
Gave my girls a trim got all those half eaten leaves with spidermites then made a mixture of soap eucalyptus , and teatree essential oils and gave them a bath in it. (Sprayed em down with a spray bottle) seems to have worled so far gonna make a few more times and spray my ladies down a few more times so as to kill the bugs when the eggs hatch.the are starting to look better and hopefully they thrive. Week one flowering!!!!!
Likes
13
Share


@KirbyFarm
Follow
This was my first outdoor autoflower experience. Very happy with the results. Buds could have had a better taste in my opinion but that is just preference.
Likes
23
Share


Likes
30
Share


@Grileon
Follow
Back home.
All 8 branches looking well. Thay have grown fast during this 7 days.
The roots look healthy and white. This week want to try not to change full res. Just going to add some nutrients so that the ppm goes to 600. Let's see how it will work.
Also did some lst on every branch. Trying to make them as horizontal as possible for now. Hope to start scrog next week.
Likes
11
Share


@Budking420
Follow
This week she has the most amazing colors and smells. I am very pleased with her and I'm going to pop another strawberry gorilla and cherry cola off for 2 more diaries! Might not pop them off till next week but I'm thinking this plant is very close another week or so and she should be done or very close!!!! Check back next week to see just how fast she finishes and remember it's always 4:20 somewhere!!!!!