
Likes
Comments
Share


@1Prinz
Follow
I’m drying the plant inside of a closed room with a vent. I still have 26 degrees and a humidity of around 60%-55%.
Final Result: 15g dry

Likes
23
Share


@RadDad
Follow
😎
This week I successfully transplanted Blueberry to her forever home, which is a 5 gal. Lumo-X fabric pot filled with good old potting soil. Once in her new pot I gave her 500ml water with Dutch Science's Seed and Root formula. She looks healthy and strong but still very young. I'm really keeping an eye on my light levels because i'm trying to avoid stretching. Controlling stretching was one of the bigger mistakes I first made during my first ever grow last summer.
So far everyone seems happy in the tent despite have 3 different plants at 3 different stages of growth.
Grow strong little one we have lots of training to do 💪.


Likes
93
Share


@PEAKYPLANTERS
Follow
masters and beginners
walcome to peaky garden
thank you again for gathering on the pages of my diaries! we carry out our work with dedication and live on ambition!
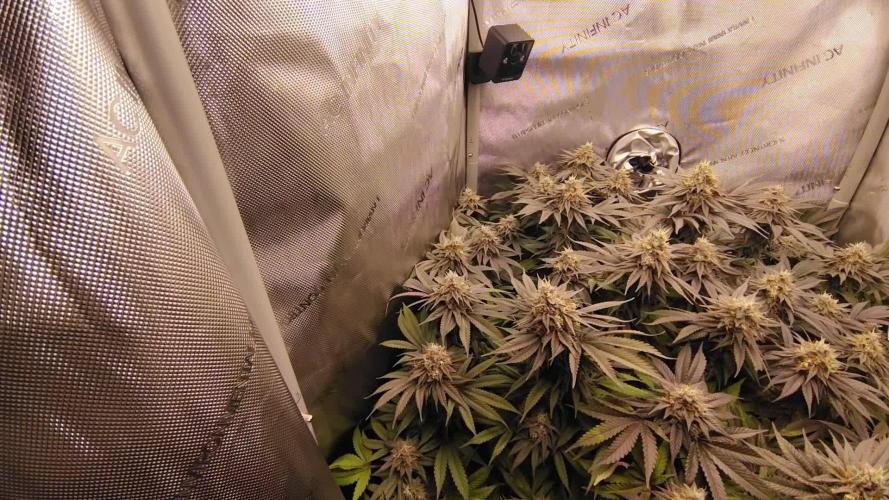
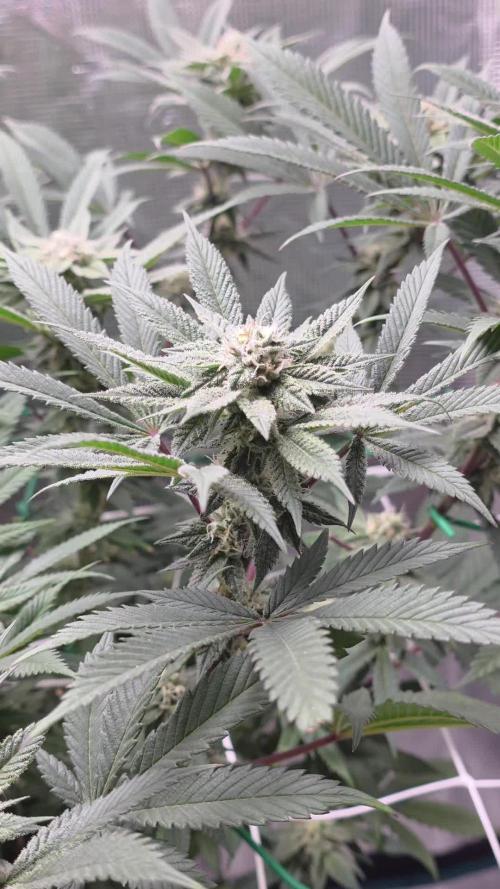
friends .... but have you seen my zkittelz as it begins to show the traits of a gorilla?
It is huge!
My girls ride beautifully and look very fit !

Likes
165
Share


@Tropicannibis_Todd
Follow
💩Holy Crap Growmies We Are Back💩
So what do you say we have some fun 👈 We got some EXOTIC SEEDS 👉 👻👻👻MONSTERMASH👻👻👻 😛
Well my friends we are just at the 21 day mark and as you can see the righty won 🏆👈
👉 So now i felt i need to start training her over to maximize her growth by doing some LST 👈
Lights being readjusted and chart updated .........👍
👉I used NutriNPK for nutrients for my grows and welcome anyone to give them a try .👈
👉 www.nutrinpk.com 👈
NutriNPK Cal MAG 14-0-14
NutriNPK Grow 28-14-14
NutriNPK Bloom 8-20-30
NutriNPK Bloom Booster 0-52-34
I GOT MULTIPLE DIARIES ON THE GO 😱 please check them out 😎
👉THANKS FOR TAKING THE TIME TO GO OVER MY DIARIES 👈

Likes
19
Share


@LueRootsGrowGermany
Follow
Hallo Liebe Community!
Leider gab es einen Nacktschneckenbefall den ich feststellte als ich am Samstag von meinen unvermeidbaren Terminen wieder kam. Auch ein Sonnensegel musste zwecks Schaden entfernt werden :-( Was mir gar nicht gefällt und ich auch arg dran zu Knabbern hab...
Seitdem bin ich jeden Tag auf der Hut und ich habe den Untergrund der Untersetzer ein wenig Schneckenuntauglich gemacht.
Ehrlich gesagt wollte ich heute los und was gegen Schnecken besorgen aber bisher scheint es gut zu funktionieren.
Ja die Natur halt, es kommt doch immer wieder was neues :-)
Zum Wachstum
Stamm und Blattwuchs machen sich gerade echt super, Seitentriebe entwickeln sich top (einige wie auf den Fotos zu sehen ist, sind beschädigt).
Leider kommt ihre Buschige Form durch den Verlust des Sonnensegels aktuell nicht so zum Vorschein, aber ich denke sie kann das noch demnächst ein wenig gut machen.
Mein Ziel sehr Naturgewachsene Pflanzen zu schaffen in diesem Run, um echte Fotos zu Erhalten (Portfolio).
Sie trinkt ca. 500 ml, eher etwas mehr.
Das Wetter ist aktuell eher grau aber dafür hält sich der Regen in Grenzen.
Bis nächste Woche! Euch eine angenehme und Erfolgreiche Woche gewünscht!
Viele Grüße an die Community und Kollegen!
LueRootsGrowGermany!

Processing
Likes
2
Share


@AirDem
Follow
Jusqu’à présent ça va je pense . J’ai ajouté le 20 avril 20 un peu de tonte de gazon par dessus pour couvrir un peu et par temps chaud j’ai l’impression que ça garde la terre à la bonne humidité.

Likes
44
Share


@SooSan
Follow
13 jours de 12/12
OK il y a du changement !
Dans la partie du scrog vertical le stretch n’a pas été assez fort
J'ai donc abandonné la culture verticale pour cette fois
J'ai donc fusionné le bas de la tente pour avoir un espace de 90x60x90
Le ts1000 a été retiré pour laisser la place aux barres du FC-E 4800
Et bien sur gros LST pour gagner en surface et gagner 20 à 30cm de hauteur
Vu qu’il y a 16 plantes mais que sur growdiaries on ne peut mettre que 8 variétés j'ai divisé en 2 diaries pour le bas de la tente
1️⃣
🏠 90x60x90
☀️ FC-E 4800 => puissance a 20%
🍁
1x Black Bomb / Philosopher Seed
2x Amnesia Lemon / PEV Seeds
1x Blueberry / PEV Seeds
1x Blueberry / 00 Seeds
1x Wappa / Paradise Seed
1x Dark Phoenix / Green House Seed
1x Quick Sherbet / Exotic Seeds
1x Mango Cream / Exotic Seeds
1x Banana Frosting / Sensi Seed
1x Hindu Kush / Sensi Seed
4x Fast Mix / Sweet Seed
📎 https://growdiaries.com/diaries/122084-grow-journal-by-soosan
📎https://growdiaries.com/diaries/124052-grow-journal-by-soosan
2️⃣
🏠 30x60x50
☀️TS1000 => puissance a 50%
🍁 4x Quick Sherbet - Exotic Seed
📎 https://growdiaries.com/diaries/122080-grow-journal-by-soosan


Likes
2
Share


@Greenbean15
Follow
Large 2x4 tent: Pineapple Express far back left corner, white widow front left corner; berry-white middle and purple trainwreck far right.
Small 2x3 tent- purple trainwreck on week 7-8 of flower and white widow on week 3-4.
Male-separated in a dark non-aerated room
All the girls are growing well. Berry white suspected plant is still looking indica. Purple trainwreck is budding well and stretching too. Much more than I’ve seen other PT plants do, I don’t think the nodes are too spaced out though. White widow is starting to frost up. This particular plant is a clone, the mother developed buds on the leaves and the fan leaves were covered in trichomes giving me lots of good trim for edibles. The leaves are already beginning to frost up. The Pineapple Express is a bit out of control, I had to put a second net up to control her. I went ahead and super cropped her as well, I did snap a few branches but she doesn’t appear to be phased by the damage.
I selectively pollinated specific branches on each female in the larger tent. The male was removed before the pods opened. I think one pod may have already split but I tried to minimize his natural pollination. He was moved into a different room with no air flow and no light. Pods opened in a few days and I used tips to collect pollen and then dab onto buds. Pollinated branches are marked with a green tie around them. I’m hoping that by spraying the tents with water after pollinating that I didn’t pollinate the entire tent.
Here’s to hoping for neat seeds for in the future whenever I am able to grow again and for good bud 👩🌾🏼🌱

Likes
6
Share


@Va_smoking
Follow
I accidently let this one dry out TWICE... so she took a while to sprout. Glad I didn't kill her


Likes
3
Share

@Dottgreenthumb
Follow
La fioritura avanza si iniziano a intravedere i calci gonfiare sulle cole dello strain e questo mi piace la pianta sta sviluppando tantissima resina molto positivo ho versato ad 1.4 di ec compreso partendo da 0.6 con calcio e magnesio lo scolo è di 1.6 un po basso la prossima annaffiata settimanale aumento

Likes
179
Share


@Grow3rPT
Follow
👉 ( Floração ) 👈
📅 Total de Dias 71 (F 41) - 12/10/2021 / 💦 Rega com nutrientes apenas planta 4 ( Plantas 1,2,3 e 5 não foram regadas )
📅 Total de Dias 72 (F 42) - 13/10/2021 / 💦 Rega com nutrientes plantas 1,2,3 e 5 ( Planta 4 não foi regada )
📅 Total de Dias 73 (F 43) - 14/10/2021 / 💦 Rega apenas com agua planta 4
📅 Total de Dias 74 (F 44) - 15/10/2021 / 💦 Rega planta 2 apenas com agua. Plantas 1,2,3 e 5 não foram regadas
📅 Total de Dias 75 (F 45) - 16/10/2021 / 💦 Rega de todas as plantas apenas com agua
📅 Total de Dias 76 (F 46) - 17/10/2021
📅 Total de Dias 77 (F 47) - 18/10/2021 / 💦 Rega apenas com agua (apenas a planta 4) 1,2,3 e 5 não foram regadas
👉 MARSHYDRO
👉 CODIGO PORMOCIONAL : Grow3rPT
👉 Em marshydro.eu 3% de desconto em qualquer produto


Likes
20
Share


@Boomdrawfyah
Follow
Dia 134 y semana 6 de floración,ultimo dia de vida de las plantas.
Este año ha sido un poco raro las plantas han crecido como monstruos tuvieron un crecimiento espectacular un tallo muy grande y junto con sus ramas flexibles y muy resistentes. Pero al llegar el engorde de floración no se porque les falto el empujon final para hinchar el cogollo, tiene muy buena pinta , mucha resina y muy fuerte buen olor pero me esperaba mas en la fase final. Cortamos ya que tambien habian orugas y no terminaba de eliminarlas por completo, la semana que viene era entera de lluvias así que decidi cortar un poco mas temprano para poder prevenir cualquier mal mayor, hay mucha gente que le gusta cortar antes de tiempo ya que el efecto es muy diferente, este año probaremos que tal.


Likes
12
Share


@Tazard
Follow
WOW she is a monster! Just shy of 2 meters! Well 1.7 meters. Still good for a strain that is rated for 0.9 meters. She is developing quite an impressive stature with an abundance of beautiful bud sites.

Likes
13
Share


@KIOSKOdeCHUKI
Follow
Hola amigos!!!! Buenos os comento un poco la situacion; me quedo al final 3 runtz 3 bruce bummer 1 girl scouth cookies y 1 lemon haze auto..me a decepcionado los regalitos que hace la pagina eurogrow..ultimamente no sale nada bien con ese tipo de semillas de regalo.veremos y estaremos pendientes de que no salga algun macho.un saludo estamos en contacto!!👍👍👍
Likes
1023
Share

@Grow3rPT
Follow
Cultivo Led The Jungle ( The Smith 150w 4000k ) - Não tem esta opção para colocar no diário.
Semana 8
Total Dias 50 - 30/05/2021
Total Dias 51 - 31/05/2021 / Rega 1L x 4 Plantas ( Nutrientes GROW e BLOOM) Estou com alguns problemas de nitrogénio. ( Talvez potássio também)
Desfolhamento de algumas folhas que não estavam a apanhar luz
Total Dias 52 - 01/06/2021
Total Dias 53 - 02/06/2021
Total Dias 54 - 03/06/2021 / Rega 1L x 4 Plantas ( Nutrientes BLOOM e BioBizz CalMag)
Total Dias 55 - 04/06/2021
Total Dias 56 - 05/06/2021

Likes
3
Share


@Casa_das_Arvores
Follow
Olá amigos, obrigado por acompanhar meu diário!
Siga meu perfil, deixe seu like, comentário ou dúvida, ficarei feliz em ajudar se eu puder.
Mais uma semana tranquila, nenhuma grande alteração dos parâmetros de temperatura e umidade, ph ou EC. Realizei a retirada das folhas mais antigas pois elas estavam enormes e largas, ocupando espaço de iluminação das plantas menores com quem dividem espaço. Em breve faço a colheita da Gorilla Rainbows e elas irão para o grow de 0,8x0,8 e terão maior espaço aéreo e de raízes para finalizar sua vegetação e em seguida farei a virada para floração.
Fiz um ajuste na nutrição para poder testar. O objetivo e conseguir entregar os ppm de cada elemento muito próximo do feedchart da Advanced Nutrients, porém usando fertilizante mineral muito mais barato e acessível no meu país, e algumas sobras q tenho da linha GH
Sigam também meu Instagram @casadasarvoresgrow
Cultivo Medicinal pessoal. Não vendo, não dou e não compartilho. Mais um brasileiro em desobediência civil buscando na natureza a sua saúde
Likes
17
Share


@Fishcake
Follow
The girls got the chop last Friday having a bit of bother with humidity at 70% at 23 c but I can get it down to 60% humidity but the temps drop to around 16 c I'm also attempting to reveg the zupreme just incase its nice lol I already have a baklava reveging now will make a diary for those tomorrow
