
Likes
Comments
Share


@HegauHillsFarmers_M11
Follow
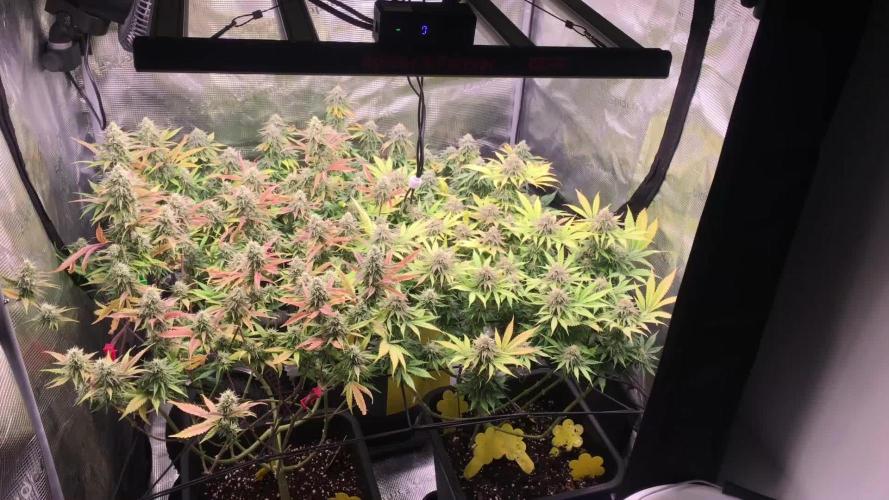
Tag 49 - Ende der 7. Woche.
In dieser Woche haben die Blüten nochmal ordentlich an Volumen dazu gewonnen und produzieren eine dicke Harzschicht. Auch der Duft der Blüten wurde in dieser Woche intensiver.
Da sich die Pflanze nun vollkommen auf die Produktion der Blüten konzentriert, habe ich den Dünger nochmal etwas angepasst/verändert um der Pflanze alle Nährstoffe zu liefern die sie für die Produktion der Blüten benötigt.
An Tag 43 wurde die Pflanze gedüngt.
Nährstofflösung:
2 ml/l - B-52 Advanced Nutrients.
4 ml/l - pH Perfect Sensi Bloom Part A
4 ml/l - pH Perfect Sensi Bloom Part B
2 ml/l - Bud Candy Advanced Nutrients.
2 ml/l - Big Bud Advanced Nutrients.
Davon hat die Pflanze 1l an Tag 43 erhalten.


Likes
17
Share


@GangbudsGenesgdl
Follow
14/12/20
inicio de semana, se le aplico dos cucharadas de leonardita y dos mas de harina de cangrejo riegos solo con agua, se metio al invernadero una led bestva 600w elite tanbien se rego con un poco de algantic potasium se le relleno con 4cm de sustrato se le ato las puntas del apical alas hojas de abajo
15/12/20 55cm de altura
18/12/20
ya cuenta con 58cm de altura
20/12/20
cierre de semana asta la fecha riegos solo con agua

Likes
Comments
Share


@eldruida_lamota
Follow
Vamos familia, actualizamos la cuarta semana de crecimiento de estas Black Rainbow de Seedstockers, salieron las 3 de 3, 100% ratio éxito.
Aplicamos varios productos de Agrobeta, que son increíbles para aportar una buena alimentación a las plantas.
Temperatura y humedad dentro de los rangos correctos dentro de la etapa de crecimiento.
La tierra utilizada es al mix top crop, por cambiar.
De 3 ejemplares seleccioné los 2 mejores para completar el indoor y trasplanté directamente a macetas de 7 litros, se ven bien sanas las plantas, tienen un buen color y progresan a muy buen ritmo por el momento.
Agrobeta:
https://www.agrobeta.com/agrobetatiendaonline/36-abonos-canamo
Hasta aquí todo, Buenos humos 💨💨💨.

Likes
61
Share


@Roberts
Follow
Sweet Bourbon Kush auto has exploded in growth in the last week. She got her second heavy dose of lst today. She is looking pretty strong, and healthy. Hopefully it continues. Thank you Super Sativa seed club. 🤜🏻🤛🏻🌱🌱🌱
Thank you grow diaries community for the 👇likes👇, follows, comments, and subscriptions on my YouTube channel👇. ❄️🌱🍻
Happy Growing 🌱🌱🌱
https://youtube.com/channel/UCAhN7yRzWLpcaRHhMIQ7X4g

Likes
8
Share

@Thedibber
Follow
Bottom left I forgot I mixed with coco as I didnt have enough livingsoil left to fill the pot. Showing some signs of fading but giving it a dose of biobizz tonight and 50g 2 8 10 amendment to each. Watering 2L each every 2days still. Weekly microben feed at 5ml per L
25/10/25 - Added 55g of 2 8 10 amendment to each pot and mixed then watered 2L 5ml per L microben Ph6.8
27/10/25 - Watered 2.5L each Ph6.8


Likes
100
Share


@AsNoriu
Follow
Day 111. First is ready, second week behind, third maybe even 3 weeks behind ....
Plus they are LEAFY ,!!!!
Trim jail ...
Wet trim for all of them - no doubts !!!
Day 115. Still hanging, slowly drying and result should be decent at the end ... A week more I guess, very humid in UK ...
Day 118. First trimmed - 175 g. Other is chopped ! One still grows ...
Day 136. Chop day for the last one !!! Long run ....
Happy Growing !!!

Likes
11
Share


@Organic473
Follow
This week was extremely hot. No heat stress on the girl. I love the progress so far.
Likes
28
Share


@TheHighentist
Follow
It's officially week 4 of veg.
What a ride! These ladies DO NOT give up and neither did i.
Second grow, it is a learning curve.
With all the growth stunned, i am a bit impatient.
BUT the good news is the smallest have starting growing again.
Anyways...
👽👉19/9 New automation program for this week. (See pictures for app screenshots for automation and datalogger)
Temps - 21night/29day
RH% - 60RH night / 68RH day
My plan is to decrease the humidity at night, to increase the vpd.
The same goes for my light output and nutrients.
Changing the variables gradually over time.
👽👉20/9 I topped two more plants.
The growth is gradually getting better. They should be ready for their first real feed tomorrow. (Only top fed them last watering)
👽👉21/9 ** First real feed.
-They reacted well to a last lose dose top feeding, so this time i will give them a full feed, but same low dose.
-Programmed new automation based on VPD Graf (see pictures) Set to 1.0 VPD. // Inkbird app, i am adjusting the RH% to the temp in the tent.
-Did some experimental LST on one of the smaller ones.
Dont have a co2 meter, but have co2 bag. But it has not been added as a variable to the climate calculations.
👽👉22/9 The new automation program has proven efficient and working(for now). Now its interesting to see the plants adapting the constant VPD.
👽👉23/9 Did some more LST work to keep the tallest ladies at level.
👽👉24/9 Visiting the ladies and checking up on the lst work. Tucking in leaves, plotting my next move.
*Water day. they shared 5 Liter, where the bigger ones got more.
PH 6.4 - EC 1.52 (Last water was PH 6.4 - EC 1.37)
1.5ml/L Bio heaven+Bio fish. (Next time they will get 2ml/L)
👽👉25/9 Turned up the lights from 75% to 100%. Temps are about to rise higher. might as well let the ladies get used to it.


Likes
6
Share


@Barcelona_Farmers710
Follow
Aplicamos recientemente jabón potásico por problemas con trips... estamos controlando todo a tiempo, en 3 semanas ya pasaremos al armario grande para continuar dándole crescimiento para las nenas farmers!🍁

Likes
7
Share


@fabialien
Follow
A esta semana le cambiamos radicalmente la solución para que de esta semana en adelante su nutrición sea de la misma linia, principalmente para tener un control del PH en la solución nutritiva .
Likes
37
Share


@D33jW
Follow
ritical Purple Kush was harvested on day 65 of flowering.
This plant was a joy to grow, with no major issues throughout the cycle.
The buds are dense, beautifully colored, and carry a delightful sweet,
earthy aroma with citrus undertones.
Can't wait to see how it cures—it promises to be an exceptional smoke!


Likes
47
Share


@rhodes68
Follow
12/17 Week 12
Wow Layla made to week 12 but this will be her last, trics are ready and just letting her dry out before harvest.
My wife says hers buds remind of Cleopatra from the Adams family... have to remember that new year for Halloween
Maggie - one gal @6.4PH + 12ml Peak Soul finisher maybe her last feeding as hair growth is slowing so looks like next week-ish
Those buds are really getting thick and heavy had to tighten up the support a bit.
12/19 HARVEST DAY LAYLA
Pics up top wet yield 578 grams
am happy
Into the dry boxes (took two) for a few days
UPDATE****
Dry weight 219 grams
12/20 Mag gets another feed still building buds same PH and PK as before.
12/21 Bud production slowing even after the feed so thats all for Maggie, just getting her preped from her on.

Likes
14
Share


@Nuggetnerd_420
Follow
Recycled Living Soil 5 gallon pot PLANET OF THE GRAPES 🍇.. fills my 3x3 she will be a producer!!!! What a keeper pheno just a giver with that frost to boot .. smell is hitting now just fermented grapes 🍇 that’s it

Likes
54
Share


@MrJones
Follow
MrJones Cream Mandeiran Auto XL - ViparSpectra XS2000 240W Infrared Full Spectrum LED Grow Light
´🍪⊱╮🍪╰⊰🍪 WEEKLY GOALS 🍪╰⊰´🍪⊱╮🍪
🏡Indoor - 3"x4"x8" Custom Built Grow Closet
🌞Environment - 80F and 60%Humidity - using Humidfyer as needed.
🌾LST and Defoliation - this strain likes to stretch!
🗓️Week 6 Flower
⚱️5-Gallon 📊5.8/6.2 PH
💧 Feeding / Using Dr. Earth Dry Organic Amendments - Home Grown & Bud / Bloom Booster
🌞ViparSpectra XS2000 240W x2 Infrared Full Spectrum LED Grow Light
🕷️ IPM - Will be using Green Cleaner" 1 OZ per Gallon, and CannControl from Mammoth alternating between products each month for Integrated Pest Management.
´🍪⊱╮🍪╰⊰🍪 PLANT UPDATES 🍪╰⊰´🍪⊱╮🍪
📝 Notes - With week 8 underway, Started the week off with an IPM treatment of Green cleaner, the buds are hard and getting very fat, the ViparStrectra XS-2000 lights are just blowing up on these ladies, just amazing!
╰⊰🍪╰⊰´🍪⊱╮🍪╰⊰🍪╰⊰🍪╰⊰´🍪⊱╮🍪╰⊰🍪╰⊰🍪╰⊰🍪⊱╮
🔶Sunday 08.01.21/ Just watering with H20 PH to 5.8/6.2
🔶Monday 08.02.21/ Watering with 32 ounces daily of H20 PH 5.8 / 6.2 - The plants are starting to show signs of nutrient lockout, adjust the PH to see if I can correct it, just not much time to do anything else.
🔶Tuesday 08.03.21/ Watering with 32 ounces daily of H20 PH 5.8 / 6.2
🔶Wednesday 08.04.21/ Watering with 32 ounces daily of H20 PH 5.8 / 6.2
🔶Thursday 08.05.21/ Watering with 32 ounces daily of H20 PH 5.8 / 6.2
🔶Friday 08.06.21/ Watering with 32 ounces daily of H20 PH 5.8 / 6.2
🔶Saturday 08.07.21/ With the week ending, the ladies ae looking great, just Watering with 32 ounces daily of H20 PH 5.8 / 6.2
╰⊰🍪╰⊰´🍪⊱╮🍪╰⊰🍪╰⊰🍪╰⊰´🍪⊱╮🍪╰⊰🍪╰⊰🍪╰⊰🍪⊱╮
Cream Mandarine XL Auto®️ Information
Tall-stemmed auto-flowering strain. This high-yielding 4th generation auto-flowering strain is the resulting hybrid from the cross between selected specimens of our Cream Mandarine Auto®️ (SWS29)) and a Super Tai’98 elite clone.
The genetic coming from the Super Tai’98 elite clone contributes with interesting Sativa characteristics to this hybrid, such as bigger size, but also subtle aromatic and spicy tones with hints of wood and nuts. The so much appreciated Cream Mandarine Auto®️ genetic contributes with traits from the Indica side, such as high flower and resin production, but also sweet and fresh aromas with tones of citric fruits of the mandarin orange type.
DATA SHEET
Variety SWS55
Indica: 35% / Sativa: 63,4% / Ruderalis: 1,6%
THC: 18-23% · CBD: 0,6%
Indoor Yield: 450-650 g/m2
Outdoor Yield: 50-300 g/plant
Indoor/Outdoor Harvest: 9 weeks from germination
Height: 110-150 cm


Likes
144
Share


@roro_204
Follow
***I’m not sure why but it’s only letting me put 100 growing plants, but I actually harvested 180 plants in three separate rooms of about 300 sqfeet almost each, running in at 350 g per plant ***
Given her being my first grow, I don’t really have anything to compare to but me and my plants have gone through a lot this year.
Definitely going to need filters with this one, for the strong scent.
10 out of 10 would recommend this strain. I tried some fish fertilizer through some of the early growth and everytime I did, I would notice the plants beginning to burn so I completely stopped it, I learned organic is the best way to go if I’ll ever be using fertilizer again. This is the only way I would’ve learned it through experience!
I didn’t think I can make it all the way through with my harvest, but ever since I got on Growdiaries everybody has helped me tremendously with every question I had, without the site my whole to harvest would’ve went to shit along time ago. Haha I really can’t thank my Growmies here enough for all their support. Every time I thought about giving up I would have uplifting comments assuring me my plants we’re doing fine.
A message to all nee growers. Don’t be afraid of failure. Ask questions. I don’t know when my next grow will be but when, or if I decide to grow again, I’ll definitely document it on the best possible weed growing platform.
Cheers friends!
Likes
71
Share


@DogDoctorOfficial
Follow
Week 1 Flower Report: Anesia Pheno Hunt!
Hello, wonderful Grow Diaries community! Welcome back to another exciting week of our Anesia pheno hunt. We've officially entered the flowering stage, and I couldn't be more thrilled to share the progress and updates with you all.
Week 1 Flower Highlights:
Transition to Flowering: Our Anesia ladies are making the exciting transition from veg to flower. The stretch is on, and they're reaching for the stars! This week, the plants have shown remarkable growth, with sturdy branches and lush foliage. Future#1, Zoomiez, Apricot Oreo, and the resilient Red Banana Pudding are all thriving beautifully.
Nutrient Update: To support this critical phase, I’ve adjusted their nutrient regimen. Using the fantastic Aptus Holland range, I’ve started them on the flower mix, including Regulator, CaMg-Boost, TopBooster, and P-Boost. The All-in-One Pellets in the soil provide a solid nutrient base, so no need for the All-in-One Liquid. This powerful combo ensures they get all the essential nutrients for robust flowering.
Environment Control: Maintaining optimal conditions is key. With the help of my Blue Lab Guardian monitor, I’ve kept the TDS at 420 and pH at 5.8, ensuring perfect balance for nutrient uptake. The Future of Grow LED lights continue to provide the ideal spectrum for vigorous growth and bloom.
Topping and Training: Earlier, we topped the plants, and the results are showing! The plants have developed multiple strong colas, promising an abundant harvest. The water droplets after topping always bring a smile, signifying the plants’ health and vitality.
Invitation:
If you haven’t already, be sure to check out my YouTube series, "Welcome to the Green Oasis." In this series, I take you behind the scenes of our grow operations, sharing tips, updates, and in-depth looks at our garden. Each episode is filled with insights and a whole lot of green goodness. Join us on YouTube and be part of our growing journey!
Watch the series here: Welcome to the Green Oasis -
https://www.youtube.com/@dogdoctorofficial
Thank you, Anesia Seeds, for the incredible genetics, and shoutouts to Aptus Holland for the top-notch nutrients, Future of Grow for the amazing LEDs, and the entire Grow Diaries community for your support and encouragement. Together, we’re making this journey unforgettable.
Stay tuned for more updates, and happy growing!
Genetics Red Banana Pudding = RBP
Apricot Oreoz = AO
Zoomiez = Z
Future#1 = F
https://anesiaseeds.com/
Plant nutrition - Aptus Holland - https://aptus-holland.com
LED Photons - Future of Grow - https://www.thefuturofgrow.com/
Controls - Trol Master - https://www.trolmaster.eu/
Watering - Autopot - https://autopot.co.uk/
Tent - Mars Hydro - https://marshydro.eu/
Love and attention - Me, myself and i
As always thank you all for stopping by, for the love and for it all , this journey of mine wold just not be the same without you guys, the love and support is very much appreciated and i fell honored and blessed with you all in my life, With true love comes happiness. Always believe in your self and always do things expecting nothing and with an open heart , be a giver and the universe will give back to you in ways you could not even imagine so
More info, the ocasional give-away and exclusive updates from all my adventures can be found - links in the profile description
Friendly reminder all you see here is pure research and for educational purposes only
Growers Love To you All

Likes
27
Share


@Salokin
Follow
Hi Growmies,
She is becoming a monster. This plant is only 18 cm tall and basically consists of stems an buds, by now she has overtaken her mother in terms of bud production, quality and bud volume. I like to believe that the one feeding of pk 13/14 stimulated it even more. As of now the feeding will get less end less, preparing her for ripening. I am a super proud of this little project and it’s outcome and looking forward to cut this beauty down in roughly 3 weeks. Not much more to do but wait.
