
Likes
Comments
Share


@Hazebuster888
Follow
1 woche noch ca. +/- 3-4 tage je nachdem wie es ausschaut.... bin mega gespannt...
habe vor 2 tagen schon ein kleinen trieb abgeschnitten um es vorab testen zu können und die sieht schon mega aus 😋😋😋👌😉
Likes
12
Share


@EARL_GRASS
Follow
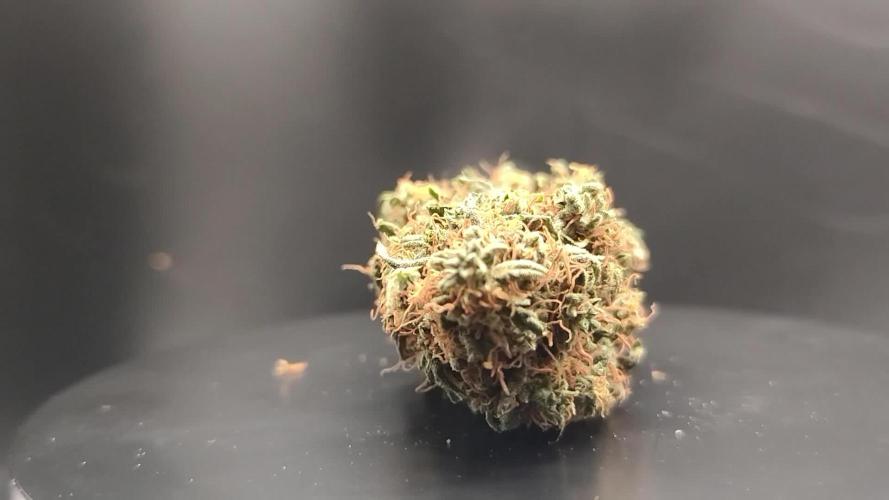
This lady is Frosty sticky icky
Orange terpenessssssssss don't lie
Juyce nuggy


Likes
18
Share


@JeyGanesha
Follow
Ok!!! adesso è partita bene...questa strawberry 🍓gorilla 🐵, è nata con un cotiledone che se guardate bene sembra morsicata da non so cosa😂🙈..le prime 2 foglioline sono uscite normali, la 3 foglia è uscita con una malformazione. ...adesso dal 3 nodo in su dovrebbe crescere più che bene💪💪🍓🐵
Likes
4
Share


@Familytrees19
Follow
Beautiful week! Seen some beautiful growth and stems are becoming very thick! What great genetics so far! Elev8 seeds so far seem really good, I’ve grown these breeder seeds before and the same thing Beautiful growth and thick healthy stems! I used the destiny foliar spray and they seem to like it! All plants showing stretching too the light! This will be my second crop using the kind led K5 XL1000 wifi enabled! What a beautiful light, the plants seem to love it as well! I topped them a few days ago and the growth has started. I’m thinking of flipping these babies week 4 maybe week 5
Likes
4
Share

@Xpie77
Follow
🌿 Eindverslag – 24K Gold Kush (WeedSeedShop)
Kweekduur: 10 weken bloei
Type: Indica-dominant (Kosher Kush × Tangie)
Kweekmethode: Indoor (grond / LED)
Verslagperiode: Week 1 t/m oogst
---
🔸 Algemene indruk
De 24K Gold Kush leverde een zeer harsrijke en aromatische oogst op. De soort combineert de krachtige body-stoned effecten van Kosher Kush met het fruitige, opwekkende karakter van Tangie.
De planten bleven compact (70–90 cm), met stevige zijtakken die goed gevuld raakten met dichte, glinsterende toppen.
---
🌸 Bloei-overzicht per fase
Fase Periode Belangrijkste ontwikkelingen
Vroege bloei (week 1–3) Overgangsfase met sterke rek (stretch). Eerste bloeiharen zichtbaar. Licht stikstofrijk schema.
Midden bloei (week 4–6) Toppen zetten sterk aan. Intens aroma van citrus en diesel. Sterke harsvorming start in week 5. RH teruggebracht naar 45%.
Late bloei (week 7–8) Toppen verdikken, trichomen worden melkachtig. Minder stikstof, extra PK-voeding toegepast (PK 13/14 1 ml/L).
Rijpingsfase (week 9–10) ± 15–25 % amber trichomen. Flush gestart met pH-gecorrigeerd water. Geur extreem intens, plant klaar voor oogst.
---
🔬 Trichomen & rijping
80 % melkachtig, 15 % amber, 5 % helder bij oogst.
Dit zorgde voor een evenwichtige high: eerst euforisch en creatief (Tangie), daarna ontspannen en zwaar (Kosher Kush).
Ideaal voor zowel avondgebruik als creatieve ontspanning overdag in lage dosis.
---
💧 Klimaat & verzorging
Parameter Gemiddelde waarde
Temperatuur dag 25 °C
Temperatuur nacht 19 °C
Luchtvochtigheid (bloei) 45 %
pH voeding 6.3
Watergift 1,5–2 L per plant, 2–3× per week
Voeding Organische voeding + PK 13/14 in late bloei
Flush Laatste 10 dagen, enkel water
---
✂️ Oogstresultaat
Kenmerk Waarde
Oogstdatum Dag 70 van bloei
Drooggewicht ± 420 g/m²
Topstructuur Compact, glinsterend, amberkleurige trichomen
Geur & smaak Citrus, sinaasappel, diesel, kush, licht zoet
Effect Ontspannend lichaamseffect, milde euforie, langdurig high
THC-gehalte (geschat) 20–24 %
CBD-gehalte 1 %
---
🌬️ Drogen & curen
Gedroogd bij 20 °C en 50 % RV, gedurende 10 dagen.
Daarna gecured in glazen potten, dagelijks luchten eerste 2 weken.
Na 4 weken curing: geur nog complexer (fruitig + aards), rook zachter en romiger.
---
✅ Eindbeoordeling
Eigenschap Score (1–10)
Groei & vitaliteit 9
Opbrengst 8.5
Harsproductie 9.5
Geur & smaak 9
Makkelijkheid kweek 8
Algehele tevredenheid ⭐ 9/10
Conclusie:
24K Gold Kush is een betrouwbare, potente soort voor kwekers die houden van een fruitig kush-profiel met veel hars. Ze vergeeft kleine fouten, reageert goed op training en beloont met zware, glinsterende toppen. Ideaal voor zowel recreatief gebruik als extracten (rosin / hasj).

Likes
57
Share


@DeepWaterGrower
Follow
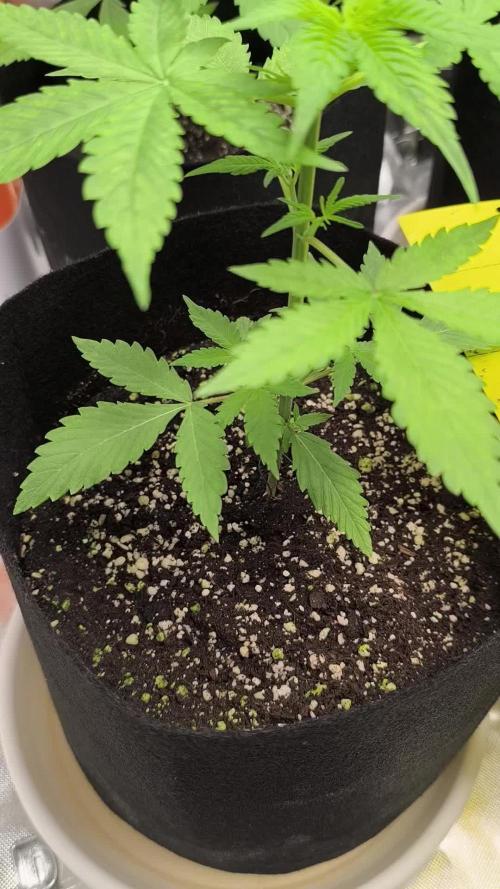
🗓️ WEEK 2 / DAY 8-14
⚡ Light: 40 cm / 75 watt;
⌛ Schedule: 20/4;
🌡️ 22.5° C - 65% RH average;
📑 PH 5.8 - EC 0.8;
💧 Watering every other day trough the clay with 50 ml solution: tap water + Fire Yields 1 ml/l;
🌱 Removed Pheno #3, the other two seedlings are doing very fine;
⚙️ Fan, extractor and pump ON 24/0. No Humidifier.
👯♀️ As you can see in the pics, I have other seedlings in my grow-box, here the diaries if you want to take a look:
- White Widow (GHS): https://growdiaries.com/diaries/198827-green-house-seed-co-white-widow-grow-journal-by-deepwatergrower

Likes
21
Share


@greenthumbartisan
Follow
Day 44 - March 25, 2021
Started noticing a couple gnats in our house. It's been warm outside and they are starting to come out. Unfortunately saw some in the room as well and can only assume there are many more feeding on the ladies. Gave foliar spray using Bee Safe Organicide.
Gave all the girls a thorough haircut today and worked on trying to get canopy under control. Vegatation was very thick.
Doesn't look like deficency issue with F7 is spreading. Continuing to watch for any changes indicating the problem is still ongoing.
Gave foliar spray (1:00AM):
* Bee Safe Organicide
Watering:
03:00AM-3:10AM
~0.33 gallons per pot
11:00AM-11:10AM
~0.33 gallons per pot
7:00PM-7:10PM
~0.33 gallons per pot
Reservoir:
* tested 10:45PM
* 2.21 EC
* 5.9 PH
* 73.94F (with ambient temps being higher, res temp is higher as well)
* ~13-gallons remaining before topping off
* Added ~5-gallons (solution mixed 3/24) (11:00PM)
* 2.16 EC (after topping off)
* 5.9 pH (after topping off)
* 73.40F (after topping off)
* ~18-gallons remaining (after topping off)
Lights:
* Gavita LEDs On 20-hours (8:00AM - 4:00AM)
** 8:00AM Lights On (100%)
** 1:00AM-4:00AM (Reduced light intensity to 50% for foliar spray)
* Gavita LEDs Off 4-hours (4:00AM - 8:00AM)
* UV Bars Off 24-hours
Air control:
69F-82F (80F AVG) (Lights On)
66F (Lights Off)
50%-65% (56% AVG) humidity (Lights On)
60%-70% RH (Lights Off)
~1181PPM CO2 (Lights On)
~690PPM CO2 (Lights Off)
Day 45 - March 26, 2021
Didn't do much in the garden today. Tucked a couple branches under trellis netting and that's pretty much it. Hoping will have the trellis on each cage filled out by next weekend.
Nutrient deficiency with F7 seems to be resolved. New growth not showing any issues.
Found a dead gnat on a leaf. Bee Safe foliar spray seems to have done the trick. Continuing to keep close eye out for pests.
Mixed of nutrient solution (11:00PM):
** 50-gallons RO water (0.06 EC)
** 10ML h2o2 per gallon
** 5ML Botanicare Cal-mag+ per gallon (0.54 EC after Cal-Mag)
** 0.5ML Mills Nutrients Vitalize per gallon
** 10ML Mills Nutrients Basis A & B per gallon
** 4ML Mills Nutrients Start-R per gallon
** 1.25ML pHup per gallon (bring PH from ~5.1 to 5.8)
** ~2.02 EC
** 5.8/5.9 pH
Watering:
03:00AM-3:10AM
~0.33 gallons per pot
11:00AM-11:10AM
~0.33 gallons per pot
7:00PM-7:10PM
~0.33 gallons per pot
Reservoir:
* tested 11:30PM
* 2.16 EC
* 5.8/5.9 PH
* 73.94F (with ambient temps being higher, res temp is higher as well)
* ~10-gallons remaining
* Didn't top off today
Lights:
* Gavita LEDs On 20-hours (8:00AM - 4:00AM)
** 8:00AM Lights On (100%)
* Gavita LEDs Off 4-hours (4:00AM - 8:00AM)
* UV Bars On 8-hours (12:00PM - 8:00PM)
Air control:
69F-82F (81F AVG) (Lights On)
66F (Lights Off)
50%-65% (60% AVG) humidity (Lights On)
60%-70% RH (Lights Off)
~1268PPM CO2 (Lights On)
~620PPM CO2 (Lights Off)
Day 46 - March 27, 2021
Did some more pruning to remove thick foliage and open up nodes. Continuing to tuck branches through trellis. Expect will be ready to go into flower in apprxomately a week.
CO2 tank ran out and co2 levels dropped to 330PPM for the first couple of hours of lights on. Replaced tank at 10AM.
Watering:
03:00AM-3:10AM
~0.33 gallons per pot
11:00AM-11:10AM
~0.33 gallons per pot
7:00PM-7:10PM
~0.33 gallons per pot
Reservoir:
* topped off with ~18-gallons
* tested 9:30PM
* 2.06 EC
* 5.9 PH
* 73.94F (with ambient temps being higher, res temp is higher as well)
* ~20-gallons remaining
Lights:
* Gavita LEDs On 20-hours (8:00AM - 4:00AM)
** 8:00AM Lights On (100%)
* Gavita LEDs Off 4-hours (4:00AM - 8:00AM)
* UV Bars On 8-hours (12:00PM - 8:00PM)
Air control:
69F-82F (80F AVG) (Lights On)
66F (Lights Off)
55%-70% (64% AVG) humidity (Lights On)
60%-70% RH (Lights Off)
~1397PPM CO2 (Lights On)
~330PPM CO2 (Lights Off)
Day 47 - March 28, 2021
Didn't do much in the garden today. Deficiency issue on new growth is continuing to newest nodes on F7 and is starting to show in F6, F2, and F3 as well. Also noticed a few leaves with small tip of nutrient burn.
Flushed F2, F3, F6, and F7 until runoff EC was equal to input. F1,F4, F5, and F8 look good but will flush those tomorrow as well just in case.
Flushed with:
* RO Water (starting EC 0.05)
* 0.5ML Mills Nutrients Vitalize per gallon
* 5ML Cal-Mag+ per gallon
* pH 5.8
* EC 0.53
Watering:
03:00AM-3:10AM
~0.33 gallons per pot
11:00AM-11:10AM
~0.33 gallons per pot
7:00PM-7:10PM
~0.33 gallons per pot
Reservoir:
* tested 8:30PM
* 2.06 EC
* 5.9 PH
* 74.48F
* ~13-gallons remaining
Lights:
* Gavita LEDs On 20-hours (8:00AM - 4:00AM)
** 8:00AM Lights On (100%)
* Gavita LEDs Off 4-hours (4:00AM - 8:00AM)
* UV Bars On 8-hours (12:00PM - 8:00PM)
Air control:
69F-82F (79F AVG) (Lights On)
66F (Lights Off)
55%-70% (65% AVG) humidity (Lights On)
60%-70% RH (Lights Off)
~1312PPM CO2 (Lights On)
~1292PPM CO2 (Lights Off)
Day 48 - March 29, 2021
Flushed F1, F4, F5, and F8 until runoff EC was equal to input.
Gave Foliar Spray
Foliar Spray:
* 1 Gallon RO Water (EC 0.08)
* 10ML CalMag+ per Gallon
* 0.5ML Mills Nutrients Vitalize per gallon
* PH 6.0
* EC 1.19
Flush with:
* RO Water (starting EC 0.05)
* 0.5ML Mills Nutrients Vitalize per gallon
* 5ML Cal-Mag+ per gallon
* pH 5.8
* EC 0.54
Watering:
03:00AM-3:10AM
~0.33 gallons per pot
11:00AM-11:10AM
~0.33 gallons per pot
7:00PM-7:10PM
~0.33 gallons per pot
Reservoir:
* tested 8:30PM
* 2.06 EC
* 5.9 PH
* 73.40F
* Topped off to approximately 20-gallons
Lights:
* Gavita LEDs On 20-hours (8:00AM - 4:00AM)
** 8:00AM Lights On (100%)
* Gavita LEDs Off 4-hours (4:00AM - 8:00AM)
* UV Bars On 8-hours (12:00PM - 8:00PM)
Air control:
69F-82F (78F AVG) (Lights On)
66F (Lights Off)
55%-70% (67% AVG) humidity (Lights On)
60%-70% RH (Lights Off)
~1301PPM CO2 (Lights On)
~1117PPM CO2 (Lights Off) [Goofed up on setting timer for UV bars and were on during dark period causing CO2 to stay on.]
Day 49 - March 30, 2021
No work in the garden today.
Gave Foliar Spray
Foliar Spray:
* 1 Gallon RO Water (EC 0.08)
* 10ML CalMag+ per Gallon
* 0.5ML Mills Nutrients Vitalize per gallon
* PH 6.0
* EC 1.19
Watering:
03:00AM-3:10AM
~0.33 gallons per pot
11:00AM-11:10AM
~0.33 gallons per pot
7:00PM-7:10PM
~0.33 gallons per pot
Reservoir:
* tested 8:00PM
* 2.05 EC
* 5.9 PH
* 73.76F
* Topped off to approximately 20-gallons
Lights:
* Gavita LEDs On 20-hours (8:00AM - 4:00AM)
** 8:00AM Lights On (100%)
* Gavita LEDs Off 4-hours (4:00AM - 8:00AM)
* UV Bars On 8-hours (12:00PM - 8:00PM)
Air control:
69F-82F (76F AVG) (Lights On)
66F (Lights Off)
55%-70% (70% AVG) humidity (Lights On)
60%-75% RH (Lights Off)
~1288PPM CO2 (Lights On)
~793PPM CO2 (Lights Off)
Day 50 - March 31, 2021
Deficiency Issues:
Still having issues with what looks like Zinc deficiency. Also found 4 of 5 fan leaves with Calcium deficiency over the last couple of days. Runoff is PH 5.8 and EC is 0.78. EC in runoff has been very low. I'm pretty confident it's not a PH issue at this point. Seems plants are rapidily soaking up the nutrients in the water. I also found 8 or 9 fan leaves with slight nutrient burn a few days ago. Nutrient burn seems to have tapered off and haven't noticed any spreading. Going to try adding an additional watering to the schedule to see what happens. I'm hesitant to mix stronger nutrients due to nutrient burn I started to see earlier this week. At the same time, need to figure out the cause of the nutrient deficiencies. I'm currently using the Light Feeding Schedule from Mills Nutrients (says "light", but is still 2.06 EC including 0.54 EC for water + CalMag) Need to switch to flower soon but need to figure out deficiency issues before the switch.
Defoliation:
* Removed quite a bit of fan leaves suffocating nodes. Girls are 10lbs lighter.
Despite the nutrient issues, the girls have been filling out fast. Did a timelapse over the past couple days and can see significant growth in a short period.
Gave Foliar Spray
Foliar Spray:
* 1 Gallon RO Water (EC 0.08)
* 10ML CalMag+ per Gallon
* 0.5ML Mills Nutrients Vitalize per gallon
* PH 6.0
* EC 1.19
Watering:
03:00AM-3:10AM
~0.33 gallons per pot
11:00AM-11:10AM
~0.33 gallons per pot
8:00PM-8:10PM
~0.33 gallons per pot
Reservoir:
* tested 11:30PM
* 2.06 EC
* 5.9 PH
* 73.40F
* Topped off to approximately 20-gallons
Lights:
* Gavita LEDs On 18-hours (10:00AM - 4:00AM)
** 10:00AM Lights On (100%)
** 11:00AM Reduced intensity to 50% for foliar spray
** 12:00PM Increase intensity to 75%
** 1:00PM Increased intensity to 100%
* Gavita LEDs Off 6-hours (4:00AM - 10:00AM)
* UV Bars On 8-hours (12:00PM - 8:00PM)
Air control:
69F-82F (77F AVG) (Lights On)
66F (Lights Off)
55%-70% (67% AVG) humidity (Lights On)
60%-75% RH (Lights Off)
~1574PPM CO2 (Lights On)
~880PPM CO2 (Lights Off)


Likes
8
Share

@GuanoRomano
Follow
🌱 Week 2 – Vegetative Growth
09/27: Started the day noticing chlorosis on some leaves. The pattern matches an iron deficiency: interveinal chlorosis mainly on the newer leaves. After checking, this seems to be caused by a nutrient lockout, consistent with the high substrate pH since the beginning of the grow. Lesson learned for next time. Performed a heavy flush with 20 L of water per plant. Runoff dropped from EC 1200 → 500 and pH 7.1 → 6.7. From now on, I’ll water with enough solution to get ~20% runoff each time instead of just ~250 ml. Will also lower input pH to 5.6–5.7 to gradually bring substrate pH down into range. Noticed that some plants have started to give off a light smell 🌿.
09/28: Each plant watered with 1 L at pH 5.6, EC 950. Solution included 3 ml/L CalMag + 0.8 ml/L Coco A + 0.8 ml/L Coco B + 1 ml/L Deeper Underground. Runoff EC not measured (since heavy flush was done yesterday). Runoff pH still unchanged, same as yesterday (~6.7). Yesterday I lowered the light, today increased it back to 13.5k lux. Chlorosis is still advancing, hoping successive irrigations will help bring substrate pH down.
09/29: Watered again but with 500ml this time. Solution (same recipe as yesterday) at pH 5.6. Surprisingly, runoff pH rose higher than yesterday, now at 7.0, with EC 700. Light intensity increased to 14.5k lux.
09/30: Watered with 500 ml at pH 5.6, EC 1050. Solution included 3 ml/L CalMag (new bottle — seems to add more EC than the old one) + 1 ml/L Coco A + 1 ml/L Coco B + 1 ml/L Deeper Underground. Runoff measured EC 700–800, pH 7.0. Since the flush, stems have thickened significantly 💪.
10/01: Watered with 1 L at pH 5.6, EC 1200. Solution included 2.5 ml/L CalMag + 1 ml/L Coco A + 1 ml/L Coco B + 1 ml/L Deeper Underground. Runoff measured EC 650, pH 7.0. Substrate pH still not dropping, but plants are growing at a good pace. Only two plants continue to show chlorosis, while all show a noticeable thickening of stems this week.
10/02: Significant vertical growth observed — most plants stretched about 8 cm in the last 3 days. Watered again with the same solution as yesterday, but only 500 ml per plant. Input pH 5.6, runoff pH still at 7.0, EC 600–700. Chlorosis persists, and on one plant with symptoms, small brown spots appeared, suggesting a possible manganese deficiency. Also noticed what look like early pre-flowers (tiny pistils) on two plants, though it feels early for day 20.
10/03: Watered with the same solution as previous days (pH 5.6, EC 1200). Runoff remained stable at pH 7.0, EC ~600–700. Based on uptake, I plan to progressively raise input EC until EC in ≈ EC out. Gradually increasing VPD range, target for Week 3 is 1.0–1.2 kPa.
---
📝 Week 2 Summary
🚩 Main challenge: persistent high runoff pH (~7.0) causing chlorosis, initially resembling iron deficiency but later showing signs closer to manganese deficiency (brown spotting).
Heavy flush reduced EC, but pH correction is progressing slowly.
Plants responded with strong stem thickening and rapid vertical growth (+8 cm in 3 days).
Aroma starting to appear on some plants 🌿.
⚡ Light stabilized around 14–15k lux, with adjustments to avoid stress.
🌱 Despite issues, most plants are vigorous, only 2 showing stronger deficiency symptoms.
➡️ Plan for Week 3
Irrigation: Increase input EC gradually until it balances with runoff (~EC in = EC out). Maintain runoff at ~20% each watering.
pH management: Keep input pH at 5.6–5.7 to push substrate down from current ~7.0.
VPD: Raise target range to 1.0–1.2 kPa for optimal transpiration.
Light: Hold intensity ~14.5k lux, slight increases only if no stress observed.
Monitoring: Track chlorosis spots closely — see if new growth improves once substrate stabilizes.
Pre-flowers: Keep observing possible pistils.
Processing
Likes
7
Share


@420keef
Follow
Ran into some problems with this one but it turned out pretty decent, it already smells fire i can't wait to smoke it, i'll keep you guys posted when i get a taste!


Likes
2
Share

@LST420
Follow
Week 12 The buds are slowly fattening up. Dutch Passion issued a warning on their website that certain strains like this one can cause them to produce male flowers when exposed to too much stress. So I only do careful rounds of minimum defoliation in order to hopefully prevent this from happening.

Likes
1
Share

@Franco123
Follow
the plant is fine and has a strong cheese-like smell, it is growing and like all the crosses that were made with the inverted cutting of domina tangy
Likes
11
Share


@StartGrowingShxt
Follow
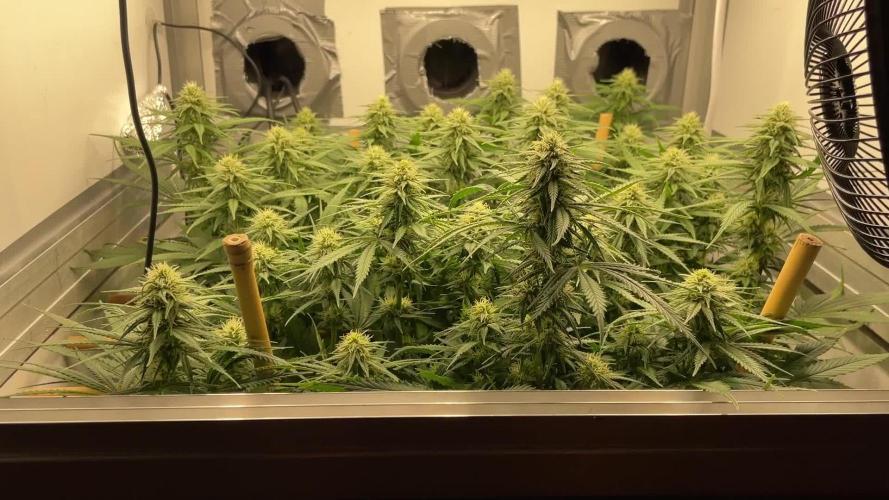
Week 10!
September 9
-Blue cheese is looking great depending on what the pistils and trichomes look like at the end of the week I will be cutting ~Day 70
-Bubble Kush is progressing nicely and is visually bulking up smells like pine sol and lemons very nostalgic reminds me of college.
-Will be watering Bubble Kush in two days as I watered over the weekend and I have a tendency to overwater this particular lady also watered the Blue Cheese lady but she will probably not be getting anymore water for the week…maybe idk great way to start the week tho peace
Likes
17
Share


Likes
51
Share


@DogDoctorOfficial
Follow
the freak is getting better and better , i mean she still a frack but now a freak that is evolving and starting to pack up <3<3<3
as the week keeps going she keeps getting better and now the trichome production is starting to became a serious business for this one, form a freat to chick i think, lets see but loving the evolution n these rare peace of art hehehe
I mean not much to say apart that she is gonna prove us all wrong and deliver great medicine in the end, tats what i think hihihi
As always thank you all for stopping by for the love and support and for it all, i truly appreciate it all <3 <3 <3
Genetics - Fast Buds Tester 2308
Ligth - LUMATEK ZEUS 465 COMPACT PRO
Food - APTUS HOLLAND
#aptus #aptusplanttech #aptusgang #aptusfamily #aptustrueplantscience #inbalancewithnature #trueplantscience #fastbuds #dogdoctorofficial #growerslove
With true love comes happiness <3 <3 <3 Always believe in your self and always do things expecting nothing and with an open heart , be a giver and the universe will give back to you in ways you could not even imagine so <3 <3 <3
All info and full product details can be find in can find @
https://2fast4buds.com/ wen released
https://aptus-holland.com/
https://autopot.co.uk/
https://lumatek-lighting.com/
Have a few good more diaries going on fell free to drop by and say hi <3 <3 <3
<3 <3 <3 Growers love to you all <3 <3 <3


Processing
Likes
7
Share


@Tropicleaf
Follow
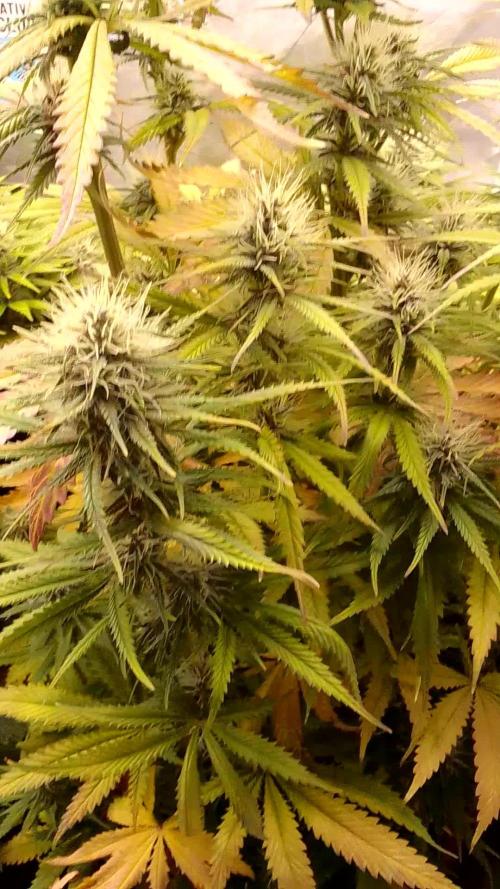
Still running into def. but they are still holding strong, great resin production and strong sweet sour smell on the sour alien livers and a pungent lime smell to the alien vs triangle
2 more weeks fore the sour alien and id say 3 more weeks for the alien vs triangle.


