The Grow Awards 2026 🏆 


Likes
Comments
Share
@Mrs_Larimar
Follow
HOW TO:
Excellent Papaya Zoap Cultivation
Yield: 3 plants
Time: Approximately 10 weeks from seed to harvest
Ingredients:
- 3 Papaya Zoap seeds
- Terra Preta MJ mix soil
- Water
- PK Booster (for late flowering stage)
Instructions:
1. Planting:
- Plant 3 Papaya Zoap seeds in Terra Preta MJ mix soil.
2. Seedling care:
- Provide daily watering to the seedlings.
- Maintain a consistent watering schedule as they grow.
3. Vegetative stage:
- Allow plants to grow vigorously in the nutrient-rich Terra Preta MJ mix.
- Continue regular watering as needed.
4. Flowering stage:
- When plants enter late flowering, apply PK Booster as needed.
- Maintain water schedule, adjusting as necessary.
5. Harvest (after approximately 10 weeks):
- Plants should display a well-structured, symmetric "chandelier" appearance.
- Look for dense, conical-shaped buds with attractive purple and blue hues.
Notes:
- This strain grows quickly, reaching maturity in about 10 weeks from seed.
- The Terra Preta MJ mix provides sufficient nutrients for most of the growing cycle.
- Minimal intervention is required beyond regular watering and late-stage PK boosting.
Result:
Enjoy your symmetrical, vigorous Papaya Zoap plants with dense, colorful buds. The minimal-fuss growing process yields impressive results in a relatively short time frame.

Processing
Likes
16
Share
@HisHope
Follow
3/11 Week 11 a day early due to visitors day 28 of Flower
Her buds building and coning as any proud female would like. No signs of any deficiencies and the tips are ok so leaving all nuets as is.
Halfway to projected harvest date according to Fast Buds, we believe them.
Having some humidity issues due to our funky weather.
Humidity running higher than is safe on lights out , 60-70%, so installed one small dehumidifier but getting a larger one today to add to it.
That is pretty much it, hope for better pics later!
Good growing out there!
3/12 Vid and Pics of her
We fouled up and miscalculated days in flower today should be 29 as she obviously into flower on 2/12. Hubby just looked at the calendar wrong 😏
Fix what I can sorry folks thought it looked further along than that.
pics

Likes
14
Share
@Momentum
Follow
Von den heutigen Updates zeigen mir die Pflanzen, dass sie schon in Vorblüte waren, wie ich sie bekam, aber sie sich noch Zeit genommen haben, um zu bewurzeln.
Likes
54
Share
@rhodes68
Follow
1/29 Week 5
Nothing but the kind of problems I asked for, some white tips that mean an increase of runoff is needed.
Half expected to see this as I have been varying the amount as a learning experiment. Will up to 20% for a few days
In addition will be reducing nuets slightly keeping cal-mag as is until reason to change presents itself.
Will be kind of boring the next couple of weeks at least till they get into the big tent.
1/30 Aeryn now at 15 inches
Runoff at 40% and nuets reduced to lower pot EC
Ive tossed out my old bottle of Cal-Mag I think its turned on me as these white tips did not appear until it was folded into the feed.
Just no way this dose of nuets is causing the tips to show burning.
2/1 Major defoliation last night at lights out.
Removed perhaps 25-40% or leaf mass on all plants to allow them to stay in the tent another two weeks.
It was time to learn the process anyway, took a compromise path to doing it, some recommended taking more some less, hey sounded good to me.
Plants doing very well after defoliation except for those aggravating white tips, going to be reducing Cal-Mag again to 1ml/gal and keep CT at 5ml/gal taking C-M to zero based on what I see.
2/2 Dropped Cal-Mag from feed, want to see if that has anything to do with those white tips.
Runoff is at 40-50% ppm out under 900 so dam if I know. Will continue to defoliate as we go when something pokes its head where it does not belong.
Otherwise they are beautiful, good job so far Fast Buds. 👍
2/3 man they recover fast, removed a few fan leaves that poked their heads where they shouldnt.
Add Si to feed tomorrow for stem strength
Not comfortable leaving these in veg for two more weeks, just asking for problems. So...
Plan for flowering:
Flipping this weekend so new week will still be veg.
Removing one plant from the Moya tent to the Flowering tent to relieve space pressure as both tents will be set to 12/12 and just flower them all.
Should have space in Moya to cover the few days they are in there with just three plants, have a bout 18" of light hang to work with.
Thinking of moving Aeryn as she is largest and most likely to cause issues.
Just not sure what the stretch is going to be 😳
2/4
The white tips were absolutely caused by the Cal-Mag, considering the doses and PPM that is puzzling to say the least.
Adding Si for a few feeds to get em ready for flowering as I have no idea how these are going to grow so heading off some potentials.
Plants hit 20" over night still flipping in a few days
Likes
19
Share
@emeraldlabs
Follow
Moving along; first topping came on day 18.
Will include all details once done with topping (going for mainline).
Photos taken 21 days after breaking soil

Likes
39
Share
@sandspur
Follow
Well I was out at the beginning of the week. These things are coming along and will be ready for harvest soon. The branches starting bending over in places but this is okay since it keeps them from being burned by the light. Again humidity is too high but we're keeping the fans going.

Likes
11
Share
@DixTheReal
Follow
Ho sistemato LST giornalmente perché continuano a crearsi nuove ramificazioni e gemme ovunque. Sto irrigando con 0.5L di acqua ogni giorno, ma credo dovrò passare a 1lt perché l’assorbe subito.
Giorno 35 - l’apicale si é spezzato al 50% ho provveduto subito a mettergli del nastro di carta intorno e fargli un sostegno sotto per reggerlo nella sua posizione. Immagino che ora se dovesse sopravvivere avrà un blocco di qualche giorno.
*Giorno 35 h.20.30 dopo solamente 6 ore l’apicale ha iniziato ad alzarsi da solo staccandosi dal sostegno, assurdo!


Likes
2
Share
@mojogrow
Follow
I was seeing that this genetics has a problem with the leaves, it has white spots and leaves with a quite peculiar development.
There is no plague in the indoor and the conditions I think are the right ones
the euphoria is better now, more steady, I gave her 2 ml of bioheaven, 1 ml of biogrow and 5 ml of trimix pro.


Likes
34
Share
@Roberts
Follow
Auto moon rock Is growing slow. She is making progress just not fast. She was neen oil treated a week ago. There is a mite issue in the grow room. She should pick up her growth pace very soon. Thank you Medic Grow, and Divine Seeds. 🤜🏻🤛🏻🌱🌱🌱
Thank you grow diaries community for the 👇likes👇, follows, comments, and subscriptions on my YouTube channel👇. ❄️🌱🍻
Happy Growing 🌱🌱🌱
https://youtube.com/channel/UCAhN7yRzWLpcaRHhMIQ7X4g


Likes
37
Share
@Susquihanna
Follow
This was another hot, hot week with a big rainstorm. Take a look at the measuring cup, it is full of rainwater. Gorilla Cookies continues to smell and is very sticky. It is a tall and lanky plant but look at the heavy buds weighing down the stems. It should be ready to take down in a couple of weeks.
Half way through this grow, I had to stop using Miracle Grow and change my grow plan. I decide to use Advance Nutrients Jungle Juice for the rest of the grow. Jungle Juice’s selling point is that it is the only nutrient that I should need during the entire grow. One just need to make the solution stronger as the plant matures.
The directions say to “stir vigorously” and that is true. It is very clumpy and I had to stir and shake the bottle a lot. As your plant is in veg and growing larger, directions say to up your Jungle Juice to 4 ml per liter. If my calculations are correct, I am using approx. 5 tablespoons per 5 gallon bucket.
1 gal is 3.78 liters
5 gallons=18.92 liters
4ml jungle juice per liter x 18.92 liters= 75.7 ml which is = to 5.119 tablespoons per 5 gallon bucket of water
As the end of the summer is quickly approaching, I have spent some time reflecting this week on all of the contests that I have entered and not won this summer. It can be a little frustrating because of all the time I have spent taking pictures and writing commentary. But, instead of it getting me down, I have to think about all of the positive take aways and I want to share them on this platform.
I have read a lot of diaries and now know why I am just an apprentice. I have a lot to learn from all of you. There are some really good growers with a lot of experience and crazy grow techniques. So much knowledge is on this platform-it’s mind boggling.
To be a great grower, you must be willing to be vulnerable and put yourself out there and try different suggestions and new techniques. I have made a few friend that I enjoy chatting with. I enjoy reading comments versus just seeing likes.
My best friend on grow diaries is @Natrona and my neighbor as well. She has been growing longer than I have been so I routinely learn from her. This summer I learned to mix 1 cup of Perlite into my soil. I can see where my plants need the air flow. And, I now I only defoliate fan leaves that absolutely need to be gone. I let the fan leaves stay on until they fall off. I want my buds to pull all the nutrients they can out of the fan leaves. I also bought 2 new tools that @natrona suggested. The first was a water PH tester and the second was my Max-ee Magnifier which is informative and fun to use.
As always, Let’s Chat it up AND Likes and comments are appreciated
Likes
12
Share
@Krissci
Follow
Entering 2nd week of flowering...
Mainlining for the 1st time.
Largest plants of all
Each plant has 8x nodes. Topped 3 times.
Tied down to create an X style frame.
2x on this run
2x seedmans strawberry Banana grape in 5gal pots (1m2 tent) to compare.
But strawberry Banana as a strain seems to be a big grower


Likes
14
Share
@Chuckwaggon420
Follow
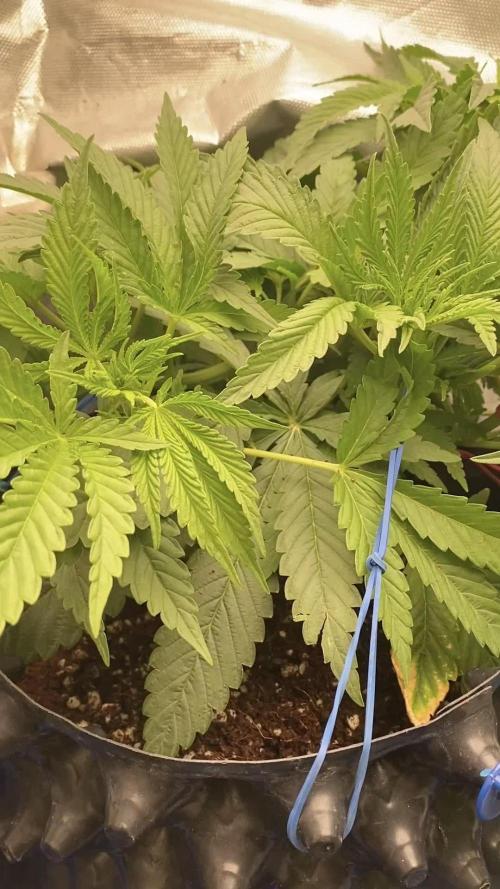
These girls are staying happy yes they are!! Put them into 1 gallon on Saturday now they have slowed back to there water/ feedings every 3 days. Will let them get used to there new home and will top them before to long to make them bush out! Still just steady marching here.
Much love


Likes
Comments
Share
@HoneyBlunt42
Follow
День 44
Красивый предцвет, вторая неделя. Лопухи размером с ладонь. Сдерживаю рост канцелярскими резинками. Пригибаю раз-два в неделю.
У меня появился BioBizz RootJuice для корней. На предвеге его еще можно добавлять - раз в неделю пролиаваю 2 ml/l. В остальном ратвор целиком по Simplex Coco.
Навожу раствор в AquaPot (15 л).
Сперва 13 л вода осмос. В нее:
-CalMag - 1 ml/l.
-Затем спустя минуту SillicX - 0,25 ml/l.
-После этого разведенные в литрушках Simplex Coco A и Simplex Coco B - в итоге выходит 2 ml/l раствора (30 ml part A в одну бутыль 1 л и 30 ml part B - во вторую литушку).
-Потом Simplex PK Boost - 1 ml/l.
-Затем Simplex Taste в бак - 1 ml/l.
-Simplex Aroma Punch - 1 ml/l.
-Simplex Fulvic Gold - 1 ml/l.
-Simplex pH down - 1 ml/l.
Даю настояться несколько часов с аэратором перед поливом.
Заметил, что за 4 дня на камне для аэрации наросла слизь.
Возможно, Simplex Taste и Aroma Punch стоит проливать отдельно от основного раствора.
День 47
Растения активно развиваются на второй неделе предцвета. Раз в две недели пригибаю и растягиваю ветки. Это притормаживает рост кол, и они равномернее распределяются по боксу. Визуально состояние - выглядят хорошо, без дефицитов.


Processing
Likes
19
Share
@PremiumNamaste
Follow
The seed popped out of the soil at day 4. Day 6 she had her helmet removed with some assistance. Day 7 she shows 3 leaves, I’m guessing 1 didn’t make it do you the shell staying on too long, but this has happened before, so no worries! She will be moved to veg tent as soon as she does some stretching.

Likes
6
Share
@Comfrey
Follow
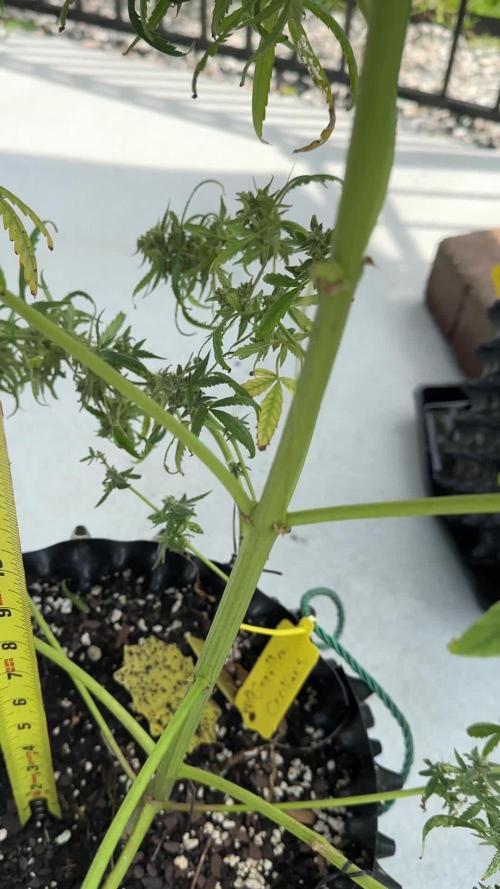
This is the last week. Every second evening I did an ice water flush. At day 90 she moved from the sunny balcony to the dark basement.
I chose and bought a grow tent for me and my wife. So the winter we‘ll be growing our weed for the spring and summer. But actually I love to grow outdoors. Next outdoor season will be only in half a year. For me the arriving of the tent a few days ago gives me the possibility to dry without the smell in the house.
Happy legal growing!