
Likes
Comments
Share


@NikoRussia
Follow
Засуха. Все кусты на большом азоте- шишки веником. На одном растении пожелтение листьев, но шишки плотнее. Внес монофосфат калия 12 грамм на 10 литров воды. Это последнее удобрение. Через 2-3 недели пойдут дожди и тогда надо будет срезать.

Likes
11
Share


@NOLOGIK
Follow
9/7/2021-at the end of the cycle I thought that the flowers get bigger .. nothing to say about the quantity.
a strong smell reminiscent of something sweet.
the buds are hard and coated with glue.
I am washing the roots.
ready to harvest up to 2 days again and then cut.
Sorry for me traslate 😅

Likes
13
Share


@DevelGrow
Follow
War eine Challenge! Zwei Versionen hintereinander in einem Zeitraum der erst eng dann verlängert wurde! Beide haben etwas für sich! Danke an John von SSSC !✌️keep Green and grow High 🍀💚🍀
Likes
16
Share


@Comfrey
Follow
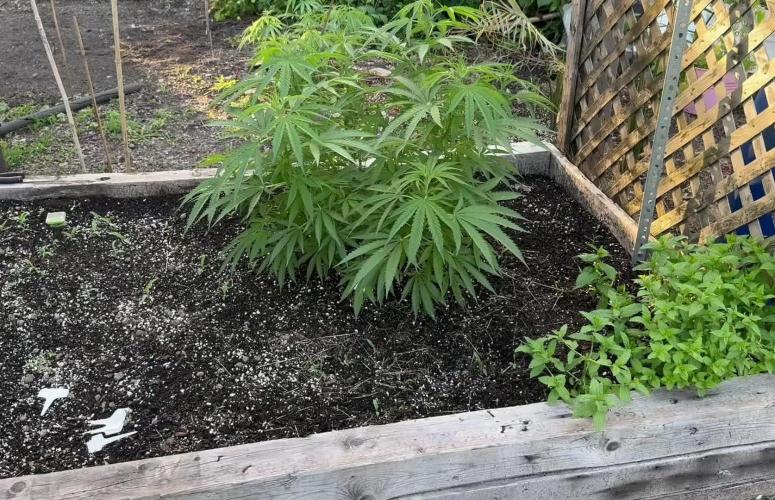
Week started how I hoped. Rain stops and the sun is shining several hours per day. But it is still cloudy often.

Likes
14
Share


@nonick123
Follow
Día 15 (27/01) Ha reaccionado bien al trasplante. A ver como se desarrolla en los siguientes días!
Día 16 (28/01) Muestra un buen desarrollo con las primeras ramas formándose
Día 17 (29/01) Subo a DLI 40
Muestra un color verde estupendo 😍
Día 18 (30/01) Tras subir el DLI la temperatura en el indoor ha subido a de 22ºC a 26 ºC, de modo que va a acelerar las necesidades hídricas
Se sigue desarrollando estupendamente 😁
Día 19 (31/01) Seguimos a buen ritmo
Creo que debería haber regado este día... (Visto como estaba de seca al día siguiente...)
Día 20 (01/02) Elimino las ramas más inferiores (1er nudo) que siempre suelen quedar débiles en el stretch
Riego con 350 ml H2O RO
Día 21 (02/02) Empieza a estirarse! 😍
Está sedienta! Riego con 350 ml H2O
En una semana a floración!
Khalifa Genetics - https://khalifagenetics.com/product/lemon-blanco-v3/
💦 BioTabs 15% DISCOUNT code "GDBT420" biotabs.nl/en/shop/ @biotabs_official
🌱Substrate PRO-MIX HP BACILLUS + MYCORRHIZAE @promixmitch @promixgrowers_unfiltered
💡2 x Mars Hydro FC1500 EVO Led Grow Light (2024 NEW FC 1500-EVO Samsung LM301H 150W LED) - https://marshydro.eu/products/fc1500-evo-led-grow-lights/ - https://www.amazon.de/dp/B0CSSGN5D8?ref=myi_title_dp

Likes
25
Share

@ChickenWing1024
Follow
Great week for the black opium! pink and purple bud all around - her trichomes have started picking up on their production - the smell is an amazing skunky berry (Sometimes even a slight coffee odor) - my neighborhood must be getting some good wiff's.
Girl scout cookies probably has one more week of stretch left - did a final final final LST on her yesterday, shes loving the flat canopy - going to create some phat buds! shes got much more nodes than the auto black opium + the internode distance looks like it will allow for really well stacked buds which I am excited for!


Likes
6
Share

@smoking_hills9
Follow
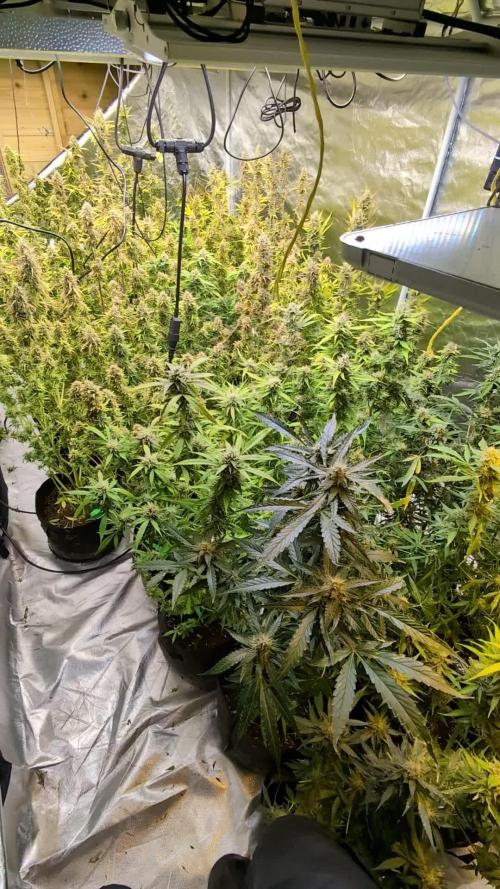
Last final defoliation done, now buds are fully exposed to the lights and the best part, harvest trim will be easier. Still it took me around 8 h altogether to defoliate all of them. Tones of buds and frost , amazing smells. Won't rush will give it a bit more to swell.

Likes
9
Share


@DeepRootsGrowTrees
Follow
TRIPPLE G by ROYAL QUEEN SEEDS
Week # 17 overall
Week #16 Veg
No issues this week she looking good looks like she is about to start to flower!! Stay Growing!!
Royal Queen Seeds TRIPLE G

Likes
29
Share


Likes
46
Share


@LittleBigTrees
Follow
Defoliated and trimmed lower fluff from The plant day 20 flower ,
Lots of air and light can now get to the plant and hopefully grow some nice buds

Likes
1
Share

@Black_Widow
Follow
Привет садоводы !!!
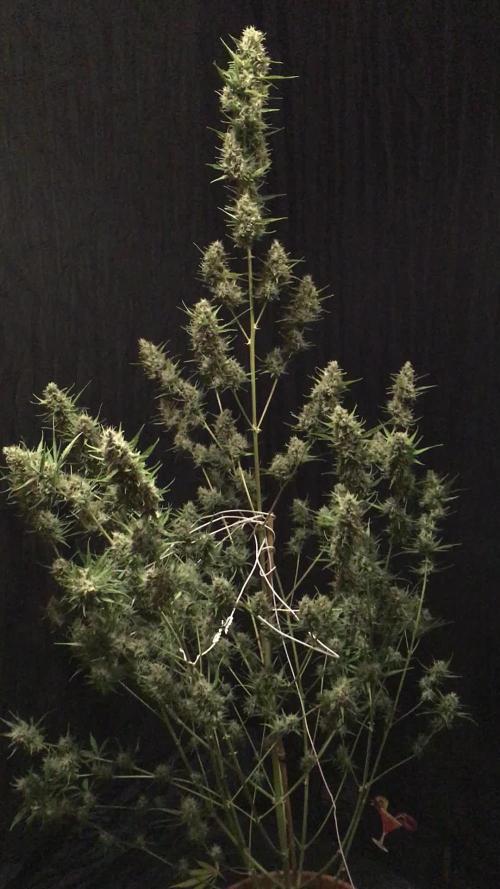
Прошло ровно 10 недель и цветок готов
Прекрасная генетика- супер auto
запах очень приятный сладковатый карамельный и цветки увесистые
Ставлю оценку Отлично !!!

Likes
11
Share


@Chimney_Chief
Follow
Plant has shown slow but healthy growth since its arrival, LST continues and I've managed to keep the plant at the same height it was last week but now at a horizontal angle.
I did up the nutes for one feed to a slightly under recommended dose but in the days following I noticed the plant looking a little 'droopy' and since she has been with me she hasnt been drinking very well so I opted to flush her for a feed, since then she has seemed very happy :) whilst drinking much better (possible nute lock was imminent). Now back down to half doseages with the exception of CalMg (to help after flush) but will be increasing them in the following days.
As of next week I will be transferring her and another plant my partner is nurturing into single bucket DWC set ups. Fingers crossed I will see some hearty results for making the crossover to hydro.


Likes
10
Share


@Elpicor
Follow
Letting soil dry before harvest, th strain is underestimated by growers, great buds and smells like cherry cola, they loves cold temperatures.

Likes
13
Share


@DaisyNabis
Follow
cada dia mas glotonas mis bellas, estoy aplicando riego casi día por medio, solo una vez a la semana las abono, el resto solo con agua. hice algunos amarres a los tutores ya que están en pleno crecimiento

Likes
11
Share


@RoyColt
Follow
Day87 25/02
4 lt ro water -16 ml bloomA -16 ml bloomB -8 ml big bud -8 ml nirvana,
Total 1080 ppm, ph 6,2
Drain 200 ml, 1180 ppm.
*Day89 Continue Defoliation and LST.
Day89 27/02
4 lt ro water - 2ml sensi cal mag extra,
Total 120 ppm, ph 6,1
Drain 600ml, 950 ppm.
*Day91 continue defoliation, 1100 PPFD.
Day91 01/03
4lt ro water -16 ml BloomA -16ml BloomB -8ml Big Bug -8ml Nirvana,
Total 1120 ppm - Ph 6,2
Drain 500ml, 980 ppm.
Likes
9
Share


@russrahl
Follow
Flipped to flowering on these girls as the screens are now almost full across the 4x8 tent and we will still need to train them along the screens for the next 2-3 weeks. So working for a packed tent this time hopefully. Plants have been exploding in growth daily. Water was changed out and new water added with 3/4 Remo Flowering lineup and UC Roots at full strength. Smell is starting to get noticeable when you open the tent and is very pleasant.

Likes
148
Share


@CrazyHorse
Follow
After a hard week, you can finally see the effects of my efforts, if you look at the photo of my girl from day 43 and you compare it with 45, you can see the differences in the color of the leaves. The new set of fertilizers works and my darling seems to be happy, let it be like that all the time without any problems :)
This is the first time that I am growing a photopyriodic girl, after changing the light cycle to 12/12 you can finally see her reactions.
I am excited and waiting for the situation to develop 😍
By the way, she drinks 1.25 liters a day, 5 liters in 4 days.
If I drank as much as she did, I wouldn't have liver anymore
All The Best, You Lovely Girls Growers :D