


Likes
Comments
Share


@MorangoTango
Follow
A white widow #2 finalmente está se recuperando.
Devido ao calor excessivo as plantas não estão com muito cheiro, infelizmente não estou conseguindo abaixar mais a temperatura.
Aumentei a dose de fertilizantes e estou fazendo rega diária.
As C99xBB estão super densas e com um aroma bastante marcante, provavelmente na próxima semana eu iniciarei a rega apenas com agua me preparando para colher.


Likes
5
Share


@GrowFunMD
Follow
I am now putting my weekly comments in the videos. Watch the videos for updates.

Likes
12
Share


@Herbalist7
Follow
Running 4 autos in the same aeroponic system isnt ideal as 2 of my plants need to flush this week.. while the other 2 still have about 2 weeks again... its all good tho.. id take it out an flush them individually before harvesting.


Likes
24
Share


@Aleks555
Follow
Sticky Orange XXL Automatic from Sensi Seeds is now eight weeks old, and she’s absolutely stunning! The buds are dense, the aroma is strong and delicious, and most importantly — incredibly sticky. We’re using fertilizers from Xpert Nutrients, and I must say, our girl is absolutely loving it! This product is truly high-quality, and we’re seeing excellent results. A huge thank you to Xpert Nutrients for their amazing fertilizer — it’s making our baby so healthy and strong!

Likes
18
Share


@ODNTrick
Follow
Better weather this week. I fed kelp and molasses on day 45. Canuck is showing nice trichome development. The pyramid continued to grow so I gently applied a couple of more tie downs to let as much light in as possible. Branches are getting quite stiff. Smell is nice from both in the evening.


Likes
99
Share


@BudXs
Follow
Fimmed the mothers and accidently topped an Auto because I wasn't paying attention. No big deal, all plants super healthy and growing strong


Likes
25
Share


Likes
42
Share


@Master_weeda
Follow
Bonjour à tous les padawans et maîtres jedis
Tout d'abord merci à Tom de seedsman pour ses graines ainsi que greenhouse de me permettre de faire cette culture en m'offrant le feeding greenhouse
Je rappelle que cultive simultanément 9 pots de 10 et 11 litres dans une box prévu pour 4 et que je n'utilise que le strict minimum du matériel nécessaire à une culture correcte au prix le plus bas possible
MATÉRIEL CONFIGURATION
Box 80×80×160
Lampe led Lampwin 300 watts ×2
Ventilateur à pince 15 watts
Xiaomi Deerma humidificateurs 5L
Hygrometre thermomètre
Extracteur PROFAN 107 m3/h - 100
Prise programmable électronique ×2
1 pot carré noir 10 litres
Green house feeding enhancer
Green house feeding biobloom
Green house feeding biogrow
Substrat biobizz ligthmix
Fil de fer et pince coupante
Microscope
Petite balance de précision
CULTURE ÉTAPE PAR ÉTAPE
J'ai tout dabord fais germé ma graine avec le easy start de Royal queen seed et je suis agréablement surpris car franchement le taux de réussite est très élevé (17 graines sur 19) simple d'utilisation et très efficace.
Une fois la plantule sortie et d'une hauteur de 2 ou 3 centimètres je la prend délicatement et la place directement dans son pot définitif. Je préconise des pots allant entre 10 litres et 15 litres pour des autofloraisons cultivées en intérieur.
Le pot aura été préalablement préparé (video dans diarie) avec 30 grammes d'engrais greenhouse feeding biobloom et 30 grammes de greenhouse feeding biogrow, soit l'équivalent de 3 grammes par litre de substrat.
Je dépose donc la plantule dans son pot définitif je recouvre un peu de avec de la terre je tasse légèrement et j'arrose pour garder le substrat humide pas plus
Je place ma lampe led 300watts à environ 90 centimètres de la plantule avec un cycle de lumière de 24/24 pendant une semaine. Au début de la semaine 2 le cycle de lumière passera en 20/4 grace a un programmateur car c'est pour moi le cycle de lumière qui offre le meilleur rendement pour une autofloraison.
Jour1: léger arrosage
Jour2: léger arrosage
Jour3: la plantule commence à être plus vigoureuse mise en place de la ventilation pour augmenter sa masse racinaire et léger arrosage
Jour4: arrosage avec un litre et demi d'eau ph6.3 à laquelle j'ai ajouté 0.9 gramme de greenhouse feeding enhancer (soit 0.6 gramme par litre d'eau)
Jour5: aucune technique spéciale
Jour6: aucune technique spéciale
Semaine agréablement calme sans problème ni carence apparente
Que la force soit avec vous !
Likes
12
Share


@PacoMendoza420
Follow
The plants officially entered the explosive period of the growth. They're absolutely loving life, and despite the overexposed colour in the photos their green is absolutely healthy. They are growing low and bushy, which is perfect because I want to mainline all of them
At the end of week 3 the plants are almost ready for the first topping, as you can see they doubled in size in just 3 days.

Likes
3
Share


@Dsant
Follow
Another 20L dechlorified tap water reservoir change on the 19th.
Flowering stretch looks to be finally over - and I'm glad, because I've got no more vertical space left. Can barely believe these have been topped, they're by far the biggest plants I ever grew (not that I have grown many to be honest lol)
Did a good defoliation session on the 22nd, but that was before the pics and video. RH went down from around 70%+ to a controlled 64%.
Temps are super high at the tent, but the girls look to be handling that very well. We'll see.
Likes
1
Share

@Day_1
Follow
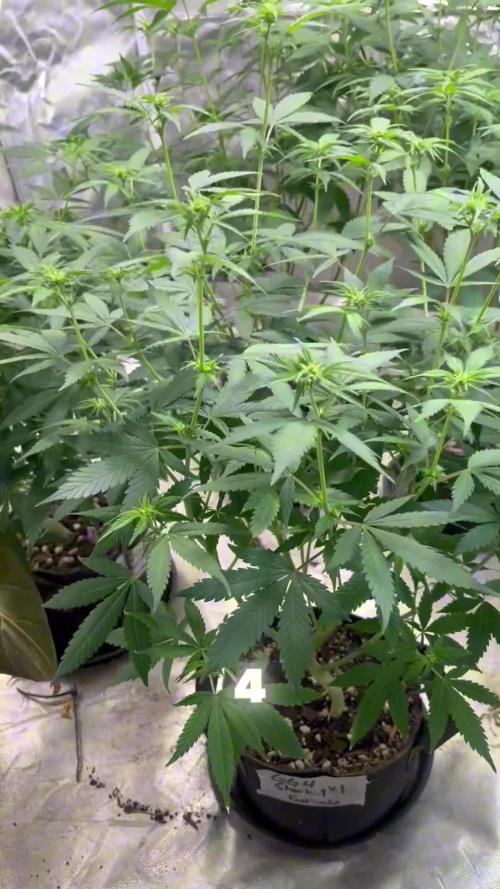
Ladies are doing amazing. First week of flower. I’ve went ahead and topped dressed with worm castings Gaia green 444 and 284 and Bone meal also water them with stash blend.
Likes
2
Share


@Stoenoe
Follow
As you can see, my leafs don't look really healthy. It's either the fact that the soil was too wet for a couple of days cause my friends took care of it when I was away or it's because the humidity is so low. It's only on 36%, even though i bought an humidifier. The light was maybe too close to the plant as well in first week (30 cm I think, maybe less). I already highered the lamp to try and lower the humidity and to prevent the leaves from curling but idk if that's the solution...
My first grow I never had problems with my humidity, maybe its because its colder outside now? I changed my ventilator as well, maybe that has an impact as well, but surely not that big?
Any tips on:
-What I should do to improve the leafs and prevent them from curling
-What I should do to higher the humidity.
As for nutrients, I mixed my soild with Biogrow (3g/l) when the plant was around day 3. I think this may have been too much too soon, but that's what they adviced on their site so I just went with it and afterwards I found out that you should try to wait untill your plant is a bit bigger.(I think)

Likes
12
Share


@UK420hydrogrow
Follow
Ok so had a lot to do this week harvested the large critcial mass to which I got 6 n half 0z from one plant so happy with that i also had a few issues with enviroment mainting right temp and humidty as been a lil issue but think all is well now so there all now on the 7 week of flower think I may push these as far as I can to maximise yield potential overall a real good plant to grow had very few issues from start to finish a top strain a deffo keeper for the garden of mothers in my opinion


Likes
6
Share


@LoganatorDude
Follow
Even though it says 80 Gallon pot, it’s really 400, it just glitches out when I enter 400 and converts to say only 80.
I know she looks bad! I know.
She has only been managing a nutrient lockout with horribly low pH for far too long! The Hydrated Lime has indeed fixed the pH! Resulting in my next inbound set of problems. The original soil from the second 2.3L pot she was in was too strong! She needs to get her roots out into the larger pot, but that only gives her so much more space. Plus in that larger black plastic pot, the hot dry sun at 7,000 ft in elevation, really heats up those pots! When it’s 98F later, that sounds like torture! Maybe it was enough to balance out the more concentrated stuff towards the inside of the root mass. But I don’t want her roots to stop there! The time is now for her to go into the 400!!!
The soil is 6.5 pH through and through. The peas are about to bloom! She has just avoided lockout and is picking up momentum! The 400 gives her a huge diameter for her roots! Something I sincerely hope her genetics will take advantage of. The soil is rich and alive! The temps in 400 will be so much better!
Now I must prepare for my Arch Nemesis!
The Butterfly!!!!!!
Lol
But seriously. They find my plants attractive, and decide to serve my plants as food for their offspring!!!! Not okay! Last year their success rate on my plants was a fat 0!! But they did some serious damage! I am prepared this year!! I will watch with vigilance for any butterflies around my plants specifically. I will spray my plants down regularly with diatomaceous earth! Not too much obviously! I know less is more when spraying that stuff! No mother wants to give her children food with razor blades in it!
And as always there is always next year! I can’t let a phase of mice and men get the better of me. However!!… that’s what I said LAST YEAR!!!! Lol. This year IS next year!
Anyways she looks rough right now on Day 58 but I tell yah what, she has very recently made a dramatic turnaround for the better!!
…I hope!
Happy Growing!
StrongTrees💪🌳


Likes
1
Share


@LAShugars
Follow
Growing great! Trying to stop the stretching. Really thick stem at the base for this little 3 gallon grow bag.
Likes
8
Share


@MountainFlowers
Follow
Flowering week 6 --->
Indoor plant:
This is the last week of flowering. The flowers are ready to be harvest.💪
I watering the plant only with 4lt of water (pH 6.5).
I removed the yellowing leaves.
I will wait after all the soil il totaly dry before harvesting.
Temperature grow box---> 22-26 °C
Umidity grow box ---> 45 - 55 %
Outdoor plants:
They are in full bloom ready for the harvest😍. This week I watering the plants only with water.
Likes
4
Share


@Maximilian1234
Follow
Es geht in die Blüte 😃
Ich kenne den Strain noch nicht und rechne trotz topping mit einer starken Streckung in den erst ca. 4 Wochen.
Ich liebe es ja jedes Mal zu sehen wie schnell sich die Pflanzen entwickeln und nach Umstellung des Lichts verändern.
Ab jetzt werde ich bei jedem gießen den Mineralischen Dünger von Plagron verwenden.
Trauermücken nerven hart sollten aber dank fressfeinden bald Geschichte sein. Ich bin gespannt 😉
Likes
Comments
Share

@LegacyGrow
Follow
Englischversion below
Deutsch:
Tag 16 Veg:
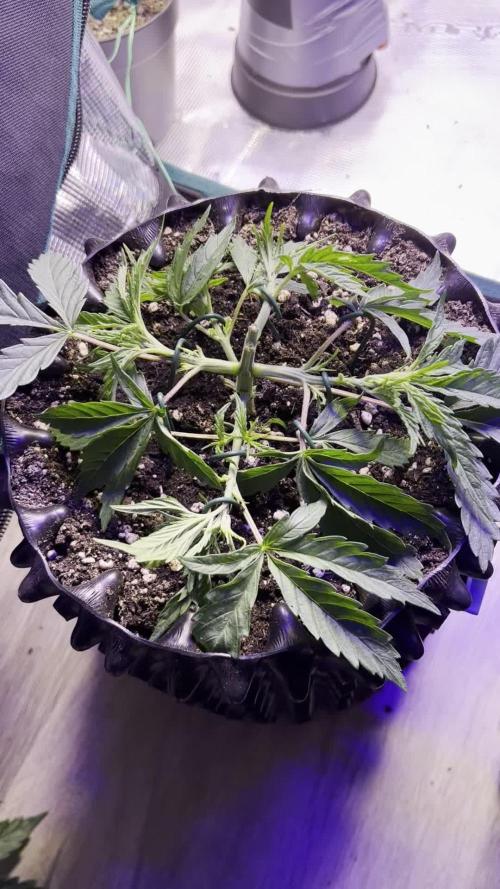
LST und Topping sind die Schritte die jetzt anstehen. LST muss täglich wenn nicht sogar mehrfach täglich ausgeführt und kontrolliert werden, um zu gewährleisten, dass die gewünschte Pflanzenstruktur erstellt wird. Wie auf den Bildern zu sehen ist, hat die Dame vorne links weniger Triebe. Beim Training hat sich einer bereits verabschiedet (Durch Unachtsamkeit) und ein Trieb entwickelte sich einfach nicht und wurde entfernt. Beim LST versuche in jeden Trieb in eine eigene Richtung zu biegen und dann senkrecht zum Boden auszurichten.
Ich warte noch 2 Tage bis zum nächsten Topping - zum einen, damit der Stress auf die Pflanze verteilt wird, zum anderen weil der Wachstum einiger Triebe der schwächeren Pflanzen noch nicht so weit sind.
der VPD liegt zwischen 0.44 und 0.68 - für die frühe Wachstumsphase ideal - das ist auch am Wachstum der Pflanzen zu erkennen.
Tag 17 Veg:
Heute früh wurde zum 2ten Mal, diesmal an der ersten entstandenen Nodie, getoppt. Nur bei den Obeneren Trieben wurde gewartet, da diese noch zu jung waren. Warum habe ich trotzdem die unteren Triebe getoppt? - Erstmal macht es sinn den hohen Stress auf ein paar Tage zu verteilen, außerdem möchte ich eine Gewisse Struktur erreichen. Vor und nach der überliebenden Nodie sind Erdanker gesetzt um die Triebe in Position zu halten.
Tag 19 Veg:
Heute gibt es wieder ca. 1-1,2L Flüssigkeit mit 6,3 PH und 1ml Cal-Mag für jede Dame. Dabei wird das Wasser in 125ml Schüben nach und nach verabreicht, bis ein leichter Drain von ca. 100ml zu erkennen ist.
Tag 20 Veg:
Dem Wachstum der Pflanzen ist zu entnehmen, dass sie das letze Topping verarbeitet haben. Die neuen Seitentriebe legen nach und nach zu. Hier ist es wichtig, für eine Gute Struktur, regelmäßig mit LST zu intervenieren. Auf den Bildern von Heute sind die Pflanzten vor und nach dem LST zu sehen. Auch einige Blätter, die die Triebe bedecken, wurden entfernt. Die ganze Energie soll in den Wachstum der Triebe geleitete werden.
----------------------------------------------------------------------------------------------------------------------------------------------
Day 16 – Vegetative Phase:
LST and topping are the next steps to be carried out. LST needs to be performed and monitored daily, if not several times a day, to ensure that the desired plant structure is achieved. As can be seen in the images, the plant at the front left has fewer shoots. During training, one shoot was lost due to inattention, and another shoot failed to develop properly and was therefore removed. During LST, the goal is to bend each shoot into its own direction and then orient it horizontally to the ground.
I am waiting another two days before the next topping. This is done partly to distribute stress more evenly across the plants, and partly because the growth of some shoots on the weaker plants is not yet sufficiently advanced.
VPD is currently between 0.44 and 0.68, which is ideal for the early growth phase. This is also reflected in the visible growth of the plants.
Day 17 – Vegetative Phase:
Early this morning, topping was performed for the second time, this time at the first newly formed node. Only the upper shoots were left untouched, as they were still too young.
Why were the lower shoots topped anyway? First, it makes sense to distribute the high level of stress over several days. In addition, a specific plant structure is intended to be achieved.
Before and after the remaining node, ground anchors were placed to keep the shoots in position.
Day 19 – Vegetative Phase:
Today, approximately 1–1.2 L of liquid was applied to each plant, adjusted to a pH of 6.3 and supplemented with 1 ml/L Cal-Mag. The water was administered gradually in 125 ml increments until a slight runoff of about 100 ml was observed.
Day 20 – Vegetative Phase:
Based on the plants’ growth, it is evident that they have recovered from the last topping. The new side shoots are progressively gaining vigor. At this stage, regular intervention with LST is essential to establish and maintain a well-structured plant architecture. In today’s images, the plants are shown before and after LST. In addition, several leaves covering the shoots were removed so that energy is directed entirely toward shoot growth.

Likes
17
Share

@Bncgrower
Follow
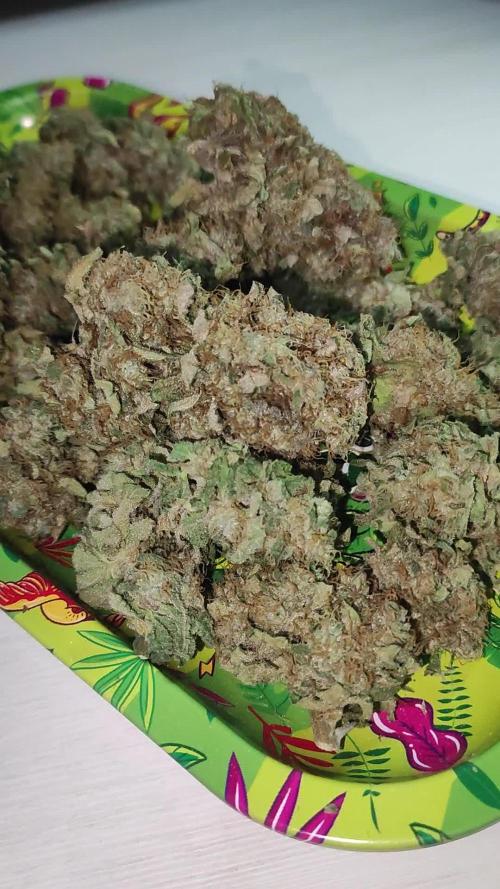
Harvested last night, truly strong smell, cultivation was absolutely perfect from start to finish. Very happy with the result, anxious for the drying and curing process! Thank you for following along.. 🤜🤛🌱🌿🌲