Likes
Comments
Share


@Leonardo_DaGrower
Follow
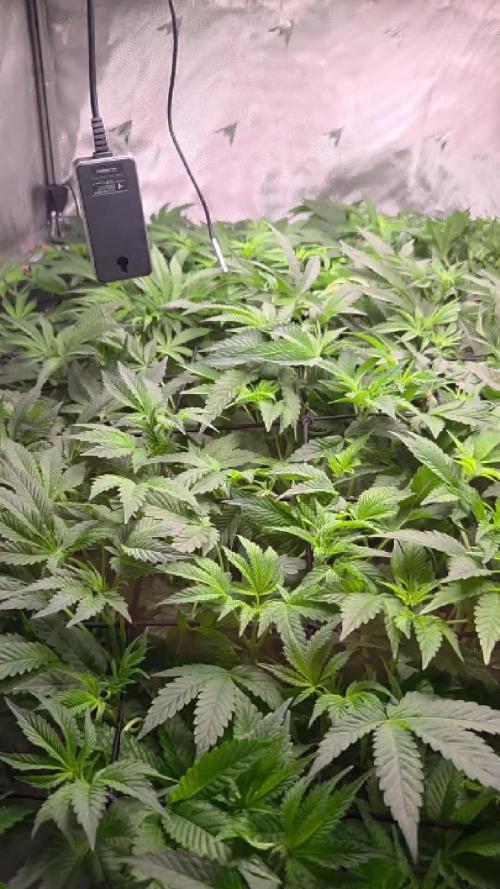
Lights were 80% until this week. Now at 100% for flower. The plants have exploded in growth. One more stretchy than the other. I’m struggling to keep the tent cooler than 80 degrees.


Likes
17
Share


@Hawkbo
Follow
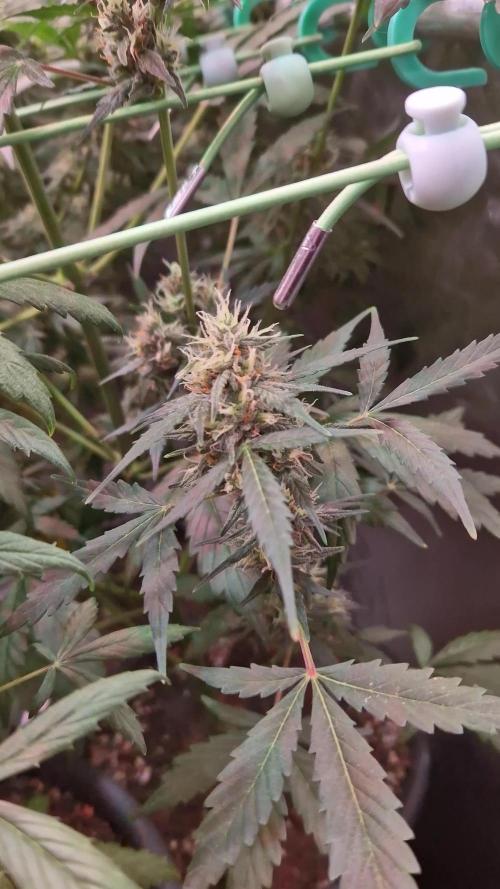
This one stretched a good amount, I thought it got lightly pollinated by a moonshine cookies male but I havnt found any seeds yet. The Marge Simpson nugs are pretty cool lookin. I had one bad feed that burnt the tips in flower i wish i could take back but the ph meter got confused. This shit is top shelf.
Likes
93
Share

@LGreen
Follow
🌿 Schönen Sonntag & einen entspannten 1. Advent aus der richtigen Zeitzone =)
🌱 Wochenupdate
Diese Woche wurde echt viel gefummelt 😄 Im Fokus standen Canopy-Aufbau und selektives Entlauben =)
Bin da wirklich pingelig und könnte das den ganzen Tag machen… echt schlimm 😅
Was ich jetzt schon sagen kann: Blueberry Cupcake hat mit Abstand den krassesten Stretch hingelegt.
Purpz hat ihren Platz auch relativ gefüllt, performt echt gut und ist fast gleichauf mit BBCC.
Notorious zieht auch, soll aber wohl etwas später definierter drücken. Mir gefällt ihr Wachstum richtig gut.
Guzzlerz macht sich auch echt gut für ihren schlechten Start.
Ihre Sides gehen mittlerweile richtig steil. Ein paar mehr Triebe wären nice gewesen, aber da lag sicher auch einiges an mir.. :D
Abseits meiner Dummheiten lief alles absolut smooth. Eine tolle Veg und richtig gute Stretch-Phase bis jetzt =D🔥
🌿 Pflanzenstatus & Training
Ich halte die Canopy aktuell noch flach – für zwei, drei Tage =) Anschließend steht das Verteilen auf die Meshes an. Danach dürfen sie endlich nach oben =D
Die Richtungen sind grob gelegt, erste Ansätze sieht man auch schon =D Ich kann’s echt nicht erwarten… Budporn ist einfach magisch 😄🔥
Über die Tage sind immer wieder größere oder verdrehte Blätter rausgeflogen – hauptsächlich, um Luft und Licht auf möglichst viele Triebe zu bekommen 😊
Man kann wirklich ohne Bedenken ~30 % Biomasse rausnehmen, wenn die Vitalität das zulässt, ohne sichtbaren Stop im Wachstum 🌱
🌬️ Luft & Ventilation
Hab jetzt noch zwei Clip-Ventis dazugezogen. Die Angst vor Schimmel kickt langsam wieder =D
Es laufen jetzt zwei unter und zwei über der Canopy – jeweils gegenüberliegend und zirkulierend.
Ich muss gestehen, dass ich den Boundary-Layer-Disruption-Effekt kenne bzw. davon weiß, und ihn durchaus stimmig finde 😊 Aber bis jetzt war die Angst vor Schimmel in irgendeiner Ecke doch größer 😂
Ich hab nicht den Eindruck, dass es negativ ist, zirkulierende Luft auf die Pflanzen zu richten, solange man nicht voll draufpustet 💨
⚙️ System
Läuft nach wie vor stabil =) Die Top-Ups halten die Nährlösung sauber auf Kurs.
Gestern hat sich klar abgezeichnet, dass wir mitten im Stretch-Peak sind 😄 Sie ziehen massiv Kationen und verursachen dadurch einen deutlich messbaren pH-Drop.
Das ist für mich das Signal, das Training in den nächsten Tagen zu beenden 🌿😊
800 PPFD
1,0 kPa VPD
700–800 ppm CO₂ im Durchschnitt
💚 Special Mention
Der Aufwärtstrend setzt sich fort 😊 Man mag es kaum glauben, aber sie macht sich wirklich gut – sie deckt sogar etwas mehr als die Hälfte ihres Quadranten ab 💚
Bin echt froh, dass sie es geschafft hat und meinen Scheiß noch mitgetragen hat 😂
Danke fürs Lesen echt verrückt, wie viele inzwischen dabei sind – freut mich wirklich mega 😊💛
Eine schöne, entspannte Adventszeit euch allen 🌲😊


Likes
24
Share


@Nickeluring
Follow
Day 30 of flower;
She's growing very tall and she has forced me to move my light as high as I can. She has also forced me to raise the other 3 plants in the tent. She's starting to build some very long colas.

Likes
27
Share


@Potgoblin
Follow
So it's the day 9 of flower start of week 2 and she is really starting to stretch!!!
I'm trying to only feed her a couple litres at a time to reduce the amount of humidity in there and to make sure she dries out a bit more regularly...so far it's staying around 45% which is pretty damn good 😁👊
So day 13 of flower 31/08/21 and she is FLYING! even after the heavy defoliation!!
I've still got about 9 days of upward growth to go she's staying quite squat though perhaps because she's 60% indica or maybe I should have vegged a week or 2 longer.. first grow live and learn lol
Last feed she had was Monday 29/08 and she drank 4L of full dose nutes and so far so good no burn 😁🔥stays at 2ml per litre of bloom feed for another week and I also picked up some "Rezin" to stimulate trichome production that will be going in next time
More pictures to follow next week!
Peace!!
Likes
92
Share


@DogDoctorOfficial
Follow
🌸 Week 4 Flower Report: Growth, Challenges & Big Changes! 🌸
Hey, Grow Diaries Fam! ✨
We’re here at Week 4 of Flower, and what a week it’s been—packed with challenges, adjustments, and exciting progress! Before diving into the details, let’s start with a note on my flowering timeline. While this is Week 4, I don’t start counting flower days the moment I flip to 12/12. Instead, I wait for the plants to show true signs of bloom. It’s a small but significant distinction that keeps things accurate and aligned with the plants’ development. 🌱
Defoliation: Timing is Everything!
Defoliation is a critical part of the flowering stage, and I typically wait until Day 21. However, this week, I tackled it earlier on Day 17 because:
1️⃣ The room was simply too full.
2️⃣ And most importantly—the Papaya Zoap had other plans!
She’s a fighter—determined, defiant, and constantly reaching for the moon. Despite intense training like super cropping, she’s still pushing upward, nearly outpacing the LED lights. Challenges like this remind us of a simple truth: gardening mirrors life. It’s about resilience, adaptation, and unwavering determination. 💪
This week, I added a second SCROG layer. While this net will support the flowering colas, it’s also there to strategically manage the Papaya Zoap. Why? Because experience has taught me that if she grows out of the LED’s range, she won’t finish properly—and that could disrupt the balance for every other plant in the tent. It’s all about teamwork, even in the garden. 🌟
Defoliation was intense, removing nearly all the leaves with stems to clear space and boost airflow. The tent now looks dramatically different! For the full before-and-after transformation, be sure to check out my YouTube channel—trust me, you’ll want to see this process up close! 🎥✨
Switching to Aptus Holland Minerals
A major milestone this week: I’ve transitioned entirely to Aptus Holland Minerals. 🌊 From now on, it’s just minerals—no more organic inputs. This marks the start of a new chapter, and I’m incredibly curious to see how the plants react to these changes. Here’s the current nutrient mix:
• System Clean: 0.5 ml/L
• Regulator: 0.15 ml/L
• RO Water Conditioner: 0.8 ml/L
• All-in-One Liquid: 2.1 ml/L
I’m keeping the pH at 6.1 and TDS at 556 ppm, and so far, the plants are thriving. This week also included a thorough system clean, ensuring everything runs smoothly as we enter the final flowering stages. 🌿
Bud Development: Pure Magic!
The bud formation across all the genetics is nothing short of incredible. Every plant is thriving, and the canopy is lush, vibrant, and full of potential. I’ve raised the PPFD to 750 for this stage, with temps steady at 25°C and RH at 63%—keeping the VPD dialed in at 1.11. The TrolMaster ecosystem, paired with the AutoPots, makes managing these precise conditions seamless. With more time to focus on the plants, I can give them the daily care they deserve. 💚
Shoutouts & Gratitude
A huge thank you to my sponsors and supporters: TrolMaster, Aptus Holland, Pro-Mix, Cannakan, and the amazing seed banks. Your incredible products and technology make this journey possible. 🌟
To the Grow Diaries community and all my followers—thank you for your energy, love, and even the challenges from the haters. It all fuels this incredible process, and I apprecilove every bit of it.
Special shoutout to Brother Daggadna—check him out on Instagram and show some love! 💚
The plants are heading into the next phase of bloom, and I can’t wait to share how this story unfolds. 🌸✨
As always, stay tuned, stay positive, and let’s keep growing strong together! 🙌
Growers’ love to all 💚
#TrolMaster #AptusHolland #GrowLife #CannabisCommunity #FlowerWeek4 #NeverGiveUp #GrowWithLove #IndoorHorticulture #Defoliation #PPFD #ControlledEnvironment #SCROGNet #DogDoctorOfficial
Discount Codes so you can save big on your next check out 💚💚💚
Kannabia - DOGDOCTOR 30% off
SeedsmanSeeds - DOGDOCTOR 10% off
CannaKan- DOGDOCTOR 15% off
terpyz.eu - DOCTOR 15% off
The Neutralizer - PORKIT5-DOG 15% off
As always thank you all for stopping by, for the love and for it all , this journey of mine wold just not be the same without you guys, the love and support is very much appreciated and i fell honored and so joyful with you all in my life 🙏
With true love comes happiness 💚🙏 Always believe in your self and always do things expecting nothing and with an open heart , be a giver and the universe will give back to you in ways you could not even imagine so 💚
Friendly reminder all you see here is pure research and for educational purposes only
Growers Love to you all 💚💚💚
P.S. – A Deep Dive into the ICL-300: Revolutionizing Under-Canopy Lighting
The ICL-300 isn’t just another LED—it’s a game-changer for under-canopy lighting. Unlike traditional LED systems that project light in a single direction, the ICL-300’s 300-degree design ensures even light distribution beneath the canopy. 🌟 This unique feature means that no part of your plant is left in shadow, creating a balanced environment for lower buds to thrive.
Key Tech Specs & Benefits:
• 300-Degree Light Distribution: This design fills the under-canopy space with optimal light, enhancing photosynthesis where it often gets neglected. 🌱
• Full Spectrum Output: Tailored to meet the specific needs of plants at every stage, ensuring quality growth from base to apex.
• Energy Efficiency: Advanced LED technology delivers maximum output with minimal energy usage, keeping costs down and sustainability up. 💡
• Durability & Heat Management: Built with high-quality materials, the ICL-300 stays cool and reliable, even in intense growing environments.
Why It Matters:
Under-canopy lighting is a game-changer for growers aiming to maximize yield and quality. Typically, lower buds receive less light, resulting in larfy or underdeveloped flowers. The ICL-300 changes that dynamic entirely by turning shadows into opportunity. 🌟 With light evenly dispersed across the entire plant, you’re not just growing; you’re sculpting a masterpiece.
For me, the ICL-300 is more than a tool—it’s a partner in innovation. It ensures that every plant in my grow room has equal opportunity to shine, from the top colas to the smallest buds at the base. When paired with a carefully managed ecosystem, like the one powered by TrolMaster, the potential for consistent, top-quality harvests reaches new heights.
This isn’t just about adding light—it’s about adding value, efficiency, and balance to the grow process. I’m beyond excited to see how the ICL-300 transforms the game in my tent, and I can’t wait to share the results with you all! 💚


Processing
Likes
4
Share


@mastermind74
Follow
Day 1 Just planted seed direct to coco coir, bagged for humidity, no exhaust fan as of yet, COBs dimmed to 1/10th power...let's see how this goes also sprinkled seed holes with great white mychorrhizae.
Day 3- Sproutling Partially Unearthed , Installed AC Infinity T6
Day 4- I have little sproutlings 100% germination and 3 above ground girls. Combated low humidity yesterday with an asthma nebulizer lol. Decided to invest in a humidifier today. So far so good.👍🏾
Day 5- Today coco was a little dry. Gave them Cal-Mag and Great White myko mixed water Ph balanced to 5.8.
Likes
21
Share


@Esoteric_growing
Follow
Stretching well at day 14, will only do a little defoliation on day 21 and then it’s pretty much on auto pilate. Excited for the terps on this one

Likes
11
Share

@TrickzGrowz
Follow
Ein wunderschöner dicker Headbud. Die unteren sehen auch mega lecker aus!
Likes
8
Share


@BoboLacetti
Follow
This is by far the largest indoor plant I have ever had!!
I'm super excited. And because I am so convinced of Hydro, I bought an RDWC system. This will be used in the next grow
The PH always rises to 6.2, I bring it down to 5.8 every 48 hours
Otherwise it really just keeps growing. It takes significantly longer than Dutch Passion stated. It also doesn't get 20H light but "only" 12H. I think these are the last days of the flowering phase. I slowly shut down the EC. It will also sometimes be below 16 degrees. I am very excited to harvest this plant!


Processing
Likes
18
Share


@OrganicAlphapak420
Follow
Here she is ! DAWG DAZE at Day 78/ Week 11 from seed. Standing strong at 22 inches tall from top of soil. Using only 2x 100w closet case LED @spectrum_king_led kept at 10 inches from tops. She's grown in a 3 gallon smart pot @smartpots with 2 1/2lb kind soil and filled rest with cocoloco bush doctor soil and fed only tap water every 2 days as needed..kept the daily temps between (day) 80°-65° (night ) and humidity between 30%-45%. My preference. ..did her final minor lst training to get them left side colas in line. She fattening up real good now and her aroma is a strong sweet lemon pine . Great to enjoy everytime I walk in. Shes reaching her final weeks of flowering now. Maybe 2 more solid weeks . Looking forward to it. Will update next week on her organic growth. Enjoy.
Likes
21
Share


@3lementa1
Follow
I've been taking off all the lower shoots coming off the main stems. I don't want to lose sight of the main colas I'm focusing on. Once we're in flower I'll start leaving more of the side branches, at this stage none will reach the light by the end of flower. I'd rather do the hard pruning now before the switch.
I'm going to keep them in veg for another week. The mainline structure is working really well.
Likes
56
Share


@Cannabeast40
Follow
Welcome back once again😍
And probably one of the last times before harvest 😊
I still turn down the light and adjust the nutrients accordingly, I’m at about 50% of each and will turn it down further the last week or so 😎
See you next week 🙂
-------------------------------------------------------------------------------------------------------
SpectrumX LED🔥 @medicgrow
880 Watt⚡️
2x UV/IR LED panels 💥
2.7 μmol/J🔥
Full Spectrum V1,F1,VS,FS🌈
Display with PPFD & Live spectrum
Light measurement: Apogee MQ-610 & Apogee DLI-600.
Fertiliser:
Organics Nutrients
https://www.organicsnutrients.com/en/
Green Buzz Nutrients
Discount Code: GD42025
Grants 25% with a minimum Order value at 75 Euro.
https://greenbuzzliquids.com/en/shop/


Likes
38
Share


@RastaGrow
Follow
New design new record new sun in my garden , I want to thank the Spider Farmers team, you guys are just super one of the best teams in the world. Постараюсь подтвердить все ваши надежды которые касаются меня большое вам спасибо за такой прекрасный подарок я вас люблю 😍❤️🔥🍀

Likes
7
Share