
Likes
Comments
Share


@420DeepGrow
Follow
Gracias al equipo de Divine Seeds, Marshydro y XpertNutrients sin ellos esto no seria posible.
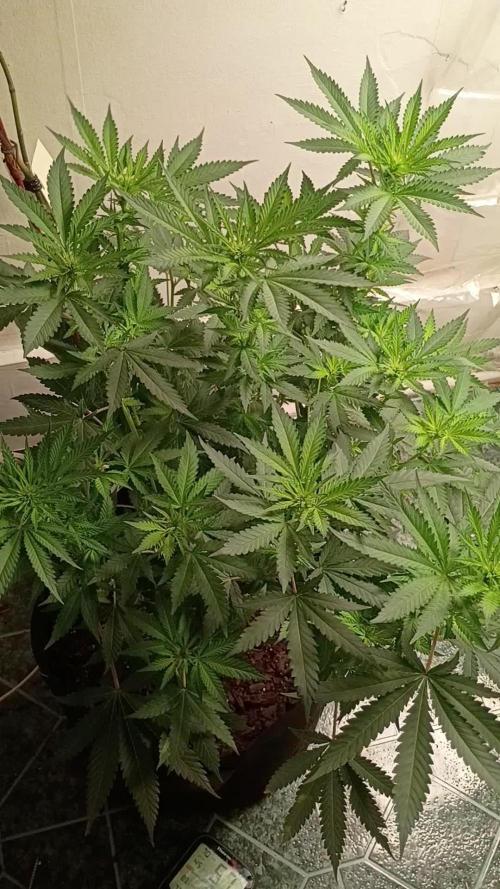
💐🍁Fractal:
La semilla de marihuana Fractal es una cepa especialmente psicodélica que Semillas Divinas desarrolló para experiencias esotéricas y místicas, meditación y creatividad. La potente y vívida Skunk#1 fue cruzada con una pegajosa Afghani Indica, y el resultado es ahora conocido como Fractal. Este exótico híbrido es resinoso, picante y productivo. La mejor opción para el cultivo comercial: un compromiso entre mayores rendimientos y maduración rápida.
En interiores se espera una altura de 1,70 m, en exteriores las plantas crecen hasta 2 m. Fractal se adapta a todo tipo de entorno de cultivo: cajas de cultivo, instalaciones hidropónicas o aeropónicas, plantaciones exteriores, balcones, terrazas e invernaderos. Para un mejor rendimiento se recomienda entrenar a las plantas de Fractal para ampliar su estructura y limitar su crecimiento vertical. Usar ScroG o SoG, LST, FIM o topping.
Fractal tiene una inmunidad inherente al moho y a las plagas de insectos, pero como sus colas son gruesas, proteja sus plantas del aire viciado. También durante las semanas de lluvia su plantación puede necesitar ser cubierta. Listo para la cosecha al aire libre en octubre. Grandes y densos cogollos.
Los cogollos de marihuana de la variedad Fractral huelen a hachís y algo a tierra, desprenden cedro y notas afrutadas al romperse. Mida su porción con cuidado: su potencia está por encima de la media. Con Fractal experimentas un apedreamiento general que te hace sentarte o frena tu movimiento. Perfecto para pasar una noche junto a una hoguera. Es mejor consumirlo por la noche.
🚀🌻 Consigue aquí tus semillas:
https://divineseeds.net/es/fractal-fem/
💡FC6500: Eficiencia líder en el mercado: la lámpara de cultivo LED FC-E6500, que ostenta un estatus líder en el mercado, es una solución rentable con un PPE de 2,8 µmol/J y un rendimiento máximo de 2,5 g/vatio. Ofrece un PPF alto de 2026 umol/S y es adecuada para una cobertura de vegetación de 1,50 m x 1,50 m y una cobertura de flores de 1,20 m x 1,20 m.
Iluminación versátil y uniforme.
https://marshydro.eu/products/mars-hydro-fc-e-6500-730w-commercial-led-grow-light/?gad_source=1&gclid=Cj0KCQjw1qO0BhDwARIsANfnkv9IIrYSbmJqz8PqpJOIyWwJfp5bc3SGJgUV68USLQ4tjmXDYwoBuAsaAue3EALw_wcB
🚥 MarsHydro ADLITE UV/IR/RED:
Para lograr un crecimiento óptimo de las plantas y maximizar los rendimientos es un arte simple que depende en gran medida de las condiciones ambientales adecuadas. Reconociendo las limitaciones de la iluminación natural y las soluciones de iluminación tradicionales para satisfacer estas necesidades únicas, lanzamos ADLITE. Estas luces especiales UV, IR y roja están diseñadas para llenar áreas del espectro, proporcionando las altas longitudes de onda que las plantas necesitan para un crecimiento y desarrollo óptimos.
Consigue aqui tu Adlite:
https://marshydro.eu/collections/adlite-supplemental-lights/
🏠 : Marshydro 1.50 x 1.50 x 1.80, carpa 100% estanca con ventanas laterales para llegar a todos los lugares durante el grow
https://marshydro.eu/products/diy-150x150x200cm-grow-tent-kit
🌬️💨 Marshydro 6inch + filtro carbon para evitar olores indeseables.
https://marshydro.eu/products/ifresh-smart-6inch-filter-kits/
🍣🍦🌴 Xpert Nutrients es una empresa especializada en la producción y comercialización de fertilizantes líquidos y tierras, que garantizan excelentes cosechas y un crecimiento activo para sus plantas durante todas las fases de cultivo.
Consigue aqui tus Nutrientes:
https://xpertnutrients.com/es/shop/
📆 Semana 6:
Debido a unos cortes en el suministro de luz, ellas han ralentizado algo su desarrollo.
Se siguen formando los cogollos aunque algo mas espigados de lo que me gustaría, algunas variedades han aguantado bastante bien este estres, lo que indica una buena genetica, entre ellas está esta variedad.
Continuo con las dosis de nutrientes recomendadas por el fabricante.
Potencia del foco: 100
Adlite: máximas horas.


Likes
20
Share


@PureMedicin
Follow
Scrog installed and the ladies are growing closer to it everyday. One of the pink kush are growing very well and i Hope it have the qualities in flower that im Looking for. Very pleased so far 🙂

Likes
5
Share


@Ryno1990
Follow
Tropicana cookies autoflower from fast buds soaking for 24-48 hrs on 517
After soaking for 48 hrs i placed the seed in a damp paper towel with some great white for 2 days till the tap root got good size an then planted seed into coco an then she popped up 2 days later on 5/23 an is growing good so far under the medic grow fold 6
Comming up ending week 1 of seedling stage she is growing great an looking great
Starting week 2 of seedling stage this auto has been doing pretty good so far she's starting to grow noticeable.more every day

Likes
31
Share


@BudXs
Follow
Super busy with a move and a big garden reno. Sorry, this is the only update for this week


Likes
8
Share


@OS_Farmz
Follow
I decided to start flushing #1 and #3 Gator breath plants, since they already have good sugar and sizes, leaves are dark purple or yellow-brown. I will keep feeding #2 Gator Breath and both Total Eclipse plants, they are looks like need more time to form good sugar buds. Thanks for reading and folowing, cheers.


Processing
Likes
6
Share


@Mr_nugs_lover_David
Follow
She's looking gorgeous,I lsted the talles branches to get a more even canopy. Let's see how she turns out,I'm loving to grow this strains her performs well with lst and all types of training,she's being fed only using 100% organic and bio amendments by florians living organics and guanokalong and also my lactobacillus serum home made,it is being a pleasure to grow her.

Likes
42
Share

@PersonalSmok3s
Follow
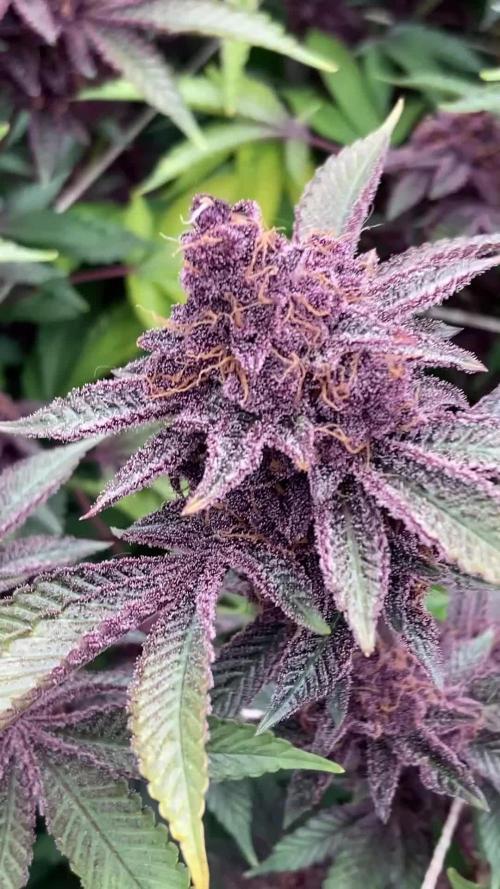
Harvested these ladies at day 68 of flower. Minus the tops from plant #2.
Absolutely stunning genetics! All the plants expressed a range of pinks, reds and purples. I’ve not just experienced anything like it to this extent.
All the plants share a mixture of different terpenes, but predominantly Orange, Cherry and Gas.
Plant #1 smells of Trop Cherry
Plant #2 smells like heavy sour Gas
Plant #3 smells like Orange oil & Gas
Plant #4 smells like Orange oil & Gas
Plant #5 smells like Cherry & Orange
Plant #6 smells of heavy Cherry Gas with subtle Orange tones.
Plant #7 smells like heavy Orange Gas
I’ve ended up leaving plant #5 to keep flushing with the new group 🤷♂️😸
I’ve added a video of a dry bud from plant #2
The second video is plant #6.
It’s been a really fun grow, I’ve got clones of the plants I want to run again so expect future diaries.
I’d like to thank everyone who has commented or liked this diary, I hope it’s been helpful in some way 😸
PersonalSmok3s🌱💚

Likes
73
Share


@Roberts
Follow
Cookies and cream auto is growing great. She is just finishing bulking and has about 10 days left roughly. I will be switching her to ph water this weekend so in 2 days. She has grown great under the Medic Grow Mini Sun-2 light. Next update is harvesting. Thank you Medic Grow, and MSNL Seeds. 🤜🏻🤛🏻🌱🌱🌱
Thank you grow diaries community for the 👇likes👇, follows, comments, and subscriptions on my YouTube channel👇. ❄️🌱🍻
Happy Growing 🌱🌱🌱
https://youtube.com/channel/UCAhN7yRzWLpcaRHhMIQ7X4g

Likes
17
Share


@Foggedaboudit
Follow
My oh my the bouquet on these cherries! Absolutely pumped for these!
Likes
26
Share


@MG2009
Follow
05/19/2021
Week #7 flower.
Gave her a good rinse today she was covered with pollen from nearby trees, drinking more water took 2 full two liter bottles before any runoff, soaking it up like a sponge.
Couple hours later fed her some (1-3-3-1.5)
N-P-K-calcium
I anticipate two more weeks till harvest but we will see. Just got to keep her hydrated for next couple weeks.
Apparently she is perking up! after taking a rest for a week or so. And putting on new flowers, and Tangie parentage is very identifiable in her SMELL! WOW
Enjoy the videos.🙏
Ps.
I decided to fix floppy stem, hopefully it will now put more effort into finishing flower!
Will she swell in last weeks??
Likes
2
Share


@rsfrosch660
Follow
Die achte Blütewoche markiert den Übergang von der reinen Massebildung zur Reifephase. Die Blütenstände sind dicht, kompakt und zeigen eine explosive Produktion von Trichomen, was auf eine intensive Synthese von Cannabinoiden und Terpenen hindeutet. Das Blätterdach bleibt dank des SCROG-Managements makellos gleichmäßig. Die Vitalität der Pflanzen manifestiert sich in einer hohen Wasseraufnahme von 6-7 Litern alle zwei Tage, ein Beleg für die optimale Funktion des Gesamtsystems.
Der Fokus liegt nun vollständig auf der Bestimmung des optimalen Erntezeitpunkts durch mikroskopische Analyse der Trichome. Gleichzeitig wurde die finale Spülphase eingeleitet, bei der nur noch pH-reguliertes Wasser verabreicht wird, um die Qualität des Endprodukts zu maximieren.
Flower Week 8: Entering the Ripening Phase & Harvest Preparation
The eighth week of flowering marks the transition from pure bulking to the ripening phase. The buds are dense, compact, and show an explosive production of trichomes, indicating an intense synthesis of cannabinoids and terpenes. The canopy remains impeccably even thanks to the SCROG management. The vitality of the plants is manifested in a high water uptake of 6-7 liters every two days, proof of the optimal functioning of the entire system.
The focus has now shifted entirely to determining the optimal harvest window through microscopic analysis of the trichomes. Simultaneously, the final flushing phase has been initiated, providing only pH-adjusted water to maximize the quality of the final product.

Likes
15
Share


@Shizzlemanizzle
Follow
Been away couple of days
Day 74
Came back and the lady’s exploded. Dropped down the nutrients since day 60 and started flushing on day 68. I’m waiting for the plants to get brown trichomes. But all in all I’m happy if I don’t fuck it up somehow
Day 77
Flushed yesterday the last time. Ppm was 400. Will chop them on day 84, if nothing special happens this is the last Post until before chopping them.
THANK YOU ALL FOR YOUR TIPpS AND YOUR OPINION YOU GUYS ARE GREAT!!!! Happy Growing to everyone !

Likes
22
Share


@Oklahomasunrise
Follow
We are getting a nice quick start just like always from fastbuds. I'm starting this week now with a video of our 5 gallon home. I will add more pics through out the week. Please come back to follow along! I'm so excited about this grow!
It's been a few days but I wanted to update you all. The #1 plant got eaten by something.
I threw that soil out and started over again.
The # 2 plant has a tap root showing and is in the pot as of today May 30th. I'm keeping a close eye on the bug situation.
May 31st- the replacement seed for plant 1 has cracked open has a tail and will be popping up any time now!
I do have fungus gnats, I did a soil drench with sns 709 and put out stick yellow traps. Hopefully this will do.
Likes
13
Share


@Highguyz
Follow
Stopped using tiger bloom and just using spring water probably going too flush them next week

Processing
Likes
6
Share


@jollychap
Follow
Greetings friends
Allow me to introduce you to my first ever brand spanking new homemade self contained DWC hydroponic system. So for this small experimental cycle, I will be testing various nutritional additives and plant training techniques. I will be sure to record a daily log in order to optimize my progress. Please note I will not be including germination and drying time.
Day 1 Mon, 16 July
So after a few days germination and nurturing, the plants have been moved to their permanent home. I filled the reservoir with nutrients following the can a websites specific instructions.
Day 2 Tue, 17 July
I've noticed a small growth in height however, I had a small humidity dome which upon moving slightly damaged the leaves but I noticed some strange spots which may have been from the fertiliser. But I did follow the dosages exactly??
Day 4 Thurs, 18 July
Note to self, maybe stick with clones seeing as you get straight into the vegging stage saving maybe a week or two. That and the fact they're free.
Ok, so I had to completely empty all my reservoirs because I misinterpreted the CANNA websites feeding schedule. It said 0-3 weeks which I foolishly did not realise was post-germination/sapling. And also one of the smaller plants #3, actually fell over because it's roots still had not dug deep enough to feed on the reservoirs moisture. However, I almost literally saw it pop back up with a tad of rehydration. Note to self a good trick for future reference will be to fill the reservoir right up until it pretty much touches the net pot and then shrinks back down to that even 35L once I begin adding nutrients.
Day 5 Fri, 18 July
Ok, so I gathered a bit of Intel from my friendly neighbourhood hydroman. First off I can hold off buying the EC meter until next they enter the actual vegetative stage which apparently is between 3 to 5 internodes ( the space between nodes) until then I will be feeding them a fraction amount of veggie fertilizer and rhizotonic. Now, this swamp cooler thing has piqued my curiosity if I'm not mistaken dry ice converts to carbon dioxide which we all know plants love so, that means a swamp cooler can cool, raise humidity and increase co2? In the mean time, I was given a bag of homegrown co2 which I will photograph. This will also counter the high-temperature problems I have been having. Apparently, plants can withstand an additional 10 degrees with the addition of co2 that complemented by silica would prove to be invaluable in the summer. I will be purchasing a humidifier for my saplings soon and have decided to stick with weekly reservoirs, Peace out.
Day 7 Sun, 21 July
Note to self I think for my cycle if I used a short square shaped reservoirs and perhaps less litres next time with multiple net pots per reservoir and with clones I think that would greatly accelerate vegge time and thus shorter cycles in general
Got myself a very good humidifier and added small amounts of vegge fertilizer to the none CANNA plants.

Likes
9
Share


@Jakobyzone420
Follow
Sono molto felice della mia pianta e dei suoi frutti spero in un buon raccolto da secca 😉 io direi di farmi fare altre 3 settimane di fioritura e poi raccogliere. Saluti 🙏🙏
Likes
13
Share


@603grower
Follow
Finally got the girls into their nets and in their final positions. I now have two rows 5‘ x 11‘ gave each plant half cup of craft blend and did a 1 inch layer of build a flower, then covered with chopped up leaves and straw, then watered in with recharge And I gave them a small lolly pop and thind out some of the smaller branches. I’m thinking they will go into flower in about two weeks. Here are some before and after shots.
