
Likes
Comments
Share


@Unkraut
Follow
nice strain with a rich terpene profile! sweet, gelato like, hard hitting smoke!
sadly my phenos had no banana taste but still very nice

Likes
26
Share


@Rangaku
Follow
The beautiful apricot has got the chop , flushed her the last week and not much else .
Stunning buds that taste so good like a sweet apricot coulis . Will deffo grow this one again .
Thanks fastbuds for the seeds , love ya work .

Likes
37
Share


@OrganicPower
Follow
Week 07 and the heat wave is behind us. Didn’t update last week but not much to report. Some serious damage was a result of the heat, causing the lights and everything else to become too much for the girls. #2 took it the best and is still growing nicely packing on weight and some serious frost! Finishing much faster then the others. I might re veg her the smell is so nice. The two larger #1 & 4 have been hungry forever awhile and I never applied anymore Gaia:(

Likes
25
Share

@MistaOC
Follow
31.01. F29
Overall, everything is still running according to plan, although powdery mildew is starting to become more noticeable again. Control measures remain consistent and ongoing. Compared to the previous Super Buff Cherry run, the situation is much better under control, mainly because countermeasures are being applied earlier and more actively this time. The goal is to get the mildew issue fully resolved in the coming weeks.
Aside from that, the Blueberry Skunks are performing exceptionally well. The automatic irrigation system clearly contributes to stable, low-stress growth, and the Biotabs nutrient system continues to impress. The difference compared to earlier runs is very noticeable, especially considering how little manual input is required.
All in all, this is a solid run, and despite the mildew challenge, it already creates a lot of anticipation for the harvest.
05.02. F34
Unfortunately, powdery mildew has become noticeably more present again and has clearly spread compared to last week. So far, the infestation is fortunately limited to the fan leaves, although it is visibly more pronounced there than it was a week ago.
The plants were treated again with a water–Purolyt solution to actively counter the issue. The current focus is clearly on containing the mildew and closely monitoring how the situation develops.
Relative humidity is currently around 53 %. The goal is to bring it below 50 % (ideally around 48 %), as powdery mildew struggles significantly more below this threshold. Even a difference of just a few percentage points can make a noticeable impact.
Aside from this, the grow continues to perform very well overall. Biotabs is once again outstanding, delivering excellent results with very simple handling. The Gardena drip Blumat system is working flawlessly, and all key parameters remain well balanced.
Thrips were only present at a very minimal level. After a single nematode application, no further signs have been observed so far.
The focus remains on keeping the powdery mildew under control.
Likes
39
Share


@King_Green21
Follow
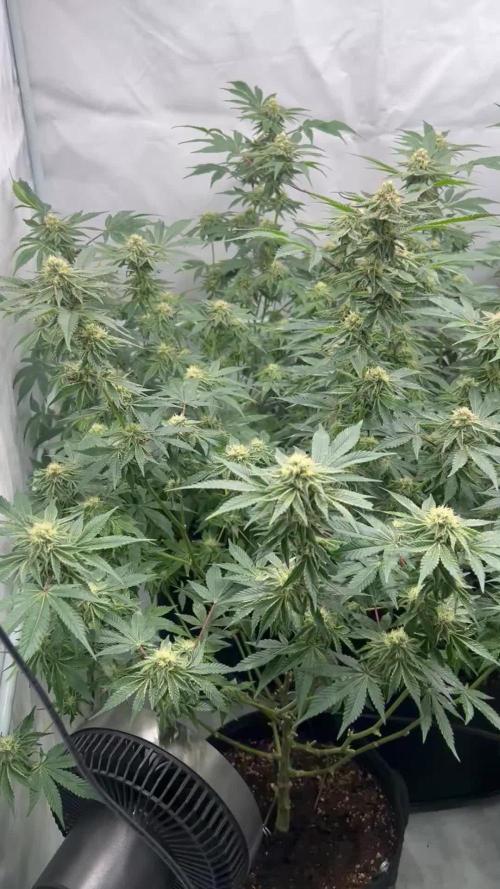
Everything looking good this week happy with the vegetative stage with the th Seeds original Bubblegum. Says they are an ibl strain so the genetics should be stable, which is less chance of 10 different phenos ( update me If I’m wrong here, still learning )
Day 54 - today I did the last defoliation and lst 2 days before swith to 12/12. Middle growth was insane so spread them out abit by screwing small screws in to the pot and using the as a tie down
Day 55 - all plants seemed to have bounced back the day after and look exactly how I planned so far so good
Day 56 - final day of vegetative growth all seems good, all females showing white hairs , have raised the lights and turned Intake to full to maintain humidity levels and switched lights to 12 / 12.

Likes
2
Share


@SecretC8keSociety
Follow
Today I finished Wedding Glue Autos.
Now onto London Pound Cake ! Will check back in 2 days to see if tap root show.
Supposedly be 12 seeds but end up with 13.
3 gallons smart pots and 10 -> 2 gallon plastic pots


Likes
4
Share

@Budhunter
Follow
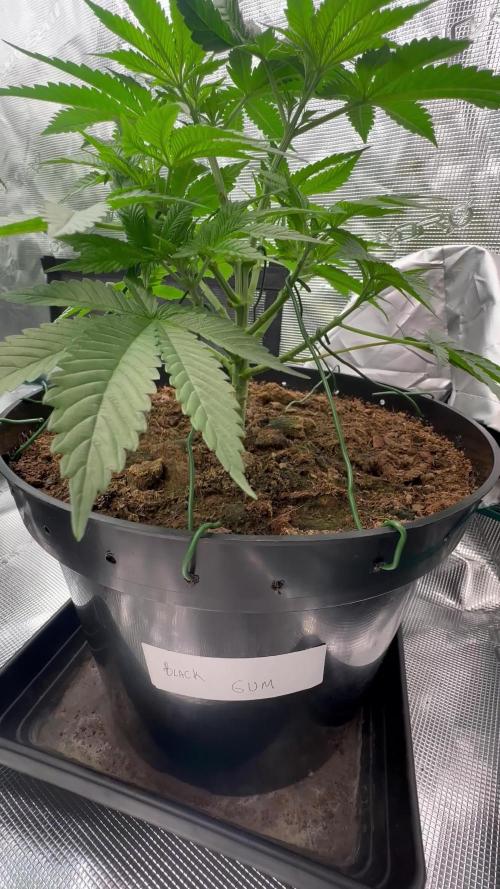
Week 5 Veg - day 41
Black gum seems a bit behind in size in comparison with the other genetics I am running together but overall it’s healthy. I will be vegging it for 1 or 2 weeks more before flipping into flower. Let’s go

Likes
1
Share


@Barzenegger
Follow
Transplanted them into the AutoPots this week, humidity could be higher. Maybe I can turn on the reservoir next week already.
Likes
25
Share


@Vincent11
Follow
Hi Everyone
A great week like always for the Gorilla Autoflower from RQS.
Buds forming up nicely getting bigger by the day. Some big buds forming again.
She is doing really good besides the light stress I always cause because no high in little grow room.
She accepted high PK Bloom nutrition really well and we are gone into first flower sprout first orange/brown pistils have appeared.
This means she is getting ready to go into finishing and concentrating on buds ripening.
From my experience most Autoflowers have 2-3 cycles off flower spouts before they are ready.
So one more week High Bloom nutrition awaits my baby.
Feeding her 2 times Nutrition, 1 Time 6PH water only 1.2 Litres every 2 and half days.
I think she will do well on the scale.
Thanks everyone for following and good luck growing.
Happy Growing

Likes
7
Share


@DailyDabs
Follow
Got both plants started and transferred into the Hydro setup, both seem to be growing well. I just recently installed 2 UV B lights on the wall that turn on for a few hours mid day. Interested to see if I notice a difference with them in there.

Likes
5
Share


@Dark_Shadow_420
Follow
La pobre agarro oidio, está en tratamiento, de no recuperarse pronto la voy a cortar para evitar contagiar las otras plantas


Likes
48
Share


@Stork
Follow
It was very easy to grow as a super-strong nothing can hurt her for nut burs u need to do it way over so she starts to get burns well for my first DWC I love it buds are amazing even not experienced like me can grow her perfectly I can't wait to try and smoke here 😎😎🤩😘
Likes
21
Share

@Kirsten
Follow
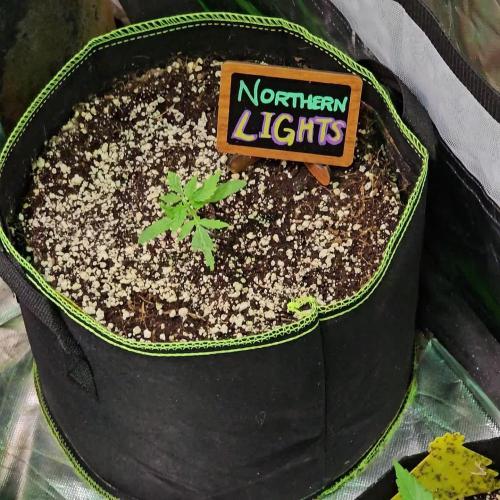
Northern lights is looking a little bit sorry for itself. Unfortunately, she was leaning really heavily towards the ground. So I decided that I was going to use some metal garden pegs to prop her up with. She seems to be doing well in that respect now.
The leaves are looking a little bit crazy. I'm not sure what's going on with that, but hopefully, she'll start growing, and she'll grow out of it. I guess we'll have to wait. And see what happens.
I have added an additional 100Watt UVA/UVB lamp, as the uppermost canopy of Acapulco Gold is blocking pretty much everything in the tent.
Hopefully, this will aid the shorter plants in surviving until I can harvest it. There will be so much more space and lighting. Can't wait! 😅
Here is what I did this week.
25.9.25:
I watered with 1.5L of dechlorinated water PH'd to 6.5 with;
💜 Sea K
PH: 6.5
PPM: 565
The fungus gnats have really increased since I did a watering of the whole tent.
I have some more sticky traps set out, and I will not water for several days.
Once it has dried the top soil, I will add some more Diatomaceous Earth to the top 5cm.
Thanks for checking in this week, and see you in the comments 👌💚🙌🧡😁

Likes
16
Share


@TechDCo
Follow
10 /11 Weeks Flower¬¬ It's going to be a long flowering phase!
18/01/2024
Performed a mid-day clean using hydrogen peroxide
Moved Spicy Temp to the flower tent
Noted that the temperatures are a little high
Searching for a new, large heatsink for the CropMaster Pro 1000 to resemble the SK600. Considering modifications to the CropMaster's heatsink as it is currently equipped with a 12-watt fan driver, PC fans, and connected to the LED mains power. It still works well, but planning to replace some LEDs once this grow is completed.
Fed 200ml of organic random feed to 5 plants
Discovered a sprouted seedling beneath the Forgotten Haze and relocated it to the veg tent
19/01/2024
Noted the arrival of the flowers
20/01/2024
Conducted a mid-day photoshoot
Started using natural fertilizer as flowering has commenced, applied 150ml for every 5 liters of water
20-01-2024
Recorded a video of the pre-flowering stage, indicating anticipation of a substantial yield
20/01/2024
Performed defoliation before the onset of substantial flowering and cleaned up the lower growth
Implemented SCROG (Screen of Green)
22/01/2024
Recorded a video of the pre-flowering stage
23/01/2024
No major changes, just observing more leaves and flowers
23/01/2024
Trimmed off the small undergrowth shoots
Missed a few of the lower growth shoots
24/01/2024
Gently stretched the plant within the SCROG setup
I'm aware that I need to reposition the pot more to the left to ensure the plants stretch evenly from both sides, but honestly, I'm feeling a bit lazy to do it tonight. I'll tackle it first thing in the morning, I promise! Originally, my plan was to have two plants in the set-up, but it turns out that Freaky Pablo is male.
And now for a plant-related joke: Why did the Forgotten Haze Cakes go to therapy? Because she had too many hang-ups!
_____________________________________
#IT WAS A RIDDLE YA DIDDLE SEE IT-
"I was so stoned & baked last night and a little bit pebbled and tripped over a rake and then I finally had a ''eureka moment'' of what, ''Banana Shrimps are symbolic of! haha, my innocence is now ruined! The question I'm asking is; will I ever grow up? and leave Mushroom Town"
_____________________________________.
REAL CONCLUSION: The Skunk Of Trutn.
Answer: Not for another 3-4 Weeks, then you get to leave Mushroom city.
"But it's about Forgotten Haze Cake maturity in to woman hood begins. But she still stays in mushroom land, the land of the Forgotten, she's lost amongst the Haze and Cake strains of the cold damp soil where mushrroms grow.
This is a Kind symbolic gesture reminder here, to keep the top soil clean during these colder times. We don't want mould or bud rot.
Some hazes like to see 3 days of dropped temps to change her colours like a psychedelic trip during the start of maturity"
"Shes always tripping over rakes, I have a little baby rake I use to freshen up her top soils"
Allso she was living next door to Freaky Pablo that turned out to be male to where Bananas come from and shes the shrimp. This riddle is told by the perspective of the Plant realising she's a woman going through the stages womanhood"
So, in conclusion, my fellow thinkers and growers, let's embrace the absurdity, cherish our innocence, and ponder the enigma of find a rake to trip over and lead us to that illuminating "eureka moment," no matter how stoned, baked, or pebbled we may be. Cheers to growth, both in the mind and the garden!
_____________________________________
At mid-day on January 25th, 2024, I accidentally placed the light too close to the plants for a couple of hours, resulting in burnt leaves and pistils. It can't be a calcium deficiency since I have been feeding 6ml of calcium to 5 liters of water. The only difference was the proximity of the light.

Likes
11
Share


@TheThiccBud
Follow
sooooo... I have now harvested the plants and they looks so pretty 😍😌 I'm really proud of myself to have produced such THICC BUDS!!! 😅😍 and the smell is so awsome 😵 this strain is a 11 from 10 👌 a realy big Thanks to Royal Queen Seeds for this 2 awsome strains 💪 A detailed rating comes after drying with a detailed score board 😄
Likes
5
Share


@CelticSmokey88
Follow
Promoting Mars hydro fc3000 honeslty everyone whouses this light will tell you how deadly it is I germinate my seeds in the soil u this ligjt and have 100% success rate


Likes
10
Share


@Garamantes
Follow
After 3 days, when the temperature rose above 11 degrees, I could finally remove the greenhouse from the pet bottle.
I did the first fertilizing with Advanced nutrients Voodoo juice, Piranha and Tarantula for better development and protection of the root.
Unfortunately, the pet bottle greenhouse, which was dewy and dirty from snail slime, caused the main stem to pull out more than I would have liked.
I like it when the main stem is low and immediately starts to form secondary branches