
Likes
Comments
Share


@DeepRootsGrowTrees
Follow
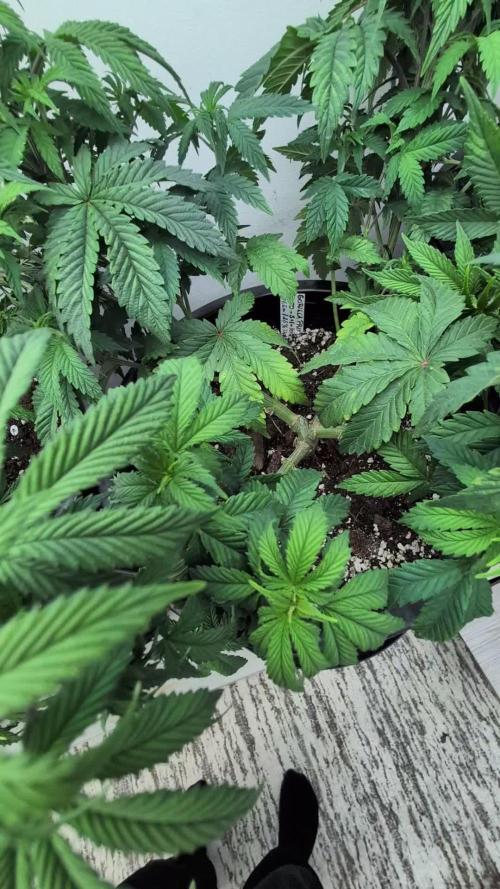
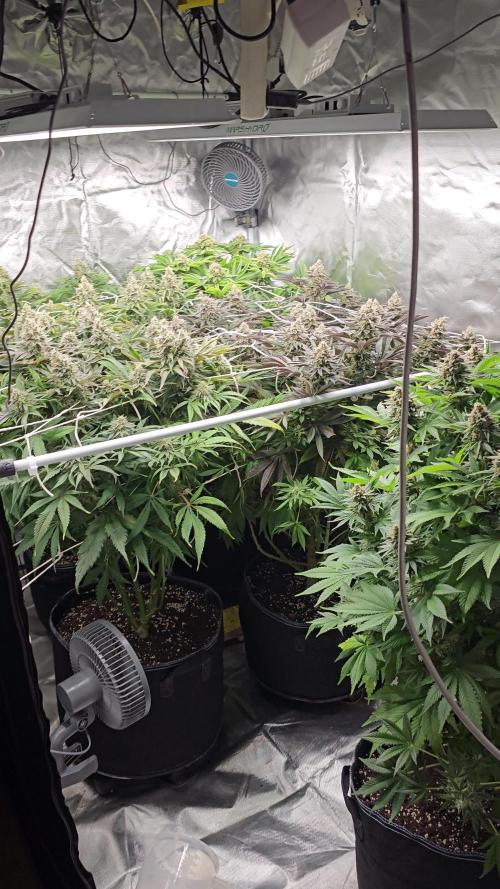
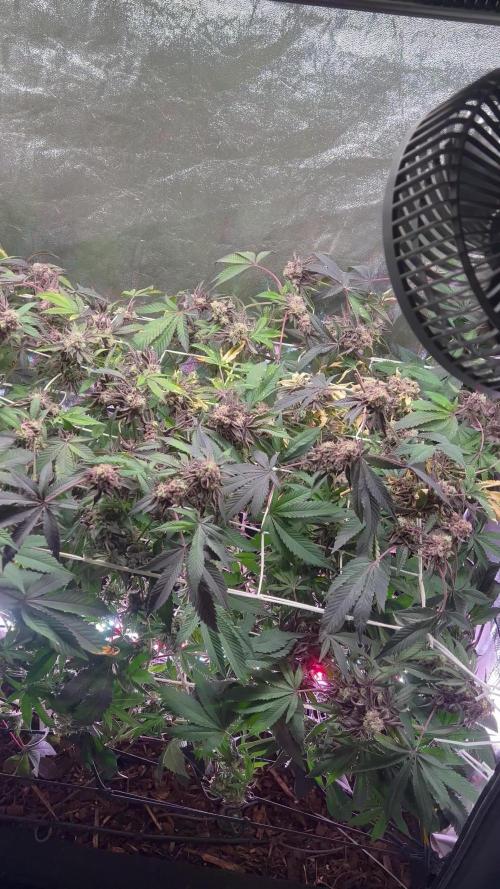
MIMOSA ZKITTLEZ FF/
GANJA FARMER
WEEK #15 OVERALL
WEEK #5 FLOWER
This lady is a beast 💪 she's c completely taken over the tent she's about 4 inches from the light I mean she's just about as much plant as you can get into a small ⛺️ impressed with the genetics of this strain hearty and a strong 💪 plant she's producing nice looking buds!! Stay Growing!!
Thank you for stopping by and taking a look it's much appreciated!!
THANK YOU GANJA FARMER!!
BUDTRAINER.COM BUD CLIPS
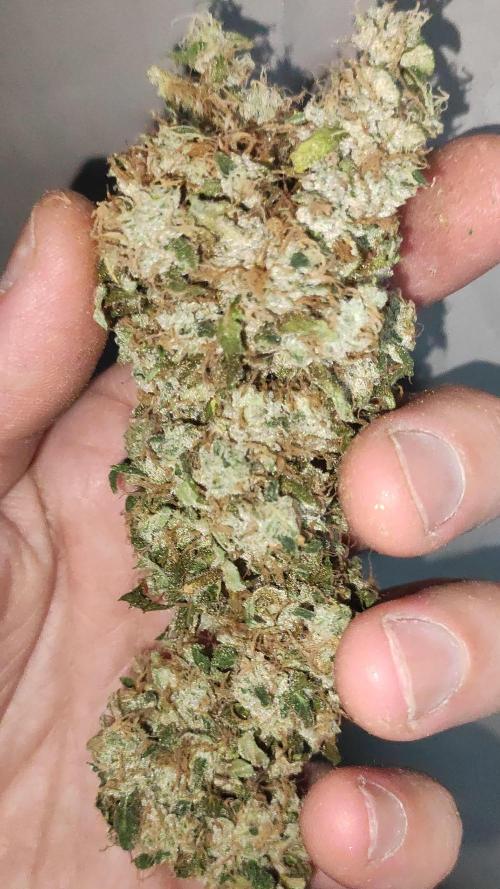
MIMOSA ZKITTLEZ FF /
GANJA FARMER

Likes
14
Share

@TrichoWitchka
Follow
Cawte,dnes 1.12. nam zacina 7.t fotaky a 4.t auta.🙂🌱 .Hnojim kazdu druhu zalievku (kazdy 4den). Teplota 24-26st. Vlhkost 65-67%. No a konečne dostali novú frizuru🤣✂️. Dufam ze sa im to bude pacit a nezmyslia si nahodit z trucu los bananos😁🍌 lebo bude adios amigos sekeros

Likes
9
Share

@AsNoriu
Follow
Day 122 since seed touched soil. Girl is on final stretch, took all nutes out last watering. Today gave 6.3 phed water for last time, maybe if few other girls will show signs of bulking, ill do one more watering.
Last week installed dehumidifier, so all environment is way better.
Fat girl, created nice colas and still bulking ...
Happy Growing !!!

Likes
3
Share


@pendeja420
Follow
A very sunny week that made the plants double in size and grow healthier. I didn't water once this week and the plants are good with it, thanks to @MadeInGermany. Pre-flowering stage has started this week and each day I can see more and more pistils.
As I expect the plants to stretch the following 2/3 weeks, I thought some little training would help. So I taped a couple leaves downwards in each plant-the ones that blocked sunlight from sidebranches, that will be bud sites in the future-.
Processing
Likes
11
Share


@Newbie5648
Follow
Day 57. Nutes increased for more growth hopefully.
Day 58 notice alot what looks like thc from leaves and hairs.
Day 59 to 63 see more orange hairs and trychomes. See videos
Average 200ml water everyday.
Likes
56
Share


@Organic_LarF
Follow
High GD community,
Week 12,
Haze doing very good. Her sativa genes push her to grow big. But the stems are a bit thin. Hst and LST will help those branches get more solid.
She had a hard time in the beginning of her life, but now she is definitly on the good flow.
Thats it for this week boys and girls,
Thanks for reading and passing by and 💚💚💚👏👏👏👍👍👍 for Marshydro leds. Quality/price top!
Grow safe buds and feel free to check out my other ladies doing fine thanks!
🙏🌿🌿🌿🙏
Weedseedsexpress!!!! 👏👏👏
LarfxWSE for discount at weedseedsexpress!!! 15% off!!!
Zamnesia!!! 👽👽👽
Add OrganicLarF as a code when buying your own MarsHydro LED light and get a nice reduction!!!👽🚀🛸

Likes
6
Share


@cookingwithninja
Follow
Plants are currently drying
2+ months later. And next project au79

Likes
35
Share


@Canadian
Follow
From beginning to end this girl has been a pleasure to grow I will update the last information taste high and final bag appeal Thank you for reading have a happygrow. Updating this girl smokes as exotic as she looks she has a fruity almost perfume smell to it and the high last at least for 3 hours or more very strong but not overpowering allows you to enjoy friends and activity with no problems I must be honest this is a very impressive plant with incredibly large yield . Density is typical for a hybrid but it’s such a remarkable colour and smell +the high that is a must Try for any cannabis grower sweet seeds definitely score a very rare plant here AAAAA+
Cannabis grower

Likes
7
Share

@Bncgrower
Follow
Great harvest, I was impressed with the quality of this strain. After the drying and curing process, I'll give my feedback! 💪

Likes
14
Share


@Gardens_of_Of
Follow
Green House Feeded one is moved to the middle and she enjoys her new spot. Advanced Nutrients feeded one is overfed. I will be adjusting the Ph and reduce feeding. Light intensisty is at 90% in 50 cm distance.

Likes
5
Share

@GERGrowDesigns
Follow
Welcome to Flower Week 1 of Fast Buds Purple Haze Auto
I'm excited to share my grow journey with you from my
FastBuds Project . It's going to be an incredible ride, full of learning, growing, and connecting with fellow growers from all around the world!
For this Project , I’ve chosen the Feminized Auto Purple Haze:
Here’s what I’m working with:
• 🌱 Tent: 120x60x80
• 🧑🌾 Breeder Company: Fast buds
• 💧 Humidity Range: 60
• ⏳ Flowering Time: 8 Weeks
• Strain Info: 23%THC
• 🌡️ Temperature: 26
• 🍵 Pot Size: 12
• Nutrient Brand: Hy-Pro
• ⚡ Lights : 600W x 2
A huge thank you to Fast Buds for allowing me to try my Best with this amazing collection from Automatic and Photo Strains they managed to Sponsore . Big thanks for supporting the grower community worldwide! Your genetics and passion speak for themselves!
I would truly appreciate every bit of feedback, help, questions, or discussions – and of course, your likes and interactions mean the world to me as I try to stand out in this exciting competition!
Let’s grow together – and don’t forget to stop by again to see the latest updates!
Happy growing!
Stay lifted and stay curious!
Peace & Buds!

Likes
3
Share


@BandVstraingrowers
Follow
We think she's doing ok. Anyone else think otherwise? We love critic


Likes
38
Share


@steadfast_grower
Follow
Note: I didn't necessarily flush but I didn't add any more additives or nutrients while away so I've set the nutrient values in the diary to null.
---------------------------------------
June 12 (Day 90)
---------------------------------------
Away - Camping.
---------------------------------------
June 13 (Day 91)
---------------------------------------
Away - Camping.
After camping, they survived the summer heatwave and look pretty good. The stench in the tent is not like your typical Northern Lights or White Widow. It's straight-up funk that hits you in the back of your throat. I can't really pinpoint any specific scents but it's a very rich and pungent odor for sure.
I’m 100% confident the roots are probably degrading with rot after the warm temps. The only problem I had while away is was the AC fills into a 5gallon bucket and it couldn’t keep up with demand about an hour before I got home. After a quick cleanup, I took a closer look and I’m happy with trichomes on both plants.
This was supposed to be a 65-75 day fast finisher. Today is day 91. I’m satisfied.
I consumed a test bud on weekend that went under a 3 day dry. White ash, no harshness, and punchy in regards to the effects. Chopping them tomorrow.

Likes
3
Share

@Organic_G
Follow
Ich hasse es wie die Pest, schlimmste was es auf der Welt gibt, Harvest… 😭 3 Tage meines Lebens schon in die kacke versenkt… denke für die nächsten Ernten wird eine Trimm Maschine angeschafft

Likes
20
Share


@420DeepGrow
Follow
Así finaliza una increíble cosecha de Papaya Zoap de Sweet Seeds !
Desde el inicio, esta planta demostró ser robusta 💪 y fácil de cuidar, con un crecimiento rápido y resistente. Durante la floración, los aromas tropicales empezaron a destacar, anticipando lo que Sería una experiencia única. Los cogollos están densos, cubiertos de resina y con un aroma increíblemente dulce, con toques cítricos y exóticos. En cuanto al rendimiento, ha sido bastante satisfactoria, y la calidad de la hierba es de primera
Processing
Likes
21
Share


@LittleBigTrees
Follow
The plants were so crowded I decided to put them into a Larger tent to allow some light to the lower bud sites and to help lower the humidity amongst the plants. I'm sure they will love the extra space.
The light has now been raised 20cm (20cm taller tent)
Allowing me to turn out right up which is 45000 lux in the centre right below it.
I will up the bloom to 2ml/l this coming week.
Likes
9
Share


@MG2009
Follow
01/012022
A little to aggressive on super cropping,but it will make a great clone.Should be last week of veg. Gonna reppot and amend with 5-2-4 for transition to flowering. She's taking on forbidden fruit smell most definitely. Hopefully she's A girl!
Two clones taken, and as soon as clones are rooted she will go to flower room.
Likes
21
Share


@Staffedition
Follow
Привет друзья. Моей растихе сегодня 103 дня.
Паутинный клещь побеждаю
На много стало зеленее и пушистей.
Растение пришло в себя.
20.10 перевёл свет в режим 12/12
Начал применять LST технику на 19 дне и продалжаю применять её через день, а 18 августа добавил ДЕФОЛИЗАЦИЮ
С 20.08 ДЕФОЛИЗАЦИЮ делаю каждые 3,4 дня
С 20.08 LST технику делаю каждые 4.6 дней
На сегодняшний день влажность 54%
5.09.2023 заметил высокий Ph 7.9
С 48 дня Ph не ниже 5.8
На сегодняшний день Ph 6.0
Начал кормить с 60 дня Canna Terra Vega
PPM 870
Всем мира и добра!
Не забудь поставить лайк❤️, если понравилась как прошла неделя
И читайте наш TELEGRAM: https://t.me/smail_seeds
#Smail_Seeds 😀

Likes
15
Share


@pifflestikkz
Follow
Day 1
30/12/24 Monday evening.
Started the seed off in de-chlorinated tap water and calmag 3ml to 5L pH 6.4.
I will use this water for the rest of the week as sprays and transfer water.
Day. 2
31/12/24 Tuesday
Seed has sunk 🙌
Transferred now to paper towel, sprayed with same water. Covered. Left in cupboard 24hrs untill tap root emerges ✌️
Day 3 Wednesday
01/01/25 nothing yet so left for a further 24 hours.
Day 4
02/01/25 Thursday
Tap root just emerged! Seed only just cracked. Will leave a further 24hrs for a sustainable tap root.
Day 5
03/01/25 Friday
Tap root has reach 2/3cm and now been potted up in a 1L pot with cannaterra pro, added perlite, added cococoir, and dynomyco, all watered yesterday to dampen off. . Sprayed top soils today to settle in seeds.
Day 6
04/01/25 Saturday
Seed has emerged to top of soil level 😁
Moved all seedlings into the auto tent so they can catch the 600w dual hps.
Day 7
05/01/25 Sunday
The seedlings are here 🙌
She made it through the first week, onwards and upwards 🚀💚
Seed casing will pop tonight I think.
Light spray with de-chlorinated tap water and calmag. Covered with dome.
Picture update 📸💚

