The Grow Awards 2026 🏆 


Likes
Comments
Share
@Snakeking
Follow
Everything is fine and they doing awesome
They are in week 6/7 ish and some start to fade nicely.
It’s hard to tell exactly when week1 started.
I saw some pests(spider mites& caterpillar)attack one some leaves and remove those and hopefully mites don’t spreading to much.because spider mites love hot long days and low humidity and the days getting shorter and cooler day by day.
I check them every 30 minutes to make sure everything is fine:)


Processing
Likes
8
Share
@hi_bengal
Follow
So far so good! Watering with ph'd water at 6.3 to 6.5. Running a 18/6 light schedule using a 135w hlg quantum board. This little girl is growing like crazy! 😊 She'll be 3 weeks old in 4 days.


Likes
Comments
Share
@KannaGrowing
Follow
Esta semana, nuestras plantas empiezan a mostrar las primeras flores.
Ya tenemos la sala con las cuatro luminarias funcionando al 75% de su potencia y las he separado un poco más, ya que veo que con led, el espacio internodal es muy reducido.
Añadimos a la mezcla de fertilizantes CALMAG de BioBizz, que aportará un extra de calcio y magnesio.
Regamos cada tres días aproximadamente, una vez con fertilizantes y otra vez con agua.
Comenzamos a reducir la humedad relativa en la sala y desconectamos la calefacción en fase nocturna, para que empiecen a pasar un poco de frío.
Likes
15
Share
@YouCannaBlowMe
Follow
Seems to be taking well to being moved to the 5gal pot. Growing a lot faster after the 2nd day in the bigger pot. Watered for the first time since planting in big pot after 5 days with 1L distilled water (Ph 7) mixed with 1/2 tsp. fox farms grow big and 1/2 tsp. big bloom. Since my soil is considered hot soil I wanted to use less than the recommendation on the bottle.

Likes
7
Share
@HideAndFly420
Follow
She grows alone for one month with everything automatic cause i went in hoiliday for one month. Everything went really really good. :D
Likes
76
Share
@BB_UK
Follow
Took a while to get there but OMG little note quick! So I started her in a 1 litre pot and stuck her on top of a 1.5L Pepsi bottle with the top chopped off! And she yielded heavily for that amount of soil a whopping! 224.63 wet weight so can’t wait to see what she holds dry because them buds were like boulders! So dense! I will be back to document her dry weight and then a couple of weeks later with the update on the smoke report! But I know it’s going to be so loud! She has deep pungent aromas like gassy and sweet! She’s going to be a powerhouse! She was a little over as today a banana developed but that just tells me “well done” timing just right! She’s a little long for my taste of auto but I do suggest anyone grow her she’s amazing! In the end!


Likes
14
Share
@BruWeed
Follow
🍀Estuvo bien en toda su etapa, no tuve ningún problema. Los resultados fueron muy buenos, se encuentra muy resinosa y con aroma a dulce.
🍀En total saque 143g de una sola planta.
🍀En total estuvo 105 días de vida desde su germinación.
🍀Recomiendo esta genética, por el momento son cocos Premium, ya quiero probarlo para saber que sabor tiene.
🍀Ahora se encuentra en etapa de secado, cuando ya estén para la etapa de curado subiré más imágenes.
🍀🇦🇷Podes seguirme en Instagram como @bruweed_arg🍀🇦🇷

Likes
8
Share
@HakunaMatata
Follow
Day 60: Week 4 of flowering!
She is still taking heavy feeding and looks very healthy.
Some leaves at the very top tacoed a bit. She grew tall and a bit close to the light but no big deal, she is handling it well.
Im still not sure if letting her grow more internodal space was a good idea. I believe she is getting more light in between branches and growing larger buds than the Tangie because of this. I'll wait to the harvest to compare both results.
Day 63: Watered with Plagron Bloom, Bud Candy, enzymes and a little bit of CalMag. There is a little bit of wind burn on one of the lower fan leaves but it is expected since my intake is right in that corner.
She stopped stretching and her buds are becoming bigger and bigger!


Likes
9
Share
@TrialAndErrorGrows
Follow
Ok week 5 veg. I usually just let the plants grow through the trellis net.
This time I tried a little bit of everything. I did a fairly big trim on leaves. I tied down branches with twist ties and then lowered the trellis net overtop. I may have gone a little overboard. But looking at other peoples diary’s I am seeing a lot of techniques being used so I will giver a shot. Trial and error.
**Update**
Plants growing up through trellis nicely. After tie down and trim.
Likes
142
Share
@MadeInGermany
Follow
Hey everyone :-)
This week a lot has happened 🤗🍀.
The 5 that are already in the 12/12 cycle explode day after day 😍😅.
All others have been repotted, and will remain in the vegi phase for 1-2 weeks.
Otherwise there is not much to say 😃.
I wish you all a good start into the week, let it grow and stay healthy 🙏🏻🍀🌱


Likes
13
Share
@Lfuego22
Follow
This is the last few days. I added flawless finish yesterday and will harvest in 2 days. Gotta run outta town so taking it down one week earlier than I wanted. This gives me the week to make sure they dry process is going well and hopefully start the cure the night before I leave 🤞🏾
Likes
15
Share
@Introvertalent
Follow
I watered her three times this week with 0,8 liters of rainwater, and on the first occasion, I did also provide it with nutrients. At the beginning of the week the runoff water was perfect around 6,4 ph and 800 ppm. Overall, she's a bit small 31cm, but she seems to be doing well, and I have no complaints.
Likes
44
Share
@The_garden_of_Vixen
Follow
One step at the time! My plant got a new house. I love this tent! Also it keep the smell inside. Now it’s time to guess if it’s a boy or a girl! I bet for a girl 💖
Likes
2
Share
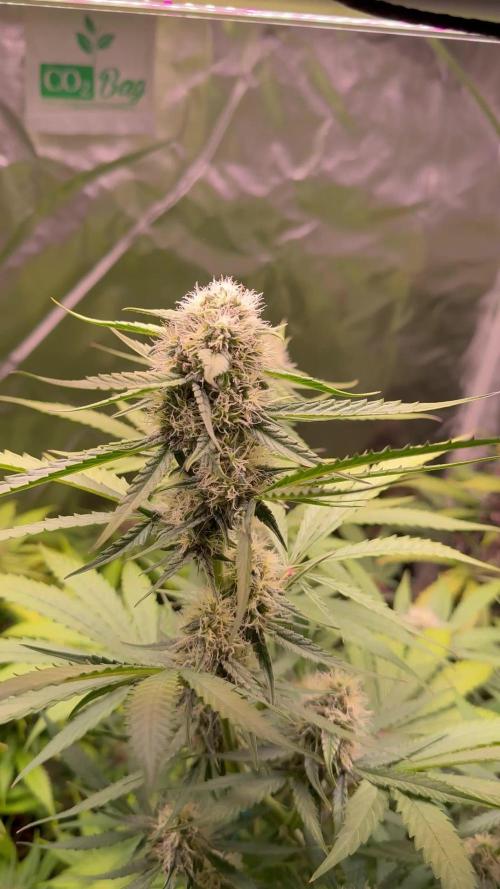
@Nocone_Purple
Follow
This week the Epsilon F1 is moving deeper into mid-flower. The bud sites are stacking well along the branches and calyx development is becoming more visible. Trichomes are starting to cover the flowers, and the overall structure looks very healthy. At this point I’m still running Big Bud in the feed, since the plant is in the phase where it needs maximum phosphorus and potassium to build size and density. Overdrive will come later, once the flowers are more developed and closer to ripening. For now, the Epsilon F1 looks on track and should start to gain serious weight in the upcoming weeks.
Likes
42
Share
@AutoCrazy
Follow
All I can say is that this thing is a beast. She likely only has a week or two left so I did one last small top dress with dry amendments as well as some ewc and super soil to top it off.
Cant wait to watch this girl really fatten up. She’s already having trouble holding up the colas.
😎🍿🍻🌱
Likes
6
Share
@Dengued
Follow
Day 56....buds developing nicely....laid off any nutrients for the last week and considering just one more spirulina feeding, then just well-water for the rest of the grow, with no flush....pollution/haze levels high which might effect the plants
