Processing
Likes
Comments
Share


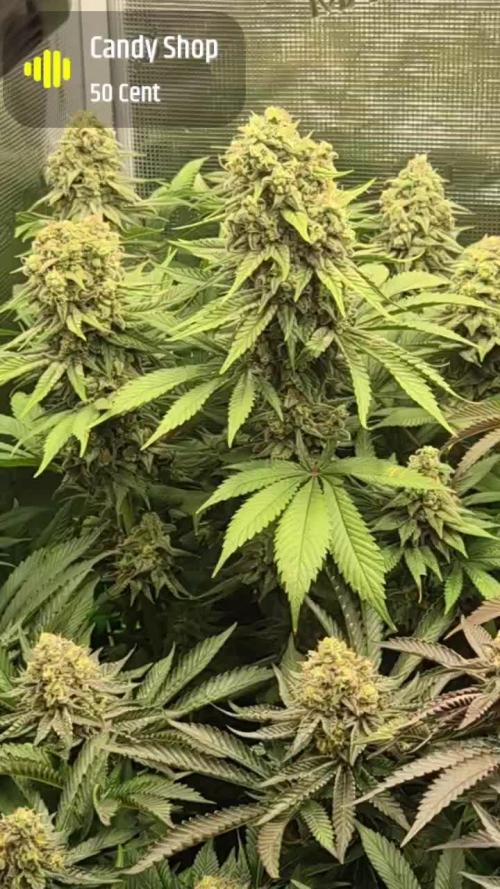
@Cogollo_eu
Follow
**Encontrarás la traducción a español al final de la descripción**
If you like this week, please hit a like, it costs you nothing! 👊. Thanks in advance 😉!
From/Desde: 16/09/19 || To/Hasta: 22/09/19
From day/Desde día: 56 || To day/Hasta día: 62
-----IMAGES & VIDEOS-----
V1 - Compiled all growing timelapses into a complete growing video, hope you like it mates!.
V2 - My apologies about the quality of this video buddies, I didn't choose a very good place to record it, and also the GoPro released the manual configured blocked exposure, so there are many color differences among days, as every day upon lights on the GoPro make a new exposure and temp adjustment (The light is 3,000k i don't know why the GoPro read it different daily).
V3 - I'm still learning to record some cool videos, as for example @MyrceneDream ones 👊, and many others.... I'm not doing it well at time.
-----WEEK SUMMARY-----
Hard work times drain my time for the plants and to make content, sorry about that.
At last flowering started, as can be shown in the weekly video, the first 3 days after the full switch to 12, she stayed in a frozen state, no much growing or movement at all. Since the 4th day she started to grow at high speed, a bit more than a cm/day. She's really looking awesome, making some bold branches and defining every part of the plant very well.
Some weeks ago I told that the smell went too strong at home, but it lowered to normal levels last week, now she's smelling more and more each day again ;).
I can say about Alice.K, that I had 0 problems or weird things along the current 9 weeks, she suffered very high temperatures, some insects, and also i'm going hard with nutes, I'm cycling EC reaching 2 sometimes, and she didn't show any excess signs at time, I'm not telling that they're not going to exist on Alice, but not at time, if i see some, i will stop and re-adjust.
Also she has responded very well to every prune or cut I've maded to her, and the distribution is perfect, I'm in love with the form she developed. while i was thinking on 4 external main colas with 12 secondary decent Satellites, she's developing 2 awesome central colas, with 4 secondary and very decent sub-colas, and then 10 excellent satellites, and many small ones that i will cut later on (Already cutted many below the SCROG net).
-----WATERING CALENDAR-----
18/09/19 (Day 58) - 3,000 ml with Tarantula, Piranha, Rhino Skin, Big Bud, Bud Candy & Bud Ignitor @ (1.1 E.C. | PH 6 | 25.7ºC)
22/09/19 (Day 62) - 4,000 ml with Silica Power, Organic Bloom, PK Booster, Bloom Stimulator, Pro Active, Bud Ignitor, Bud Candy, Bud Factor X & Sensizym @ (2.1 E.C. | PH 6.4 | 25.8ºC)
*****ESPAÑOL*****
Por favor, si te gusta esta semana dale un like, no te cuesta nada 👊. ¡Gracias por adelantado 😉!
-----IMÁGENES Y VÍDEOS
V1 - He compilado todos los timelapses de crecimiento en un vídeo de 1 minuto, espero que os guste!.
V2 - Debo disculparme por la calidad de este vídeo compañeros, no escogí una buena posición para situar la cámara y esta además perdió el bloqueo de exposición que le pongo, por lo que al realizar un auto-ajuste automático a diario, hay diferencia en la exposición y el color entre los vídeos de cada día. No entiendo por que siendo siempre la misma luz de 3.000 k la cámara la interpreta diferente cada día.
V3 - Todavía estoy intentado aprender ha hacer buenos vídeos, como pueden ser los de @MyrceneDream 👊 entre muchos otros por ejemplo... De momento no me salen bien, ya iré mejorando.
-----SUMARIO SEMANAL-----
Estoy teniendo tanto trabajo que me está dejando muy poco tiempo para las plantas y para realizar contenidos, lo siento.
Por fin empezó la floración. Como se puede ver en el vídeo semanal, los 3 primeros días de la floración la planta se mantuvo en un estado vegetativo (sin crecimiento). A partir del cuarto día a empezado a crecer a gran velocidad, de momento más de 1 cm al día. De verdad que se ve maravillosa, está engordando bien las ramas y definiendo su partes muy bien.
Hace algunas semanas comenté que ya estaba apestando toda mi casa y aún estaba en crecimiento. El olor fue disminuyendo hasta niveles normales y esta semana de nuevo está volviendo a incrementar su olor día a día.
De momento debo remarcar que en 9 semanas de cultivo que van, la Alice.k me ha dado 0 problemas o cosas raras. Ha sufrido de altas temperaturas, algunos insectos y he empezado a ir fuerte con los nutrientes. Estoy ciclando la EC en los riegos, sobrepasando los 2 en algunos casos, de momento no ha mostrado ningún signo de exceso. Con esto no quiero decir que no los vaya a mostrar si sigo así, pero de momento no lo ha hecho, si en algún momento empiezo a ver signos, ya frenaré y reajustaré.
También es un planta fuerte y con capacidad de recuperación rápida, eso se puede observar en los vídeos perfectamente. Y lo increíble es la distribución que ha adquirido, mientras yo pensaba en una estructura con 4 colas exteriores principales grandes y 12 satélites centrales pequeños, ella me ha sorprendido formándose con 2 cola centrales enormes (para el tamaño del cultivo), 4 colas exteriores grandes y un montón de satélites de tamaño superior al que esperaba, más adelante cortaré los que se queden más retrasados (de momento he cortado mucho de lo que quedaba por debajo de la red)
-----CALENDARIO DE RIEGO-----
18/09/19 (Día 58) - 3.000 ml con Tarantula, Piranha, Rhino Skin, Big Bud, Bud Candy & Bud Ignitor @ (1,1 E.C. | PH 6 | 25,7ºC)
22/09/19 (Día 62) - 4.000 ml con Silica Power, Organic Bloom, PK Booster, Bloom Stimulator, Pro Active, Bud Ignitor, Bud Candy, Bud Factor X & Sensizym @ (2,1 E.C. | PH 6,4 | 25,8ºC)

Likes
2
Share


@CannaIGrow
Follow
Topped this girl this week, she’s growing pretty good. Very nice looking plant to my eye.


Likes
16
Share


@the_medicine_grow_uk
Follow
So she’s a week into flush with only about 10% amber trichomes so has a few more days yet. The bud size isn’t moving but the density of the buds has definitely increased.
Let me know what you think. 🙌🏼🙌🏼

Likes
14
Share


@UnitedStrainsGermany
Follow
Day 95 for break up cake #2 wihaaaa only 8h to cut and 19 days for 🎄 thanks @kanna is for this wedding cake cross of Kush it's mY favourite now. Greetings from Stuttgart


Likes
6
Share


@Broffel
Follow
A new week, week 8 of flower and this will be the last week the girls get nutrients, next week starting to flush.
Day 110 last dag they get nutrients

Likes
7
Share


@Stifler
Follow
I was already disheartened that the plant did not reveal sex, so I didn't take many pictures, but decided to go to 12 by 12 to see...
Processing
Likes
1
Share


@Mr_nugs_lover_David
Follow
She's stinky as hell,very powerful aroma, so sweet and floral, loving her so far, hope I can grow this strain many more times, that smell it's hard to forget. Hope you enjoy, I put my heart on every plant! 💚 🌱 ✌️ 💎


Likes
17
Share


@Elcoquigrow
Follow
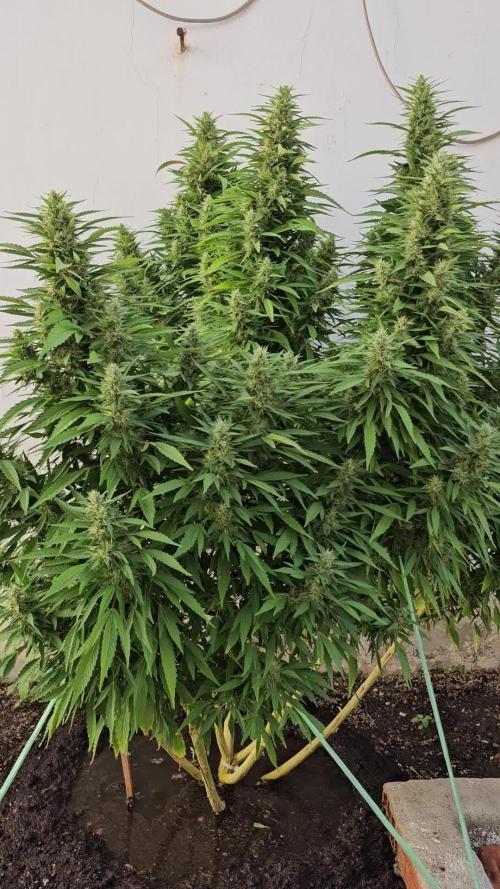
Muy satisfecho con el resultado de mi primer cultivo SCROG espero afinar detalles y mejorar el uso de la malla en el próximo 🙌🏾
Likes
18
Share


@Bread_n_Buds
Follow
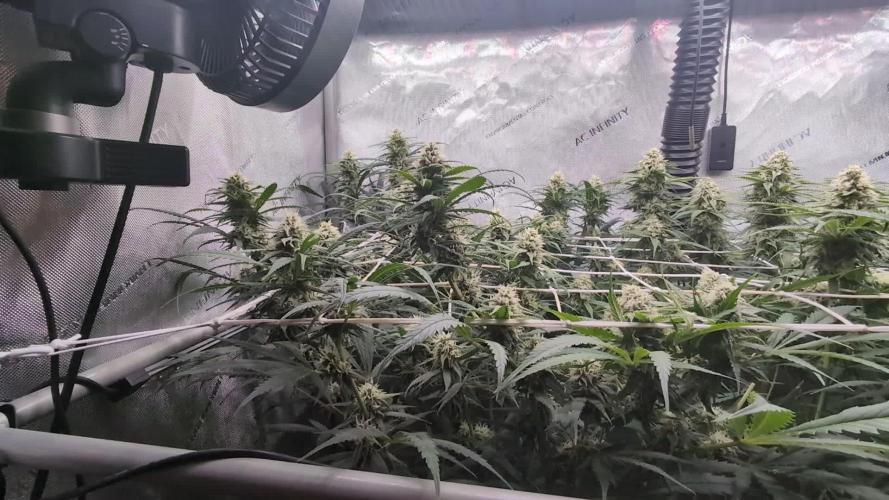
The photoperiodic Blue Dream gave us this magnificent main cola which is the most exciting visual part but guys, you should smell what this beauty has. A real marvel I am very happy with her. Also here excellent resin and resistance to the first heat.
** Remember that we have two plants per strain one left to grow straight and one worked with the techniques.
Description // This plant was simply left to grow straight, free and beautiful and the result was really excellent. The scent is its hidden strength, great fragrance in the room and soon in the jars. It did not give us particular problems and was very fast to flower.
Trichomes and maturation // We did a thorough microscopic analysis 10x (and 10x x 1.6) and noticed a good percentage of milky/lumpy trichomes; The percentage of amber trichomes was also excellent and still a bit transparent, but that's fine for us as we're not crazy about THC oxidation and hyper indica effects around here.
Fertilizers and soil // We used the Plagron organic fertilizer range, all the recommended additives and Pro Mix soil, both unfertilized and organic. Calculate the dosage according to your needs on the website
------ https://plagron.com/
The nutrients are available in convenient packs on the Zamnesia website
--------- https://www.zamnesia.io/en/11457-plagron-easy-pack-natural.html
Try this strain, it's more than promising ---- // https://www.zamnesia.io/en/3271-zamnesia-seeds-blue-dream-feminized.html
Zamnesia Short Description // Exceptionally tasty and potent, Blue Dream by Zamnesia Seeds is a distinctive and sophisticated hybrid. A blend of Haze and Blueberry strains, it manages to bring out the best of both worlds. Its short flowering time of just 9 weeks far surpasses that of other Haze strains!
From the moment you take your first toke of Blue Dream your taste buds will be intoxicated by a delicious blend of berry, citrus and sweet flavours. As for the experience, Blue Dream induces an incredible uplifting and euphoric high. But be careful, if you consume large quantities you will quickly be swept away to dreamland. This overwhelming potency not only makes Blue Dream particularly attractive to recreational users, but also to medical marijuana users. Those suffering from anxiety, stress, insomnia, depression, pain and lack of appetite will find this plant particularly effective in reducing symptoms.
The whole world of growing and more is at Zamnesia, just take a look at the site and you'll find "the best that nature has to offer" in various shapes and colors.
The new strains are fantastic and the old ones are no exception...
-- // www.zamnesia.com

Likes
9
Share

@TheBulldozerSicily
Follow
Siamo agli sgoccioli, un altro paio d giorno.. forse settimane e raccogliamo!

Likes
9
Share


@mangodalat
Follow
CAFE RACER
22/4---->13/8
Everything was fine until week 4 when i brought her to my garden. The changing environment slowed her down.
Week 7 starts to appear preflower.
Streching lasts for 3 weeks(streching x2)
Week 4 of bloom starts to smell ( weak)
Week 7-8 of bloom: rains a lot so the humidity is high so i harvested her by week 8 of bloom.
I have moldy buds(about 5g).
THANKS FOR WATCHING THIS DIARY. SEE YOU THE NEXT DIARY.

Likes
9
Share


@ScouseCityLX
Follow
Week 6 for grape glaze we see some colour starting to come through real nicely. Trichomes popping out of the buds, they will really stand out when all trimmed up. Will be running this again 100% have 6 more seeds to pheno hunt.

Likes
11
Share


@GREENPHOENIX6262
Follow
Week 5 - 08/27
Seedsman - Critical + 2.0
Blimburn - Apple Fritter
All running smoothly, Introduced the exhale C02 bag last week thus far no issues or signs of deficiencies.
Light defo - Heavy feed to start the week (Nutes)
*Mid-Week Update* Week 1 -Early Flower* 08/30
Both have grown significantly since last update, Flowering has begun.
Introduced Raw NPK (Potash/Phosphorus)
*End of week recap* 09/02
39-40 inches in height
Week 1 of flower went smoothly
Introduced Raw NPK Phosphorus and Potassium

Likes
6
Share

@yggy-420
Follow
Only water filled up again. 💦
Due to the rather humid living soul substrates, a few fungus gnats
Likes
2
Share