


Likes
39
Share


@J4kpvp
Follow
Hello:)
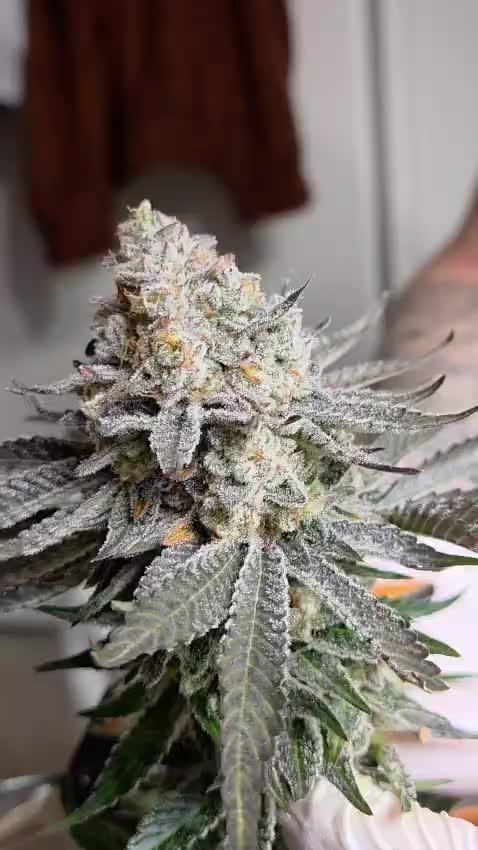
Man, these plants are really taking their time:( The front 2 plants are ready, I could‘ve cut them even a week ago and the back two still look the same as last week in terms of trichomes. It looks like I need to wait at least a few more days for them..
I also cut the two buds which I thought had some mold, luckily there was nothing… I‘m still thinking about an early harvest though… don‘t want to risk all 4 plants…
RH is under control again, my dehumidifier was just broken:)

Likes
12
Share

@Highlife90
Follow
Bin super zufrieden.
Die ernte ist in den dry ferm bags.
Freue mich soo aufs naschen 😍😁


Processing
Likes
13
Share


@Wollywinkah
Follow
Week 4 update. It has been very busy lately, so I have been able to spend less time on the plants than I wanted. Nutritions well maintained. It has now become a collection of different types of growth. 1 plant grows up very wide and high and is already in bloom. The other is more elevated and is now also in bloom. The third bumps a bit behind it and only has some signs of pre-flowering but no buds. The smallest does quite well for its size. My idea is to use 3 different techniques now. For the 2 largest a scrognet. The other, second largest, I am not finished yet. Maybe make cuttings? And the smallest, I want to have 1 big top. No idea if this is possible in 1 tent but it seems fun. I keep the light schedule on 6/18. They are doing very well.

Likes
45
Share


@Bembeto
Follow
Se sigue alargando la maduración del pato 🦆 pero bueno, se nota que están ganando tamaño los cogollos y a su vez una forma hermosa😍
Estoy enamorado de los colores ya les contaré aserca de ella cuando llegue la cosecha, muchas gracias por el apoyo de la comunidad a lo largo del proceso, motivan a seguir haciendo diarios incluso mejores y mejores. Un abrazo hasta la próxima actualización ✨✌️
Likes
59
Share


@Ganjagrandaddy
Follow
Day 56 (flowering day 16): My stars of the show right here. These plants are beasts. I can only imagine how they would grow outside.
I managed to get #1 as she had just gone to sleep. Her wilted look is due to having enough light for the day so she has dropped off like granny after Christmas Dinner while the kids carry on .lol The structures on these are amazing. They have een slower to flower and I expect a mid Jan 2020 harvest.
#1 Sleeping beauty has not missed a beat the whole grow. She continues to wring every last morsel of nutrition from her soil. Tons of bud sites and each branch is looking like a mini version of a whole plant!!.
#2 has een moved to the outside for more ligjt and so I can watch her more. she has shown signs of calmag issues so I have made sure to keep that up with the mega crop too.
#3 while a lot less wide , has a very thick under belly to her branching. she should support a lot of weight.
These ladies will benefit from the earlier harvested strains by getting a light each it seems. let's see what 300w each can do for their lady two weeks.
Merry Christmas all


Likes
Comments
Share


@GreenLupinCWB
Follow
Lindas e bem desenvolvidas, colheita em breve.
Uma tropicana24k,a outra uma cruza com 24k e sourDiesel ,um cheiro magnífico e as duas estão cobertas por tricomas.
Likes
8
Share


@Rinna
Follow
Overal I’m very happy. The weight’s looking insane. Obviously imma update you after drying and curing. Can’t say to much at this point, apart from the fact that everything is looking very nice!

Likes
13
Share


@gr3g4l
Follow
Desde el transplante siguen creciendo y se han recuperado del todo, sin más. Ahora ya estoy contando los dias que me faltan para cambiar el fotoperiodo a 12/12h. xd.
Esta semana les hice un riego foliar con Hemplex, auxinas, citoquininas y otras.
Riego cada tres dias, a final de semana 600m l/ Planta

Processing
Likes
3
Share


@darkc0de
Follow
Week 2
——
Wednesday: Day 8
—-
Started blues main nutrient feeding. She seem to be loving life at the moment. Getting bigger by the day.
Run off:30%
Run off ph: 6.1
Run off EC 2.4
I believe the run off ec is so high is because the coco mix I used is pre blended with charge. The reason I think this is today feed was the highest EC I’ve done and that was 1.5 EC.
—-
Day 9
—-
Increased her base nutrients by .5ml/l it added an extra 0.3 ec that yesterday feed, but the sound of the medium Snap crackle and popping it quite relaxing. Is this the zen water at work?
Final EC: 1.8
Run Off: 27%
Run Off PH: 6.0
Run Off EC: Still way over what it mean to be but it’s going down, I still believe it’s too do with Ecothrive Charge being in the coco already.
Blue looking very healthy even tho the high ec run off.
—-
Day 10
—-
Feed: 900ml
PH: 5.8
EC: 2.0
Run Off: 275ml
Run Off %: 27
NOTES:
Looking healthy as usual.
—-
Day 11
—
Feed: 900ml
PH: 5.7
EC: 1.8
- Run Off
Amount: 220ml
%: 24
Ph 6.4
Notes:
All is well in the garden this morning. Still trying to bring the run off ph down to 5.8 during veg. Still the ec of the run off is still stupid, read somewhere re top dress on week 4, which I’m not as not using charge. So touchwood it would of sorted itself out. Blue look like she enjoying the feed mind.
—-
Day 12
—-
Just the same as yesterday just bigger. Today going to start to research how to lst etc and to see if can find out what EC charge is at.
—-
Day 13
—
Feed: 1l
PH: 5.7
EC: 2.0
Note:
Thought today was the best time to start to use my base nutrients at full dose. Not much new to report but starting to enjoy waking up just to see how much she has grow. She has started to lean one side so I have proped her up with a plant label stick.
—-
Day 14
—
Water: 2L
PH: 5.8
EC: 2.0
Notes:
Seem to be enjoying the nutrients. She looks very healthy. Roll of week 3 as think maybe to start of her lst training
Likes
13
Share


@NiceGuyGrows
Follow
Late start to the video journal. Starting at week 7 of flower. I have been noticing some pistols turning yellow. I will keep growing for 3 more weeks. Plants still look healthy to this point. I really expect them to loose this healthy look. Hopefully with this will come some bulking of the buds.


Processing
Likes
10
Share


@SunSetSarah
Follow
they all seem pretty dang Happy... Thank goodness :) All they are eating on is The Amazing Michigan Water only Soil.. 6.3 ph Then every other feeding I give them Planet Earth Tea Blend.. I did do the Flip with My 8 of my Clones.. They are all between 12 & 15 inches Tall. I only have about 3 feet of Space between the Lights and The Ladies. So its all Trial in Error... Thank Goodness it has been all Trial so far.. Flower room is Holding at 79.3 F & 52% Rh And 70.5 F 47 % RH During lights out.
I need to find out what I am working with these Clones. I have 5 different Strains.. #1 1-Blue Alien.... #2. 2-Gorilla Glues#4's
#3- 2 Tangerine Dream...
#4. 6- Ghost OG Kush... #5 1 - Sun Set Sherbert..... Then I am going to Stay with Gorilla Glue and Green Crack since I have over 40 Seeds.. I prefer the 1 st Generation way better then Clones.. Much Easier to train them from seed...

Likes
12
Share


@Boomer911
Follow
Growth Overview:
Vegetative Stage: Auto Critical Orange Punch developed into a thick and bushy plant with vigorous growth. It filled out its space well, creating a dense canopy of healthy, deep green leaves.
Flowering Stage: The plant maintained its bushy structure, with buds developing steadily and gaining significant mass. By the time of harvest, the buds were thick and plentiful, displaying a beautiful orange hue typical of this strain.
Harvest Details:
Timing: Harvested at the peak of maturity, with the trichomes reaching the desired level of cloudiness and amber.
Yield: The plant produced a substantial amount of dense, resinous buds, thanks to its bushy nature and strong branching.


Processing
Likes
8
Share


@Staffedition
Follow
Всем привет друзья!
Кустик готовится к харву.
Очень приятно начал пахнуть.
Мне кажется, что он начал меньше кушать.
Всем добра и хорошего роста!
Processing
Likes
32
Share


@Hawkbo
Follow
Everything is still alive thankfully and smells fuckin tremendous. The pictures were taken on day 49 or 50. I'll probly start flushing some of them over the next week the citradellic are lookin close. They kinda all look close even tho I expected some 70 dayers with the mostly sativa crosses but I gotta get in there and check the trichs.
Likes
16
Share


@Bread_n_Buds
Follow
Here we are at the moment that we enjoy the most, the flowers are starting to form, our Green Cure CBD reveals the sex and of course like all Zamnesia plants I will be the father of two beautiful girls.
One is growing straight and is further along in flowering but I will show it to you soon, I have focused a lot on this one in main - lining. It is a plant that has a good internodal distance so we have more time to shape it before the woodification and it lends itself very well to lst interventions even a little late.
I managed to open it on the main line very well and the lateral branches are really, growing and stretching properly.
We will not see the super productive trees of the autumn harvest but I am willing to bet that we will have lots of beauty and lots of resin in beautiful bush-sized plants.
Wait for the uncle BreadandBuds....
We are still using soil, feeding and all the recommended additives from Plagron 100% organic. We have moved on to the flowering start schedule that keeps the same Power Roots additives - Sugar Royal, Pure Zym and adds the flowering stimulant dear in my house for obvious reasons of Biscotti. Of course the basic fertilizer is now Alga Bloom.
The Green Sensation when the flowers are already a bit swollen, do not start immediately. The Power Buds must immediately stimulate the start and development of the buds.
---- Decide on the right soil and calculate your fertilizer schedule based on the soil on the official website.
-- www.plagron.com
Try a seed of this variety that drives us crazy..
---- https://www.zamnesia.io/en/10672-zamnesia-seeds-green-cure-cbd-f1-automatic.html
Description Zamnesia // Zamnesia's breeding team has harnessed F1 genetics to bring you Green Cure CBD F1 Automatic. This autoflowering cultivar is easy to grow, accessible and reliable for all levels of experience. Ready in just 11 weeks, growers can expect impressive yields of tasty buds with a clear-headed effect that's ideal for meditative moments.
All the best that mother nature can offer is on ---- www.zamnesia.com
Likes
13
Share


@KirbyFarm
Follow
Started giving them plain water to flush before harvest. Buds look like they are still chunking up though. They have like a lemon smell too i was not expecting. Great strain for sure
Likes
3
Share


@Selfsupply420
Follow
Amazing strain, very easy to grow and hope to do do more Royal gorilla auto in the future and see what else RQS have to offer. Absolutely solid buds and potent asf. Taste is 9/10. thc I would say 20%+. I also used terpinator in weeks 7 and 8 at a rate of 4ml/l which I didn't list in my diary. I'm sure this contributed to the density of the buds. I will use terpinator alongside advanced nutritions range for all future plants.


