
Likes
Comments
Share


@SkunkyDog420
Follow
Hallo zusammen 🤙.
Sie wächst sehr schön und macht keine Probleme


Likes
102
Share


@Aleks555
Follow
Hello, folks. The week went well. We are feeding at 1200 ppm and have activated CO2 supplementation 1500ppm. Day 25 - we pruned the leaves, topped the plants, tied and stretched the branches. Next week, we'll take clones and switch to 12/12. Thanks for leaving comments and likes. Special thanks to Zamnesia Seeds and Plagron.


Likes
4
Share


@HowtoBubatz
Follow
Looks like the stretch has officially come to an end and with it, the first signs of trichome production have started to show up!✨
Unfortunately, the plant stayed pretty small despite being in a 20L pot, which is a bit of a bummer. I was hoping for more size, but hey let’s see what she can deliver in quality! Sometimes the small ones pack the biggest punch. 😏
Excited to see how the buds develop from here!😊


Processing
Likes
6
Share


@Mr_nugs_lover_David
Follow
She's responding super good to lst method she looks absolutely gorgeous I would have loved to be able to grow her since march however It was not posible but I keep this wonderful indica in my list. This wonderful pheno of Alien gorilla has started flower the 3rd of August.

Likes
45
Share


@PEAKYPLANTERS
Follow
The queen of cultivation welcomes you to a new week in her fantastic gardens!
The small feminized grow under a 18/6 and then be rotted and transferred
happy and
abundant
harvest
to all


Likes
9
Share


@JonDin
Follow
it was outdoor growing in soil. used flora trio, koolblum, rippen and floraKleen. I had to harvest 1 weeks early, but it was awesome tree :D I've got about 100g dry. about 300-320 wet.
Likes
14
Share


@SamDo
Follow
🇺🇸 Week 8 of Growth – Mother Gorilla – Royal Queen Seeds 🇺🇸
This week, I’m happy! The roots have recovered well. They continue to eliminate dead roots, and you can see in the photos that new root growth is emerging. This is a great sign—it means the plant is regaining strength. The roots have resumed their growth, which is the big highlight of the week.
The plant has also continued to develop foliage. It’s now dense and well-filled out. Today, I did a major defoliation to maximize light penetration and maintain good airflow. Now, I’ll let the plant recover because I think I’ll be switching to flowering soon, maybe next week or the one after. I really want to optimize light penetration to encourage new shoots, which will later become flowering sites.
Environmental Conditions & Nutrients:
We’re still at 18 hours of light, with temperatures between 25–27°C and humidity around 70%.
pH and EC:
I’ve had some issues with pH rising. It tends to climb to 6.5–6.6, so I have to lower it regularly. Since switching back to RO water, I stopped adding tap water. But now, I’ve started reintroducing small amounts to help stabilize the nutrient solution. Initially, my RO water had an EC of 0.1, which I increased to 0.2–0.3, and now I plan to raise it to 0.4 before adding nutrients. This should help maintain a more stable pH.
The EC was set at 1.4, and now it has dropped slightly to 1.3, which is great news—it means the plant is drinking and absorbing nutrients well.
Final Thoughts:
• The roots are bouncing back.
• The plant is strong and healthy.
• I performed heavy defoliation and topped some apical growths to keep the canopy even as I finish filling the Scrog net.
• I changed the nutrient solution this week, so we’re on a fresh mix.
Now, I’ll let the plant recover from the defoliation, which might slow it down for a couple of days. Overall, things are looking great, and we’re getting closer to flowering!
⸻
🇫🇷 Semaine 8 de Croissance – Mother Gorilla – Royal Queen Seeds 🇫🇷
Cette semaine, je suis content ! Les racines ont bien repris. Elles continuent d’éliminer les racines mortes, et sur les photos, on peut voir que de nouvelles pousses apparaissent. C’est un excellent signe : la plante retrouve sa vigueur. Les racines ont repris leur croissance, et c’est vraiment la bonne nouvelle de la semaine.
La plante a également continué son développement foliaire. Elle est maintenant bien touffue et bien fournie. Aujourd’hui, j’ai fait une grosse défoliation pour maximiser la pénétration lumineuse et maintenir une bonne circulation de l’air. Maintenant, je vais laisser la plante récupérer tranquillement, car je pense la passer en floraison bientôt, probablement la semaine prochaine ou celle d’après. Je veux vraiment optimiser la pénétration lumineuse pour favoriser de nouvelles pousses, qui deviendront des sites de floraison.
Conditions & Nutrition :
On reste sur 18 heures de lumière, avec des températures entre 25 et 27°C, et une humidité d’environ 70%.
pH et EC :
J’ai eu quelques soucis avec le pH, qui a tendance à monter jusqu’à 6,5–6,6, donc je dois le réajuster régulièrement. Depuis que je suis repassé à l’eau osmosée, je ne mets plus d’eau du robinet, mais j’ai recommencé à en ajouter un peu pour aider à stabiliser la solution nutritive. À l’origine, mon eau osmosée avait une EC de 0,1, que j’ai augmentée à 0,2–0,3, et maintenant, je compte la monter à 0,4 avant d’ajouter les nutriments. Cela devrait aider à maintenir un pH plus stable.
L’EC était à 1,4, et maintenant, elle est descendue à 1,3, ce qui est une bonne nouvelle : la plante boit et absorbe bien les nutriments.
En résumé :
• Les racines reprennent bien.
• La plante est forte et en bonne santé.
• J’ai fait une grosse défoliation et topé quelques apex pour maintenir une canopée homogène et finaliser le remplissage du Scrog.
• Changement de solution nutritive cette semaine, donc on repart sur du neuf.
Je vais maintenant laisser la plante récupérer de la défoliation, ce qui la ralentira sans doute un peu pendant 2–3 jours. Dans l’ensemble, ça se passe très bien, et on se rapproche de la floraison !
🤘😎
Likes
20
Share


@Mr_weed_pt
Follow
Last week. 9 weeks have pass now 48h of darkeness and then chop chop..
Likes
7
Share


@Zelfiris
Follow
Welcome to my next grow/experiment! Really excited to grow my first Mephisto Genetics! I have too many options so my girlfriend picked these seeds to grow first. I have plans to top once and hopefully be successful at making a clone to reverse. From there I’d like to maybe make some F1, and S1 seeds as well as breed it with the cultivar sharing the tent: Fastbuds Amnesia Zkittlez.
This freebie seed had a slower start but they all popped! Started off germinating on Saturday 2/3 by soaking the seeds in a cup of water for 24 hours before transferring to a wet paper towel. On Tuesday 2/6 tap roots were present (one was barely coming out) and they were moved to rapid rooter plugs and put into a humidity dome. On 2/11 they had sprouted up 1.5” and were transferred to the top fed RDWC system. Filled the reservoir following General Hydroponics 10 part chart at light strength and diluted by 50%.
SE7000 is ~30” above at 40% providing ~270ppfd.


Likes
1
Share


@Mastercheef
Follow
Well they got fox farms first dose of heavy feed concentration and exploded in growth! Following fox farms dosage chart is working well so far! As well as spider farmers light chart.

Likes
87
Share


@Mrs_Larimar
Follow
2021-10-30
Girls doing fine, they took the first Topping easy.
and regrown well.
Fast Plants Spray and Benefical Drinks keep her Happy.
During the „GROW OFF FOR CHARITY“, @Weedseedsexpress will Donate 100 Euro per Month to our Charity Goal
and an additional 500 euro's by the End of he Contest, if we reach at least 2000 Likes on our weekly Posts
on Instagram.
The other Companies who are Sponsoring our „ GROWOFF FOR CHARITY“
are giving us Products and Merchandise from their Companies. And they help Promote our „ Growoff“
There are coming some AUCTIONS and GIVEAWAYS fort Horticultists
The „GROW OFF FOR CHARITY“ is Sponsored by:
( Named in Order of Appearance)
@weedseedsexpress
@urban_chili
@greenbuzzliquids
@Herbiesheadshop_com
@genoneeleven_nutrients
@zamnesiaxseeds
@spilffseeds
@Inseediousseeds
@sgreenlab
@Royalqueenseeds
@Viparspectra
• PLS FOLLOW OUR SPONSORS!
• LIKE AND SHARE This Posting!
• To Reach the 2000 Likes per Week!
Atm runs aGiveaway until 2021-10-31---- Midnight EST
https://www.instagram.com/p/CVP9hbEM7Qh/
Next Giveaway is prepared- watch out!
here are some Codes
Lights:
https://viparspectra.eu/discount/M.Larimar
And for the Fertilisers:
https://greenbuzzliquids.com/en/shop/
Code: mrs_larimar
Likes
20
Share

@Splashy
Follow
24.04.2026
Heute habe ich mich dazu entschlossen die Damen zu ernten. der Hauptpunkt welcher mich jetzt dazu gebracht hat zu ernten waren die trichome, es sind jetzt auf jeder Pflanze Bernstein farben zu erkennen. sie trinken auch nicht mehr all zu viel und ich musste am Ende nur noch alle 3 tage gießen anstatt alle 2 Tagen.
sie sind jetzt grob getrimmt und trocknen und curen jetzt in der vcure von vivosun. ich werde noch mehr Bilder machen, sobald sie fertig sind. freue mich schon auf das Ergebnis. die buds werden jetzt 5 Tage getrocknet und dann 9 Tage gecured, also gibt es in 14 Tagen neue Bilder.
ich wünsche allen die bei dem Contest mit machen viel glück und einen guten grow, am Ende sind wir alle Gewinner eines guten grows.
danke an zamnesia und plagron für das bereitstellen der Samen und des düngers.
es gab mir Mal die Chance einen Strain von zamnesia zu testen und in den dünger von plagron rein zu schnuppern. hat mir beides gefallen und ich werde drauf zurück greifen in Zukunft, ganz sicher.


Likes
31
Share


@mikearon
Follow
The problem encountered during the growth :
- Water (at the beginning) too little pumps that didn’t propagate the water equally so I went for a bigger industrial pump that pumps equally in the whole tent.
- RC : Some problems with the humidity at the beginning but got sorted out when I got the de humidifier
- Babies almost died mid-grow, came in with the ultimate save of the day, one day later and it was over.
- Had a problem with the container that held the water as water was empty when I’d get back at the end of the week (during flowering mode) so I went with a 120L container which works just fine.
- Didn’t flush properly because I was in a rush
Likes
12
Share


@Jungle_James_Grows
Follow
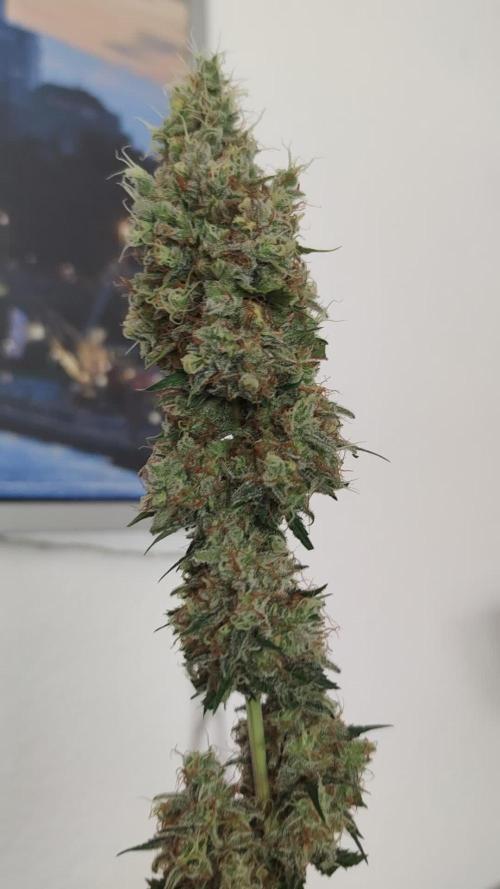
Just water and molasses as the trichomes are cloudy but no amber's yet but very frosty and smells amazing
17/1 chopped her tonight she had 24 hours of dark before.